User Manual
Page 1
R HL15R/HLC15R/ HL15RW/HLC15RW/HL15T/HLC15T / HL19R/HLC19R / HL19T/HLC19T/ HL19RW/HLC19RW/ HL22R/HLC22R/ HL22T/HLC22T LCD TV & LCD TV/DVD Combo USER MANUAL Please read this manual carefully before using this TV set and keep it for future reference.
R HL15R/HLC15R/ HL15RW/HLC15RW/HL15T/HLC15T / HL19R/HLC19R / HL19T/HLC19T/ HL19RW/HLC19RW/ HL22R/HLC22R/ HL22T/HLC22T LCD TV & LCD TV/DVD Combo USER MANUAL Please read this manual carefully before using this TV set and keep it for future reference.
User Manual
Page 4
... LASER RADIATION WHEN OPEN AND INTERLOCK DEFEATED.DO NOT STARE INTO BEAM. Safety Instructions(for TV with DVD) PRECAUTIONS FCC WARNING-This equipment may cause harmful interference unless the modifications are expressly approved in the instruction manual.The user could lose the authority to possible eye injury. CAUTION:USE OF CONTROLS OR...
... LASER RADIATION WHEN OPEN AND INTERLOCK DEFEATED.DO NOT STARE INTO BEAM. Safety Instructions(for TV with DVD) PRECAUTIONS FCC WARNING-This equipment may cause harmful interference unless the modifications are expressly approved in the instruction manual.The user could lose the authority to possible eye injury. CAUTION:USE OF CONTROLS OR...

User Manual
Page 6
... please do not use ; l Please comply strictly with a dry soft cloth; To prevent this machine. l Please comply with the LCD-TV, disconnect the power cord from the LCD-TV . l Please do as required when you are not recommended by manufacturer: l Before operation, please make sure that the operating voltage... places; l Please keep this book; If service is correct; l Do not place the unit on the machine and in this manual for proper ventilation; If water comes in direct sunlight or near heat sources; Safety Notice Items Incorrect usage may cause fire or electric shock...
... please do not use ; l Please comply strictly with a dry soft cloth; To prevent this machine. l Please comply with the LCD-TV, disconnect the power cord from the LCD-TV . l Please do as required when you are not recommended by manufacturer: l Before operation, please make sure that the operating voltage... places; l Please keep this book; If service is correct; l Do not place the unit on the machine and in this manual for proper ventilation; If water comes in direct sunlight or near heat sources; Safety Notice Items Incorrect usage may cause fire or electric shock...
User Manual
Page 11
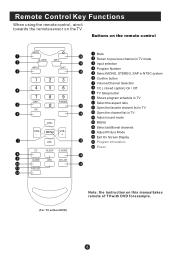
...channel in TV mode Input selection Program Number Select MONO, STEREO, SAP in NTSC system Confirm button Volume/Channel Selection CC ( closed caption) On / Off TV Sleep button Shows program schedule in TV Select ...the aspect ratio Open the favorite channel list in TV Open the channel list in TV Adjust sound mode MENU Select additional channels... Adjust Picture Mode Exit On Screen Display Program Infromation Power (For TV without DVD) Note: the instruction on the remote control MUTE Q.VIEW INPUT ...
...channel in TV mode Input selection Program Number Select MONO, STEREO, SAP in NTSC system Confirm button Volume/Channel Selection CC ( closed caption) On / Off TV Sleep button Shows program schedule in TV Select ...the aspect ratio Open the favorite channel list in TV Open the channel list in TV Adjust sound mode MENU Select additional channels... Adjust Picture Mode Exit On Screen Display Program Infromation Power (For TV without DVD) Note: the instruction on the remote control MUTE Q.VIEW INPUT ...

User Manual
Page 14
... jacks, as shown in the figure. VCR HDMI Input How to connect Connect the cables from VCR to the VCR owner s 2 manual.) 3.T.urn on the TV. 2. Insert a video tape into the VCR and press PLAY on the VCR. (Refer to the S-VIDEO input, the picture quality is improved; ... the user guide supplied with your AV devices and ensure that it has Composite or S-Video connectors; 2.Make sure that the power of the LCD-TV to the TV input jacks, as shown in the figure. Connection Option 2 1. Operate the corresponding external equipment. cting a regular VCR to VCR, match the ...
... jacks, as shown in the figure. VCR HDMI Input How to connect Connect the cables from VCR to the VCR owner s 2 manual.) 3.T.urn on the TV. 2. Insert a video tape into the VCR and press PLAY on the VCR. (Refer to the S-VIDEO input, the picture quality is improved; ... the user guide supplied with your AV devices and ensure that it has Composite or S-Video connectors; 2.Make sure that the power of the LCD-TV to the TV input jacks, as shown in the figure. Connection Option 2 1. Operate the corresponding external equipment. cting a regular VCR to VCR, match the ...
User Manual
Page 19
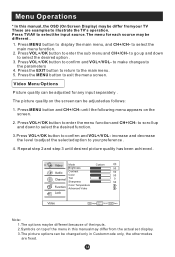
... 1.The options may be different because of the menu in Custom mode only, the other modes are examples to the parameters 4. Press TV/AV to enter the menu function and CH+/CH- Press VOL+/OK button to select the desired option . 3. to go up and...TV's operation. Video Menu Options Picture quality can be adjusted as follows: 1. Press MENU button and CH+/CH- Video Mode Brightness Custom 50 Audio Contrast 50 Color 50 Channel Tint 0 Sharpness 50 Color Temperature Function Advanced Video Lock Video OK Adjust CH+/- Select EXIT Back VOL+/- Menu Operations * In this manual...
... 1.The options may be different because of the menu in Custom mode only, the other modes are examples to the parameters 4. Press TV/AV to enter the menu function and CH+/CH- Press VOL+/OK button to select the desired option . 3. to go up and...TV's operation. Video Menu Options Picture quality can be adjusted as follows: 1. Press MENU button and CH+/CH- Video Mode Brightness Custom 50 Audio Contrast 50 Color 50 Channel Tint 0 Sharpness 50 Color Temperature Function Advanced Video Lock Video OK Adjust CH+/- Select EXIT Back VOL+/- Menu Operations * In this manual...
User Manual
Page 26
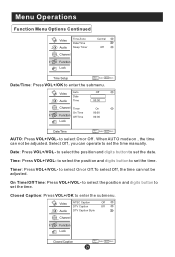
Select Off , you can operate to set the time manually. Date/Time: Press VOL+/OK to select On or Off . to enter the submenu. to select the position and digits button to set the date. ...
Select Off , you can operate to set the time manually. Date/Time: Press VOL+/OK to select On or Off . to enter the submenu. to select the position and digits button to set the date. ...

User Manual
Page 44
...input. Press MUTE button and verify if Mute mode is in some or all pictures Verify if the antenna is available. Refer to TV input. Adjust the antenna. Verify if the same problem exists in location possible faults use help guide below. No color for some ... adjust. Switch to the power supply. Verify if sound system is selected. Make fine adjustment of power supply is properly plugged in the Manual for technical assistance. Verify that may be repaired by a qualified registered service person. Abnormal functioning Disconnect the television from power supply and, ...
...input. Press MUTE button and verify if Mute mode is in some or all pictures Verify if the antenna is available. Refer to TV input. Adjust the antenna. Verify if the same problem exists in location possible faults use help guide below. No color for some ... adjust. Switch to the power supply. Verify if sound system is selected. Make fine adjustment of power supply is properly plugged in the Manual for technical assistance. Verify that may be repaired by a qualified registered service person. Abnormal functioning Disconnect the television from power supply and, ...

User Manual
Page 45
Specifications Model Picture, sound system Audio output External input port 15 19 without notice. Dimensions quoted in this manual are subject to change without DVD 19 with DVD 22 NTSC, ATSC, Clear QAM 1.5W+1.5W AV input PC input S-VIDEO input PC audio input YPbPr input Antenna input Power requirements ~120V 60Hz Power consumption 50W Temperature Humidity Accessories 60W 80W Working:+5 ~+35 Storage:-15 ~+45 Working:20% ~ 80% Storage: 5% ~ 90% Remote control Batteries User manual 70W NOTE Design and specifications are approximate.
Specifications Model Picture, sound system Audio output External input port 15 19 without notice. Dimensions quoted in this manual are subject to change without DVD 19 with DVD 22 NTSC, ATSC, Clear QAM 1.5W+1.5W AV input PC input S-VIDEO input PC audio input YPbPr input Antenna input Power requirements ~120V 60Hz Power consumption 50W Temperature Humidity Accessories 60W 80W Working:+5 ~+35 Storage:-15 ~+45 Working:20% ~ 80% Storage: 5% ~ 90% Remote control Batteries User manual 70W NOTE Design and specifications are approximate.


