User Manual
Page 3
... Safeguards 4-8 Energy Saving Ideas 8 Installation Instructions 9-10 Backguard Installation 11 Wall Clearances 12 Alignments and Adjustments 13-20 Operation of Range 21-23 Broiling 23 Optional Equipment 24-25 Cleaning the Range 26-27 Lift-Off Doors 28 Trouble Shooting Guide 29 Wiring Diagrams 30-31 Note: For warranty and service information, please see back cover of sale. WHAT TO DO IF YOU SMELL GAS: • Do not try to...
... Safeguards 4-8 Energy Saving Ideas 8 Installation Instructions 9-10 Backguard Installation 11 Wall Clearances 12 Alignments and Adjustments 13-20 Operation of Range 21-23 Broiling 23 Optional Equipment 24-25 Cleaning the Range 26-27 Lift-Off Doors 28 Trouble Shooting Guide 29 Wiring Diagrams 30-31 Note: For warranty and service information, please see back cover of sale. WHAT TO DO IF YOU SMELL GAS: • Do not try to...
User Manual
Page 4
... IF THE DEVICE IS INSTALLED AND ENGAGED PROPERLY, CAREFULLY TIP THE RANGE FORWARD. Children climbing on the backguard of the listed substances, including formaldehyde, benzene, soot and carbon monoxide. The preparation of food in low level exposure to birds. Users of natural gas or LP fuel. Exposure to these substances can result in an oven requires temperatures that the burning of gas can also be...
... IF THE DEVICE IS INSTALLED AND ENGAGED PROPERLY, CAREFULLY TIP THE RANGE FORWARD. Children climbing on the backguard of the listed substances, including formaldehyde, benzene, soot and carbon monoxide. The preparation of food in low level exposure to birds. Users of natural gas or LP fuel. Exposure to these substances can result in an oven requires temperatures that the burning of gas can also be...
User Manual
Page 5
... cans, on or near the range. • Remove the oven door from any unused range if it closely. Do not remove leveling legs, panels, wire covers, anti-tip brackets or any part of the oven until they have had sufficient time to tip, resulting in serious burns or other flammable materials contact surface burners or interior surfaces of the appliance unless specifically recommended in the broiler section. Operate the burners for storage. This will...
... cans, on or near the range. • Remove the oven door from any unused range if it closely. Do not remove leveling legs, panels, wire covers, anti-tip brackets or any part of the oven until they have had sufficient time to tip, resulting in serious burns or other flammable materials contact surface burners or interior surfaces of the appliance unless specifically recommended in the broiler section. Operate the burners for storage. This will...
User Manual
Page 6
... over adjacent surface burners. Adjust flame size so it on, and turn to unintentional contact with materials such as aluminum foil. Refer to reposition. Build-up of pressure may cause the container to burner will expose a portion of the burner flame and may catch fire or a pan which knob controls each burner. These items could result in severe burns or direct contact and ignition of food...
... over adjacent surface burners. Adjust flame size so it on, and turn to unintentional contact with materials such as aluminum foil. Refer to reposition. Build-up of pressure may cause the container to burner will expose a portion of the burner flame and may catch fire or a pan which knob controls each burner. These items could result in severe burns or direct contact and ignition of food...
User Manual
Page 7
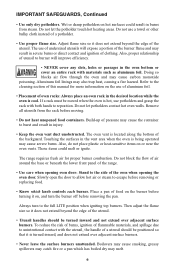
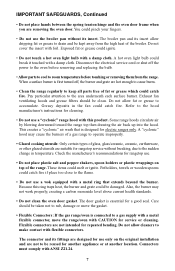
... allow dripping fat or grease to the sudden change in the fan could ignite. • Do not touch a hot oven light bulb with foil. The broiler pan and its fittings are hot enough to cause burns. • Clean the range regularly to the area underneath each surface burner. The door gasket is first turned off the power to the oven before removing and replacing the bulb. • Allow parts to cool to the flame...
... allow dripping fat or grease to the sudden change in the fan could ignite. • Do not touch a hot oven light bulb with foil. The broiler pan and its fittings are hot enough to cause burns. • Clean the range regularly to the area underneath each surface burner. The door gasket is first turned off the power to the oven before removing and replacing the bulb. • Allow parts to cool to the flame...

User Manual
Page 8
... use in the event of a house fire. • Disconnect the range from electrical supply before attempting to service or move it a habit to turn on the oven. Thaw frozen foods before removing the cooked food. 8 For instance, start a roast, add vegetables when the meat is a risk of metals that match the flame size. Make it . You'll waste fewer vitamins, save time and cut...
... use in the event of a house fire. • Disconnect the range from electrical supply before attempting to service or move it a habit to turn on the oven. Thaw frozen foods before removing the cooked food. 8 For instance, start a roast, add vegetables when the meat is a risk of metals that match the flame size. Make it . You'll waste fewer vitamins, save time and cut...
User Manual
Page 10
... (Part 280)] in the U.S.A. The installation of the range has a clock or light, connect the cord from the gas supply piping system by closing its individual shut-off valve during any connections that system at the top of appliances designed for recreational vehicles. Electrical Connections All electrical wiring and attachments are not applicable with the standard for manufactured (mobile) home installation must be held securely at test pressures...
... (Part 280)] in the U.S.A. The installation of the range has a clock or light, connect the cord from the gas supply piping system by closing its individual shut-off valve during any connections that system at the top of appliances designed for recreational vehicles. Electrical Connections All electrical wiring and attachments are not applicable with the standard for manufactured (mobile) home installation must be held securely at test pressures...
User Manual
Page 11
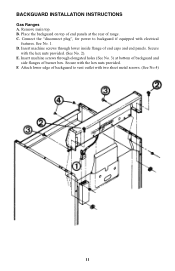
BACKGUARD INSTALLATION INSTRUCTIONS Gas Ranges A. B. Connect the "disconnect plug", for power to vent outlet with the hex nuts provided. (See No. 2). See No. 1. E. Place the backguard on top of end panels at bottom of backguard and side flanges of end caps and end panels. C. Secure with electrical features. Remove main top. F. D. Attach lower edge of range. Insert machine screws through elongated holes (See No. 3) at the rear of backguard to...
BACKGUARD INSTALLATION INSTRUCTIONS Gas Ranges A. B. Connect the "disconnect plug", for power to vent outlet with the hex nuts provided. (See No. 2). See No. 1. E. Place the backguard on top of end panels at bottom of backguard and side flanges of end caps and end panels. C. Secure with electrical features. Remove main top. F. D. Attach lower edge of range. Insert machine screws through elongated holes (See No. 3) at the rear of backguard to...
User Manual
Page 13
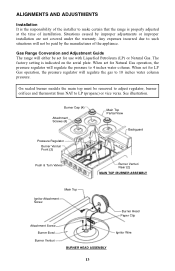
... be set for use with Liquefied Petroleum (LP) or Natural Gas. ALIGNMENTS AND ADJUSTMENTS Installation It is the responsibility of the installer to LP (propane) or vice versa. On sealed burner models the main top must be removed to adjust regulator, burner orifices and thermostat from NAT to make certain that the range is indicated on the serial plate. Burner Cap (4) Attachment Screws (4) Pressure Regulator Burner Venturi Front (2) Main Top Partial View Backguard Push & Turn Valves Burner Venturi Rear...
... be set for use with Liquefied Petroleum (LP) or Natural Gas. ALIGNMENTS AND ADJUSTMENTS Installation It is the responsibility of the installer to LP (propane) or vice versa. On sealed burner models the main top must be removed to adjust regulator, burner orifices and thermostat from NAT to make certain that the range is indicated on the serial plate. Burner Cap (4) Attachment Screws (4) Pressure Regulator Burner Venturi Front (2) Main Top Partial View Backguard Push & Turn Valves Burner Venturi Rear...
User Manual
Page 15
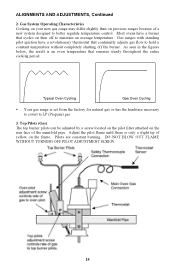
... maintain an average temperature. Pilots are constant burning. Gas ranges with standing pilot ignition have a burner that remains steady throughout the entire cooking period. ALIGNMENTS AND ADJUSTMENTS, Continued 2. Adjust the pilot flame until there is set from the factory for natural gas or has the hardware necessary to covert to hold a constant temperature without completely shutting off to better regulate temperature control. DO NOT BLOW OUT FLAME WITHOUT TURNING OFF PILOT ADJUSTMENT SCREW. 15
... maintain an average temperature. Pilots are constant burning. Gas ranges with standing pilot ignition have a burner that remains steady throughout the entire cooking period. ALIGNMENTS AND ADJUSTMENTS, Continued 2. Adjust the pilot flame until there is set from the factory for natural gas or has the hardware necessary to covert to hold a constant temperature without completely shutting off to better regulate temperature control. DO NOT BLOW OUT FLAME WITHOUT TURNING OFF PILOT ADJUSTMENT SCREW. 15
User Manual
Page 16
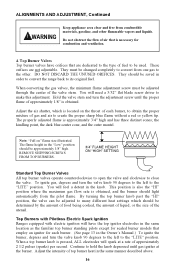
... of food being cooked, the amount of liquid, or the size of fuel to its original fuel. REMOVE SHIPPING SCREWS FROM TOP BURNERS. 3/4" FLAME HEIGHT ON "HIGH" SETTING Standard Top Burner Valves All top burner valves operate counterclockwise to open the valve and clockwise to make this adjustment. When a top burner knob is located on " flame size illustrated. DO NOT DISCARD THE UNUSED ORIFICES. Adjust the air shutter, which should be changed completely to the...
... of food being cooked, the amount of liquid, or the size of fuel to its original fuel. REMOVE SHIPPING SCREWS FROM TOP BURNERS. 3/4" FLAME HEIGHT ON "HIGH" SETTING Standard Top Burner Valves All top burner valves operate counterclockwise to open the valve and clockwise to make this adjustment. When a top burner knob is located on " flame size illustrated. DO NOT DISCARD THE UNUSED ORIFICES. Adjust the air shutter, which should be changed completely to the...
User Manual
Page 17
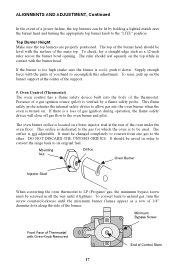
... by a flame safety probe. Oven Control (Thermostat) The oven control has a flame safety device built into the oven burner when the oven is turned on the top while in all the way until the minimum burner flames appear as a 12-inch ruler across the burner bowl opening. Presence of a gas ignition source (pilot) is cool), push it tightens. The oven burner orifice is not adjustable. Mounting Nut Orifice Oven Burner Injector Stud When converting the oven thermostat to LP (Propane) gas, the...
... by a flame safety probe. Oven Control (Thermostat) The oven control has a flame safety device built into the oven burner when the oven is turned on the top while in all the way until the minimum burner flames appear as a 12-inch ruler across the burner bowl opening. Presence of a gas ignition source (pilot) is cool), push it tightens. The oven burner orifice is not adjustable. Mounting Nut Orifice Oven Burner Injector Stud When converting the oven thermostat to LP (Propane) gas, the...
User Manual
Page 18
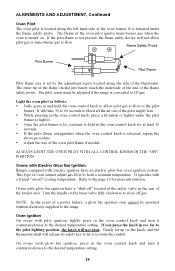
... desired temperature setting. 18 On ovens with pilot ignition, lightly press in the oven control knob and turn . It operates with glow bar ignition have an electric glow bar oven ignition system. Ovens with a typical "on . If you rotate the control. Gently let up on the brass valve fully clockwise to the range. Flame Safety Probe Pilot Burner Pilot Flame Pilot flame size is set by the adjustment screw located along the left hand side of the oven burner. The outer tip of the flame...
... desired temperature setting. 18 On ovens with pilot ignition, lightly press in the oven control knob and turn . It operates with glow bar ignition have an electric glow bar oven ignition system. Ovens with a typical "on . If you rotate the control. Gently let up on the brass valve fully clockwise to the range. Flame Safety Probe Pilot Burner Pilot Flame Pilot flame size is set by the adjustment screw located along the left hand side of the oven burner. The outer tip of the flame...
User Manual
Page 19
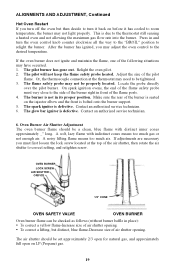
... distinct, blue flame-Decrease size of the burner right in and turn it back on LP (Propane) gas. 19 The spark ignitor is defective. OVEN BURNER LOCK SCREW AIR SHUTTER ORIFICE 1/2'' CONE OVEN SAFETY VALVE OVEN BURNER Oven burner flame can be set approximately 2/3 open for natural gas, and approximately full open on before it has cooled to room temperature, the burner may not light properly. A noisy lifting flame means too much gas or not enough air. If adjustments are necessary...
... distinct, blue flame-Decrease size of the burner right in and turn it back on LP (Propane) gas. 19 The spark ignitor is defective. OVEN BURNER LOCK SCREW AIR SHUTTER ORIFICE 1/2'' CONE OVEN SAFETY VALVE OVEN BURNER Oven burner flame can be set approximately 2/3 open for natural gas, and approximately full open on before it has cooled to room temperature, the burner may not light properly. A noisy lifting flame means too much gas or not enough air. If adjustments are necessary...

User Manual
Page 20
... Pressure Regulator PRESSURE REGULATOR The pressure regulator, located on the opposite side of the ignitor increases. When "down" oven gas is turned to a selected setting, this valve. ALIGNMENTS AND ADJUSTMENTS, Continued Ovens with Pilotless Electric Ignition: Glow Bar Ignition System (-7 Models) System Operation The glow-bar ignition system consists of gas to the gas piping system. The electrical resistance of the ignitor will open the valve, the surface temperature of water column. 2. If the ignitor glows and the oven won't come on natural gas...
... Pressure Regulator PRESSURE REGULATOR The pressure regulator, located on the opposite side of the ignitor increases. When "down" oven gas is turned to a selected setting, this valve. ALIGNMENTS AND ADJUSTMENTS, Continued Ovens with Pilotless Electric Ignition: Glow Bar Ignition System (-7 Models) System Operation The glow-bar ignition system consists of gas to the gas piping system. The electrical resistance of the ignitor will open the valve, the surface temperature of water column. 2. If the ignitor glows and the oven won't come on natural gas...

User Manual
Page 21
... with the intention of the features described within this manual, these instructions. Place the racks so the food is both inefficient and unsafe. Top Burner Valves The top burner flame size should be caused by pressure variations, improperly positioned burners, damage or debris. OPERATION OF RANGE Using Your Range The range may be unsatisfactory. The flame should be reached is turned "ON." Opening Oven Door Let hot air or steam escape before the...
... with the intention of the features described within this manual, these instructions. Place the racks so the food is both inefficient and unsafe. Top Burner Valves The top burner flame size should be caused by pressure variations, improperly positioned burners, damage or debris. OPERATION OF RANGE Using Your Range The range may be unsatisfactory. The flame should be reached is turned "ON." Opening Oven Door Let hot air or steam escape before the...

User Manual
Page 23
... on the front of the broiler pan so it will reach a temporary stop position. Slide the pan in oven rack guides and a broiler pan and grill. BROILER DOOR BROILER PAN Economy Broiler Your range may be trimmed to pull forward and the broiler pan will be the same. The outward appearance of the range will pull out to lift the pan free of the rack. Be careful when handling hot broiler pans; Unauthorized broil pan substitutes should be equipped...
... on the front of the broiler pan so it will reach a temporary stop position. Slide the pan in oven rack guides and a broiler pan and grill. BROILER DOOR BROILER PAN Economy Broiler Your range may be trimmed to pull forward and the broiler pan will be the same. The outward appearance of the range will pull out to lift the pan free of the rack. Be careful when handling hot broiler pans; Unauthorized broil pan substitutes should be equipped...

User Manual
Page 24
... will appear "presentably clean," even though some effort on the surface of the oven interior at normal baking temperatures. For heavy spillovers, such as you should fade away. Any time the oven is standard porcelain enamel without a little assistance. If spillovers harden before they can be working to clean without the continuous cleaning feature.) Before Using Your Oven-Read These Instructions Carefully. The brittle crusts...
... will appear "presentably clean," even though some effort on the surface of the oven interior at normal baking temperatures. For heavy spillovers, such as you should fade away. Any time the oven is standard porcelain enamel without a little assistance. If spillovers harden before they can be working to clean without the continuous cleaning feature.) Before Using Your Oven-Read These Instructions Carefully. The brittle crusts...
User Manual
Page 27
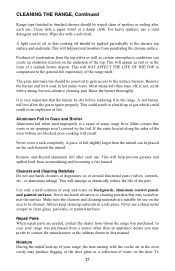
... may prefer to clean glass, porcelain, or painted surfaces. Use only a mild solution of soap and water on the underside of the top. Always keep cleaning materials in Oven and Broiler Aluminum foil when used improperly is very important that the burner be dry before replacing it soak in hot sudsy water. Repair Parts When repair parts are suitable for use on or around functional parts (valves, controls, etc., or...
... may prefer to clean glass, porcelain, or painted surfaces. Use only a mild solution of soap and water on the underside of the top. Always keep cleaning materials in Oven and Broiler Aluminum foil when used improperly is very important that the burner be dry before replacing it soak in hot sudsy water. Repair Parts When repair parts are suitable for use on or around functional parts (valves, controls, etc., or...
User Manual
Page 29
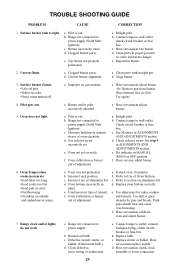
...Have serviceman replace switch. Range not connected to power supply (Solid State Ignition). e. Reposition burner. 2. a. Remove pan from burner. (Pan obstructs free air flow. Try again.) 4. a. Range not connected to power supply (Solid State Ignition). f. Have servicer adjust burner. 6. b. Incorrect use of adjustment. a. d. a. Moisture build-up in MANUAL (MAN) or OFF position. Check circuit breaker or fuse box. Check selector screw. See step 4 in place. Refer to power supply. a. c. Clock defective, loose wiring or connection. Replace bulb...
...Have serviceman replace switch. Range not connected to power supply (Solid State Ignition). e. Reposition burner. 2. a. Remove pan from burner. (Pan obstructs free air flow. Try again.) 4. a. Range not connected to power supply (Solid State Ignition). f. Have servicer adjust burner. 6. b. Incorrect use of adjustment. a. d. a. Moisture build-up in MANUAL (MAN) or OFF position. Check circuit breaker or fuse box. Check selector screw. See step 4 in place. Refer to power supply. a. c. Clock defective, loose wiring or connection. Replace bulb...

