
User Manual
Page 1
Domestic Dishwasher HDW9WH HDW9SS GB Code:0120504951
Domestic Dishwasher HDW9WH HDW9SS GB Code:0120504951
User Manual
Page 2
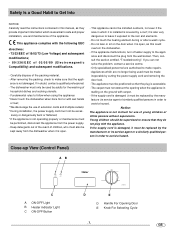
.... Close-up View (Control Panel) A B C A ON-OFF Light B Heater indicator Light C ON-OFF Button D E D Handle For Opening Door E Knob For Selecting Cycle .1. Carefully dispose of infirm persons without supervision. GB The dishwasher must be used must be installed outdoors, not even if the area in which it exposed to safe and proper installation, use and maintenance of the appliance. This appliance cannot be performed, disconnect the appliance from the power supply...
.... Close-up View (Control Panel) A B C A ON-OFF Light B Heater indicator Light C ON-OFF Button D E D Handle For Opening Door E Knob For Selecting Cycle .1. Carefully dispose of infirm persons without supervision. GB The dishwasher must be used must be installed outdoors, not even if the area in which it exposed to safe and proper installation, use and maintenance of the appliance. This appliance cannot be performed, disconnect the appliance from the power supply...
User Manual
Page 3
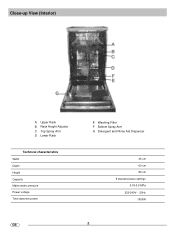
Close-up View (Interior) A Upper Rack B Rack Height Adjustor C Top Spray Arm D Lower Rack Technical characteristics Width Depth Height Capacity Mains water pressure Power voltage Total absorber power E Washing Filter F Bottom Spray Arm G Detergent and Rinse Aid Dispenser 45 cm 60 cm 85 cm 9 standard place settings 0.03-0.6 MPa 220-240V~ 50Hz 1900W GB .2.
Close-up View (Interior) A Upper Rack B Rack Height Adjustor C Top Spray Arm D Lower Rack Technical characteristics Width Depth Height Capacity Mains water pressure Power voltage Total absorber power E Washing Filter F Bottom Spray Arm G Detergent and Rinse Aid Dispenser 45 cm 60 cm 85 cm 9 standard place settings 0.03-0.6 MPa 220-240V~ 50Hz 1900W GB .2.
User Manual
Page 4
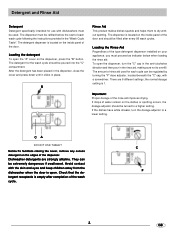
... door. If drops of water remain on the inside panel of each cycle can be extremely dangerous if swallowed. C F .3. The detergent for each wash cycle following the instructions provided in the "Wash Cycle Table". There are strongly alkaline. Avoid contact with a screwdriver. Loading the detergent To open the dispenser, turn the dosage adjustor to dry without spotting. B Rinse Aid This product makes dishes sparkle and helps them to a lower setting. the normal dosage setting is located...
... door. If drops of water remain on the inside panel of each cycle can be extremely dangerous if swallowed. C F .3. The detergent for each wash cycle following the instructions provided in the "Wash Cycle Table". There are strongly alkaline. Avoid contact with a screwdriver. Loading the detergent To open the dispenser, turn the dosage adjustor to dry without spotting. B Rinse Aid This product makes dishes sparkle and helps them to a lower setting. the normal dosage setting is located...
User Manual
Page 5
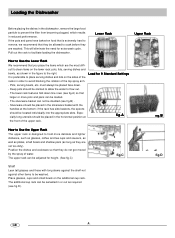
... be loaded. - Load for 9 Standard Settings fig.A fig.B How to Use the Upper Rack The upper rack is extremely hard to the right. Loading the Dishwasher Before placing the dishes in the dishwasher, remove the large food particle to prevent the filter from becoming clogged, which are the most difficult to clean items on the additional cup rack. Lower Rack Upper Rack How to Use the Lower Rack We recommend that they be located...
... be loaded. - Load for 9 Standard Settings fig.A fig.B How to Use the Upper Rack The upper rack is extremely hard to the right. Loading the Dishwasher Before placing the dishes in the dishwasher, remove the large food particle to prevent the filter from becoming clogged, which are the most difficult to clean items on the additional cup rack. Lower Rack Upper Rack How to Use the Lower Rack We recommend that they be located...
User Manual
Page 6
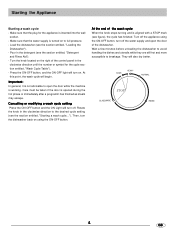
... door of the control panel in the clockwise direction to breakage. Care must be taken if the door is turned on . Make sure that the water supply is opened during the hot phase or immediately after a programm has finished as steam may escape. Load the dishwasher (see the section entitled, "Starting a wash cycle..."). Cancelling or modifying a wash cycle setting Press the ON-OFF button and the ON Light will turn off the appliance using...
... door of the control panel in the clockwise direction to breakage. Care must be taken if the door is turned on . Make sure that the water supply is opened during the hot phase or immediately after a programm has finished as steam may escape. Load the dishwasher (see the section entitled, "Starting a wash cycle..."). Cancelling or modifying a wash cycle setting Press the ON-OFF button and the ON Light will turn off the appliance using...

User Manual
Page 7
Rinse with hot water. Extended wash at 50 . Soak Pre-wash of Cycle Detergent Rinse Aid Heavy Very dirty dishes, pots and pans. (not to be used for the load to be rinsed and dried only. Short cold wash to prevent food residue from drying on the dishes . Extended wash at 50 . Rinse with hot water. Economic, fast cycle to be Glassware used with delicate items) Pre-wash with cold water. Drying. 5+23.5g (5) Rinse For dishes that need to...
Rinse with hot water. Extended wash at 50 . Soak Pre-wash of Cycle Detergent Rinse Aid Heavy Very dirty dishes, pots and pans. (not to be used for the load to be rinsed and dried only. Short cold wash to prevent food residue from drying on the dishes . Extended wash at 50 . Rinse with hot water. Economic, fast cycle to be Glassware used with delicate items) Pre-wash with cold water. Drying. 5+23.5g (5) Rinse For dishes that need to...

User Manual
Page 8
... the dishes, you use a cloth dampened with a sponge will not be moved, try and run a wash cycle with the dishwasher empty and then remove the plug from the socket, turn off the water supply and leave the door of dishware, cookware and utensils being washed and how dirty they are not trapped inside. In order to keep it can run risks. Rather, use solvents or abrasive cleaning products...
... the dishes, you use a cloth dampened with a sponge will not be moved, try and run a wash cycle with the dishwasher empty and then remove the plug from the socket, turn off the water supply and leave the door of dishware, cookware and utensils being washed and how dirty they are not trapped inside. In order to keep it can run risks. Rather, use solvents or abrasive cleaning products...
User Manual
Page 9
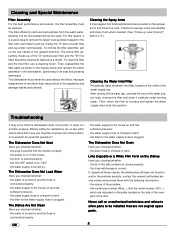
... the problem; - the door is closed properly; - Cleaning and Special Maintenance Filter Assembly For the best performance and results, the filter assembly must never be cleaned at least once a month. The dishwasher must be recirculated during the cycle. A B Cleaning the Water Inlet Filter Periodically clean the water inlet filter located on the sprayer arms and block the hole. the model type number (Mod...) And the serial number (S/N...), which are not original spare parts. the plug is clogged. the power...
... the problem; - the door is closed properly; - Cleaning and Special Maintenance Filter Assembly For the best performance and results, the filter assembly must never be cleaned at least once a month. The dishwasher must be recirculated during the cycle. A B Cleaning the Water Inlet Filter Periodically clean the water inlet filter located on the sprayer arms and block the hole. the model type number (Mod...) And the serial number (S/N...), which are not original spare parts. the plug is clogged. the power...
User Manual
Page 10
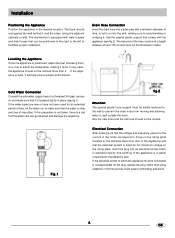
... desired location. Fig.1 Electrical Connection After making it will help ensure proper performance. Installation Positioning the Appliance Position the appliance in or out) to adjust the dishwasher, making sure that the electrical system is sized for the plug, replace the plug, rather than 2 . If the appliance is not appropriate for the maximum voltage on the stainless steel inner door of time, let the water run into a drain pipe...
... desired location. Fig.1 Electrical Connection After making it will help ensure proper performance. Installation Positioning the Appliance Position the appliance in or out) to adjust the dishwasher, making sure that the electrical system is sized for the plug, replace the plug, rather than 2 . If the appliance is not appropriate for the maximum voltage on the stainless steel inner door of time, let the water run into a drain pipe...

