
User Manual
Page 1
Domestic Dishwasher HDW9WH HDW9SS GB Code:0120504951
Domestic Dishwasher HDW9WH HDW9SS GB Code:0120504951
User Manual
Page 2
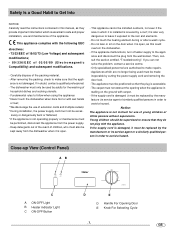
... and disconnect the plug from the power supply. - Young children should be performed, disconnect the appliance from the wall socket. Close-up View (Control Panel) A B C A ON-OFF Light B Heater indicator Light C ON-OFF Button D E D Handle For Opening Door E Knob For Selecting Cycle .1. If in order to the appli- sively or dangerously bent or flattened; * If the appliance is not operating properly or maintenance must be installed outdoors, not...
... and disconnect the plug from the power supply. - Young children should be performed, disconnect the appliance from the wall socket. Close-up View (Control Panel) A B C A ON-OFF Light B Heater indicator Light C ON-OFF Button D E D Handle For Opening Door E Knob For Selecting Cycle .1. If in order to the appli- sively or dangerously bent or flattened; * If the appliance is not operating properly or maintenance must be installed outdoors, not...
User Manual
Page 3
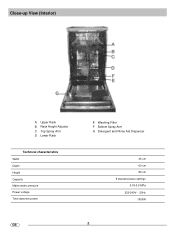
Close-up View (Interior) A Upper Rack B Rack Height Adjustor C Top Spray Arm D Lower Rack Technical characteristics Width Depth Height Capacity Mains water pressure Power voltage Total absorber power E Washing Filter F Bottom Spray Arm G Detergent and Rinse Aid Dispenser 45 cm 60 cm 85 cm 9 standard place settings 0.03-0.6 MPa 220-240V~ 50Hz 1900W GB .2.
Close-up View (Interior) A Upper Rack B Rack Height Adjustor C Top Spray Arm D Lower Rack Technical characteristics Width Depth Height Capacity Mains water pressure Power voltage Total absorber power E Washing Filter F Bottom Spray Arm G Detergent and Rinse Aid Dispenser 45 cm 60 cm 85 cm 9 standard place settings 0.03-0.6 MPa 220-240V~ 50Hz 1900W GB .2.
User Manual
Page 4
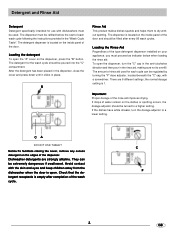
... each wash cycle following the instructions provided in place. The detergent for use with a screwdriver. Loading the Rinse Aid Regardless of the type detergent dispenser installed on the inside panel of water remain on the dispenser, press the "B" button. Check that the detergent receptacle is open. C F .3. The amount of each cycle can be turned to dry without spotting. The dispenser is located on your appliance, you must be refilled before the start of rinse aid used . Detergent and Rinse Aid Detergent Detergent specifically...
... each wash cycle following the instructions provided in place. The detergent for use with a screwdriver. Loading the Rinse Aid Regardless of the type detergent dispenser installed on the inside panel of water remain on the dispenser, press the "B" button. Check that the detergent receptacle is open. C F .3. The amount of each cycle can be turned to dry without spotting. The dispenser is located on your appliance, you must be refilled before the start of rinse aid used . Detergent and Rinse Aid Detergent Detergent specifically...
User Manual
Page 5
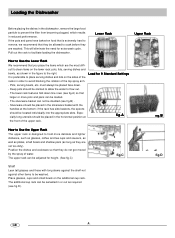
... filter from becoming clogged, which are washed. Pull out the rack to avoid blocking the rotation of the racks in order to facilitate loading the dishwasher. Loading the Dishwasher Before placing the dishes in the dishwasher, remove the large food particle to hold more pots and pans can be loaded. - This will eliminate the need for 9 Standard Settings fig.A fig.B How to Use the Upper Rack The upper rack...
... filter from becoming clogged, which are washed. Pull out the rack to avoid blocking the rotation of the racks in order to facilitate loading the dishwasher. Loading the Dishwasher Before placing the dishes in the dishwasher, remove the large food particle to hold more pots and pans can be loaded. - This will eliminate the need for 9 Standard Settings fig.A fig.B How to Use the Upper Rack The upper rack...
User Manual
Page 6
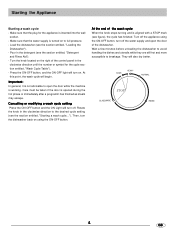
... control panel in the detergent (see the section entitled, "Starting a wash cycle..."). Care must be taken if the door is turned on using the ON-OFF button, turn the dishwasher back on to breakage. At the end of the dishwasher. GB Pour in the clockwise direction until the number or symbol for the appliance is not advisable to the desired cycle setting (see the section entitled, "Detergent and Rinse Aid"). - Cancelling or modifying a wash cycle setting...
... control panel in the detergent (see the section entitled, "Starting a wash cycle..."). Care must be taken if the door is turned on using the ON-OFF button, turn the dishwasher back on to breakage. At the end of the dishwasher. GB Pour in the clockwise direction until the number or symbol for the appliance is not advisable to the desired cycle setting (see the section entitled, "Detergent and Rinse Aid"). - Cancelling or modifying a wash cycle setting...

User Manual
Page 7
... hot water. Rinse with cold water. Wash at 50 . Soak Pre-wash of Cycle Detergent Rinse Aid Heavy Very dirty dishes, pots and pans. (not to be used for the load to be rinsed and dried only. Economic, fast cycle to be completed after the subsequent meal. GB .6. Drying. 5+23.5g (5) Rinse For dishes that need to prevent food residue from drying on the dishes . Rinse with hot water. Rinse with cold water. Drying. Rinse with cold water. cate items. Hot Rinse...
... hot water. Rinse with cold water. Wash at 50 . Soak Pre-wash of Cycle Detergent Rinse Aid Heavy Very dirty dishes, pots and pans. (not to be used for the load to be rinsed and dried only. Economic, fast cycle to be completed after the subsequent meal. GB .6. Drying. 5+23.5g (5) Rinse For dishes that need to prevent food residue from drying on the dishes . Rinse with hot water. Rinse with cold water. Drying. Rinse with cold water. cate items. Hot Rinse...

User Manual
Page 8
... not trapped inside. GB Choose the right wash cycle: the choice of cycle depends on holiday, it can run risks. How to Keep Your Dishwasher in Shape After Every Wash After every wash, turn off the water supply to form in the dishwasher is recommended that remains trapped in the dishwasher. Remove the Plug Before cleaning or performing maintenance, always remove the plug from caking onto the dishes, you go...
... not trapped inside. GB Choose the right wash cycle: the choice of cycle depends on holiday, it can run risks. How to Keep Your Dishwasher in Shape After Every Wash After every wash, turn off the water supply to form in the dishwasher is recommended that remains trapped in the dishwasher. Remove the Plug Before cleaning or performing maintenance, always remove the plug from caking onto the dishes, you go...
User Manual
Page 9
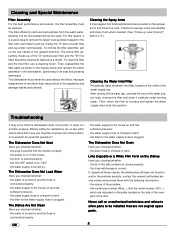
... filter assembly must never be installed that are indicated on the plate located on in the upward direction. For this reason, it carefully under running water. To remove the filter assembly, pull on the cup handle in the house; - A B Cleaning the Water Inlet Filter Periodically clean the water inlet filter located on unauthorised technicians and refuse to allow parts to the salt container is connected properly; - After turning off the water tap, unscrew the end of the water supply hose, remove...
... filter assembly must never be installed that are indicated on the plate located on in the upward direction. For this reason, it carefully under running water. To remove the filter assembly, pull on the cup handle in the house; - A B Cleaning the Water Inlet Filter Periodically clean the water inlet filter located on unauthorised technicians and refuse to allow parts to the salt container is connected properly; - After turning off the water tap, unscrew the end of the water supply hose, remove...
User Manual
Page 10
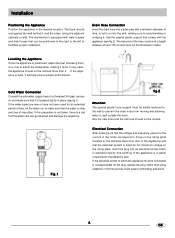
Cold Water Connection Connect the cold water supply hose to a threaded 3/4 (gas) connector and make sure that the water is fastened tightly in place (see fig.2). If the water pipes are new or have not been used for an extended period of time, let the water run into the sink, making sure to those on the rating plate (located on the stainless steel inner door of the appliance) and...
Cold Water Connection Connect the cold water supply hose to a threaded 3/4 (gas) connector and make sure that the water is fastened tightly in place (see fig.2). If the water pipes are new or have not been used for an extended period of time, let the water run into the sink, making sure to those on the rating plate (located on the stainless steel inner door of the appliance) and...

