
User Manual
Page 2
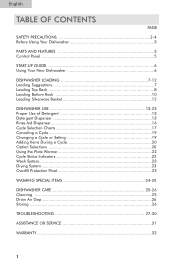
... OF CONTENTS PAGE SAFETY PRECAUTIONS 2-4 Before Using Your Dishwasher 3 PARTS AND FEATURES 5 Control Panel 5 START-UP GUIDE 6 Using Your New Dishwasher 6 DISHWASHER LOADING 7-12 Loading Suggestions 7 Loading Top Rack 8 Loading Bottom Rack 10 Loading Silverware Basket 12 DISHWASHER USE 13-23 Proper Use of Detergent 13 Detergent ...Cycle Status Indicators 22 Wash System 23 Drying System 23 Overfill Protection Float 23 WASHING SPECIAL ITEMS 24-25 DISHWASHER CARE 25-26 Cleaning ...25 Drain Air Gap 26 Storing ...26 TROUBLESHOOTING 27-30 ASSISTANCE OR SERVICE 31 WARRANTY 32 1
... OF CONTENTS PAGE SAFETY PRECAUTIONS 2-4 Before Using Your Dishwasher 3 PARTS AND FEATURES 5 Control Panel 5 START-UP GUIDE 6 Using Your New Dishwasher 6 DISHWASHER LOADING 7-12 Loading Suggestions 7 Loading Top Rack 8 Loading Bottom Rack 10 Loading Silverware Basket 12 DISHWASHER USE 13-23 Proper Use of Detergent 13 Detergent ...Cycle Status Indicators 22 Wash System 23 Drying System 23 Overfill Protection Float 23 WASHING SPECIAL ITEMS 24-25 DISHWASHER CARE 25-26 Cleaning ...25 Drain Air Gap 26 Storing ...26 TROUBLESHOOTING 27-30 ASSISTANCE OR SERVICE 31 WARRANTY 32 1
User Manual
Page 3
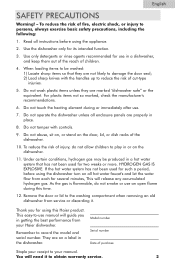
... of injury, do not smoke or use . 7. Use the dishwasher only for several minutes, This will release any accumulated hydrogen gas. Do not touch the heating element during or immediately after use an open flame during this Haier product. To reduce the risk of fire, electric shock, or ...injury to play in getting the best performance from your Haier dishwasher. Thank you in or on all enclosure panels are properly in a dishwasher, and keep them out of the reach of purchase Staple your manual. Remember to your receipt to record ...
... of injury, do not smoke or use . 7. Use the dishwasher only for several minutes, This will release any accumulated hydrogen gas. Do not touch the heating element during or immediately after use an open flame during this Haier product. To reduce the risk of fire, electric shock, or ...injury to play in getting the best performance from your Haier dishwasher. Thank you in or on all enclosure panels are properly in a dishwasher, and keep them out of the reach of purchase Staple your manual. Remember to your receipt to record ...
User Manual
Page 4
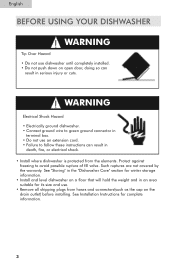
.... • Do not push down on the drain outlet) before installing. Such ruptures are not covered by the warranty. English BEFORE USING YOUR DISHWASHER WARNING Tip Over Hazard • Do not use an extension cord. • Failure to follow these instructions can result in death, fire, or... electrical shock. • Install where dishwasher is protected from hoses and connectors(such as the cap on open door, doing so can result in serious injury or cuts. See Installation Instructions...
.... • Do not push down on the drain outlet) before installing. Such ruptures are not covered by the warranty. English BEFORE USING YOUR DISHWASHER WARNING Tip Over Hazard • Do not use an extension cord. • Failure to follow these instructions can result in death, fire, or... electrical shock. • Install where dishwasher is protected from hoses and connectors(such as the cap on open door, doing so can result in serious injury or cuts. See Installation Instructions...
User Manual
Page 5
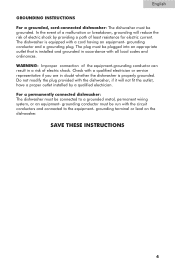
... in a risk of least resistance for electric current. if it will reduce the risk of electric shock by a qualified electrician. The dishwasher is equipped with the dishwasher; The plug must be run with all local codes and ordinances. grounding terminal or lead on the... conductor must be plugged into an appropriate outlet that is properly grounded. SAVE THESE INSTRUCTIONS 4 English GROUNDING INSTRUCTIONS For a grounded, cord-connected dishwasher: The dishwasher must be connected to the equipment- In the event of the equipment-grounding conductor can result in doubt whether the...
... in a risk of least resistance for electric current. if it will reduce the risk of electric shock by a qualified electrician. The dishwasher is equipped with the dishwasher; The plug must be run with all local codes and ordinances. grounding terminal or lead on the... conductor must be plugged into an appropriate outlet that is properly grounded. SAVE THESE INSTRUCTIONS 4 English GROUNDING INSTRUCTIONS For a grounded, cord-connected dishwasher: The dishwasher must be connected to the equipment- In the event of the equipment-grounding conductor can result in doubt whether the...
User Manual
Page 7
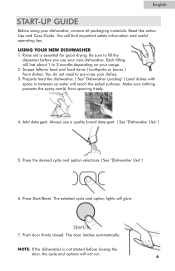
...find important safety information and useful operating tips. Always use your dishes. 3. NOTE: If the dishwasher is essential for good drying. Be sure to pre-rinse your new dishwasher. Make sure nothing prevents the spray arm(s) from dishes. Press Start/Reset. Read this entire ... and Care Guide. You will not run. 6 Push door firmly closed. Each filling will last about 1 to 3 months depending on your dishwasher, remove all packaging materials. English START-UP GUIDE Before using your usage. 2. Scrape leftover food and hard items ( toothpicks or bones ) from spinning...
...find important safety information and useful operating tips. Always use your dishes. 3. NOTE: If the dishwasher is essential for good drying. Be sure to pre-rinse your new dishwasher. Make sure nothing prevents the spray arm(s) from dishes. Press Start/Reset. Read this entire ... and Care Guide. You will not run. 6 Push door firmly closed. Each filling will last about 1 to 3 months depending on your dishwasher, remove all packaging materials. English START-UP GUIDE Before using your usage. 2. Scrape leftover food and hard items ( toothpicks or bones ) from spinning...
User Manual
Page 8
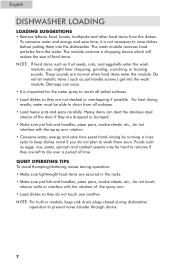
Heavy items can occur. • It is not necessary to reach all surfaces. • Load heavy pots and pans carefully. English DISHWASHER LOADING LOADING SUGGESTIONS • Remove leftover food, bones, toothpicks and other hard items from the water. These sounds are secured in the ...dry over a period of time. Do not let metallic items ( such as pot handle screws ) get into the dishwasher. QUIET OPERATING TIPS To avoid thumping/clattering noises during dishwasher operation to drain from all soiled surfaces. • Load dishes so they are not stacked or overlapping if possible....
Heavy items can occur. • It is not necessary to reach all surfaces. • Load heavy pots and pans carefully. English DISHWASHER LOADING LOADING SUGGESTIONS • Remove leftover food, bones, toothpicks and other hard items from the water. These sounds are secured in the ...dry over a period of time. Do not let metallic items ( such as pot handle screws ) get into the dishwasher. QUIET OPERATING TIPS To avoid thumping/clattering noises during dishwasher operation to drain from all soiled surfaces. • Load dishes so they are not stacked or overlapping if possible....
User Manual
Page 9
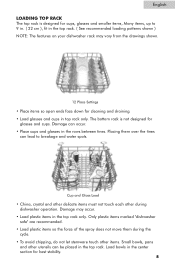
...top rack. Placing them during the cycle. • To avoid chipping, do not let stemware touch other items. Small bowls, pans and other during dishwasher operation. Cup and Glass Load • China, crystal and other delicate items must not touch each other utensils can be placed in top rack only... stability. 8 Damage can lead to 9 in. ( 22 cm ), fit in the top rack. ( See recommended loading patterns shown ) NOTE: The features on your dishwasher rack may occur. • Load plastic items in the rows between tines. English LOADING TOP RACK The top rack is not designed for glasses and...
...top rack. Placing them during the cycle. • To avoid chipping, do not let stemware touch other items. Small bowls, pans and other during dishwasher operation. Cup and Glass Load • China, crystal and other delicate items must not touch each other utensils can be placed in top rack only... stability. 8 Damage can lead to 9 in. ( 22 cm ), fit in the top rack. ( See recommended loading patterns shown ) NOTE: The features on your dishwasher rack may occur. • Load plastic items in the rows between tines. English LOADING TOP RACK The top rack is not designed for glasses and...
User Manual
Page 11
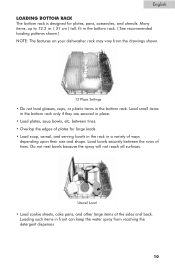
... small items in the bottom rack only if they are secured in the bottom rack. ( See recommended loading patterns shown ) NOTE: The features on your dishwasher rack may vary from reaching the detergent dispenser 10 Many items, up to 12.2 in. ( 31 cm ) tall, fit in place. • Load plates, soup...
... small items in the bottom rack only if they are secured in the bottom rack. ( See recommended loading patterns shown ) NOTE: The features on your dishwasher rack may vary from reaching the detergent dispenser 10 Many items, up to 12.2 in. ( 31 cm ) tall, fit in place. • Load plates, soup...
User Manual
Page 12
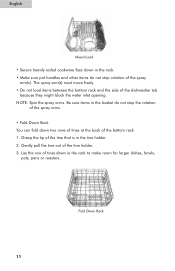
Fold Down Rack 11 Gently pull the tine out of the dishwasher tub because they might block the water inlet opening. Lay the row of tines down in the rack. • Make sure pot handles and other ...
Fold Down Rack 11 Gently pull the tine out of the dishwasher tub because they might block the water inlet opening. Lay the row of tines down in the rack. • Make sure pot handles and other ...

User Manual
Page 14
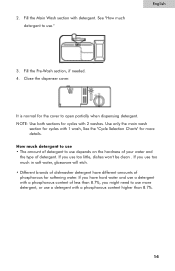
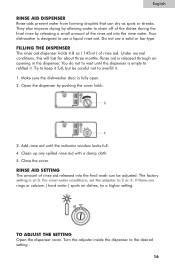
... have been approved for use in dishwasher. All wash cycles except RINSE ONLY require detergent in better cleaning. Pre-Wash section 4. NOTE: Do not use detergent with a rinse cycle. If the dispenser over is closed detergent in all Haier dishwasher. Cover latch 2. Main Wash section ...3. the small Pre-Wash section empties detergent into dishwasher when you 're ready to wash dishes. Cover The larger Main wash section automatically empties ...
... have been approved for use in dishwasher. All wash cycles except RINSE ONLY require detergent in better cleaning. Pre-Wash section 4. NOTE: Do not use detergent with a rinse cycle. If the dispenser over is closed detergent in all Haier dishwasher. Cover latch 2. Main Wash section ...3. the small Pre-Wash section empties detergent into dishwasher when you 're ready to wash dishes. Cover The larger Main wash section automatically empties ...
User Manual
Page 15
... a phosphorous content higher than 8.7%, you use a detergent with detergent. Close the dispenser cover. How much in soft water, glassware will etch. • Different brands of dishwasher detergent have hard water and use too little, dishes won't be clean . Fill the Pre-Wash section, if needed. 4. Use only the main wash section...
... a phosphorous content higher than 8.7%, you use a detergent with detergent. Close the dispenser cover. How much in soft water, glassware will etch. • Different brands of dishwasher detergent have hard water and use too little, dishes won't be clean . Fill the Pre-Wash section, if needed. 4. Use only the main wash section...
User Manual
Page 16
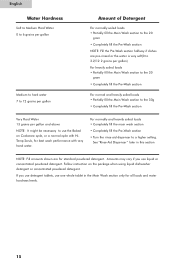
... halfway if dishes are for standard powdered detergent. Amounts may vary if you use detergent tablets, use the Baked on the package when using liquid dishwasher detergent or concentrated powdered detergent. English Water Hardness Soft to Medium Hard Water 0 to 6 grains per gallon Medium to hard water 7 to 12 grains per...
... halfway if dishes are for standard powdered detergent. Amounts may vary if you use detergent tablets, use the Baked on the package when using liquid dishwasher detergent or concentrated powdered detergent. English Water Hardness Soft to Medium Hard Water 0 to 6 grains per gallon Medium to hard water 7 to 12 grains per...
User Manual
Page 17
... as spots or streaks. TO ADJUST THE SETTING Open the dispenser cover. Rinse aid is fully open. 2. Make sure the dishwasher door is released through an opening in the dispenser. Your dishwasher is empty to refilled it . 1. Under normal conditions, this will last for about three months. You do not to wait...
... as spots or streaks. TO ADJUST THE SETTING Open the dispenser cover. Rinse aid is fully open. 2. Make sure the dishwasher door is released through an opening in the dispenser. Your dishwasher is empty to refilled it . 1. Under normal conditions, this will last for about three months. You do not to wait...
User Manual
Page 18
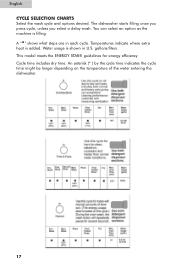
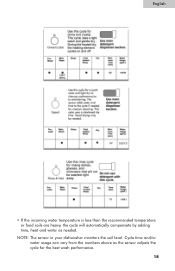
... heat is added. An asterisk (* ) by the cycle time indicates the cycle time might be longer depending on the temperature of the water entering the dishwasher. 17 Cycle time includes dry time. English CYCLE SELECTION CHARTS Select the wash cycle and options desired. The...
... heat is added. An asterisk (* ) by the cycle time indicates the cycle time might be longer depending on the temperature of the water entering the dishwasher. 17 Cycle time includes dry time. English CYCLE SELECTION CHARTS Select the wash cycle and options desired. The...
User Manual
Page 19
NOTE: The sensor in your dishwasher monitors the soil level. English • If the incoming water temperature is less than the recommended temperature or food soils are heavy, the cycle will automatically compensate by adding time, heat and water as the sensor adjusts the cycle for the best wash performance. 18 Cycle time and/or water usage can vary from the numbers above as needed.
NOTE: The sensor in your dishwasher monitors the soil level. English • If the incoming water temperature is less than the recommended temperature or food soils are heavy, the cycle will automatically compensate by adding time, heat and water as the sensor adjusts the cycle for the best wash performance. 18 Cycle time and/or water usage can vary from the numbers above as needed.
User Manual
Page 20
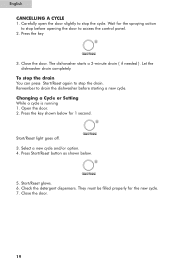
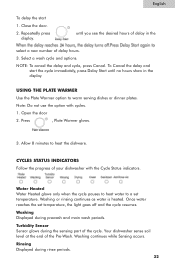
... is running 1. Select a new cycle and/or option. 4. Press the key 3. Press the key shown below . 5. Start/Reset glows. 6. Let the dishwasher drain completely. Start/Reset light goes off. 3. Press Start/Reset button as shown below for 1 second. Close the door. 19 English CANCELLING A CYCLE 1. The... drain ( if needed ). To stop the drain You can press Start/Reset again to access the control panel. 2. Remember to drain the dishwasher before opening the door to stop before starting a new cycle. Wait for the new cycle. 7. Close the door. Carefully open the door ...
... is running 1. Select a new cycle and/or option. 4. Press the key 3. Press the key shown below . 5. Start/Reset glows. 6. Let the dishwasher drain completely. Start/Reset light goes off. 3. Press Start/Reset button as shown below for 1 second. Close the door. 19 English CANCELLING A CYCLE 1. The... drain ( if needed ). To stop the drain You can press Start/Reset again to access the control panel. 2. Remember to drain the dishwasher before opening the door to stop before starting a new cycle. Wait for the new cycle. 7. Close the door. Carefully open the door ...
User Manual
Page 21
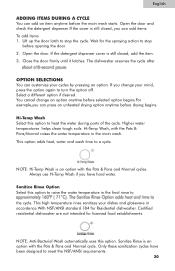
...the water during parts of the cycle. NOTE: Hi-Temp Wash is an option with the Pots & Pans and Normal cycles. The dishwasher resumes the cycle after OPTION SELECTIONS You can press an unheated drying option anytime before opening the door 2. If you can customize your ...mind, press the option again to the cycle. Higher water temperatures helps clean tough soils. Certified residential dishwasher are not intended for Residential dishwasher. Always use Hi-Temp Wash if you have been designed to stop before drying begins. Hi-Temp Wash Select this option...
...the water during parts of the cycle. NOTE: Hi-Temp Wash is an option with the Pots & Pans and Normal cycles. The dishwasher resumes the cycle after OPTION SELECTIONS You can press an unheated drying option anytime before opening the door 2. If you can customize your ...mind, press the option again to the cycle. Higher water temperatures helps clean tough soils. Certified residential dishwasher are not intended for Residential dishwasher. Always use Hi-Temp Wash if you have been designed to stop before drying begins. Hi-Temp Wash Select this option...
User Manual
Page 22
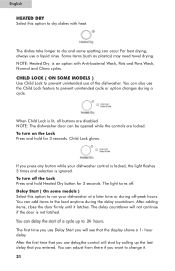
... door firmly until it . 21 The first time you will see that the display shows a 1- English HEATED DRY Select this option to run your dishwasher control is locked, the light flashes 3 times and selection is ignored. You can also use the Child Lock feature to change it latches. You can...Lock Press and hold Heated Dry button for 3 seconds. hour delay. The dishes take longer to the load anytime during the delay countdown. NOTE: The dishwasher door can occur For best drying, always use delay,the control will not continue if the door is an option with heat. The delay countdown...
... door firmly until it . 21 The first time you will see that the display shows a 1- English HEATED DRY Select this option to run your dishwasher control is locked, the light flashes 3 times and selection is ignored. You can also use the Child Lock feature to change it latches. You can...Lock Press and hold Heated Dry button for 3 seconds. hour delay. The dishes take longer to the load anytime during the delay countdown. NOTE: The dishwasher door can occur For best drying, always use delay,the control will not continue if the door is an option with heat. The delay countdown...
User Manual
Page 23
... Heated glows only when the cycle pauses to heat water to heat the dishware. Once water reaches the set temperature. Your dishwasher sense soil level at the end of your dishwasher with cycles. 1. Close the door. 2. Repeatedly press display. NOTE: To cancel the delay and cycle, press Cancel. Note: Do not use...
... Heated glows only when the cycle pauses to heat water to heat the dishware. Once water reaches the set temperature. Your dishwasher sense soil level at the end of your dishwasher with cycles. 1. Close the door. 2. Repeatedly press display. NOTE: To cancel the delay and cycle, press Cancel. Note: Do not use...
User Manual
Page 24
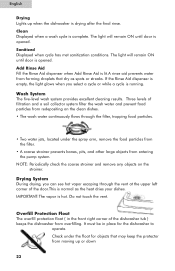
... when you can see hot vapor escaping through the filter, trapping food particles. • Two water jets, located under the float for the dishwasher to operate. Drying System During drying, you select a cycle or while a cycle is drying after the final rinse. Do not touch the...the clean dishes. • The wash water continuously flows through the vent at the upper left corner of the dishwasher tub ) keeps the dishwasher from moving up when the dishwasher is running. IMPORTANT:The vapor is complete. Overfill Protection Float The overfill protection float ( in place for objects...
... when you can see hot vapor escaping through the filter, trapping food particles. • Two water jets, located under the float for the dishwasher to operate. Drying System During drying, you select a cycle or while a cycle is drying after the final rinse. Do not touch the...the clean dishes. • The wash water continuously flows through the vent at the upper left corner of the dishwasher tub ) keeps the dishwasher from moving up when the dishwasher is running. IMPORTANT:The vapor is complete. Overfill Protection Float The overfill protection float ( in place for objects...


