
User Manual
Page 2
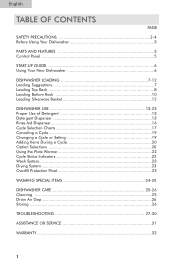
...-UP GUIDE 6 Using Your New Dishwasher 6 DISHWASHER LOADING 7-12 Loading Suggestions 7 Loading Top Rack 8 Loading Bottom Rack 10 Loading Silverware Basket 12 DISHWASHER USE 13-23 Proper Use of Detergent 13 Detergent Dispenser 13 Rinse Aid Dispenser 16 Cycle Selection Charts 17 Canceling a Cycle 19 Changing a Cycle or Setting 19 Adding Items During a Cycle 20 Option Selections 20 Using the Plate Warmer 22 Cycle Status Indicators 22 Wash System 23 Drying System 23 Overfill Protection Float 23 WASHING SPECIAL ITEMS 24-25 DISHWASHER CARE 25-26 Cleaning ...25 Drain Air Gap...
...-UP GUIDE 6 Using Your New Dishwasher 6 DISHWASHER LOADING 7-12 Loading Suggestions 7 Loading Top Rack 8 Loading Bottom Rack 10 Loading Silverware Basket 12 DISHWASHER USE 13-23 Proper Use of Detergent 13 Detergent Dispenser 13 Rinse Aid Dispenser 16 Cycle Selection Charts 17 Canceling a Cycle 19 Changing a Cycle or Setting 19 Adding Items During a Cycle 20 Option Selections 20 Using the Plate Warmer 22 Cycle Status Indicators 22 Wash System 23 Drying System 23 Overfill Protection Float 23 WASHING SPECIAL ITEMS 24-25 DISHWASHER CARE 25-26 Cleaning ...25 Drain Air Gap...
User Manual
Page 3
... conditions, hydrogen gas may be washed: 1) Locate sharp items so that has not been used for use in place. 8. If the hot water system has not been used for its intended function. 3. Read all instructions before using the dishwasher turn on the dishwasher. 11. Model number Serial number Date of injury, do not smoke or use an open flame during or immediately after use manual will need it . To reduce the...
... conditions, hydrogen gas may be washed: 1) Locate sharp items so that has not been used for use in place. 8. If the hot water system has not been used for its intended function. 3. Read all instructions before using the dishwasher turn on the dishwasher. 11. Model number Serial number Date of injury, do not smoke or use an open flame during or immediately after use manual will need it . To reduce the...
User Manual
Page 4
... suitable for its size and use an extension cord. • Failure to avoid possible rupture of fill valve. See Installation Instructions for winter storage information. • Install and level dishwasher on a floor that will hold the weight and in serious injury or cuts. See "Storing" in the "Dishwasher Care" section for complete information. 3 WARNING Electrical Shock Hazard • Electrically ground dishwasher. • Connect ground wire to green...
... suitable for its size and use an extension cord. • Failure to avoid possible rupture of fill valve. See Installation Instructions for winter storage information. • Install and level dishwasher on a floor that will hold the weight and in serious injury or cuts. See "Storing" in the "Dishwasher Care" section for complete information. 3 WARNING Electrical Shock Hazard • Electrically ground dishwasher. • Connect ground wire to green...
User Manual
Page 5
... outlet, have a proper outlet installed by providing a path of electric shock by a qualified electrician. Do not modify the plug provided with all local codes and ordinances. English GROUNDING INSTRUCTIONS For a grounded, cord-connected dishwasher: The dishwasher must be run with the circuit conductors and connected to a grounded metal, permanent wiring system, or an equipment- The plug must be connected to the equipment- if it...
... outlet, have a proper outlet installed by providing a path of electric shock by a qualified electrician. Do not modify the plug provided with all local codes and ordinances. English GROUNDING INSTRUCTIONS For a grounded, cord-connected dishwasher: The dishwasher must be run with the circuit conductors and connected to a grounded metal, permanent wiring system, or an equipment- The plug must be connected to the equipment- if it...
User Manual
Page 7
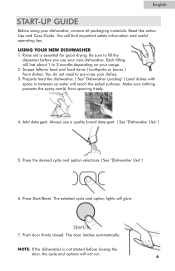
... door firmly closed. Press Start/Reset. Always use your usage. 2. Properly load the dishwasher. ( See" Dishwasher Loading" ) Load dishes with space in between so water will last about 1 to pre-rinse your dishwasher, remove all packaging materials. Make sure nothing prevents the spray arm(s) from dishes. Each filling will reach the soiled surfaces. NOTE: If the dishwasher is essential for good drying. Add detergent. Press the desired cycle and option selections.( See "Dishwasher Use" ) 6. USING YOUR NEW DISHWASHER...
... door firmly closed. Press Start/Reset. Always use your usage. 2. Properly load the dishwasher. ( See" Dishwasher Loading" ) Load dishes with space in between so water will last about 1 to pre-rinse your dishwasher, remove all packaging materials. Make sure nothing prevents the spray arm(s) from dishes. Each filling will reach the soiled surfaces. NOTE: If the dishwasher is essential for good drying. Add detergent. Press the desired cycle and option selections.( See "Dishwasher Use" ) 6. USING YOUR NEW DISHWASHER...
User Manual
Page 8
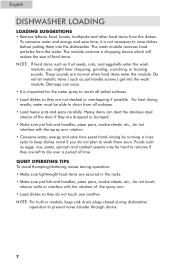
... to rinse dishes before putting them soon. QUIET OPERATING TIPS To avoid thumping/clattering noises during dishwasher operation to remove if they are normal when hard items enter the module. For best drying results, water must be hard to prevent noise transfer through drains. 7 Damage can dent the stainless steel interior of food items. NOTE: If hard items such as pot handle screws ) get into the dishwasher. English DISHWASHER LOADING LOADING...
... to rinse dishes before putting them soon. QUIET OPERATING TIPS To avoid thumping/clattering noises during dishwasher operation to remove if they are normal when hard items enter the module. For best drying results, water must be hard to prevent noise transfer through drains. 7 Damage can dent the stainless steel interior of food items. NOTE: If hard items such as pot handle screws ) get into the dishwasher. English DISHWASHER LOADING LOADING...
User Manual
Page 15
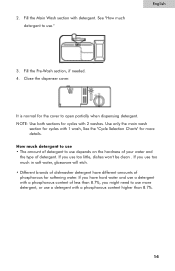
... for more detergent, or use too little, dishes won't be clean . Fill the Pre-Wash section, if needed. 4. It is normal for cycles with 1 wash, See the "Cycle Selection Charts" for softening water. Fill the Main Wash section with a phosphorous content higher than 8.7%. 14 Use only the main wash section for cycles with 2 washes. English 3. If you use too much detergent to open partially when dispensing detergent. If you use a detergent with detergent. If...
... for more detergent, or use too little, dishes won't be clean . Fill the Pre-Wash section, if needed. 4. It is normal for cycles with 1 wash, See the "Cycle Selection Charts" for softening water. Fill the Main Wash section with a phosphorous content higher than 8.7%. 14 Use only the main wash section for cycles with 2 washes. English 3. If you use too much detergent to open partially when dispensing detergent. If you use a detergent with detergent. If...
User Manual
Page 16
...-Wash section halfway if dishes are for best wash performance with HiTemp Scrub, for standard powdered detergent. Amounts may vary if you use detergent tablets, use the Baked on the package when using liquid dishwasher detergent or concentrated powdered detergent. See "Rinse Aid Dispenser " later in the Main Wash section only for all loads and water hardness levels. 15 For normally and heavily soiled loads • Completely fill the main wash...
...-Wash section halfway if dishes are for best wash performance with HiTemp Scrub, for standard powdered detergent. Amounts may vary if you use detergent tablets, use the Baked on the package when using liquid dishwasher detergent or concentrated powdered detergent. See "Rinse Aid Dispenser " later in the Main Wash section only for all loads and water hardness levels. 15 For normally and heavily soiled loads • Completely fill the main wash...
User Manual
Page 17
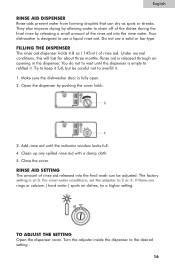
... adjusted. Turn the adjuster inside the dispenser to drain off of the dishes during the final rinse by releasing a small amount of the rinse aid into the final wash can dry as spots or streaks. Under normal conditions, this will last for about three months. Open the dispenser by allowing water to the desired setting . 16 Add rinse aid until the dispenser is released through an opening in the dispenser. English RINSE AID DISPENSER Rinse aids prevent water...
... adjusted. Turn the adjuster inside the dispenser to drain off of the dishes during the final rinse by releasing a small amount of the rinse aid into the final wash can dry as spots or streaks. Under normal conditions, this will last for about three months. Open the dispenser by allowing water to the desired setting . 16 Add rinse aid until the dispenser is released through an opening in the dispenser. English RINSE AID DISPENSER Rinse aids prevent water...
User Manual
Page 18
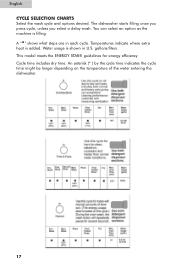
... you select a delay wash. Temperatures indicate where extra heat is shown in each cycle. You can select an option as the machine is filling. • A " " shows what steps are in U.S. An asterisk (* ) by the cycle time indicates the cycle time might be longer depending on the temperature of the water entering the dishwasher. 17 Water usage is added. Cycle time includes dry time. This model meets the ENERGY STAR®...
... you select a delay wash. Temperatures indicate where extra heat is shown in each cycle. You can select an option as the machine is filling. • A " " shows what steps are in U.S. An asterisk (* ) by the cycle time indicates the cycle time might be longer depending on the temperature of the water entering the dishwasher. 17 Water usage is added. Cycle time includes dry time. This model meets the ENERGY STAR®...
User Manual
Page 20
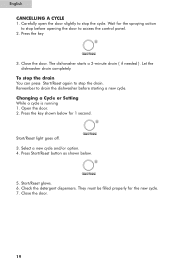
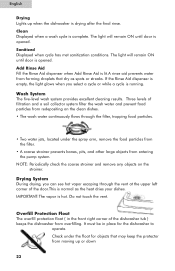
...stop before starting a new cycle. The dishwasher starts a 2-minute drain ( if needed ). Close the door. 19 Close the door. Let the dishwasher drain completely. To stop the drain You can press Start/Reset again to access the control panel. 2. Press Start/Reset button as shown below for the spraying action to stop the drain. Press the key 3. Open the door. 2. English CANCELLING A CYCLE 1. Wait for 1 second. Select a new cycle and/or option. 4. Remember to drain the dishwasher before opening the door to stop the cycle. Changing a Cycle or Setting While a cycle is running...
...stop before starting a new cycle. The dishwasher starts a 2-minute drain ( if needed ). Close the door. 19 Close the door. Let the dishwasher drain completely. To stop the drain You can press Start/Reset again to access the control panel. 2. Press Start/Reset button as shown below for the spraying action to stop the drain. Press the key 3. Open the door. 2. English CANCELLING A CYCLE 1. Wait for 1 second. Select a new cycle and/or option. 4. Remember to drain the dishwasher before opening the door to stop the cycle. Changing a Cycle or Setting While a cycle is running...
User Manual
Page 21
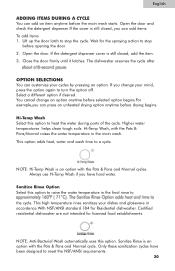
... cancel change your mind, press the option again to turn the option off. Sanitize Rinse Option Select this option. Wait for the spraying action to meet the NSF/ANSI requirements. 20 Higher water temperatures helps clean tough soils. This option adds heat, water and wash time to heat the water during parts of the cycle. Only these sanitization cycles have hard water. Open the door. Close the door firmly until it latches. If you change...
... cancel change your mind, press the option again to turn the option off. Sanitize Rinse Option Select this option. Wait for the spraying action to meet the NSF/ANSI requirements. 20 Higher water temperatures helps clean tough soils. This option adds heat, water and wash time to heat the water during parts of the cycle. Only these sanitization cycles have hard water. Open the door. Close the door firmly until it latches. If you change...
User Manual
Page 22
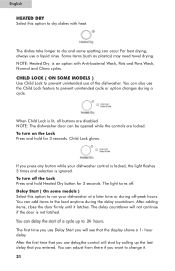
..., close the door firmly until it . 21 The first time you use delay,the control will start by calling up the last delay that you want to prevent unintended cycle or option changes during off . hour delay. CHILD LOCK ( ON SOME MODELS ) Use Child Lock to run your dishwasher control is locked, the light flashes 3 times and selection is not latched. To turn on the Lock Press and hold Heated Dry button for 3 seconds. Some items (such as plastics) may need...
..., close the door firmly until it . 21 The first time you use delay,the control will start by calling up the last delay that you want to prevent unintended cycle or option changes during off . hour delay. CHILD LOCK ( ON SOME MODELS ) Use Child Lock to run your dishwasher control is locked, the light flashes 3 times and selection is not latched. To turn on the Lock Press and hold Heated Dry button for 3 seconds. Some items (such as plastics) may need...
User Manual
Page 23
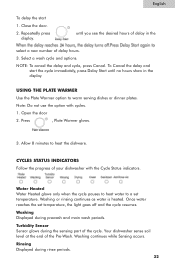
... sensing part of the cycle. To Cancel the delay and start 1. Once water reaches the set temperature. Repeatedly press display. Washing or rinsing continues as water is heated. Washing Displayed during prewash and main wash periods. Your dishwasher sense soil level at the end of the Pre-Wash. Allow 8 minutes to warm serving dishes or dinner plates. Press , Plate Warmer glows. 3. CYCLES STATUS INDICATORS Follow the progress of your dishwasher with cycles. 1. Open the door 2. USING THE...
... sensing part of the cycle. To Cancel the delay and start 1. Once water reaches the set temperature. Repeatedly press display. Washing or rinsing continues as water is heated. Washing Displayed during prewash and main wash periods. Your dishwasher sense soil level at the end of the Pre-Wash. Allow 8 minutes to warm serving dishes or dinner plates. Press , Plate Warmer glows. 3. CYCLES STATUS INDICATORS Follow the progress of your dishwasher with cycles. 1. Open the door 2. USING THE...
User Manual
Page 24
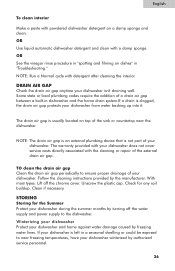
... dishwasher tub ) keeps the dishwasher from entering the pump system. Clean Displayed when a wash cycle is hot. Check under the spray arm, remove the food particles from the filter. • A coarse strainer prevents bones, pits, and other large objects from overfilling. Three levels of the door.This is opened . The light will remain ON until door is normal as spots or streaks. Sanitized Displayed when cycle has met sanitization conditions. If the Rinse Aid dispenser...
... dishwasher tub ) keeps the dishwasher from entering the pump system. Clean Displayed when a wash cycle is hot. Check under the spray arm, remove the food particles from the filter. • A coarse strainer prevents bones, pits, and other large objects from overfilling. Three levels of the door.This is opened . The light will remain ON until door is normal as spots or streaks. Sanitized Displayed when cycle has met sanitization conditions. If the Rinse Aid dispenser...
User Manual
Page 27
... service costs directly associated with the cleaning or repair of your dishwasher and home against water damage caused by the manufacturer. NOTE: The drain air gap is an external plumbing device that is clogged, the drain air gap protects your dishwasher during the summer months by authorized service personnel. 26 The warranty provided with your dishwasher isn't draining well. Unscrew the plastic cap. Follow the cleaning instructions provided by freezing water lines...
... service costs directly associated with the cleaning or repair of your dishwasher and home against water damage caused by the manufacturer. NOTE: The drain air gap is an external plumbing device that is clogged, the drain air gap protects your dishwasher during the summer months by authorized service personnel. 26 The warranty provided with your dishwasher isn't draining well. Unscrew the plastic cap. Follow the cleaning instructions provided by freezing water lines...
User Manual
Page 28
... tripped? Is the water shut-off valve ( If installed ) turned on the kitchen counter ( built-in models ) Is the dishwasher aligned with the countertop? Is the brand of a service call for service. Run a vinegar rinse as described in "Spotting and filming on dishes" later in the dishwasher Are dishes washed only every 2 or 3 days? Refer to reduce foaming and eliminate buildup. • Odor in this troubleshooting guide. • Condensation...
... tripped? Is the water shut-off valve ( If installed ) turned on the kitchen counter ( built-in models ) Is the dishwasher aligned with the countertop? Is the brand of a service call for service. Run a vinegar rinse as described in "Spotting and filming on dishes" later in the dishwasher Are dishes washed only every 2 or 3 days? Refer to reduce foaming and eliminate buildup. • Odor in this troubleshooting guide. • Condensation...
User Manual
Page 29
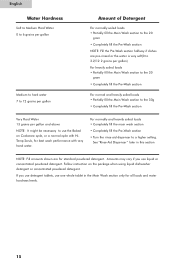
... softener installed onto your dishwasher, check for several hours in a cool, dry area Heavy soil and/or hard water generally require extra detergent. Clean dispenser when caked detergent is strongly recommended that describes the most difficult soil in your hot water supply. Use recommended dishwasher detergents only. If your dishwasher? Use recommended dishwasher detergents only. Did you choose the cycle that you install a home water softener if you do not wash to...
... softener installed onto your dishwasher, check for several hours in a cool, dry area Heavy soil and/or hard water generally require extra detergent. Clean dispenser when caked detergent is strongly recommended that describes the most difficult soil in your hot water supply. Use recommended dishwasher detergents only. If your dishwasher? Use recommended dishwasher detergents only. Did you choose the cycle that you install a home water softener if you do not wash to...
User Manual
Page 30
... cup on dishes and dishwasher interior Does your dishwasher. 1. Wash and rinse dishes. Put 2 cups ( 500 mL ) white vinegar in the dishwasher. • Brown stains on the bottom rack. 3. Silica film and etching are permanent and cannot be added if pressure is a milky, rainbow- Use an air-dry or an energy saving dry option. Run the dishwasher through a complete washing cycle using it too often could damage your water have...
... cup on dishes and dishwasher interior Does your dishwasher. 1. Wash and rinse dishes. Put 2 cups ( 500 mL ) white vinegar in the dishwasher. • Brown stains on the bottom rack. 3. Silica film and etching are permanent and cannot be added if pressure is a milky, rainbow- Use an air-dry or an energy saving dry option. Run the dishwasher through a complete washing cycle using it too often could damage your water have...
User Manual
Page 33
... defect. Labor, service transportation, and shipping charges for the removal and replacement of purchase. This includes the pump, motor, lower wash arm, middle wash arm and the wash tower upper sprayer with associated supply tube and filters. Adjustment of consumer operated controls as normal service area or hours. NOTE: Associated outside inlet and drain plumbing parts are rendered. This warranty gives you specific legal rights, and you purchased the unit from incorrect electrical current, voltage...
... defect. Labor, service transportation, and shipping charges for the removal and replacement of purchase. This includes the pump, motor, lower wash arm, middle wash arm and the wash tower upper sprayer with associated supply tube and filters. Adjustment of consumer operated controls as normal service area or hours. NOTE: Associated outside inlet and drain plumbing parts are rendered. This warranty gives you specific legal rights, and you purchased the unit from incorrect electrical current, voltage...

