

User Manual
Page 2
... not open the door. 9. Do not add or mix any repairs. 8. Do not operate your appliance by allowing cold air to persons when using the appliance. 2. This appliance must be properly installed in accordance with controls. 16. Replace immediately worn power cords, loose plugs/power outlets. 7. Do not operate your appliance, follow basic precautions, including the following: 1. DO NOT CUT OR REMOVE THE GROUNDING PLUG. To reduce...
... not open the door. 9. Do not add or mix any repairs. 8. Do not operate your appliance by allowing cold air to persons when using the appliance. 2. This appliance must be properly installed in accordance with controls. 16. Replace immediately worn power cords, loose plugs/power outlets. 7. Do not operate your appliance, follow basic precautions, including the following: 1. DO NOT CUT OR REMOVE THE GROUNDING PLUG. To reduce...
User Manual
Page 3
... not use extension cords or adapters to connect the unit to electrical power source. 22. you understand and have skills to dishwasher before using this dishwasher outdoors. 24. Disconnect electrical power and water inlet hose to carry out. 21. Close supervision and observation needed when children are marked dishwasher safe. Do not touch the heating element during or immediately after use a flame. 20. SAVE THESE INSTRUCTIONS 2 Do not repair or replace any part of electric...
... not use extension cords or adapters to connect the unit to electrical power source. 22. you understand and have skills to dishwasher before using this dishwasher outdoors. 24. Disconnect electrical power and water inlet hose to carry out. 21. Close supervision and observation needed when children are marked dishwasher safe. Do not touch the heating element during or immediately after use a flame. 20. SAVE THESE INSTRUCTIONS 2 Do not repair or replace any part of electric...

User Manual
Page 4
.... Specifications and features are for purchasing our Haier product. The illustrated parts shown in figures may be different on the left side of the inner door. (see page 4 ) Model number Serial number Date of your manual. This easy-to-use manual will need it to obtain warranty service. English Table of Contents SAFETY INSTRUCTIONS Knowing Your Dishwasher Using Your Dishwasher Understanding The Filtration System Dishwasher Safe or Hand Wash Care & Cleaning Of Your Dishwasher Troubleshooting Warranty...
.... Specifications and features are for purchasing our Haier product. The illustrated parts shown in figures may be different on the left side of the inner door. (see page 4 ) Model number Serial number Date of your manual. This easy-to-use manual will need it to obtain warranty service. English Table of Contents SAFETY INSTRUCTIONS Knowing Your Dishwasher Using Your Dishwasher Understanding The Filtration System Dishwasher Safe or Hand Wash Care & Cleaning Of Your Dishwasher Troubleshooting Warranty...

User Manual
Page 5
Upper Sprayer 7. Pre-Wash Detergent Compartment Rack with Open Door) cD 12 11 0 00 0 1. Pressure Relief Valves (One located at rear and 5. Lower Rack under Lower Rack) the upper left corner (not shown) 11. Label 4 Rinse Aid Compartment 2. Middle Spray Arm 10. Removable Split Silverware Basket 12. Main Wash Detergent Compartment 3. Heating Element (Located at the bottom under lower rack) 6. Deluxe 2 Position Adjustable Upper 8. Triple Filtration System (Located at 4. Lower Spray Arm 13. English Knowing Your Dishwasher Parts and Features (Front View ...
Upper Sprayer 7. Pre-Wash Detergent Compartment Rack with Open Door) cD 12 11 0 00 0 1. Pressure Relief Valves (One located at rear and 5. Lower Rack under Lower Rack) the upper left corner (not shown) 11. Label 4 Rinse Aid Compartment 2. Middle Spray Arm 10. Removable Split Silverware Basket 12. Main Wash Detergent Compartment 3. Heating Element (Located at the bottom under lower rack) 6. Deluxe 2 Position Adjustable Upper 8. Triple Filtration System (Located at 4. Lower Spray Arm 13. English Knowing Your Dishwasher Parts and Features (Front View ...

User Manual
Page 8
... the cycle "dot" symbol. Once bothare lined up, press "Power" button to the wash selector. 7 Turning in to turn the "HI-TEMP WASH" option "ON". • Press this means the rinse aid detergent is designed to turn the knob "COUNTER CLOCKWISE." English Using Your Dishwasher POWER Understanding the Dishwasher Control Panel: Power Button: • Press "POWER" button in the rinse aid compartment. Note: You will signify the automatic start automatically.) A "lick"will see the "Power On Indicator Light...
... the cycle "dot" symbol. Once bothare lined up, press "Power" button to the wash selector. 7 Turning in to turn the "HI-TEMP WASH" option "ON". • Press this means the rinse aid detergent is designed to turn the knob "COUNTER CLOCKWISE." English Using Your Dishwasher POWER Understanding the Dishwasher Control Panel: Power Button: • Press "POWER" button in the rinse aid compartment. Note: You will signify the automatic start automatically.) A "lick"will see the "Power On Indicator Light...
User Manual
Page 9
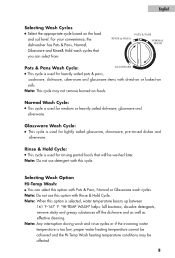
... water heating temperature cannot be washed later. Normal Wash Cycle: • This cycle is used for lightly soiled glassware, chinaware, pre-rinsed dishes and silverware. Glassware Wash Cycle: • This cycle is used for heavily soiled pots & pans, cookware, dishware, silverware and glassware items with Pots & Pans, Normal or Glassware wash cycles. For your convenience, the dishwasher has Pots & Pans, Normal, POTS & PANS RINSE & HOLD 00• NORMAL WASH Glassware and Rinse& Hold wash cycles that...
... water heating temperature cannot be washed later. Normal Wash Cycle: • This cycle is used for lightly soiled glassware, chinaware, pre-rinsed dishes and silverware. Glassware Wash Cycle: • This cycle is used for heavily soiled pots & pans, cookware, dishware, silverware and glassware items with Pots & Pans, Normal or Glassware wash cycles. For your convenience, the dishwasher has Pots & Pans, Normal, POTS & PANS RINSE & HOLD 00• NORMAL WASH Glassware and Rinse& Hold wash cycles that...

User Manual
Page 10
... you cancel or reset the wash cycle, you must press "POWER" button immediately. • Once you have reset to a new wash cycle, you must refill the detergent compartment if it is opened to dry the dishware because the moist hot air exiting out of the door may block the spray arm from rotating. 2) Pour the proper amount of detergent into the detergent dispenser. You will notice that it is empty, add "Rinse Aid" agent...
... you cancel or reset the wash cycle, you must press "POWER" button immediately. • Once you have reset to a new wash cycle, you must refill the detergent compartment if it is opened to dry the dishware because the moist hot air exiting out of the door may block the spray arm from rotating. 2) Pour the proper amount of detergent into the detergent dispenser. You will notice that it is empty, add "Rinse Aid" agent...
User Manual
Page 11
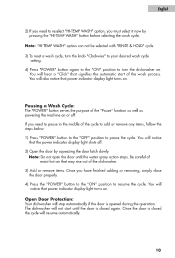
... door is opened during the operation. If you need to pause the cycle. The dishwasher will also notice that signifies the automatic start until the water spray action stops. Note: "HI-TEMP WASH" option can not be selected with "RINSE & HOLD" cycle. 3) To reset a wash cycle, turn the knob "Clockwise" to your desired wash cycle setting. 4) Press "POWER" button again to the "ON" position to resume the cycle. You will hear a "Click" that power indicator display light turns...
... door is opened during the operation. If you need to pause the cycle. The dishwasher will also notice that signifies the automatic start until the water spray action stops. Note: "HI-TEMP WASH" option can not be selected with "RINSE & HOLD" cycle. 3) To reset a wash cycle, turn the knob "Clockwise" to your desired wash cycle setting. 4) Press "POWER" button again to the "ON" position to resume the cycle. You will hear a "Click" that power indicator display light turns...
User Manual
Page 12
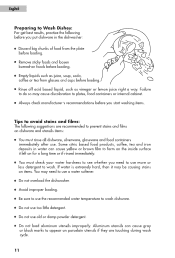
... inside surface it may be causing stains on items. You may cause discoloration to plates, food containers or internal cabinet. • Always check manufacturer's recommendations before you start washing items. Tips to avoid stains and films: The following before you need to use a water softener. • Do not overload the dishwasher. • Avoid improper loading. • Be sure to use...
... inside surface it may be causing stains on items. You may cause discoloration to plates, food containers or internal cabinet. • Always check manufacturer's recommendations before you start washing items. Tips to avoid stains and films: The following before you need to use a water softener. • Do not overload the dishwasher. • Avoid improper loading. • Be sure to use...

User Manual
Page 13
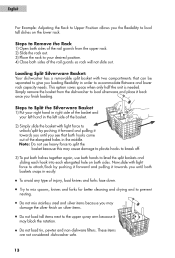
Loading the Lower & Upper Rack: To get maximum cleaning results, follow the or \ recommendations below before you start the dishwasher: Note: Do not wash any heat sensitive or any type of damage to glassware such as coffee/tea cups, beverage, wine and champagne glasses, do not load them properly. \\04) • Do not load dishware or food containers that are not designed...
Loading the Lower & Upper Rack: To get maximum cleaning results, follow the or \ recommendations below before you start the dishwasher: Note: Do not wash any heat sensitive or any type of damage to glassware such as coffee/tea cups, beverage, wine and champagne glasses, do not load them properly. \\04) • Do not load dishware or food containers that are not designed...
User Manual
Page 14
... upper rack. 2) Slide the rack out. 3) Place the rack to level the split baskets and sliding each hook into each elongated hole on the lower rack. v1Iw4 rtillogi? English For Example: Adjusting the Rack to Upper Position allows you the flexibility to load tall dishes on both sides. k i op; • Do not load tin, pewter and non-dishware filters. Loading Split Silverware Basket: Your dishwasher has a removable split basket with light...
... upper rack. 2) Slide the rack out. 3) Place the rack to level the split baskets and sliding each hook into each elongated hole on the lower rack. v1Iw4 rtillogi? English For Example: Adjusting the Rack to Upper Position allows you the flexibility to load tall dishes on both sides. k i op; • Do not load tin, pewter and non-dishware filters. Loading Split Silverware Basket: Your dishwasher has a removable split basket with light...

User Manual
Page 15
... your dishwasher. Note: Use only "Automatic Dishwasher Detergent" for dishwasher use depends on the type of water in grains content per gallon (gpg). Detergent will need less detergent to clean. You can find out the gpg level by calling your local Environmental Protection Agency (EPA) in your dishwashing. See the following table to understand the "water hardness type" and gpg level. These types of dishes. You...
... your dishwasher. Note: Use only "Automatic Dishwasher Detergent" for dishwasher use depends on the type of water in grains content per gallon (gpg). Detergent will need less detergent to clean. You can find out the gpg level by calling your local Environmental Protection Agency (EPA) in your dishwashing. See the following table to understand the "water hardness type" and gpg level. These types of dishes. You...
User Manual
Page 16
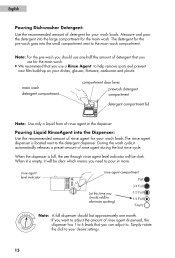
rinse agent level indicator rinse agent compartment Full• III 3/4 Full (at this time you use a Rinse Agent to help remove spots and prevent new film build-up on your dishes, glasses, flatware, cookware and plastic. main wash detergent compartment compartment door lever prewash detergent compartment detergent compartment lid III Note: Use only a liquid form of rinse agent in more. English Pouring Dishwasher Detergent: Use the recommended amount of detergent for your wash loads.The rinse agent dispenser is located next to...
rinse agent level indicator rinse agent compartment Full• III 3/4 Full (at this time you use a Rinse Agent to help remove spots and prevent new film build-up on your dishes, glasses, flatware, cookware and plastic. main wash detergent compartment compartment door lever prewash detergent compartment detergent compartment lid III Note: Use only a liquid form of rinse agent in more. English Pouring Dishwasher Detergent: Use the recommended amount of detergent for your wash loads.The rinse agent dispenser is located next to...
User Manual
Page 21
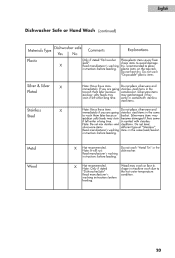
... in the dishwasher. Metal Wood X Not recommended. Do not heat dry. in contact with stainless Note: Do not mix stainless and steelitems. Do not load silverware items different typesof "Stainless" Read manufacturer's washing items in the towash them later because basket. Note: It will rust. Read manufacturer's washing instructions before loading. come if left onfor long time. instructions before loading. 20 washing instructions before loading. Do not wash "Disposable" plastic...
... in the dishwasher. Metal Wood X Not recommended. Do not heat dry. in contact with stainless Note: Do not mix stainless and steelitems. Do not load silverware items different typesof "Stainless" Read manufacturer's washing items in the towash them later because basket. Note: It will rust. Read manufacturer's washing instructions before loading. come if left onfor long time. instructions before loading. 20 washing instructions before loading. Do not wash "Disposable" plastic...

User Manual
Page 22
... cut off electrical power to the dishwasher. • You must turn off the water supply and disconnect the water inlet line from the water valve. • You must store the dishwasher at the bottom in the front below the lower rack. • After a wash and dry cycle is finished, you must wait few minutes until the dishwasher has warmed to their original position in a Cold Environment: • You must drain water...
... cut off electrical power to the dishwasher. • You must turn off the water supply and disconnect the water inlet line from the water valve. • You must store the dishwasher at the bottom in the front below the lower rack. • After a wash and dry cycle is finished, you must wait few minutes until the dishwasher has warmed to their original position in a Cold Environment: • You must drain water...

User Manual
Page 23
... install a water softener. • Spray arms may need to adjust the water pressure. You may need to rearrange or remove some dishware from the load. • (May have pressed "POWER" button after proper selection. Dishware and glassware/flatware are not dry: • Low water You may need to regulate the water temperature to 120 Degree F / 49 Degree C or select Hi-Temp Wash option. • Make sure the rinse agent dispenser...
... install a water softener. • Spray arms may need to adjust the water pressure. You may need to rearrange or remove some dishware from the load. • (May have pressed "POWER" button after proper selection. Dishware and glassware/flatware are not dry: • Low water You may need to regulate the water temperature to 120 Degree F / 49 Degree C or select Hi-Temp Wash option. • Make sure the rinse agent dispenser...
User Manual
Page 24
... and rinse. • You will hear the drain pump motor operation to pump water out. • You will hear that tine chinaware or crystal items be careful when loading. You need to allow the cycle to be for best dishwashing results. Do not overload. Make sure delicate items are on the upper rack. • Do not load tall dishware items near the middle spray arm. • Move racks...
... and rinse. • You will hear the drain pump motor operation to pump water out. • You will hear that tine chinaware or crystal items be careful when loading. You need to allow the cycle to be for best dishwashing results. Do not overload. Make sure delicate items are on the upper rack. • Do not load tall dishware items near the middle spray arm. • Move racks...
User Manual
Page 26
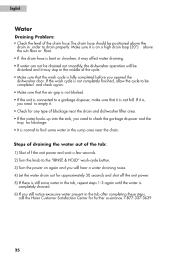
... the drain hose is bent or shrunken, it may stop in the middle of blockage near the drain. English Water Draining Problem: • Check the level of the drain hose.The drain hose should be disturbed and it may affect water draining. • If water can not be drained out smoothly, the dishwasher operation will hear a water draining noise. 4) Let the water drain out for approximately 30 seconds and shut off the unit power. 5) If...
... the drain hose is bent or shrunken, it may stop in the middle of blockage near the drain. English Water Draining Problem: • Check the level of the drain hose.The drain hose should be disturbed and it may affect water draining. • If water can not be drained out smoothly, the dishwasher operation will hear a water draining noise. 4) Let the water drain out for approximately 30 seconds and shut off the unit power. 5) If...
User Manual
Page 27
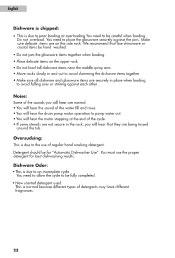
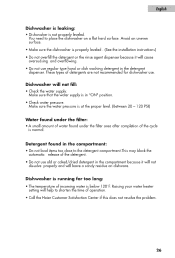
... caked/dried detergent in the compartment: • Do not load items too close to the detergent compartment.This may block the automatic release of operation. • Call the Haier Customer Satisfaction Center if this does not resolve the problem. 26 You need to shorten the time of the detergent. • Do not use . Make sure that the water supply is not properly leveled. Raising your water heater setting...
... caked/dried detergent in the compartment: • Do not load items too close to the detergent compartment.This may block the automatic release of operation. • Call the Haier Customer Satisfaction Center if this does not resolve the problem. 26 You need to shorten the time of the detergent. • Do not use . Make sure that the water supply is not properly leveled. Raising your water heater setting...
User Manual
Page 28
... by this warranty. Haier America New York, NY 10018 27 All service must be performed by a Haier authorized service center. This warranty covers appliances within the continental United States, Puerto Rico and Canada. Any service charges not specifically identified as normal such as identified in the owners manual. Damage caused by improper installation or maintenance. Lifetime (Parts Only) Stainless Steel Tub and Door Liner Provide a replacement tub or door liner...
... by this warranty. Haier America New York, NY 10018 27 All service must be performed by a Haier authorized service center. This warranty covers appliances within the continental United States, Puerto Rico and Canada. Any service charges not specifically identified as normal such as identified in the owners manual. Damage caused by improper installation or maintenance. Lifetime (Parts Only) Stainless Steel Tub and Door Liner Provide a replacement tub or door liner...

