User Manual
Page 3
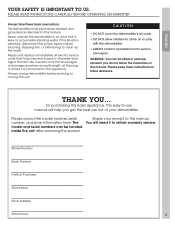
Repair and replace immediately all electric service cords that is connected to this manual. Please record the model number, serial number, and store information here. Staple your dehumidifier. You will help you do not follow the instructions in this Haier appliance. THANK YOU... ... Model Number Serial Number Date of your receipt to the appliance...
Repair and replace immediately all electric service cords that is connected to this manual. Please record the model number, serial number, and store information here. Staple your dehumidifier. You will help you do not follow the instructions in this Haier appliance. THANK YOU... ... Model Number Serial Number Date of your receipt to the appliance...

User Manual
Page 4
BEFORE USING YOUR DEHUMIDIFIER Please read this manual carefully. Call a qualified electrician if you do not understand the grounding instructions, or if you use, maintain, and get the most 2-prong outlets are not sure if the dehumidifier is required to reach the nearest wall receptacle, use only a UL-listed, 3-...prong of an electric shock, injury, fire, or death. Be absolutely certain that the outlet is properly grounded. DO NOT USE the dehumidifier until a proper ground has been made where local codes permit if the 2-prong wall outlet is grounded through the house wiring. ONLY ...
BEFORE USING YOUR DEHUMIDIFIER Please read this manual carefully. Call a qualified electrician if you do not understand the grounding instructions, or if you use, maintain, and get the most 2-prong outlets are not sure if the dehumidifier is required to reach the nearest wall receptacle, use only a UL-listed, 3-...prong of an electric shock, injury, fire, or death. Be absolutely certain that the outlet is properly grounded. DO NOT USE the dehumidifier until a proper ground has been made where local codes permit if the 2-prong wall outlet is grounded through the house wiring. ONLY ...
User Manual
Page 6
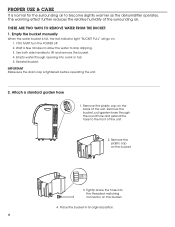
.... Place the bucket in its original position. 6 Wait a few minutes to allow the water to become slightly warmer as the dehumidifier operates. Remove the plastic cap on the bucket. 3. Empty the bucket manually When the water bucket is full, the red indicator light "BUCKET FULL" will go on the bucket. 4. This warming...
.... Place the bucket in its original position. 6 Wait a few minutes to allow the water to become slightly warmer as the dehumidifier operates. Remove the plastic cap on the bucket. 3. Empty the bucket manually When the water bucket is full, the red indicator light "BUCKET FULL" will go on the bucket. 4. This warming...
User Manual
Page 7
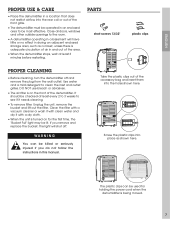
...first time, the "Bucket Full" light may be checked at least 3 minutes before restarting. Use water and a mild detergent to the room. • A dehumidifier operating in an enclosed area to see if it with a dry cloth. • When the unit is being moved. 7 Clean the filter with a vacuum cleaner...lit. DO NOT use bleach or abrasives. • The air filter is adequate circulation of air in this manual. If you do not follow the instructions in and out of the dehumidifier. Screw the plastic clips into the holes shown here. Close all doors, windows and other outside openings to...
...first time, the "Bucket Full" light may be checked at least 3 minutes before restarting. Use water and a mild detergent to the room. • A dehumidifier operating in an enclosed area to see if it with a dry cloth. • When the unit is being moved. 7 Clean the filter with a vacuum cleaner...lit. DO NOT use bleach or abrasives. • The air filter is adequate circulation of air in this manual. If you do not follow the instructions in and out of the dehumidifier. Screw the plastic clips into the holes shown here. Close all doors, windows and other outside openings to...


