User Manual
Page 3
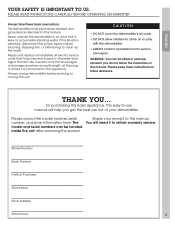
..., or attempting to clean up the water. Model Number Serial Number Date of your receipt to the appliance. DO NOT use a power cord that is connected to this manual. THANK YOU... ... CAUTION • DO NOT cover the dehumidifier's air vents. • DO NOT allow children to accumulate standing water. Never operate this manual. Please keep these basic precautions: This dehumidifier must be properly installed and grounded as...
..., or attempting to clean up the water. Model Number Serial Number Date of your receipt to the appliance. DO NOT use a power cord that is connected to this manual. THANK YOU... ... CAUTION • DO NOT cover the dehumidifier's air vents. • DO NOT allow children to accumulate standing water. Never operate this manual. Please keep these basic precautions: This dehumidifier must be properly installed and grounded as...

User Manual
Page 4
... advise against using the outlet cover screw to secure the ground terminal to have it replaced with a grounding wire and a grounded 3-prong plug. This dehumidifier has a power cord with a properly grounded outlet. FOR SAFETY REASONS, make sure the larger prong of electric shock by using an adapter plug. Power Supply Cord Wiring Requirements 115 Volt (103.5 min. - 126.5 max) 15 amp time-delay fuse or circuit breaker Adapter plug is...
... advise against using the outlet cover screw to secure the ground terminal to have it replaced with a grounding wire and a grounded 3-prong plug. This dehumidifier has a power cord with a properly grounded outlet. FOR SAFETY REASONS, make sure the larger prong of electric shock by using an adapter plug. Power Supply Cord Wiring Requirements 115 Volt (103.5 min. - 126.5 max) 15 amp time-delay fuse or circuit breaker Adapter plug is...
User Manual
Page 5
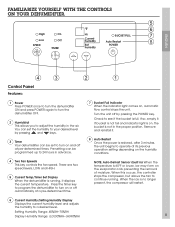
..., LOW and HIGH. 5 Current Temp/Timer Set Display When the dehumidifier is on the humidity conditions. When this occurs, the controller stops the compressor, but allows the fan to a desired level. Current humidity Set humidity BUCKET FULL Auto Restart POWER ENGLISH Control Panel Features: 1 Power Press POWER once to turn the dehumidifier ON and press POWER again to turn on , automatic flow control stops the unit. Press the timer key to program the...
..., LOW and HIGH. 5 Current Temp/Timer Set Display When the dehumidifier is on the humidity conditions. When this occurs, the controller stops the compressor, but allows the fan to a desired level. Current humidity Set humidity BUCKET FULL Auto Restart POWER ENGLISH Control Panel Features: 1 Power Press POWER once to turn the dehumidifier ON and press POWER again to turn on , automatic flow control stops the unit. Press the timer key to program the...
User Manual
Page 6
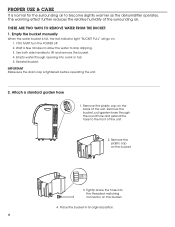
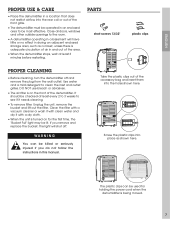
... water to become slightly warmer as the dehumidifier operates. IMPORTANT Make sure the drain cap is full, the red indicator light "BUCKET FULL" will go on the bucket. 4. Attach a standard garden hose 1. Remove the plastic cap on the bucket. 3. PROPER USE & CARE It is normal for the surrounding air to stop dripping. 3. Tightly screw the hose into a sink or tub. 5. Remove...
... water to become slightly warmer as the dehumidifier operates. IMPORTANT Make sure the drain cap is full, the red indicator light "BUCKET FULL" will go on the bucket. 4. Attach a standard garden hose 1. Remove the plastic cap on the bucket. 3. PROPER USE & CARE It is normal for the surrounding air to stop dripping. 3. Tightly screw the hose into a sink or tub. 5. Remove...
User Manual
Page 7
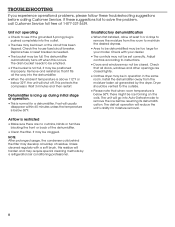
DO NOT use bleach or abrasives. • The air filter is on for holding the power cord when the dehumidifier is being moved. 7 Close all doors, windows and other outside openings to the room. • A dehumidifier operating in a basement will shut off and remove the plug from the wall outlet. PARTS short screws 13/32" plastic clips PROPER CLEANING • Before cleaning, turn the dehumidifier off . It...
DO NOT use bleach or abrasives. • The air filter is on for holding the power cord when the dehumidifier is being moved. 7 Close all doors, windows and other outside openings to the room. • A dehumidifier operating in a basement will shut off and remove the plug from the wall outlet. PARTS short screws 13/32" plastic clips PROPER CLEANING • Before cleaning, turn the dehumidifier off . It...
User Manual
Page 8
... controls may be ice forming on the coils. Unsatisfactory dehumidification • When first installed, allow at 1-877-337-3639. Install the dehumidifier away from the room to maintain the desired dryness. • Area to remove the ice before calling Customer Service. Airflow is normal for moisture removal. NOTE: After prolonged usage, the condenser coils behind the filter may be set correctly. Replace fuse or reset breaker as needed...
... controls may be ice forming on the coils. Unsatisfactory dehumidification • When first installed, allow at 1-877-337-3639. Install the dehumidifier away from the room to maintain the desired dryness. • Area to remove the ice before calling Customer Service. Airflow is normal for moisture removal. NOTE: After prolonged usage, the condenser coils behind the filter may be set correctly. Replace fuse or reset breaker as needed...
User Manual
Page 9
... and workmanship for home use, and includes the parts and labor required to repair or replace defective parts. New York, NY 10018 For toll-free service call 1-877-337-3639. 9 LIMITED FIVE-YEAR WARRANTY For an additional four-year period (beyond the first year of general coverage) the warrantor will repair or replace at its option any part of the refrigeration system (i.e., COMPRESSOR, EVAPORATOR, CONDENSER OR CONNECTING TUBE...
... and workmanship for home use, and includes the parts and labor required to repair or replace defective parts. New York, NY 10018 For toll-free service call 1-877-337-3639. 9 LIMITED FIVE-YEAR WARRANTY For an additional four-year period (beyond the first year of general coverage) the warrantor will repair or replace at its option any part of the refrigeration system (i.e., COMPRESSOR, EVAPORATOR, CONDENSER OR CONNECTING TUBE...


