Product Manual
Page 3
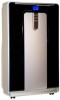
... if there are cracks or abrasion damage along the length, plug connector or if the unit malfunctions or is frayed or otherwise damaged. The exhaust hose should be free of any manner. IF you do not have a three-prong electric receptacle outlet in the wall, have a certified electrician install the proper...
... if there are cracks or abrasion damage along the length, plug connector or if the unit malfunctions or is frayed or otherwise damaged. The exhaust hose should be free of any manner. IF you do not have a three-prong electric receptacle outlet in the wall, have a certified electrician install the proper...
Product Manual
Page 5
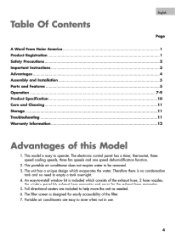
...unit has a unique design which consists of the exhaust hose, 2 hose nozzles, the window panel kit, exhaust hose connector and cover for easily accessibility of this Model 1. This model is designed for the exhaust hose connector. 5. Full directional casters are easy to empty a... tank overnight. 4. Portable air conditioners are included to be removed. 3. b. Table Of Contents A Word From Haier America Product Registration Safety Precautions Important Instructions ...
...unit has a unique design which consists of the exhaust hose, 2 hose nozzles, the window panel kit, exhaust hose connector and cover for easily accessibility of this Model 1. This model is designed for the exhaust hose connector. 5. Full directional casters are easy to empty a... tank overnight. 4. Portable air conditioners are included to be removed. 3. b. Table Of Contents A Word From Haier America Product Registration Safety Precautions Important Instructions ...
Product Manual
Page 6
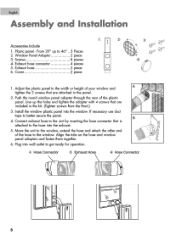
...panel. 4. Plug into wall outlet to the hose into the window. Line up to the panel. 2. Connect exhaust hose to the unit by inserting the hose connector that is attached to get ready for operation. (4: Hose Connector rt. Exhaust Hose Hose Connector If Ii 5 Window Panel Adaptor 3. ... the holes and tighten the adapter with 4 screws that are included in the kit. (Tighten screws from the front.) 3. Exhaust hose 6. Align the tabs on the hose and window panel adapters and fasten them together. 6. Screws 2 piece 8 pieces 5 4. Install the window plastic panel into the ...
...panel. 4. Plug into wall outlet to the hose into the window. Line up to the panel. 2. Connect exhaust hose to the unit by inserting the hose connector that is attached to get ready for operation. (4: Hose Connector rt. Exhaust Hose Hose Connector If Ii 5 Window Panel Adaptor 3. ... the holes and tighten the adapter with 4 screws that are included in the kit. (Tighten screws from the front.) 3. Exhaust hose 6. Align the tabs on the hose and window panel adapters and fasten them together. 6. Screws 2 piece 8 pieces 5 4. Install the window plastic panel into the ...

Product Manual
Page 7
Parts and Features 1. Built-in cable storage 10. RESET AFTER SOLVING THE PROBLEM, PRESS THE RESET BUTTON TO RESUME OPERATION. Air outlet hose 7. Casters 8. Handle hole 4. inY 1 0 • 11 Enghih 6 Air outlet 2. Control panel 3. Power supply cord Front es\ 7 Rear POWER SUPPLY CORD cs 1W t TEST: WHEN THIS BUTTON IS PRESSED OR WHEN THERE IS A CURRENT LEAK, THE UNIT WILL NOT OPERATE. Air inlet 6. Air filter 9. Water outlet drain 11. Remote control storage facility 5.
Parts and Features 1. Built-in cable storage 10. RESET AFTER SOLVING THE PROBLEM, PRESS THE RESET BUTTON TO RESUME OPERATION. Air outlet hose 7. Casters 8. Handle hole 4. inY 1 0 • 11 Enghih 6 Air outlet 2. Control panel 3. Power supply cord Front es\ 7 Rear POWER SUPPLY CORD cs 1W t TEST: WHEN THIS BUTTON IS PRESSED OR WHEN THERE IS A CURRENT LEAK, THE UNIT WILL NOT OPERATE. Air inlet 6. Air filter 9. Water outlet drain 11. Remote control storage facility 5.
Product Manual
Page 11
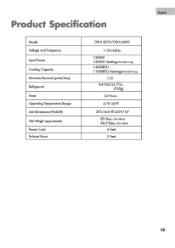
Product Specification Model Voltage and Frequency Input Power Cooling Capacity Moisture Removal (pints/day) Refrigerant Timer Operating Temperature Range Unit Dimensions (WxDxH) Net Weight approximate Power Cord Exhaust Hose CPN14XC9/CPN14XH9 115V/60Hz 1300W 1250W HeatingoNiA03-19 O4/1 14000BTU 11000BTU Heatmcgatlions,aim 110 R-410A/24.7Oz (700g) 24 Hours 61°F-100°F 20"x165/8"x33-9/16" 83 lbSIF« CPN14)(C9i 84.5 lbS{For CPN14XH9I 6 Feet 5 Feet English 10
Product Specification Model Voltage and Frequency Input Power Cooling Capacity Moisture Removal (pints/day) Refrigerant Timer Operating Temperature Range Unit Dimensions (WxDxH) Net Weight approximate Power Cord Exhaust Hose CPN14XC9/CPN14XH9 115V/60Hz 1300W 1250W HeatingoNiA03-19 O4/1 14000BTU 11000BTU Heatmcgatlions,aim 110 R-410A/24.7Oz (700g) 24 Hours 61°F-100°F 20"x165/8"x33-9/16" 83 lbSIF« CPN14)(C9i 84.5 lbS{For CPN14XH9I 6 Feet 5 Feet English 10
Product Manual
Page 12
... time, drain condensed water using the drain pipe. The plug may take a little longer to remove excess heat. • Check exhaust hose for proper installation. • Redirect the airflow. Remove exhaust hose, clean the filters, cover with a soft cloth. Use an exhaust fan to cool. • Drain the water drain pipe by...
... time, drain condensed water using the drain pipe. The plug may take a little longer to remove excess heat. • Check exhaust hose for proper installation. • Redirect the airflow. Remove exhaust hose, clean the filters, cover with a soft cloth. Use an exhaust fan to cool. • Drain the water drain pipe by...


