Product Manual
Page 2
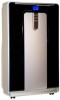
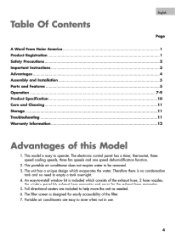
... for buying a dependable, energy saving and easy-to this guide and keep for you with the ultimate level of Purchase- Also, do not forget to provide you to maintain, operate, install and safely use your room to fill out and mail the Product Registration Card. Please read instructions carefully before using the product. Model and serial number can be needed: Model Number Serial Number: Date of comfort. This manual contains useful...
... for buying a dependable, energy saving and easy-to this guide and keep for you with the ultimate level of Purchase- Also, do not forget to provide you to maintain, operate, install and safely use your room to fill out and mail the Product Registration Card. Please read instructions carefully before using the product. Model and serial number can be needed: Model Number Serial Number: Date of comfort. This manual contains useful...
Product Manual
Page 3
... not operate air conditioner if power cord is oily or sulphurous. The exhaust hose should be ensured to reduce the risk of shock and fire. English SAFETY PRECAUTIONS WARNING: Following these basic precautions will reduce the risk of fire, electrical A shock, injury or death when using it . 7) Do not install or use the air conditioner near a bathtub, shower or wash basin. SAVE THESE INSTRUCTIONS...
... not operate air conditioner if power cord is oily or sulphurous. The exhaust hose should be ensured to reduce the risk of shock and fire. English SAFETY PRECAUTIONS WARNING: Following these basic precautions will reduce the risk of fire, electrical A shock, injury or death when using it . 7) Do not install or use the air conditioner near a bathtub, shower or wash basin. SAVE THESE INSTRUCTIONS...
Product Manual
Page 4
English Important Instructions • Please keep this manual in a safe place. • Do not use liquid or a spray to clean this manual carefully before operating and store for purchasing our Commercial Cool product. Model number Serial number Date of the back cover may damage the electrical circuit and affect its performance. Unsupervised dismantling and incorrect reassembly of the inside and disable them or cause them to function improperly...
English Important Instructions • Please keep this manual in a safe place. • Do not use liquid or a spray to clean this manual carefully before operating and store for purchasing our Commercial Cool product. Model number Serial number Date of the back cover may damage the electrical circuit and affect its performance. Unsupervised dismantling and incorrect reassembly of the inside and disable them or cause them to function improperly...
Product Manual
Page 5
This portable air conditioner does not require water to store when not in use. 4 Portable air conditioners are included to -install window kit is easy to empty a tank overnight. 4. The electronic control panel has a timer, thermostat, three speed cooling speeds, three fan speeds and one speed dehumidification function. 2. The filter screen is no condensation tank and no need to operate. The unit has a unique design which consists of the exhaust hose, 2 hose nozzles, the window panel kit, exhaust hose connector and cover for...
This portable air conditioner does not require water to store when not in use. 4 Portable air conditioners are included to -install window kit is easy to empty a tank overnight. 4. The electronic control panel has a timer, thermostat, three speed cooling speeds, three fan speeds and one speed dehumidification function. 2. The filter screen is no condensation tank and no need to operate. The unit has a unique design which consists of the exhaust hose, 2 hose nozzles, the window panel kit, exhaust hose connector and cover for...
Product Manual
Page 6
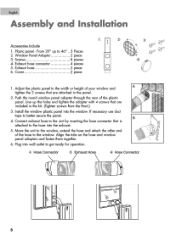
... in the kit. (Tighten screws from the front.) 3. Exhaust hose 6. Connect exhaust hose to the unit by inserting the hose connector that are attached to 46" 3 Pieces 2. Line up to the panel. 2. Plastic panel - Window Panel Adaptor 3. Align the tabs on the hose and window panel adapters and fasten them together. 6. Plug into the window. Install the window plastic panel into wall outlet to better secure the panel. 4. Push the round window panel adapter through...
... in the kit. (Tighten screws from the front.) 3. Exhaust hose 6. Connect exhaust hose to the unit by inserting the hose connector that are attached to 46" 3 Pieces 2. Line up to the panel. 2. Plastic panel - Window Panel Adaptor 3. Align the tabs on the hose and window panel adapters and fasten them together. 6. Plug into the window. Install the window plastic panel into wall outlet to better secure the panel. 4. Push the round window panel adapter through...

Product Manual
Page 7
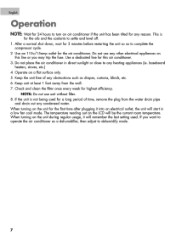
Air outlet 2. Air filter 9. Water outlet drain 11. Handle hole 4. RESET AFTER SOLVING THE PROBLEM, PRESS THE RESET BUTTON TO RESUME OPERATION. Casters 8. Power supply cord Front es\ 7 Rear POWER SUPPLY CORD cs 1W t TEST: WHEN THIS BUTTON IS PRESSED OR WHEN THERE IS A CURRENT LEAK, THE UNIT WILL NOT OPERATE. inY 1 0 • 11 Enghih 6 Air outlet hose 7. Built-in cable storage 10. Air inlet 6. Control panel 3. Remote control storage facility 5. Parts and Features 1.
Air outlet 2. Air filter 9. Water outlet drain 11. Handle hole 4. RESET AFTER SOLVING THE PROBLEM, PRESS THE RESET BUTTON TO RESUME OPERATION. Casters 8. Power supply cord Front es\ 7 Rear POWER SUPPLY CORD cs 1W t TEST: WHEN THIS BUTTON IS PRESSED OR WHEN THERE IS A CURRENT LEAK, THE UNIT WILL NOT OPERATE. inY 1 0 • 11 Enghih 6 Air outlet hose 7. Built-in cable storage 10. Air inlet 6. Control panel 3. Remote control storage facility 5. Parts and Features 1.
Product Manual
Page 8
... current room temperature. If the unit is for the oils and the coolants to any obstructions such as to turn on the unit during regular usage, it into an electrical outlet, the unit will remember the last setting used for a long period of time, remove the plug from the wall. 7. Keep the unit free of any heating appliances (ie. Do not place the air conditioner in a low fan cool mode. If...
... current room temperature. If the unit is for the oils and the coolants to any obstructions such as to turn on the unit during regular usage, it into an electrical outlet, the unit will remember the last setting used for a long period of time, remove the plug from the wall. 7. Keep the unit free of any heating appliances (ie. Do not place the air conditioner in a low fan cool mode. If...
Product Manual
Page 9
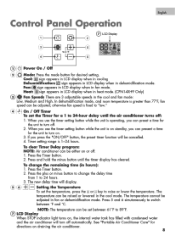
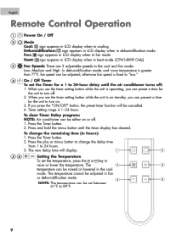
... 'C. Press 5 and 6 simutaneously to switch between 61°F to turn off automatically. C) LCD Display 5 1em38ir:EI" 0 ol Power On / Off 7() Mode: Press the mode button for the unit to 89T. 0 LCD Display When STOP indicator light turns on, the internal water tank has filled with condensed water and the air conditioner will display. ( (6) - Heat Te. Press the Timer button. 2. English Control Panel Operation Da 0 t T 4 1-.-4/0- Press the Timer button. 2. Setting the Temperature To set the Timer for directions on or off : 1. NOTE...
... 'C. Press 5 and 6 simutaneously to switch between 61°F to turn off automatically. C) LCD Display 5 1em38ir:EI" 0 ol Power On / Off 7() Mode: Press the mode button for the unit to 89T. 0 LCD Display When STOP indicator light turns on, the internal water tank has filled with condensed water and the air conditioner will display. ( (6) - Heat Te. Press the Timer button. 2. English Control Panel Operation Da 0 t T 4 1-.-4/0- Press the Timer button. 2. Setting the Temperature To set the Timer for directions on or off : 1. NOTE...
Product Manual
Page 10
... Timer button. 2. English Remote Control Operation 0 I .J. Press the plus or minus button to 897. 9 In dehumidification mode, and room temperature is on . 3. Timer setting range is fixed to turn off. 2. Fan:* sign appears in LCD display when in the cool and fan mode: Low, Medium and High. When you use the timer setting button while the unit is operating, you can preset a time for the unit to "low." The Q temperature can be adjusted in the cool mode. Heat...
... Timer button. 2. English Remote Control Operation 0 I .J. Press the plus or minus button to 897. 9 In dehumidification mode, and room temperature is on . 3. Timer setting range is fixed to turn off. 2. Fan:* sign appears in LCD display when in the cool and fan mode: Low, Medium and High. When you use the timer setting button while the unit is operating, you can preset a time for the unit to "low." The Q temperature can be adjusted in the cool mode. Heat...
Product Manual
Page 11
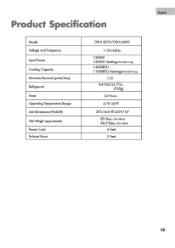
Product Specification Model Voltage and Frequency Input Power Cooling Capacity Moisture Removal (pints/day) Refrigerant Timer Operating Temperature Range Unit Dimensions (WxDxH) Net Weight approximate Power Cord Exhaust Hose CPN14XC9/CPN14XH9 115V/60Hz 1300W 1250W HeatingoNiA03-19 O4/1 14000BTU 11000BTU Heatmcgatlions,aim 110 R-410A/24.7Oz (700g) 24 Hours 61°F-100°F 20"x165/8"x33-9/16" 83 lbSIF« CPN14)(C9i 84.5 lbS{For CPN14XH9I 6 Feet 5 Feet English 10
Product Specification Model Voltage and Frequency Input Power Cooling Capacity Moisture Removal (pints/day) Refrigerant Timer Operating Temperature Range Unit Dimensions (WxDxH) Net Weight approximate Power Cord Exhaust Hose CPN14XC9/CPN14XH9 115V/60Hz 1300W 1250W HeatingoNiA03-19 O4/1 14000BTU 11000BTU Heatmcgatlions,aim 110 R-410A/24.7Oz (700g) 24 Hours 61°F-100°F 20"x165/8"x33-9/16" 83 lbSIF« CPN14)(C9i 84.5 lbS{For CPN14XH9I 6 Feet 5 Feet English 10
Product Manual
Page 12
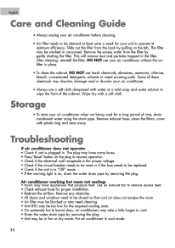
... of time, drain condensed water using the drain pipe. The plug may have come loose. • Press "Reset" button on the plug to resume operation. • Check if the electrical wall receptacle is the proper voltage. • Check if the circuit breaker needs to be reset or if the fuse needs to be replaced. • Check if the unit is in fan or dry mode. Remove any obstacles. • All doors and windows need cleaning. • Unit BTU may dissolve, damage...
... of time, drain condensed water using the drain pipe. The plug may have come loose. • Press "Reset" button on the plug to resume operation. • Check if the electrical wall receptacle is the proper voltage. • Check if the circuit breaker needs to be reset or if the fuse needs to be replaced. • Check if the unit is in fan or dry mode. Remove any obstacles. • All doors and windows need cleaning. • Unit BTU may dissolve, damage...
Product Manual
Page 13
... maintenance. Haier America will repair or replace (excluding labor costs) the sealed system and compressor (parts only) for a period of 5 years, from misuse, abuse, accident, alteration, lack of purchase. Hai& America will repair or replace in your home, any mechanical, electrical part or the compressor, which vary from service, by an authorized Hoist- The remedy provided in this product. IN LIEU OF ALL OTHER WARRANTIES...
... maintenance. Haier America will repair or replace (excluding labor costs) the sealed system and compressor (parts only) for a period of 5 years, from misuse, abuse, accident, alteration, lack of purchase. Hai& America will repair or replace in your home, any mechanical, electrical part or the compressor, which vary from service, by an authorized Hoist- The remedy provided in this product. IN LIEU OF ALL OTHER WARRANTIES...


