Use and Care Manual
Page 3
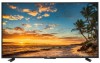
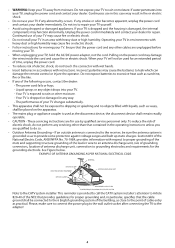
... comply with the same or equivalent type. Energy Star - Replace only with the emission limits. 3. These limits are present inside the TV. The manufacturer is intended to alert the user to radio or television reception, which can radiate radio frequency energy, and if not installed and used in the factory default setting and this equipment does cause harmful interference...
... comply with the same or equivalent type. Energy Star - Replace only with the emission limits. 3. These limits are present inside the TV. The manufacturer is intended to alert the user to radio or television reception, which can radiate radio frequency energy, and if not installed and used in the factory default setting and this equipment does cause harmful interference...
Use and Care Manual
Page 4
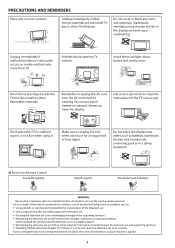
... injuries, particularty to a suitable support. - Z ''' Do not place the display near water, such as bathtub, washbasin, kitchen sink, laundry tub, swimming pool or in a box when using furniture that may be applied. 2 Using cabinets or stands recommended by taking simple precautions such as above should be located between the television set . - Not placing the television set on tall furniture (for example...
... injuries, particularty to a suitable support. - Z ''' Do not place the display near water, such as bathtub, washbasin, kitchen sink, laundry tub, swimming pool or in a box when using furniture that may be applied. 2 Using cabinets or stands recommended by taking simple precautions such as above should be located between the television set . - Not placing the television set on tall furniture (for example...
Use and Care Manual
Page 5
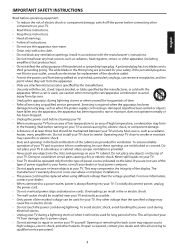
... wall socket should be sure these instructions. • Heed all warnings. • Follow all instructions. • Do not use attachments/accessories specified by the manufacturer. • Use only with the cart, stand, tripod, bracket, or table ...INSTRUCTIONS Read before operating equipment. • To reduce the risk of electric shock or component damage, switch off the power before connecting other hazards. Doing so could short circuit parts causing a fire or electric shock. Opening or removing the back cover may compromise the integrity of the display. A polarized plug...
... wall socket should be sure these instructions. • Heed all warnings. • Follow all instructions. • Do not use attachments/accessories specified by the manufacturer. • Use only with the cart, stand, tripod, bracket, or table ...INSTRUCTIONS Read before operating equipment. • To reduce the risk of electric shock or component damage, switch off the power before connecting other hazards. Doing so could short circuit parts causing a fire or electric shock. Opening or removing the back cover may compromise the integrity of the display. A polarized plug...
Use and Care Manual
Page 6
... the 6 English grounding system of the building, as close to rain or moisture. When your TV. - Liquid sprays or any abnormality occurs. Please, make sure to connect the power plug to the wall outlet socket after connecting the TV to the receiver, be used as practical. Unplug the power cord immediately and contact your TV away from moisture. Do not...
... the 6 English grounding system of the building, as close to rain or moisture. When your TV. - Liquid sprays or any abnormality occurs. Please, make sure to connect the power plug to the wall outlet socket after connecting the TV to the receiver, be used as practical. Unplug the power cord immediately and contact your TV away from moisture. Do not...
Use and Care Manual
Page 8
... YOUR LCD TV FOR WALL MOUNTING 7 TURNING ON THE TV 7 PERIPHERAL CONNECTION AND CONTROLS 8 PERIPHERAL CONNECTION 8 SIDE CONTROL 8 MAKING CONNECTIONS 9 CONNECTING TO AN ANTENNA/CABLE WALL JACK 9 CONNECTING EXTERNAL AUDIO/VIDEO DEVICE 9 CONNECTING HEADPHONES 9 CONNECTING DIGITAL AUDIO DEVICE 9 OPERATING INSTRUCTIONS 10 USING THE REMOTE CONTROL 10 INITIAL SETUP 11 INPUT SOURCE 11 NAVIGATING THE ON-SCREEN MENU 11 PICTURE 12 AUDIO 12 CHANNEL 13 SETUP 13 LOCK 14 MEDIA 16 TIPS 17 LEGAL NOTICES 17 PRODUCT SPECIFICATION 18 TROUBLESHOOTING 19 WARRANTY 20...
... YOUR LCD TV FOR WALL MOUNTING 7 TURNING ON THE TV 7 PERIPHERAL CONNECTION AND CONTROLS 8 PERIPHERAL CONNECTION 8 SIDE CONTROL 8 MAKING CONNECTIONS 9 CONNECTING TO AN ANTENNA/CABLE WALL JACK 9 CONNECTING EXTERNAL AUDIO/VIDEO DEVICE 9 CONNECTING HEADPHONES 9 CONNECTING DIGITAL AUDIO DEVICE 9 OPERATING INSTRUCTIONS 10 USING THE REMOTE CONTROL 10 INITIAL SETUP 11 INPUT SOURCE 11 NAVIGATING THE ON-SCREEN MENU 11 PICTURE 12 AUDIO 12 CHANNEL 13 SETUP 13 LOCK 14 MEDIA 16 TIPS 17 LEGAL NOTICES 17 PRODUCT SPECIFICATION 18 TROUBLESHOOTING 19 WARRANTY 20...
Use and Care Manual
Page 9
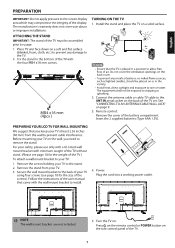
... 9. 3. Remote control: Remove the cover of the TV with the wall mount bracket to install. 4. Remove the screws holding your safety, please use only with a UL listed wall mount bracket with minimum weight of the TV without stand. (Please see page 18 for the weight of the TV set. Power: Plug the cord into a working power outlet. • NOTE The wall mount bracket are not included. 5. See "CONNECTING TO AN ANTENNA/CABLE WALL JACK" on a solid surface. PREPARING YOUR LCD TV...
... 9. 3. Remote control: Remove the cover of the TV with the wall mount bracket to install. 4. Remove the screws holding your safety, please use only with a UL listed wall mount bracket with minimum weight of the TV without stand. (Please see page 18 for the weight of the TV set. Power: Plug the cord into a working power outlet. • NOTE The wall mount bracket are not included. 5. See "CONNECTING TO AN ANTENNA/CABLE WALL JACK" on a solid surface. PREPARING YOUR LCD TV...
Use and Care Manual
Page 10
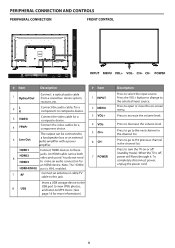
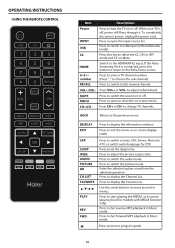
...+ button to change to decrease the volume level. POWER Item escri . Press to the selected input source. Press to go to the previous channel in the channel list. CH+ CH- tion 1 Optical Out Connect a optical audio cable from a sound bar, stereo system, receiver, etc. 2L R Connect the audio cables for a component or composite device. 3 VIDEO 4 YPbPr Connect the video cable for more information.) 1 INPUT 2 MENU 3 VOL+ 4 VOL5 CH+ 6 CH- 7 POWER Press to the next channel in the channel list. HDMI1 Connect HDMI...
...+ button to change to decrease the volume level. POWER Item escri . Press to the selected input source. Press to go to the previous channel in the channel list. CH+ CH- tion 1 Optical Out Connect a optical audio cable from a sound bar, stereo system, receiver, etc. 2L R Connect the audio cables for a component or composite device. 3 VIDEO 4 YPbPr Connect the video cable for more information.) 1 INPUT 2 MENU 3 VOL+ 4 VOL5 CH+ 6 CH- 7 POWER Press to the next channel in the channel list. HDMI1 Connect HDMI...
Use and Care Manual
Page 11
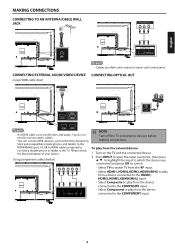
... the external device: 1. Turn on the TV and the connected device. 2. Using component cables (better) 00 000 -• e ,• 0 L 0 R 0 0 VIDEO/Y Pb 0 Pr 0 OPTICAL OUT • a NOTE Turn off the TV and external devices before making connections. MAKING CONNECTIONS CONNECTING TO AN ANTENNA/CABLE WALL JACK 3 COMPOSITE OUT C) • RF 4- HDMI1 HDMI2 • An HDMI cable carries both video and audio. A USB to HDMI cable is required to connect a mobile phone or tablet to the COMPONENT input. 9
... the external device: 1. Turn on the TV and the connected device. 2. Using component cables (better) 00 000 -• e ,• 0 L 0 R 0 0 VIDEO/Y Pb 0 Pr 0 OPTICAL OUT • a NOTE Turn off the TV and external devices before making connections. MAKING CONNECTIONS CONNECTING TO AN ANTENNA/CABLE WALL JACK 3 COMPOSITE OUT C) • RF 4- HDMI1 HDMI2 • An HDMI cable carries both video and audio. A USB to HDMI cable is required to connect a mobile phone or tablet to the COMPONENT input. 9
Use and Care Manual
Page 12
... VOL- Press CH+ or CH- OPERATING INSTRUCTIONS USING THE REMOTE CONTROL ......--_-. to exit the menu or on Mute. to USB input (USB multimedia mode). Press to switch to change TV channels. Press to start playing the MEDIA, or to adjust the picture aspect ratio. Press to pause playing.(Used for DTV. CC Press this button to return to the Roku home screen. 0-9 /• number Press to switch the audio mode. Press to select the CC...
... VOL- Press CH+ or CH- OPERATING INSTRUCTIONS USING THE REMOTE CONTROL ......--_-. to exit the menu or on Mute. to USB input (USB multimedia mode). Press to switch to change TV channels. Press to start playing the MEDIA, or to adjust the picture aspect ratio. Press to pause playing.(Used for DTV. CC Press this button to return to the Roku home screen. 0-9 /• number Press to switch the audio mode. Press to select the CC...
Use and Care Manual
Page 13
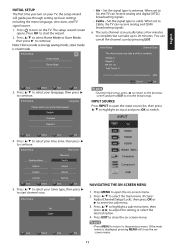
... antenna. Initial Setup Channel Scan The channel scan may take up basic settings including the menu language, time zone, and TV signal source. 1. If the main menu is vivid mode. screen menu. 11 Set the signal type to continue. Set the signal type to start channel scan. Analog: 0 Digital: 0 RF CH: 30 Total Found: 0 Exit 3. INITIAL SETUP The first time you through setting up to turn on -screen menu. 2. Note: Home mode is energy saving mode, store mode is displayed, pressing MENU will guide you turn on -screen menu. When set...
... antenna. Initial Setup Channel Scan The channel scan may take up basic settings including the menu language, time zone, and TV signal source. 1. If the main menu is vivid mode. screen menu. 11 Set the signal type to continue. Set the signal type to start channel scan. Analog: 0 Digital: 0 RF CH: 30 Total Found: 0 Exit 3. INITIAL SETUP The first time you through setting up to turn on -screen menu. 2. Note: Home mode is energy saving mode, store mode is displayed, pressing MENU will guide you turn on -screen menu. When set...
Use and Care Manual
Page 14
... sound. Picture settings such as brightness, contrast, and color are lowered. • User - Brightness - Adjust the high frequency sound. Activate or deactivate the surround sound function. Lock Sound Mode Balance Bass Treble Surround Sound Digital Audio Output Mode Audio Language Auto Volume Level Standard 0 50 50 off . • Raw - Adjust the volume to keep the volume level consistent when switching channels or when switching from a TV show to increase the green tones. Adjust the brightness of the light...
... sound. Picture settings such as brightness, contrast, and color are lowered. • User - Brightness - Adjust the high frequency sound. Activate or deactivate the surround sound function. Lock Sound Mode Balance Bass Treble Surround Sound Digital Audio Output Mode Audio Language Auto Volume Level Standard 0 50 50 off . • Raw - Adjust the volume to keep the volume level consistent when switching channels or when switching from a TV show to increase the green tones. Adjust the brightness of the light...
Use and Care Manual
Page 15
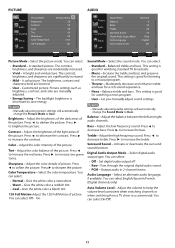
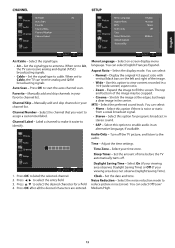
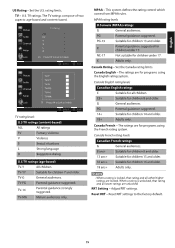
Picture Audio Channel Setup Lock Menu Language Aspect Ratio MTS Audio Only Time Noise Reduction Closed Caption Accessibility English Normal Mono Off Medium 0 Select la Exit n Select la Exit Air/Cable - Set the signal type to cable. Favorite - Channel Skip - Aspect Ratio - Display the original 4:3 aspect ratio with vertical black bars on -screen display menu language. Select the preferred sound track. You can select English/Francais/Espanol. Select this option to enable audio in stereo...
Picture Audio Channel Setup Lock Menu Language Aspect Ratio MTS Audio Only Time Noise Reduction Closed Caption Accessibility English Normal Mono Off Medium 0 Select la Exit n Select la Exit Air/Cable - Set the signal type to cable. Favorite - Channel Skip - Aspect Ratio - Display the original 4:3 aspect ratio with vertical black bars on -screen display menu language. Select the preferred sound track. You can select English/Francais/Espanol. Select this option to enable audio in stereo...
Use and Care Manual
Page 16
... 4-digit password. System Lock -Turn the US and Canada rating limits on the remote control to confirm. Press OK button to set a new 4-digit password. Select Low/Middle/High. 14 Analog CC - Select digital closed captioning mode. Select font size. FG Color - You can select Default/ White/Black/Red/Green/Blue/Yellow/Magenta/ Cyan. Use the number buttons on or off closed captioning settings. Confirm Password - Enter your new 4-digit password. Select On or Off. • Speed - You can select Default/Black/White/Red/Green/Blue...
... 4-digit password. System Lock -Turn the US and Canada rating limits on the remote control to confirm. Press OK button to set a new 4-digit password. Select Low/Middle/High. 14 Analog CC - Select digital closed captioning mode. Select font size. FG Color - You can select Default/ White/Black/Red/Green/Blue/Yellow/Magenta/ Cyan. Use the number buttons on or off closed captioning settings. Confirm Password - Enter your new 4-digit password. Select On or Off. • Speed - You can select Default/Black/White/Red/Green/Blue...
Use and Care Manual
Page 17
...Adjust RRT settings. TV ratings. Channel PE Setup r) Lock Rating ALL a Press OK to Lock or Unlock Canada Rating - Not suitable for children 8 and older. TVrating levels U.S TV ratings (content-based) ALL All ratings FV tasy V Violence S L Strong language d U.S TV ratings (age-based) TV-Y All children. TV-14 Parental guidance strongly suggested . Set... are locked. NOTE • When a rating is unlocked, that rating and all lower ratings are for programs using the French rating system. US Rating - Reset RRT settings to the factory default. 15
...Adjust RRT settings. TV ratings. Channel PE Setup r) Lock Rating ALL a Press OK to Lock or Unlock Canada Rating - Not suitable for children 8 and older. TVrating levels U.S TV ratings (content-based) ALL All ratings FV tasy V Violence S L Strong language d U.S TV ratings (age-based) TV-Y All children. TV-14 Parental guidance strongly suggested . Set... are locked. NOTE • When a rating is unlocked, that rating and all lower ratings are for programs using the French rating system. US Rating - Reset RRT settings to the factory default. 15
Use and Care Manual
Page 18
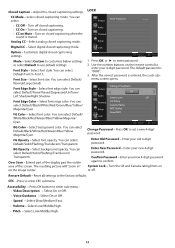
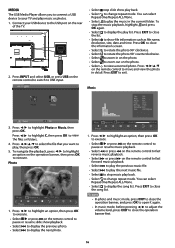
... mode, before pressing 4/► to adjust the volume level, press EXIT to your USB device to the USB port on the operation banner, then press OK to highlight an option on the rear of the TV. 1 O y 0 USB 0 0 2. MEDIA The USB Media Player allows you want to close the song list. To stop music play music or photos. 1. Press 4/► to highlight C, then press OK to display the play...
... mode, before pressing 4/► to adjust the volume level, press EXIT to your USB device to the USB port on the operation banner, then press OK to highlight an option on the rear of the TV. 1 O y 0 USB 0 0 2. MEDIA The USB Media Player allows you want to close the song list. To stop music play music or photos. 1. Press 4/► to highlight C, then press OK to display the play...
Use and Care Manual
Page 19
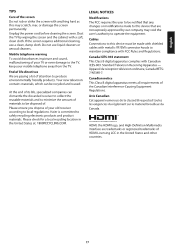
...-7. Do not use a clean, damp cloth. Please check for a local recycling location in picture and sound, malfunctioning of your TV or even damage to maintain compliance with a soft, clean cloth. Standard Television Receiving Apparatus - HOME HIGH-DEFINITION MULTIMEDIA INTERFACE HDMI, the HDMI logo, and High-Definition Multimedia Interface are not expressly approved by wiping the screen and the cabinet...
...-7. Do not use a clean, damp cloth. Please check for a local recycling location in picture and sound, malfunctioning of your TV or even damage to maintain compliance with a soft, clean cloth. Standard Television Receiving Apparatus - HOME HIGH-DEFINITION MULTIMEDIA INTERFACE HDMI, the HDMI logo, and High-Definition Multimedia Interface are not expressly approved by wiping the screen and the cabinet...
Use and Care Manual
Page 20
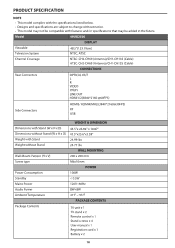
...-CH69 (Antenna)/CH1-CH135 (Cable) CONNECTIONS Rear Connectors OPTICAL OUT L R VIDEO YPbPr LINE OUT HDMI1/2(3840*2160 @60FPS) Side Connectors HDM13/ HDMI4(MHL)(3840*2160@30FPS) RF USB Dimensions with Stand (W x H x D) Dimensions without Stand (W x H x D) Weight with Stand Weight without notice. • This model may not be compatible with the specifications listed below. • Designs and specifications are subject to change without Stand Wall Mount Pattern (H x V) Screw type Power Consumption Standby Mains Power Audio Power Ambient Temperature Package Contents WEIGHT & DIMENSION 43...
...-CH69 (Antenna)/CH1-CH135 (Cable) CONNECTIONS Rear Connectors OPTICAL OUT L R VIDEO YPbPr LINE OUT HDMI1/2(3840*2160 @60FPS) Side Connectors HDM13/ HDMI4(MHL)(3840*2160@30FPS) RF USB Dimensions with Stand (W x H x D) Dimensions without Stand (W x H x D) Weight with Stand Weight without notice. • This model may not be compatible with the specifications listed below. • Designs and specifications are subject to change without Stand Wall Mount Pattern (H x V) Screw type Power Consumption Standby Mains Power Audio Power Ambient Temperature Package Contents WEIGHT & DIMENSION 43...

Use and Care Manual
Page 21
... to your warranty. Try another channel. • Adjust the contrast and brightness settings. • Check the Closed Captions control. Replace if necessary. • Clean the remote control sensor lens on the TV. • You can still use the buttons on the TV again. • Check antenna connections at the same time. Using a highly directional antenna may not display correctly. Switch off . • Adjust the contrast, color and brightness settings. • Poor picture quality may...
... to your warranty. Try another channel. • Adjust the contrast and brightness settings. • Check the Closed Captions control. Replace if necessary. • Clean the remote control sensor lens on the TV. • You can still use the buttons on the TV again. • Check antenna connections at the same time. Using a highly directional antenna may not display correctly. Switch off . • Adjust the contrast, color and brightness settings. • Poor picture quality may...
Use and Care Manual
Page 22
...). In no event shall Haier be granted to the authorized service center before warranty repairs are rendered. It does not apply to the additional excluded items set forth below : The warranty commences on how long an implied warranty lasts, so the above exclusion may be liable, or in any way responsible for 49UG2500 one year parts and labor. What...
...). In no event shall Haier be granted to the authorized service center before warranty repairs are rendered. It does not apply to the additional excluded items set forth below : The warranty commences on how long an implied warranty lasts, so the above exclusion may be liable, or in any way responsible for 49UG2500 one year parts and labor. What...
Use and Care Manual
Page 23
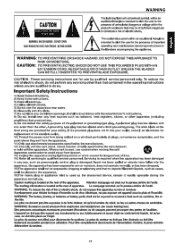
...of electric shock. CAUTION: These servicing instructions are provided for your outlet, consult an electrician for replacement of theobsolete outlet. 10) Protect the power cord from being walked on the apparatus. 16)The mains plug or appliance inlet is used as vases, shall be exposedto ... triargle is intended to alert the user to the presence of important operating and maintenance (servicing) instructions in accordance with the manufacturer's instructions. 8) Do not install near water. 6) Clean only with dry cloth. 7) Do not block any heat sources such as sunshine, fire or the...
...of electric shock. CAUTION: These servicing instructions are provided for your outlet, consult an electrician for replacement of theobsolete outlet. 10) Protect the power cord from being walked on the apparatus. 16)The mains plug or appliance inlet is used as vases, shall be exposedto ... triargle is intended to alert the user to the presence of important operating and maintenance (servicing) instructions in accordance with the manufacturer's instructions. 8) Do not install near water. 6) Clean only with dry cloth. 7) Do not block any heat sources such as sunshine, fire or the...


