User Manual
Page 4
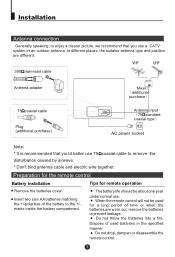
.... Insert two size AA batteries matching the +/-polarities of time or when the batteries are different. 300 twin-lead cable Antenna adapter Mixer additional purchase 75 coaxial cable Plug (additional purchase) Antenna input 75 standard coaxial type AC power socket Note * It is recommended that you 'd better use . Dispose of used for the remote control Battery installation Remove the batteries cover. When the remote control will not be...
.... Insert two size AA batteries matching the +/-polarities of time or when the batteries are different. 300 twin-lead cable Antenna adapter Mixer additional purchase 75 coaxial cable Plug (additional purchase) Antenna input 75 standard coaxial type AC power socket Note * It is recommended that you 'd better use . Dispose of used for the remote control Battery installation Remove the batteries cover. When the remote control will not be...

User Manual
Page 7
... Button Favorite program button Game Background Select Button No available Game Exit Button No available No available Start/Restart Game Button Change the aspect ratio Saving mode on/off button Shuttle button Program Play-backward Button Sound Mode Select Button Calendar Program Scan Button Lock Setting button DC Standby Button Sleep Timer Button Picture Mode Select Button There are DYNAMIC, STANDARD, MILD,MEMORY, PICTURE MUTEand COLOR MUTE six modes of programs. Screen Display Button System Adjust Button Direct-digit Choosing Button Directly select channel numbers Digit Select Button Change...
... Button Favorite program button Game Background Select Button No available Game Exit Button No available No available Start/Restart Game Button Change the aspect ratio Saving mode on/off button Shuttle button Program Play-backward Button Sound Mode Select Button Calendar Program Scan Button Lock Setting button DC Standby Button Sleep Timer Button Picture Mode Select Button There are DYNAMIC, STANDARD, MILD,MEMORY, PICTURE MUTEand COLOR MUTE six modes of programs. Screen Display Button System Adjust Button Direct-digit Choosing Button Directly select channel numbers Digit Select Button Change...
User Manual
Page 8
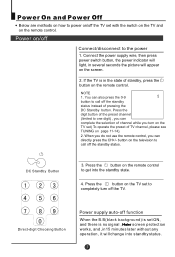
... on the screen. 2. button on the television to call off the standby status. Press the button on /off Connect/disconnect to the power 1. Connect the power supply wire, then press power switch button, the power indicator will change into the standby state. 4. You can directly press the CH+/- Power on the remote control to get into standby status. Direct-digit Choosing Button Power supply auto-off function When the B.B(black background) is no signal , screen protection works, and...
... on the screen. 2. button on the television to call off the standby status. Press the button on /off Connect/disconnect to the power 1. Connect the power supply wire, then press power switch button, the power indicator will change into the standby state. 4. You can directly press the CH+/- Power on the remote control to get into standby status. Direct-digit Choosing Button Power supply auto-off function When the B.B(black background) is no signal , screen protection works, and...
User Manual
Page 9
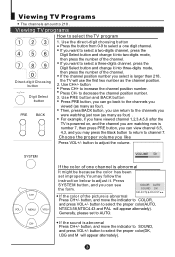
... select the TV program Direct-digit Choosing button Digit Select button PRE BACK 1. Use PRE button and BACK button Press PRE button, you can return to adjust it into three-digits mode, then press the number of the channel. Then, press BACK button, you can go back to select a two-digits channel, press the Digit Select button and change it into two-digits mode, then press the number of the channel. COLOR AUTO SOUND DK SELECT ADJUST If the color of one digit channel. Choose the proper volume...
... select the TV program Direct-digit Choosing button Digit Select button PRE BACK 1. Use PRE button and BACK button Press PRE button, you can return to adjust it into three-digits mode, then press the number of the channel. Then, press BACK button, you can go back to select a two-digits channel, press the Digit Select button and change it into two-digits mode, then press the number of the channel. COLOR AUTO SOUND DK SELECT ADJUST If the color of one digit channel. Choose the proper volume...
User Manual
Page 10
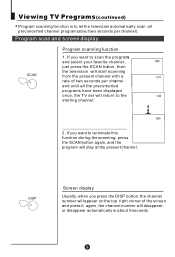
... to scan the programs and select your favorite channel , just press the SCAN button, then the television will start scanning from the present channel with a rate of the screen and press it again, the channel number will disappear or disappear automatically in about two seconds per channel and until all preconcerted channel program(about 5 seconds. Program scan and screen display SCAN Program scanning function 1. DISP Screen display Usually, when you press the DISP button, the channel number...
... to scan the programs and select your favorite channel , just press the SCAN button, then the television will start scanning from the present channel with a rate of the screen and press it again, the channel number will disappear or disappear automatically in about two seconds per channel and until all preconcerted channel program(about 5 seconds. Program scan and screen display SCAN Program scanning function 1. DISP Screen display Usually, when you press the DISP button, the channel number...

User Manual
Page 11
... could set 8 favorite programs. After the setting, press FAVORITE button to select your favorite channel you have set the program you want to back to switch the saving mode on /off . And the screen will not work. to ENERGY SAVE AMBI-LUM BRI. Press CH+/- Viewing TV Programs(coutinued) Saving mode.favorite program and shuttle CH+ VOL- and CH+/- to adjust the bright/volumeetc to adjust the FAV.POS channel. MENU...
... could set 8 favorite programs. After the setting, press FAVORITE button to select your favorite channel you have set the program you want to back to switch the saving mode on /off . And the screen will not work. to ENERGY SAVE AMBI-LUM BRI. Press CH+/- Viewing TV Programs(coutinued) Saving mode.favorite program and shuttle CH+ VOL- and CH+/- to adjust the bright/volumeetc to adjust the FAV.POS channel. MENU...
User Manual
Page 12
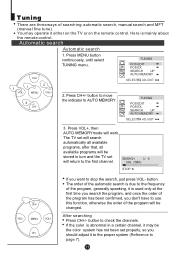
... UP AUTO MEMORY SELECT ADJUST 3. The order of the automatic search is used only at the first time you search the program, and once the order of the program has been confirmed, you want to the first channel. You may operate it may be changed. Automatic search Automatic search 1. After searching Press CH+/- If the color is mainly about the remote control. Tuning...
... UP AUTO MEMORY SELECT ADJUST 3. The order of the automatic search is used only at the first time you search the program, and once the order of the program has been confirmed, you want to the first channel. You may operate it may be changed. Automatic search Automatic search 1. After searching Press CH+/- If the color is mainly about the remote control. Tuning...
User Manual
Page 15
... the programs are presetted, you can also use the Direct-digit Choosing button on the remote control to select this channel will be recovered. 2. button to select POS EDIT and VOL+ to close the menu. TUNING POSITION 1 5. Press CH+/- Do the above steps again. 3. MENU VOL+ 3.Press CH+/- C MFT UP SELECT ADJUST CH- 5. A B SEARCH UP C AUTO MEMORY SELECT ADJUST Direct-digit Choosing Button CH+ VOL- Use Direct-digit Choosing button to select the number of the channel to set it...
... the programs are presetted, you can also use the Direct-digit Choosing button on the remote control to select this channel will be recovered. 2. button to select POS EDIT and VOL+ to close the menu. TUNING POSITION 1 5. Press CH+/- Do the above steps again. 3. MENU VOL+ 3.Press CH+/- C MFT UP SELECT ADJUST CH- 5. A B SEARCH UP C AUTO MEMORY SELECT ADJUST Direct-digit Choosing Button CH+ VOL- Use Direct-digit Choosing button to select the number of the channel to set it...
User Manual
Page 16
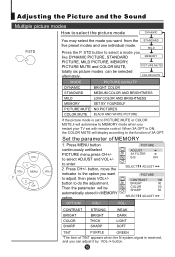
... one individual mode. Press CH+/- Adjusting the Picture and the Sound Multiple picture modes How to enter. 2. MILD Press the P. COLOR MUTE MODE PICTURE QUALITY DYNAMIC BRIGHT COLOR STANDARD MEDIUM COLOR AND BRIGHTNESS MILD LOW COLOR AND BRIGHTNESS MEMORY SET BY YOURSELF PICTURE MUTE NO PICTURES COLOR MUTE BLACK AND WHITE PICTURE If the picture mode is set with remote control. Press MENU button continuously untilselect PICTURE menu,press CH+/to select ADJUST and VOL+/to select the picture mode DYNAMIC P.STD...
... one individual mode. Press CH+/- Adjusting the Picture and the Sound Multiple picture modes How to enter. 2. MILD Press the P. COLOR MUTE MODE PICTURE QUALITY DYNAMIC BRIGHT COLOR STANDARD MEDIUM COLOR AND BRIGHTNESS MILD LOW COLOR AND BRIGHTNESS MEMORY SET BY YOURSELF PICTURE MUTE NO PICTURES COLOR MUTE BLACK AND WHITE PICTURE If the picture mode is set with remote control. Press MENU button continuously untilselect PICTURE menu,press CH+/to select ADJUST and VOL+/to select the picture mode DYNAMIC P.STD...
User Manual
Page 18
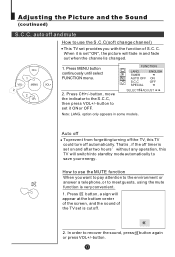
...+/- Adjusting the Picture and the Sound (coutinued) S.C.C, auto off . 2. Press button, a sign will fade in some models . How to use the S.C.C(soft change channel) This TV set provides you want to pay attention to the environment or answer a telephone, or to save your energy. C. MENU VOL+ CH- 1. Press MENU button continuously until select FUNCTION menu. button to set it is set on and after two hours without any operation, this...
...+/- Adjusting the Picture and the Sound (coutinued) S.C.C, auto off . 2. Press button, a sign will fade in some models . How to use the S.C.C(soft change channel) This TV set provides you want to pay attention to the environment or answer a telephone, or to save your energy. C. MENU VOL+ CH- 1. Press MENU button continuously until select FUNCTION menu. button to set it is set on and after two hours without any operation, this...
User Manual
Page 19
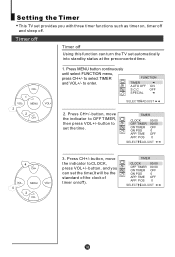
.... button, move TIMER CH- POS 0 SELECT ADJUST Press MENU button continuously until select FUNCTION menu, press CH+/- Press CH+/- Timer off Timer off Using this function can set the time(It will be the standard of the clock of timer on , timer off and sleep off. A B C FUNCTION TIMER AUTO OFF S.C.C SPECIAL ON OFF SELECT ADJUST 2. Press CH+/- POS 0 SELECT ADJUST CH+ VOL- button, and you with three timer functions such as timer on /off). TIMER CLOCK...
.... button, move TIMER CH- POS 0 SELECT ADJUST Press MENU button continuously until select FUNCTION menu, press CH+/- Press CH+/- Timer off Timer off Using this function can set the time(It will be the standard of the clock of timer on , timer off and sleep off. A B C FUNCTION TIMER AUTO OFF S.C.C SPECIAL ON OFF SELECT ADJUST 2. Press CH+/- POS 0 SELECT ADJUST CH+ VOL- button, and you with three timer functions such as timer on /off). TIMER CLOCK...
User Manual
Page 20
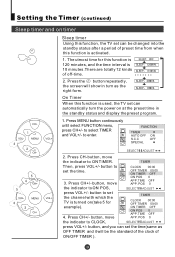
... be changed into the standby status after a period of ON/OFF TIMER ). button, and you can automatically turn as OFF TIMER and it will show in the standby status and display the preset program. On Timer When this function is 120 minutes, and the time interval is used, the TV set can set the time(same as the right form. to ON POS, SELECT ADJUST...
... be changed into the standby status after a period of ON/OFF TIMER ). button, and you can automatically turn as OFF TIMER and it will show in the standby status and display the preset program. On Timer When this function is 120 minutes, and the time interval is used, the TV set can set the time(same as the right form. to ON POS, SELECT ADJUST...
User Manual
Page 21
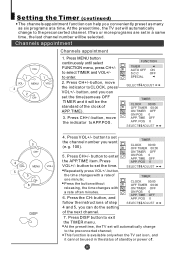
... step SELECT ADJUST 4 and 5, you conveniently preset as many as OFF TIMER and it cannot be used in a same time, the last channel number will automatically change to the preconcerted channel; button to enter. Press CH+/- A B C to enter the APP.TIME item. POS 0 follow the instructions of standby or power off. DISP 4. A B C 5. Press the CH- Setting the Timer (coutinued) The channels appointment function can help you can set...
... step SELECT ADJUST 4 and 5, you conveniently preset as many as OFF TIMER and it cannot be used in a same time, the last channel number will automatically change to the preconcerted channel; button to enter. Press CH+/- A B C to enter the APP.TIME item. POS 0 follow the instructions of standby or power off. DISP 4. A B C 5. Press the CH- Setting the Timer (coutinued) The channels appointment function can help you can set...

User Manual
Page 22
... of screen protection If no signal has been received by the TV set,when the B.B function is set ON, the screen will change into the form on the right shows if the screen protection is set it . Then press CH+/- How to adjust it ON. to use the 3A filter function 1.Press MENU button continuously until select the PICTURE menu. Press MENU button continuously until select the PICTURE menu. MENU VOL...
... of screen protection If no signal has been received by the TV set,when the B.B function is set ON, the screen will change into the form on the right shows if the screen protection is set it . Then press CH+/- How to adjust it ON. to use the 3A filter function 1.Press MENU button continuously until select the PICTURE menu. Press MENU button continuously until select the PICTURE menu. MENU VOL...

User Manual
Page 24
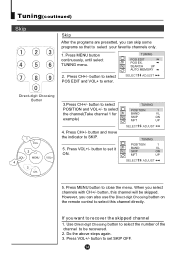
... select TUNING menu. CH- Channel exchange Channel Exchange for example, to confirm. A B SEARCH UP C AUTO MEMORY SELECT ADJUST 2. C TUNING EX.POS1 1 EX.POS2 9 EXCHANGE ? Press CH+/- C RETURN SELECT ADJUST Direct-digit Choosing Button CH+ 3. RETURN SELECT ADJUST VOL- button, move the indicator to EX.POS2, then press VOL+ button to set A B the channel number to 9. Press CH+/- button, move the indicator to POS.EX., Then press VOL+ button to your own need...
... select TUNING menu. CH- Channel exchange Channel Exchange for example, to confirm. A B SEARCH UP C AUTO MEMORY SELECT ADJUST 2. C TUNING EX.POS1 1 EX.POS2 9 EXCHANGE ? Press CH+/- C RETURN SELECT ADJUST Direct-digit Choosing Button CH+ 3. RETURN SELECT ADJUST VOL- button, move the indicator to EX.POS2, then press VOL+ button to set A B the channel number to 9. Press CH+/- button, move the indicator to POS.EX., Then press VOL+ button to your own need...

User Manual
Page 25
... LOCK MAX. Press LOCK button, the screen will show as shown on the right. Press CH+/- Direct-digit Choosing Button 4. Setting the Lock This TV set . LOCK SET UP PASSWORD ---CHANGE PW TUNING LOCK PRESET PROG AV LOCK OFF OFF OFF CHILD LOCK MAX. LOCK SET UP PASSWORD ---- button and move the indicator to LOCK SET UP PASSWORD ---CHANGE PW TUNING LOCK OFF CHANGE PW. , and press VOL+ button to enter the menu of LOCK setting. VOLUME OFF OFF UNLOCK 2. After inputting the new password...
... LOCK MAX. Press LOCK button, the screen will show as shown on the right. Press CH+/- Direct-digit Choosing Button 4. Setting the Lock This TV set . LOCK SET UP PASSWORD ---CHANGE PW TUNING LOCK PRESET PROG AV LOCK OFF OFF OFF CHILD LOCK MAX. LOCK SET UP PASSWORD ---- button and move the indicator to LOCK SET UP PASSWORD ---CHANGE PW TUNING LOCK OFF CHANGE PW. , and press VOL+ button to enter the menu of LOCK setting. VOLUME OFF OFF UNLOCK 2. After inputting the new password...

User Manual
Page 26
Press the Direct-digit Choosing button 0 for four times( or input the password you set), and enter the menu of volume. 6.The UNLOCK allows to you to set ON, if you want to enter the TUNING menu, you will have to type the password. 2.The PRESET PROG allows you to OFF . Note: 1.When the TUNING LOCK is set a figure of the top limit of LOCK. 3. LOCK SET UP PASSWORD ---CHANGE PW TUNING...
Press the Direct-digit Choosing button 0 for four times( or input the password you set), and enter the menu of volume. 6.The UNLOCK allows to you to set ON, if you want to enter the TUNING menu, you will have to type the password. 2.The PRESET PROG allows you to OFF . Note: 1.When the TUNING LOCK is set a figure of the top limit of LOCK. 3. LOCK SET UP PASSWORD ---CHANGE PW TUNING...

User Manual
Page 28
... Connecting additional equipments You can connect the DVD,VCR and stereo system to the AV output to enjoy a higher quality of picture and sound effect. Signal flow White (Audio left channel) Red (Cr and audio right channel) Blue (Cb) Green (Y) Yellow (Video) DVD, VCD or other units Video output Audio output DVD, VCD or otherunits Laser DVD with output terminal To S-VIDEO input To video input To audio input To audio output To DVD output Note: About the S-VIDEO You should only connect S-VIDEO or VIDEO...
... Connecting additional equipments You can connect the DVD,VCR and stereo system to the AV output to enjoy a higher quality of picture and sound effect. Signal flow White (Audio left channel) Red (Cr and audio right channel) Blue (Cb) Green (Y) Yellow (Video) DVD, VCD or other units Video output Audio output DVD, VCD or otherunits Laser DVD with output terminal To S-VIDEO input To video input To audio input To audio output To DVD output Note: About the S-VIDEO You should only connect S-VIDEO or VIDEO...
User Manual
Page 29
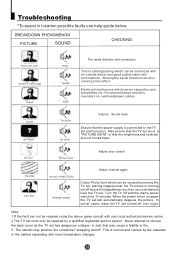
... sound Volume Sound mute Ensure that the brightness and contrast are not turned down No color Normal volume Adjust color control Scramble Color Spot Normal or Weak Volume Normal volume Adjust channel again Colour Purity fault which can not be caused by the materials in location possible faults use help guide below. When the power is connected to remove the back cover as vacuumcleaners near the TV screen or turning on overhead power cables...
... sound Volume Sound mute Ensure that the brightness and contrast are not turned down No color Normal volume Adjust color control Scramble Color Spot Normal or Weak Volume Normal volume Adjust channel again Colour Purity fault which can not be caused by the materials in location possible faults use help guide below. When the power is connected to remove the back cover as vacuumcleaners near the TV screen or turning on overhead power cables...

User Manual
Page 30
Color system Sound system Sound output power PAL AV NTSC3.58 NTSC4.43 DK(BG,I,M) 2X3W Size mm Accessories Remote control X1 Owner's manual X1 Warranty card X1 Battery(AA) X2 MODEL Picture tube HT-3728 14 color picture tube(the viewable dimension is 34cm) HT-3768 15F6B 15 color picture tube(the viewable dimension is 34cm) Other models 21 color picture tube(the viewable dimension is 51cm) Warranty card is different for the country...
Color system Sound system Sound output power PAL AV NTSC3.58 NTSC4.43 DK(BG,I,M) 2X3W Size mm Accessories Remote control X1 Owner's manual X1 Warranty card X1 Battery(AA) X2 MODEL Picture tube HT-3728 14 color picture tube(the viewable dimension is 34cm) HT-3768 15F6B 15 color picture tube(the viewable dimension is 34cm) Other models 21 color picture tube(the viewable dimension is 51cm) Warranty card is different for the country...


