User Manual
Page 2
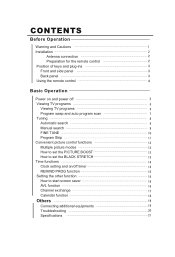
... panel Using the remote control Basic Operation Power on and power off Viewing TV programs Viewing TV programs Program swap and auto program scan Tuning Automatic search Manual search FINE TUNE Program Skip Convenient picture control functions Multiple picture modes How to set the PICTURE BOOST How to set the BLACK STRETCH Time functions Clock setting and on/off timer REMIND PROG function Setting the other function How to start screen saver AVL function Channel exchange Calendar function Others Connecting additional equipments Troubleshooting Specifications
... panel Using the remote control Basic Operation Power on and power off Viewing TV programs Viewing TV programs Program swap and auto program scan Tuning Automatic search Manual search FINE TUNE Program Skip Convenient picture control functions Multiple picture modes How to set the PICTURE BOOST How to set the BLACK STRETCH Time functions Clock setting and on/off timer REMIND PROG function Setting the other function How to start screen saver AVL function Channel exchange Calendar function Others Connecting additional equipments Troubleshooting Specifications
User Manual
Page 3
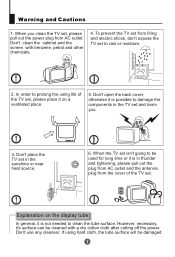
... plug from AC outlet and the antenna plug from AC outlet. If using life of the TV set and harm you. 3. Don't use any cleanser. Don't open the back cover, otherwise it 's surface can be damaged. Explanation on a ventilated place. 5. However, necessary, it is not needed to damage the components .... 4. Warning and Cautions 1. Don't clean the cabinet and the screen with a dry cotton cloth after cutting off the power. When you clean the TV set, please pull out the power plug from the cover of the TV set isn't going to rain or moisture. 2. Don't place the TV...
... plug from AC outlet and the antenna plug from AC outlet. If using life of the TV set and harm you. 3. Don't use any cleanser. Don't open the back cover, otherwise it 's surface can be damaged. Explanation on a ventilated place. 5. However, necessary, it is not needed to damage the components .... 4. Warning and Cautions 1. Don't clean the cabinet and the screen with a dry cotton cloth after cutting off the power. When you clean the TV set, please pull out the power plug from the cover of the TV set isn't going to rain or moisture. 2. Don't place the TV...
User Manual
Page 5
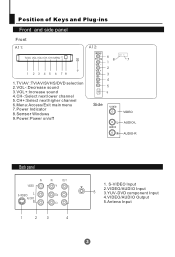
VOL+CH- Position of Keys and Plug-ins Front and side panel Front A11: A12: TV/AV VOL- CH+MENU 9 1 2 3 4 5 6 78 1.TV/AV :TV/AV/SVHS/DVD selection 2.VOL-:Decrease sound 3.VOL+:Increase sound 4.CH-:Select next lower channel 5.CH+:Select next higher channel 6.Menu:Access/Exit main menu 7.Power Indicator 8.Sensor Windows 9.Power:Power on/off 6 8 1 2 3 4 5 9 Side 7 VIDEO AUDIO-L AUDIO-R Back panel IN VIDEO S-VIDEO L AU DIO R IN OU T Y Cb Cr 1 23 4 1. S-VIDEO Input 2.VIDEO/AUDIO Input 5 3.YUV-DVD component Input 4.VIDEO/AUDIO Output 5.Antena Input
VOL+CH- Position of Keys and Plug-ins Front and side panel Front A11: A12: TV/AV VOL- CH+MENU 9 1 2 3 4 5 6 78 1.TV/AV :TV/AV/SVHS/DVD selection 2.VOL-:Decrease sound 3.VOL+:Increase sound 4.CH-:Select next lower channel 5.CH+:Select next higher channel 6.Menu:Access/Exit main menu 7.Power Indicator 8.Sensor Windows 9.Power:Power on/off 6 8 1 2 3 4 5 9 Side 7 VIDEO AUDIO-L AUDIO-R Back panel IN VIDEO S-VIDEO L AU DIO R IN OU T Y Cb Cr 1 23 4 1. S-VIDEO Input 2.VIDEO/AUDIO Input 5 3.YUV-DVD component Input 4.VIDEO/AUDIO Output 5.Antena Input
User Manual
Page 6
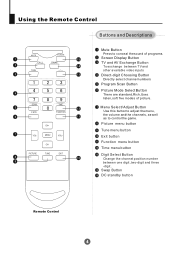
... to control the game. Picture menu button Tune menu button Exit button Function menu button Time menu button Digit Select Button Change the channel position number between TV and other available video inputs Direct-digit Choosing Button Directly select channel numbers Program Scan Button Picture Mode Select Button There are standard,Rich,User, listen,soft five modes of picture. Swap Button DC standby button Remote Control Menu Select/ Adjust Button Use this button to adjust the menu, the volume and the channels, as well as to conceal the sound of programs. Screen Display Button TV...
... to control the game. Picture menu button Tune menu button Exit button Function menu button Time menu button Digit Select Button Change the channel position number between TV and other available video inputs Direct-digit Choosing Button Directly select channel numbers Program Scan Button Picture Mode Select Button There are standard,Rich,User, listen,soft five modes of picture. Swap Button DC standby button Remote Control Menu Select/ Adjust Button Use this button to adjust the menu, the volume and the channels, as well as to conceal the sound of programs. Screen Display Button TV...
User Manual
Page 7
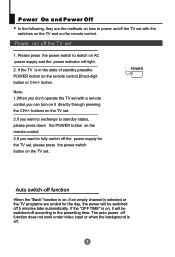
... empty channel is off 5 minutes later automatically. The auto power off function does not work under video input or when the background is selected or the TV programs are the methods on how to power on/off the TV set with the switches on the TV and on the remote control. Please press the power switch to the presetting time. If the TV is on, it directly...
... empty channel is off 5 minutes later automatically. The auto power off function does not work under video input or when the background is selected or the TV programs are the methods on how to power on/off the TV set with the switches on the TV and on the remote control. Please press the power switch to the presetting time. If the TV is on, it directly...
User Manual
Page 8
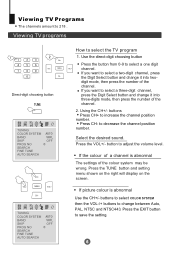
... to select the TV program Use the direct-digit choosing button Press the button from 0-9 to adjust the volume level. Press the TUNE button and setting menu shown on the right will display on the screen. buttons to select COLOR SYSTEM then the VOL-/+ buttons to change it into three-digits mode, then press the number of the colour system may be wrong. MENU CH- Press the VOL+/- button to select a one digit VOL+ channel. If picture colour...
... to select the TV program Use the direct-digit choosing button Press the button from 0-9 to adjust the volume level. Press the TUNE button and setting menu shown on the right will display on the screen. buttons to select COLOR SYSTEM then the VOL-/+ buttons to change it into three-digits mode, then press the number of the colour system may be wrong. MENU CH- Press the VOL+/- button to select a one digit VOL+ channel. If picture colour...
User Manual
Page 9
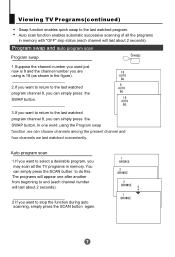
...). 2.If you want to return to end (each channel will last about 2 seconds). Program swap and auto program scan Program swap Swap 1 Suppose the channel number you used just now is 18 (as shown in memory. Viewing TV Programs(continued) Swap function enables quick swap to stop the function during auto scanning, simply press the SCAN button again. In one after another from beginning to the...
...). 2.If you want to return to end (each channel will last about 2 seconds). Program swap and auto program scan Program swap Swap 1 Suppose the channel number you used just now is 18 (as shown in memory. Viewing TV Programs(continued) Swap function enables quick swap to stop the function during auto scanning, simply press the SCAN button again. In one after another from beginning to the...
User Manual
Page 10
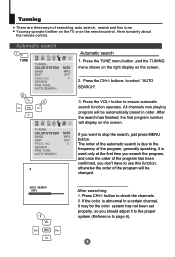
... been set properly, so you should adjust it to the proper system (Reference to page 6). All channels now playing program will be changed. CH+ VOL- If the color is abnormal in order .After the search has finished, the first program number will be automatically preset in a certain channel, it may operate it is mainly about the remote control. Press the CH+/- TUNING COLOR SYSTEM...
... been set properly, so you should adjust it to the proper system (Reference to page 6). All channels now playing program will be changed. CH+ VOL- If the color is abnormal in order .After the search has finished, the first program number will be automatically preset in a certain channel, it may operate it is mainly about the remote control. Press the CH+/- TUNING COLOR SYSTEM...
User Manual
Page 11
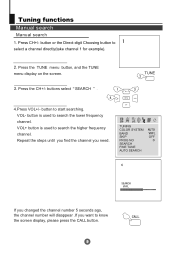
... COLOR SYSTEM BAND SKIP PROG NO SEARCH FINE TUNE AUTO SEARCH OFF If you changed the channel number 5 seconds ago, the channel number will disappear .If you need. Press CH+/- Repeat the steps until you find the channel you want to search the higher frequency channel. VOL+ button is used to know the screen display, please press the CALL button. button to select a channel directly(take channel 1 for example). buttons select SEARCH...
... COLOR SYSTEM BAND SKIP PROG NO SEARCH FINE TUNE AUTO SEARCH OFF If you changed the channel number 5 seconds ago, the channel number will disappear .If you need. Press CH+/- Repeat the steps until you find the channel you want to search the higher frequency channel. VOL+ button is used to know the screen display, please press the CALL button. button to select a channel directly(take channel 1 for example). buttons select SEARCH...
User Manual
Page 13
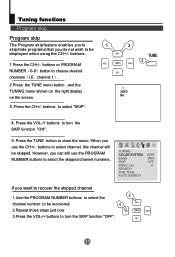
... channel will be displayed when using the CH+/- buttons. 1 Press the CH+/- CH+ VOL- CH+ VOL- When you want to recover the skipped channel 1.Use the PROGRAM NUMBER buttons to select the channel number to be recovered. 2.Repeat those steps just now 3.Press the VOL-/+ buttons to close the menu. TUNING COLOR SYSTEM BAND SKIP PROG NO SEARCH FINE TUNE AUTO SEARCH OFF If you use the PROGRAM NUMBER buttons to turn...
... channel will be displayed when using the CH+/- buttons. 1 Press the CH+/- CH+ VOL- CH+ VOL- When you want to recover the skipped channel 1.Use the PROGRAM NUMBER buttons to select the channel number to be recovered. 2.Repeat those steps just now 3.Press the VOL-/+ buttons to close the menu. TUNING COLOR SYSTEM BAND SKIP PROG NO SEARCH FINE TUNE AUTO SEARCH OFF If you use the PROGRAM NUMBER buttons to turn...
User Manual
Page 14
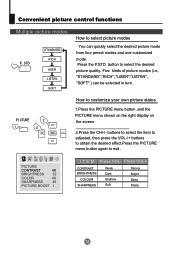
... 1.Press the PICTURE menu button ,and the PICTURE menu shown on the right display on the screen. 2.Press the CH+/- Five kinds of picture modes (i.e., "STANDARD","RICH", "USER","LISTEN", "SOFT" ) can quickly select the desired picture mode from four preset modes and one customized mode. Convenient picture control functions Multiple picture modes STANDARD RICH USER LISTEN SOFT How to select picture modes You can be selected in turn. MENU VOL+ CH- PICTURE CONTRAST 48 BRIGHTNESS 32 COLOR 48 ¹...
... 1.Press the PICTURE menu button ,and the PICTURE menu shown on the right display on the screen. 2.Press the CH+/- Five kinds of picture modes (i.e., "STANDARD","RICH", "USER","LISTEN", "SOFT" ) can quickly select the desired picture mode from four preset modes and one customized mode. Convenient picture control functions Multiple picture modes STANDARD RICH USER LISTEN SOFT How to select picture modes You can be selected in turn. MENU VOL+ CH- PICTURE CONTRAST 48 BRIGHTNESS 32 COLOR 48 ¹...
User Manual
Page 15
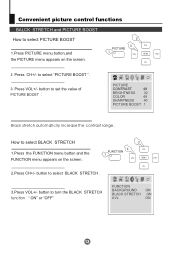
... COLOR 48 ¹ Ø ÍSPHIC¼ATRUÏPRNñEEBS½OSOµSÔT ë410 Black stretch automaticlly increase the contrast range. How to set the value of PICTURE BOOST . FUNCTION CH+ VOL- MENU VOL+ CH- 2.Press CH+/- button to select BLACK STRETCH 1.Press the FUNCTION menu button and the FUNCTION menu appears on the screen. CH+ PICTURE VOL- to turn...
... COLOR 48 ¹ Ø ÍSPHIC¼ATRUÏPRNñEEBS½OSOµSÔT ë410 Black stretch automaticlly increase the contrast range. How to set the value of PICTURE BOOST . FUNCTION CH+ VOL- MENU VOL+ CH- 2.Press CH+/- button to select BLACK STRETCH 1.Press the FUNCTION menu button and the FUNCTION menu appears on the screen. CH+ PICTURE VOL- to turn...
User Manual
Page 16
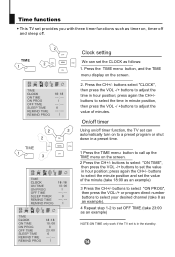
... the CH+/- On/off timer Using on/off . TIME CLOCK ON TIME ON PROG OFF TIME SLEEP TIME REMIND TIME REMIND PROG TIME CH+ VOL- buttons select "CLOCK", then press the VOL -/+ buttons to set the value in hour position; buttons to select "ON PROG", then press the VOL-/+ or program direct number buttons to select your desired channel (take 8 as an example). 4 Repeat step 1-2 to set OFF TIME.(take 18:00 as...
... the CH+/- On/off timer Using on/off . TIME CLOCK ON TIME ON PROG OFF TIME SLEEP TIME REMIND TIME REMIND PROG TIME CH+ VOL- buttons select "CLOCK", then press the VOL -/+ buttons to set the value in hour position; buttons to select "ON PROG", then press the VOL-/+ or program direct number buttons to select your desired channel (take 8 as an example). 4 Repeat step 1-2 to set OFF TIME.(take 18:00 as...
User Manual
Page 17
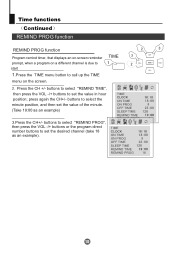
... again the CH+/- buttons to select "REMIND PROG", then press the VOL -/+ buttons or the program direct number buttons to select the minute position, and then set the value of the minute. (Take 19:00 as an example). TIME CLOCK ON TIME ON PROG OFF TIME SLEEP TIME REMIND TIME REMIND PROG TIME CLOCK ON TIME ON PROG OFF TIME SLEEP TIME REMIND TIME REMIND PROG buttons to set the desired channel (take 18...
... again the CH+/- buttons to select "REMIND PROG", then press the VOL -/+ buttons or the program direct number buttons to select the minute position, and then set the value of the minute. (Take 19:00 as an example). TIME CLOCK ON TIME ON PROG OFF TIME SLEEP TIME REMIND TIME REMIND PROG TIME CLOCK ON TIME ON PROG OFF TIME SLEEP TIME REMIND TIME REMIND PROG buttons to set the desired channel (take 18...
User Manual
Page 18
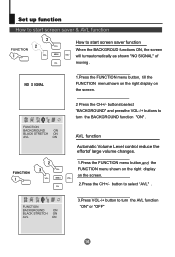
... Automatic Volume Level control reduce the effortof large volume changes. FUNCTION 1.Press the FUNCTION menu button,and the CH+ FUNCTION menu shown on the right display on the screen. VOL- CH- FUNCTION BACKGROUND ON BLACK STRETCH ON AVL ON 2 Press the CH+/- button to turn the BACKGROUND function "ON" . MENU VOL+ will turnautomatically as shown "NO SIGNAL" of CH- moving . 1.Press the FUNCTION menu button, till...
... Automatic Volume Level control reduce the effortof large volume changes. FUNCTION 1.Press the FUNCTION menu button,and the CH+ FUNCTION menu shown on the right display on the screen. VOL- CH- FUNCTION BACKGROUND ON BLACK STRETCH ON AVL ON 2 Press the CH+/- button to turn the BACKGROUND function "ON" . MENU VOL+ will turnautomatically as shown "NO SIGNAL" of CH- moving . 1.Press the FUNCTION menu button, till...
User Manual
Page 19
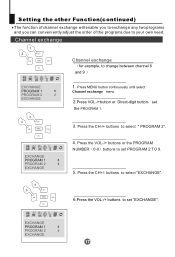
... the VOL-/+ buttons or the PROGRAM NUMBER 0-9 buttons to select " PROGRAM 2". Setting the other Function(continued) The function of channel exchange will enable you to exchange any two programs and you can conveniently adjust the order of the programs due to your own need. MENU VOL+ CH- Channel exchange CH+ VOL- EXCHANGE PROGRAM 1 PROGRAM 2 EXCHANGE Press the CH+/- Press MENU button continuously until select Channel exchange menu. 2.Press VOL-/+button or Direct-digit button set PROGRAM 2 TO...
... the VOL-/+ buttons or the PROGRAM NUMBER 0-9 buttons to select " PROGRAM 2". Setting the other Function(continued) The function of channel exchange will enable you to exchange any two programs and you can conveniently adjust the order of the programs due to your own need. MENU VOL+ CH- Channel exchange CH+ VOL- EXCHANGE PROGRAM 1 PROGRAM 2 EXCHANGE Press the CH+/- Press MENU button continuously until select Channel exchange menu. 2.Press VOL-/+button or Direct-digit button set PROGRAM 2 TO...
User Manual
Page 20
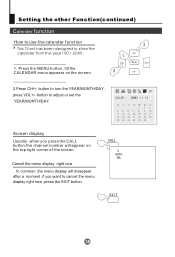
... the MENU button ,till the CALENDAR menu appears on the top right corner of the screen . Screen display Usually ,when you press the CALL button,the channel number will disappear after a moment .if you want to cancel the menu diaplay right now ,press the EXIT button. button to turn the YEAR/MONTH/DAY , press VOL+/- Setting the other Function(continued) Calender function How to use...
... the MENU button ,till the CALENDAR menu appears on the top right corner of the screen . Screen display Usually ,when you press the CALL button,the channel number will disappear after a moment .if you want to cancel the menu diaplay right now ,press the EXIT button. button to turn the YEAR/MONTH/DAY , press VOL+/- Setting the other Function(continued) Calender function How to use...
User Manual
Page 21
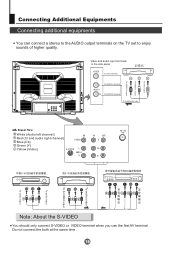
... time . To video output To AUDIO-L output To AUDIO-R output Connecting Additional Equipments Connecting additional equipments You can connect a stereo to the AUDIO output terminals on the TV set to enjoy sounds of higher quality. Video and audio input terminals in the side panel To video terminal To AUDIO-L terminal To AUDIO-R terminal To audio/video input Signal flow White (Audio left channel) Red (Cr and audio right channel) Blue (Cb) Green (Y) Yellow (Video) Note: About the S-VIDEO You should only connect S-VIDEO or VIDEO...
... time . To video output To AUDIO-L output To AUDIO-R output Connecting Additional Equipments Connecting additional equipments You can connect a stereo to the AUDIO output terminals on the TV set to enjoy sounds of higher quality. Video and audio input terminals in the side panel To video terminal To AUDIO-L terminal To AUDIO-R terminal To audio/video input Signal flow White (Audio left channel) Red (Cr and audio right channel) Blue (Cb) Green (Y) Yellow (Video) Note: About the S-VIDEO You should only connect S-VIDEO or VIDEO...
User Manual
Page 22
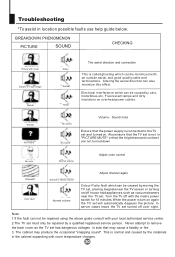
... direction can not be repaired using the above guide consult with an outside aerial, and good quality cable and terminations. Troubleshooting *To assist in side that the brightness and contrast are not turned down No color Normal volume Adjust color control Scramble Color Spot Normal or Weak Volume Normal volume Adjust channel again Colour Purity fault which can be minimized with your local authorized service center. 2.The TV set...
... direction can not be repaired using the above guide consult with an outside aerial, and good quality cable and terminations. Troubleshooting *To assist in side that the brightness and contrast are not turned down No color Normal volume Adjust color control Scramble Color Spot Normal or Weak Volume Normal volume Adjust channel again Colour Purity fault which can be minimized with your local authorized service center. 2.The TV set...
User Manual
Page 23
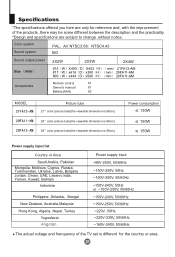
... BG Sound output power Size mm 2X2W 2X3W 615 W X400 D X452 H 817 W x616 D x390 H 800 W x444 D x596 H 2X4W mm 21FA12-AM mm 29FA11-AM mm 29FA11-AM Accessories Remote control X1 Owner's manual X1 Battery(AAA) X2 MODEL Picture tube 21 color picture tube(the viewable dimension is 68cm) 29 color picture tube(the viewable dimension is 68cm) 29 color picture tube(the viewable dimension is 68cm) Power consumption 130W 150W 150W Power supply input list...
... BG Sound output power Size mm 2X2W 2X3W 615 W X400 D X452 H 817 W x616 D x390 H 800 W x444 D x596 H 2X4W mm 21FA12-AM mm 29FA11-AM mm 29FA11-AM Accessories Remote control X1 Owner's manual X1 Battery(AAA) X2 MODEL Picture tube 21 color picture tube(the viewable dimension is 68cm) 29 color picture tube(the viewable dimension is 68cm) 29 color picture tube(the viewable dimension is 68cm) Power consumption 130W 150W 150W Power supply input list...


