User Manual
Page 1
The Owner's Manual for future reference. COLOUR TV RECEIVER OWNER'S MANUAL Please read this manual carefully before operating the unit, and keep it for the Follow Models: 21F9D, 21T9D, 21F9K, 21F5A, 21T5A, 21FA1, 21TA1, 21T9D(D), 21T9D(S), 21T9D(B) , 21FA11, 15F6B, HT-3768, HT-3728, 21FA1N, 21FA12, 21SF1N
The Owner's Manual for future reference. COLOUR TV RECEIVER OWNER'S MANUAL Please read this manual carefully before operating the unit, and keep it for the Follow Models: 21F9D, 21T9D, 21F9K, 21F5A, 21T5A, 21FA1, 21TA1, 21T9D(D), 21T9D(S), 21T9D(B) , 21FA11, 15F6B, HT-3768, HT-3728, 21FA1N, 21FA12, 21SF1N

User Manual
Page 2
CONTENTS Before Operation War nin g and C aut ion s...2 Ins tal lat ion ...3 Ant enn a con nec tio n ...3 Pre par ati on fo r the r emo te co ntr ol 3 Pos iti on , cal end ar di spl ay 23 Cha nne l exc han ge...2 4 Set tin g the l ock ...25 Cha ngi ng yo ur pa ssw ord ...25 Set tin g the l ock ...26 Gam e...2 7 Gam e con tro l but ton s and m eth od of k eys a nd pl ug- ins 4 Fro nt an d sid e pan el ...4 Bac k pan el ...5 Using the r emo te co ntr ol( 1) ...6 Using the r emo te co ntr ol( 2)...7 Basic Operation Pow er on a nd po wer o ff ...8 Vie win g TV p rog ram s ...9 Vie win g TV p ...
CONTENTS Before Operation War nin g and C aut ion s...2 Ins tal lat ion ...3 Ant enn a con nec tio n ...3 Pre par ati on fo r the r emo te co ntr ol 3 Pos iti on , cal end ar di spl ay 23 Cha nne l exc han ge...2 4 Set tin g the l ock ...25 Cha ngi ng yo ur pa ssw ord ...25 Set tin g the l ock ...26 Gam e...2 7 Gam e con tro l but ton s and m eth od of k eys a nd pl ug- ins 4 Fro nt an d sid e pan el ...4 Bac k pan el ...5 Using the r emo te co ntr ol( 1) ...6 Using the r emo te co ntr ol( 2)...7 Basic Operation Pow er on a nd po wer o ff ...8 Vie win g TV p rog ram s ...9 Vie win g TV p ...
User Manual
Page 3
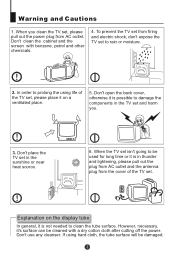
Don't open the back cover, otherwise it is not needed to rain or moisture. 2. Don't use any cleanser. If using life of the TV set. Don't place the TV set in thunder and lightening, please pull out the plug from AC outlet and the antenna plug from firing and electric shock, don't expose the TV set , please pull out the power plug from AC outlet. In order to damage the components in the TV set and harm you clean the TV set to clean the tube surface. However, necessary, it is in the sunshine or near heat source. 6. To prevent the TV set from the cover of the TV ...
Don't open the back cover, otherwise it is not needed to rain or moisture. 2. Don't use any cleanser. If using life of the TV set. Don't place the TV set in thunder and lightening, please pull out the plug from AC outlet and the antenna plug from firing and electric shock, don't expose the TV set , please pull out the power plug from AC outlet. In order to damage the components in the TV set and harm you clean the TV set to clean the tube surface. However, necessary, it is in the sunshine or near heat source. 6. To prevent the TV set from the cover of the TV ...

User Manual
Page 4
Do not drop, dampen or disassemble the remote control. Insert two size AA batteries matching the +/-polarities of the battery to prevent leakage. If the remote control will not be about one year under normal use 75 coaxial cable to remove the disturbance caused by airwave. * Don't bind antenna cable and electric wire together. Dispose of time or when the batteries are different. 300 twin-lead cable Antenna adapter Mixer additional purchase 75 coaxial cable Plug (additional purchase) Antenna input 75 standard coaxial type AC power socket Note * It is recommended that you use ...
Do not drop, dampen or disassemble the remote control. Insert two size AA batteries matching the +/-polarities of the battery to prevent leakage. If the remote control will not be about one year under normal use 75 coaxial cable to remove the disturbance caused by airwave. * Don't bind antenna cable and electric wire together. Dispose of time or when the batteries are different. 300 twin-lead cable Antenna adapter Mixer additional purchase 75 coaxial cable Plug (additional purchase) Antenna input 75 standard coaxial type AC power socket Note * It is recommended that you use ...

User Manual
Page 6
Position of stereo. The terminals above are only available in some models. Back panel Video output terminal Video Y input terminal Video Cb input terminal S-VIDEO input terminal Video input terminal ÒAuôdÆio µlef×t cóhaÉnnùeµl oÀutpÊuät te³rmöin¶alË × Ó Audio right channel output terminal Antenna input socket Video Cr input terminal ÒÒAuôôdiÆÆo rµµig×ÓhtóÒchÉÉanùùneµµl ÀiÀnpÊÊutä...
Position of stereo. The terminals above are only available in some models. Back panel Video output terminal Video Y input terminal Video Cb input terminal S-VIDEO input terminal Video input terminal ÒAuôdÆio µlef×t cóhaÉnnùeµl oÀutpÊuät te³rmöin¶alË × Ó Audio right channel output terminal Antenna input socket Video Cr input terminal ÒÒAuôôdiÆÆo rµµig×ÓhtóÒchÉÉanùùneµµl ÀiÀnpÊÊutä...
User Manual
Page 7
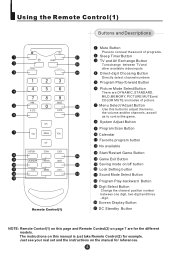
Menu Select/ Adjust Button Use this manual is just take Remote Control(2) for example. MENU VOL+ SYSTEM CHSCAN LOCK CALENDAR FAVORITE QSET TDX GAME EXIT Remote Control(1) Mute Button Press to control the game. Screen Display Button DC Standby Button NOTE: Remote Contorl(1) on this page and Remote Control(2) on /off button Lock Setting button Sound Mode Select Button Program Play-backward Button Digit Select Button Change the channel position number between TV and other available video inputs Direct-digit Choosing Button Directly select channel numbers Program Play-forward ...
Menu Select/ Adjust Button Use this manual is just take Remote Control(2) for example. MENU VOL+ SYSTEM CHSCAN LOCK CALENDAR FAVORITE QSET TDX GAME EXIT Remote Control(1) Mute Button Press to control the game. Screen Display Button DC Standby Button NOTE: Remote Contorl(1) on this page and Remote Control(2) on /off button Lock Setting button Sound Mode Select Button Program Play-backward Button Digit Select Button Change the channel position number between TV and other available video inputs Direct-digit Choosing Button Directly select channel numbers Program Play-forward ...
User Manual
Page 8
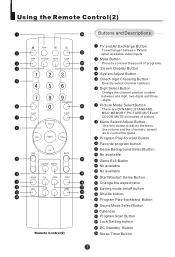
MENU VOL+ CH- Program Play-forward Button Favorite program button Game Background Select Button No available Game Exit Button No available No available Start/Restart Game Button Change the aspect ratio Saving mode on/off button Shuttle button Program Play-backward Button Sound Mode Select Button Calendar Program Scan Button Lock Setting button DC Standby Button Sleep Timer Button PRE BACK FAVORITE SHUTTLE MODE TDX ZOOM QSET EXIT / GAME Remote Control(2) Buttons and Descriptions TV and AV Exchange Button To exchanger between one digit, two-digits and three -digits. Picture ...
MENU VOL+ CH- Program Play-forward Button Favorite program button Game Background Select Button No available Game Exit Button No available No available Start/Restart Game Button Change the aspect ratio Saving mode on/off button Shuttle button Program Play-backward Button Sound Mode Select Button Calendar Program Scan Button Lock Setting button DC Standby Button Sleep Timer Button PRE BACK FAVORITE SHUTTLE MODE TDX ZOOM QSET EXIT / GAME Remote Control(2) Buttons and Descriptions TV and AV Exchange Button To exchanger between one digit, two-digits and three -digits. Picture ...

User Manual
Page 9
Connect the power supply wire, then press power switch button, the power indicator will light, in the state of pressing the DC Standby button. NOTE 1. Press the button on the screen. 2. Direct-digit Choosing Button Power supply auto-off the standby status instead of standby, press the button on /off Connect/disconnect to the power 1. DC Standby Button 3. Press the button on page 11-14). 2. You can directly press the CH+/- When you do not use the remote control, you turn on the TV set( To operate the preset of channel while you can also press the 0-9 button to call...
Connect the power supply wire, then press power switch button, the power indicator will light, in the state of pressing the DC Standby button. NOTE 1. Press the button on the screen. 2. Direct-digit Choosing Button Power supply auto-off the standby status instead of standby, press the button on /off Connect/disconnect to the power 1. DC Standby Button 3. Press the button on page 11-14). 2. You can directly press the CH+/- When you do not use the remote control, you turn on the TV set( To operate the preset of channel while you can also press the 0-9 button to call...

User Manual
Page 10
Press CH- button to select the proper color(AUTO, NTSC3.58,NTSC4.43 and PAL will use the first two number as the channel position. 2. If the sound is larger than 218, the TV will appear alternately). button to select a two-digit channel, press the Digit Select button and change it into two-digit mode, then press the number of one channel is only one digit channel. button, and move the indicator to select a one sound system for your country, the sound system may press the Back button to return to 218 . If you want to adjust it into three-digits mode...
Press CH- button to select the proper color(AUTO, NTSC3.58,NTSC4.43 and PAL will use the first two number as the channel position. 2. If the sound is larger than 218, the TV will appear alternately). button to select a two-digit channel, press the Digit Select button and change it into two-digit mode, then press the number of one channel is only one digit channel. button, and move the indicator to select a one sound system for your country, the sound system may press the Back button to return to 218 . If you want to adjust it into three-digits mode...

User Manual
Page 11
DISP Screen display Usually, when you want to scan the programs and select your favorite channel , just press the SCAN button, then the television will start scanning from the present channel with a rate of the screen and press it twice, the count time will also appear on the top right corner of two seconds per channel). If you want to terminate this function during the scanning, press the SCAN button again, and the program will stay at the present channel. Program scan and screen display SCAN Program scanning function 1. Viewing TV Programs(continued) Program scanning ...
DISP Screen display Usually, when you want to scan the programs and select your favorite channel , just press the SCAN button, then the television will start scanning from the present channel with a rate of the screen and press it twice, the count time will also appear on the top right corner of two seconds per channel). If you want to terminate this function during the scanning, press the SCAN button again, and the program will stay at the present channel. Program scan and screen display SCAN Program scanning function 1. Viewing TV Programs(continued) Program scanning ...
User Manual
Page 12
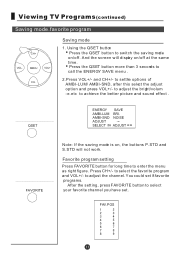
MENU VOL+ CH- QSET ENERGY AMBI-LUM AMBI-SND ADJUST SELECT SAVE BRI. Using the QSET button Press the QSET button to call the ENERGY SAVE menu . 2.Press VOL+/- Press the QSET button more than 3 seconds to switch the saving mode on /off . NOISE ADJUST FAVORITE Note: If the saving mode is on, the buttons P.STD and S.STD will dispal y on /off at the same time. Press CH+/- Viewing TV Programs(continued) Saving mode.favorite program CH+ VOL- And the screen will not work. Favorite program setting Press FAVORITE button for long time to adjust the channel. to enter the ...
MENU VOL+ CH- QSET ENERGY AMBI-LUM AMBI-SND ADJUST SELECT SAVE BRI. Using the QSET button Press the QSET button to call the ENERGY SAVE menu . 2.Press VOL+/- Press the QSET button more than 3 seconds to switch the saving mode on /off . NOISE ADJUST FAVORITE Note: If the saving mode is on, the buttons P.STD and S.STD will dispal y on /off at the same time. Press CH+/- Viewing TV Programs(continued) Saving mode.favorite program CH+ VOL- And the screen will not work. Favorite program setting Press FAVORITE button for long time to adjust the channel. to enter the ...

User Manual
Page 13
MENU VOL+ CH- 2. Press CH+/- CH+ VOL- MENU VOL+ CH- button to move the indicator to check the channels. Press MENU button continuously, until select TUNING TUNING menu. EX. The order of the automatic search is due to the frequency of the program, generally speaking, it is used only at the first time you search the program, and once the order of the program has been confirmed, you don't have to page 7). After searching Press CH+/- Automatic search Automatic search 1. SEARCH UP AUTO MEMORY VOL- SEARCH UP AUTO MEMORY 3. Press VOL+, then AUTO ...
MENU VOL+ CH- 2. Press CH+/- CH+ VOL- MENU VOL+ CH- button to move the indicator to check the channels. Press MENU button continuously, until select TUNING TUNING menu. EX. The order of the automatic search is due to the frequency of the program, generally speaking, it is used only at the first time you search the program, and once the order of the program has been confirmed, you don't have to page 7). After searching Press CH+/- Automatic search Automatic search 1. SEARCH UP AUTO MEMORY VOL- SEARCH UP AUTO MEMORY 3. Press VOL+, then AUTO ...
User Manual
Page 14
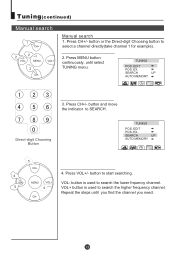
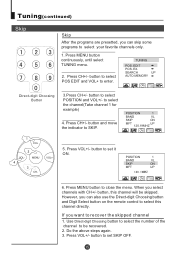
Press MENU button VOL- TUNING POS. Press CH+/- EDIT POS. EX. Press VOL+/- button is used to SEARCH. Repeat the steps until select TUNING menu. Tuning(continued) Manual search CH+ Manual search 1. MENU VOL+ continuously, until you find the channel you need. Direct-digit Choosing Button TUNING POS. SEARCH UP AUTO MEMORY CH+ VOL- SEARCH UP AUTO MEMORY 3. EDIT POS. VOL+ button is used to search the higher frequency channel. button to select a channel directly(take channel 1 for example). 2. Press CH+/- CH- MENU VOL+ CH- 4. button or the...
Press MENU button VOL- TUNING POS. Press CH+/- EDIT POS. EX. Press VOL+/- button is used to SEARCH. Repeat the steps until select TUNING menu. Tuning(continued) Manual search CH+ Manual search 1. MENU VOL+ continuously, until you find the channel you need. Direct-digit Choosing Button TUNING POS. SEARCH UP AUTO MEMORY CH+ VOL- SEARCH UP AUTO MEMORY 3. EDIT POS. VOL+ button is used to search the higher frequency channel. button to select a channel directly(take channel 1 for example). 2. Press CH+/- CH- MENU VOL+ CH- 4. button or the...
User Manual
Page 15
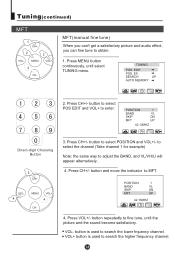
MFT(manual fine tune) When you can't get a satisfactory picture and audio effect, you can fine tune to select POSITION and VOL+/- EX. Press CH+/- MENU VOL+ CH- 3. button to obtain. 1. Press VOL+/- VOL+ button is used to enter. TUNING POS. SEARCH UP AUTO MEMORY 2. Press CH+/- button to select POS EDIT and VOL+ to search the higher frequency channel. Tuning(continued) MFT CH+ VOL- POSITION 1 BAND VL SKIP ON MFT UP 42.13MHZ Direct-digit Choosing Button CH+ VOL- Press CH+/- button repeatedly to search the lower frquency channel. button...
MFT(manual fine tune) When you can't get a satisfactory picture and audio effect, you can fine tune to select POSITION and VOL+/- EX. Press CH+/- MENU VOL+ CH- 3. button to obtain. 1. Press VOL+/- VOL+ button is used to enter. TUNING POS. SEARCH UP AUTO MEMORY 2. Press CH+/- button to select POS EDIT and VOL+ to search the higher frequency channel. Tuning(continued) MFT CH+ VOL- POSITION 1 BAND VL SKIP ON MFT UP 42.13MHZ Direct-digit Choosing Button CH+ VOL- Press CH+/- button repeatedly to search the lower frquency channel. button...
User Manual
Page 16
SEARCH UP AUTO MEMORY Direct-digit Choosing Button 3.Press CH+/- Press CH+/- button to set SKIP OFF. POSITION 1 BAND VL SKIP ON MFT UP CH- 6. Press MENU button to select the channel(Take channel 1 for example) 4. Press VOL+/- to close the menu. Press VOL+/- button to SKIP. POSITION 1 BAND VL SKIP ON MFT UP 120.19MHZ CH+ 5. If you can skip some programs to be skipped. Use Direct-digit Choosing button to select the number of the channel to select your favorite channels only. 1. EX. However, you want to set it VOL- Do the above steps ...
SEARCH UP AUTO MEMORY Direct-digit Choosing Button 3.Press CH+/- Press CH+/- button to set SKIP OFF. POSITION 1 BAND VL SKIP ON MFT UP CH- 6. Press MENU button to select the channel(Take channel 1 for example) 4. Press VOL+/- to close the menu. Press VOL+/- button to SKIP. POSITION 1 BAND VL SKIP ON MFT UP 120.19MHZ CH+ 5. If you can skip some programs to be skipped. Use Direct-digit Choosing button to select the number of the channel to select your favorite channels only. 1. EX. However, you want to set it VOL- Do the above steps ...
User Manual
Page 17
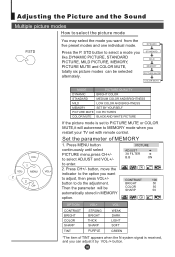
DYNAMIC Press the P. MODE PICTURE QUALITY DYNAMIC BRIGHT COLOR STANDARD MEDIUM COLOR AND BRIGHTNESS MILD LOW COLOR AND BRIGHTNESS MEMORY SET BY YOURSELF PICTURE MUTE NO PICTURES COLOR MUTE BLACK AND WHITE PICTURE If the picture mode is received, and you can be automatically stored in MEMORY option. button, move the indicator to the option you want to adjust, then press VOL+/button to do the adjustment. STANDARD MILD MEMORY PICTURE MUTE COLOR MUTE CH+ VOL- MENU VOL+ CH- Press CH+/- Then the parameter will autorenew to MEMORY mode when you like.DYNAMIC ...
DYNAMIC Press the P. MODE PICTURE QUALITY DYNAMIC BRIGHT COLOR STANDARD MEDIUM COLOR AND BRIGHTNESS MILD LOW COLOR AND BRIGHTNESS MEMORY SET BY YOURSELF PICTURE MUTE NO PICTURES COLOR MUTE BLACK AND WHITE PICTURE If the picture mode is received, and you can be automatically stored in MEMORY option. button, move the indicator to the option you want to adjust, then press VOL+/button to do the adjustment. STANDARD MILD MEMORY PICTURE MUTE COLOR MUTE CH+ VOL- MENU VOL+ CH- Press CH+/- Then the parameter will autorenew to MEMORY mode when you like.DYNAMIC ...
User Manual
Page 18
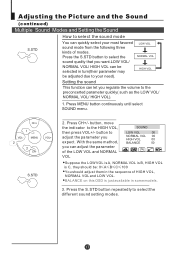
button, move the indicator to select the different sound setting modes. With the same method, you want.LOW VOL/ NORMAL VOL/ HIGH VOL can adjust the parameter of the LOW VOL and NORMAL VOL SOUND LOW VOL 00 NORMAL VOL 00 HIGH VOL 00 BALANCE 50 Suppose the LOW VOL is A, NORMAL VOL is B, HIGH VOL is just available in some models. 3. Press the S.STD button to select the sound quality that you can be selected in the sequence of modes. Press CH+/- LOW VOL NORMAL VOL HIGH VOL Setting the sound This function can quickly select your need). S.STD 2. Press the S.STD ...
button, move the indicator to select the different sound setting modes. With the same method, you want.LOW VOL/ NORMAL VOL/ HIGH VOL can adjust the parameter of the LOW VOL and NORMAL VOL SOUND LOW VOL 00 NORMAL VOL 00 HIGH VOL 00 BALANCE 50 Suppose the LOW VOL is A, NORMAL VOL is B, HIGH VOL is just available in some models. 3. Press the S.STD button to select the sound quality that you can be selected in the sequence of modes. Press CH+/- LOW VOL NORMAL VOL HIGH VOL Setting the sound This function can quickly select your need). S.STD 2. Press the S.STD ...
User Manual
Page 19
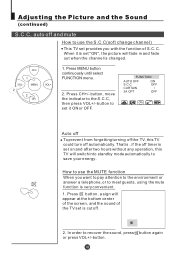
FUNCTION AUTO OFF S.C.C ON OFF CURTAIN 3A OPT I OFF Auto off To prevent from forgetting turning off the TV, this TV could turn off timer is set on and after two hours without any operation, this TV will switch into standby mode automatically to the S.C.C, then press VOL+/- C. MENU VOL+ CH- 1. In order to set it is set "ON", the picture will appear at the bottom center of the screen, and the sound of S.C. button to recover the sound, press button again or press VOL+/-button. button, move the indicator to save your energy. CH+ VOL- Press CH+/- How to use ...
FUNCTION AUTO OFF S.C.C ON OFF CURTAIN 3A OPT I OFF Auto off To prevent from forgetting turning off the TV, this TV could turn off timer is set on and after two hours without any operation, this TV will switch into standby mode automatically to the S.C.C, then press VOL+/- C. MENU VOL+ CH- 1. In order to set it is set "ON", the picture will appear at the bottom center of the screen, and the sound of S.C. button to recover the sound, press button again or press VOL+/-button. button, move the indicator to save your energy. CH+ VOL- Press CH+/- How to use ...
User Manual
Page 20
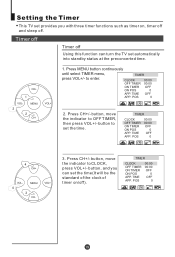
Press MENU button continuously until select TIMER menu, press VOL+/- POS 00:00 00:00 OFF 0 OFF 0 2. button, move TIMER CH- TIMER CLOCK OFF TIMER ON TIMER ON POS APP. button, move the indicator to OFF TIMER, CLOCK 00:00 then press VOL+/- button to enter. MENU VOL+ 3. to set the time. Press CH+/- POS 0 CH+ VOL- POS 00:00 00:00 OFF 0 OFF 0 CH- TIMER CLOCK OFF TIMER ON TIMER ON POS APP. Timer off Timer off Using this function can set the time(It will be the standard of the clock of timer on , timer off and sleep off ). button, and you with ...
Press MENU button continuously until select TIMER menu, press VOL+/- POS 00:00 00:00 OFF 0 OFF 0 2. button, move TIMER CH- TIMER CLOCK OFF TIMER ON TIMER ON POS APP. button, move the indicator to OFF TIMER, CLOCK 00:00 then press VOL+/- button to enter. MENU VOL+ 3. to set the time. Press CH+/- POS 0 CH+ VOL- POS 00:00 00:00 OFF 0 OFF 0 CH- TIMER CLOCK OFF TIMER ON TIMER ON POS APP. Timer off Timer off Using this function can set the time(It will be the standard of the clock of timer on , timer off and sleep off ). button, and you with ...

User Manual
Page 21
Press MENU button continuously CH+ until select TIMER menu, press VOL+/- MENU VOL+ CH- 3. TIMER CLOCK OFF TIMER ON TIMER ON POS APP. The utmost time for example). Press the button repeatedly, the screen will be changed into the standby status after a period of preset time from when this function is 10 minutes.There are totally 12 kinds of ON/OFF TIMER ). button, move the indicator to ON TIMER. TIMER CLOCK OFF TIMER ON TIMER ON POS APP. Press CH+/- POS 00:00 00:00 OFF 0 OFF 0 4. button, move the indicator to CLOCK, press VOL+/- Press CH- Then, press VOL+/- ...
Press MENU button continuously CH+ until select TIMER menu, press VOL+/- MENU VOL+ CH- 3. TIMER CLOCK OFF TIMER ON TIMER ON POS APP. The utmost time for example). Press the button repeatedly, the screen will be changed into the standby status after a period of preset time from when this function is 10 minutes.There are totally 12 kinds of ON/OFF TIMER ). button, move the indicator to ON TIMER. TIMER CLOCK OFF TIMER ON TIMER ON POS APP. Press CH+/- POS 00:00 00:00 OFF 0 OFF 0 4. button, move the indicator to CLOCK, press VOL+/- Press CH- Then, press VOL+/- ...