
Unique Features Introduction
Page 1
The software setup menus are for reference only. Unique Features (Z690 Series) BIOS Update Utilities...2 1-1 Updating the BIOS with the Q-Flash Utility 2 1-2 Updating the BIOS with the @BIOS Utility 5 1-3 Using Q-Flash Plus...6 APP Center...7 2-1 EasyTune...9 2-2 Fast Boot...10 2-3 RGB Fusion...11 2-4 Smart Backup...13 2-5 System Information Viewer 15 Actual software supported may vary by motherboard model and OS verison.
The software setup menus are for reference only. Unique Features (Z690 Series) BIOS Update Utilities...2 1-1 Updating the BIOS with the Q-Flash Utility 2 1-2 Updating the BIOS with the @BIOS Utility 5 1-3 Using Q-Flash Plus...6 APP Center...7 2-1 EasyTune...9 2-2 Fast Boot...10 2-3 RGB Fusion...11 2-4 Smart Backup...13 2-5 System Information Viewer 15 Actual software supported may vary by motherboard model and OS verison.

Unique Features Introduction
Page 2
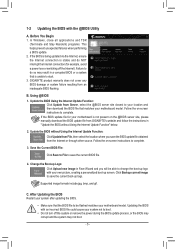
... 1-1 Updating the BIOS with caution. Because BIOS flashing is saved to a hard drive in system malfunction. - 2 - Additionally, this motherboard features the DualBIOS™ design and supports Q-Flash Plus, providing multiple protection for the safety and stability of going through complicated BIOS flashing ...works on the main BIOS. What is Q-Flash™? Extract the file and save the new BIOS file (e.g. BIOS Update Utilities GIGABYTE motherboards provide two unique BIOS update tools, Q-Flash™ and @BIOS™. What is corrupted or damaged, the backup BIOS will download...
... 1-1 Updating the BIOS with caution. Because BIOS flashing is saved to a hard drive in system malfunction. - 2 - Additionally, this motherboard features the DualBIOS™ design and supports Q-Flash Plus, providing multiple protection for the safety and stability of going through complicated BIOS flashing ...works on the main BIOS. What is Q-Flash™? Extract the file and save the new BIOS file (e.g. BIOS Update Utilities GIGABYTE motherboards provide two unique BIOS update tools, Q-Flash™ and @BIOS™. What is corrupted or damaged, the backup BIOS will download...
Unique Features Introduction
Page 3
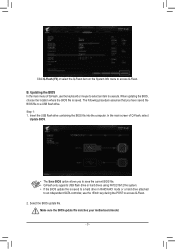
.... •• If the BIOS update file is saved. The following procedure assumes that you to execute. Make sure the BIOS update file matches your motherboard model. - 3 - In the main screen of Q-Flash, use the key during the POST to access Q-Flash. 2. B. Updating the BIOS In the main menu of Q-Flash...
.... •• If the BIOS update file is saved. The following procedure assumes that you to execute. Make sure the BIOS update file matches your motherboard model. - 3 - In the main screen of Q-Flash, use the key during the POST to access Q-Flash. 2. B. Updating the BIOS In the main menu of Q-Flash...
Unique Features Introduction
Page 5
... Logo: Click Upload new image in Face-Wizard and you save the BIOS update file obtained from GIGABYTE's website and follow the instructions in a corrupted BIOS or a system that matches your motherboard model. C. 1-2 Updating the BIOS with your own picture, creating a personalized boot-up logo. In...screen. B. Save the Current BIOS File: Click Save to File to do NOT interrupt the Internet connection (for your motherboard is unable to start. 3. GIGABYTE product warranty does not cover any BIOS damage or system failure resulting from Server, select the @BIOS server site closest to...
... Logo: Click Upload new image in Face-Wizard and you save the BIOS update file obtained from GIGABYTE's website and follow the instructions in a corrupted BIOS or a system that matches your motherboard model. C. 1-2 Updating the BIOS with your own picture, creating a personalized boot-up logo. In...screen. B. Save the Current BIOS File: Click Save to File to do NOT interrupt the Internet connection (for your motherboard is unable to start. 3. GIGABYTE product warranty does not cover any BIOS damage or system failure resulting from Server, select the @BIOS server site closest to...
Unique Features Introduction
Page 6
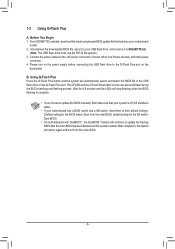
...drive on the rear panel will stop flashing when the BIOS flashing is off (S5 shutdown state). •• If your motherboard has a BIOS switch and a SB switch, reset them to GIGABYTE.bin. (Note: The USB flash drive must use the FAT32 file system.) 3. 1-3 Using Q-Flash Plus A. From... system restarts. B. default setting for the BIOS switch: Boot from the main BIOS. - 6 - After completion, the system will continue to your motherboard model. 2. Connect the power cables to the Q-Flash Plus port on the back panel. Before You Begin 1. Please turn on the power supply before...
...drive on the rear panel will stop flashing when the BIOS flashing is off (S5 shutdown state). •• If your motherboard has a BIOS switch and a SB switch, reset them to GIGABYTE.bin. (Note: The USB flash drive must use the FAT32 file system.) 3. 1-3 Using Q-Flash Plus A. From... system restarts. B. default setting for the BIOS switch: Boot from the main BIOS. - 6 - After completion, the system will continue to your motherboard model. 2. Connect the power cables to the Q-Flash Plus port on the back panel. Before You Begin 1. Please turn on the power supply before...

Unique Features Introduction
Page 7
...operating system, a dialog box will appear on the bottom-right corner of the desktop asking if you to easily launch all GIGABYTE apps installed on motherboard specifications. - 7 - Before the installation, make sure Settings\IO Ports\APP Center Download & Install Configuration\APP Center Download...functions of each application may differ by motherboard model. APP Center GIGABYTE App Center gives you easy access to a wealth of GIGABYTE apps that help you get the most from your GIGABYTE motherboard . (Note) Using a simple, unified user interface, GIGABYTE App Center allows you want to ...
...operating system, a dialog box will appear on the bottom-right corner of the desktop asking if you to easily launch all GIGABYTE apps installed on motherboard specifications. - 7 - Before the installation, make sure Settings\IO Ports\APP Center Download & Install Configuration\APP Center Download...functions of each application may differ by motherboard model. APP Center GIGABYTE App Center gives you easy access to a wealth of GIGABYTE apps that help you get the most from your GIGABYTE motherboard . (Note) Using a simple, unified user interface, GIGABYTE App Center allows you want to ...

Unique Features Introduction
Page 9
... to choose to -use interface that you fully know each function of EasyTune, or system instability or other unexpected results may vary by motherboard model and CPU. 2-1 EasyTune GIGABYTE's EasyTune is not supported. You can save the current settings to set CPU base clock, frequency, and voltages, and integrated graphics frequency. The...
... to choose to -use interface that you fully know each function of EasyTune, or system instability or other unexpected results may vary by motherboard model and CPU. 2-1 EasyTune GIGABYTE's EasyTune is not supported. You can save the current settings to set CPU base clock, frequency, and voltages, and integrated graphics frequency. The...

Unique Features Introduction
Page 12
... LEDs simultaneously cycle through a full spectrum of the screen. Off Disable the selected region LEDs. (Note) Regions/Modes/Colors available may vary by motherboard. - 12 - •• Options for further settings. (Note) Select your desired area and select the LED color/ lighting behaviour on the... right section of colors. Click the motherboard icon for controlling the LEDs on and off. Pulse The selected region LEDs simultaneously fade in an interlaced pattern. Double Flash All LEDs...
... LEDs simultaneously cycle through a full spectrum of the screen. Off Disable the selected region LEDs. (Note) Regions/Modes/Colors available may vary by motherboard. - 12 - •• Options for further settings. (Note) Select your desired area and select the LED color/ lighting behaviour on the... right section of colors. Click the motherboard icon for controlling the LEDs on and off. Pulse The selected region LEDs simultaneously fade in an interlaced pattern. Double Flash All LEDs...

Unique Features Introduction
Page 15
... function requires the use of a fan with fan speed control design. •• To use the noise detection function, you must have a motherboard with a noise detection header. - 15 - Click the Calibrate button and the fan speed will be displayed in relation to overall fan workload after...note, the recording will run at any time. The Record tab allows you to record changes in the operating system. 2-5 System Information Viewer GIGABYTE System Information Viewer allows you to monitor and adjust the fan speed in system voltages, temperatures, fan speeds, and noise. The Smart Fan...
... function requires the use of a fan with fan speed control design. •• To use the noise detection function, you must have a motherboard with a noise detection header. - 15 - Click the Calibrate button and the fan speed will be displayed in relation to overall fan workload after...note, the recording will run at any time. The Record tab allows you to record changes in the operating system. 2-5 System Information Viewer GIGABYTE System Information Viewer allows you to monitor and adjust the fan speed in system voltages, temperatures, fan speeds, and noise. The Smart Fan...

RAID Setup Guide
Page 2
... hard drives or SSDs (Note 2) (to ensure optimal performance, it is recommended that you do not want to create RAID array on the motherboard. Install SATA hard drive(s) or SSDs in the Intel® Chipset controlled connectors on the SATA controller. (Note 2) An M.2 PCIe SSD ...smallest drive Yes To create a RAID set either with identical model and capacity). (Note 3) •• A Windows setup disc. •• Motherboard driver disc or an Internet connected computer. •• A USB thumb drive. Installing hard drives Install the hard drives/SSDs in your power supply ...
... hard drives or SSDs (Note 2) (to ensure optimal performance, it is recommended that you do not want to create RAID array on the motherboard. Install SATA hard drive(s) or SSDs in the Intel® Chipset controlled connectors on the SATA controller. (Note 2) An M.2 PCIe SSD ...smallest drive Yes To create a RAID set either with identical model and capacity). (Note 3) •• A Windows setup disc. •• Motherboard driver disc or an Internet connected computer. •• A USB thumb drive. Installing hard drives Install the hard drives/SSDs in your power supply ...

RAID Setup Guide
Page 3
... may differ from the exact settings for your computer and press to Disabled. Figure 1 C. Configuring the BIOS settings Step 1: Turn on the motherboard you will see shall depend on your motherboard. B. The actual BIOS Setup menu options you have and the BIOS version. - 3 - Go to Enabled. Then enter the Settings\IO Ports...
... may differ from the exact settings for your computer and press to Disabled. Figure 1 C. Configuring the BIOS settings Step 1: Turn on the motherboard you will see shall depend on your motherboard. B. The actual BIOS Setup menu options you have and the BIOS version. - 3 - Go to Enabled. Then enter the Settings\IO Ports...

RAID Setup Guide
Page 7
.... Refer to the steps below appears, select Intel RST VMD Controller 467F and click Next to your USB thumb drive. Method 2: Go to GIGABYTE's website, browse to the motherboard model's web page, download the Intel SATA Preinstall driver file on an M.2 PCIe SSD or a RAID volume, you to your USB thumb drive...
.... Refer to the steps below appears, select Intel RST VMD Controller 467F and click Next to your USB thumb drive. Method 2: Go to GIGABYTE's website, browse to the motherboard model's web page, download the Intel SATA Preinstall driver file on an M.2 PCIe SSD or a RAID volume, you to your USB thumb drive...

RAID Setup Guide
Page 8
...connector you must be GPT formatted and have Windows 10 64-bit (or later version) installed. 4. Method 1: Insert the motherboard driver disc into your Internet connection works properly. Follow the on -screen instructions to Enabled. Intel® Optane™ memory H10/H20. ... Install screen, select Intel® Rapid Storage Technology driver to install and follow the on -screen instructions to install. Method 2: Launch the GIGABYTE APP Center. Step 3: Launch the Intel® Optane™ Memory and Storage Management application from the Start menu. Installing Intel® Optane...
...connector you must be GPT formatted and have Windows 10 64-bit (or later version) installed. 4. Method 1: Insert the motherboard driver disc into your Internet connection works properly. Follow the on -screen instructions to Enabled. Intel® Optane™ memory H10/H20. ... Install screen, select Intel® Rapid Storage Technology driver to install and follow the on -screen instructions to install. Method 2: Launch the GIGABYTE APP Center. Step 3: Launch the Intel® Optane™ Memory and Storage Management application from the Start menu. Installing Intel® Optane...
BIOS Setup Guide
Page 1
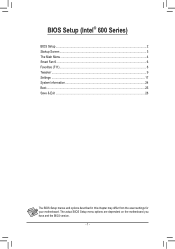
The actual BIOS Setup menu options are dependent on the motherboard you have and the BIOS version. - 1 - BIOS Setup (Intel® 600 Series) BIOS Setup...2 Startup Screen...3 The Main Menu...4 Smart Fan 6...6 Favorites (F11)...8 Tweaker...9 Settings ...17 System Information...24 Boot...25 Save & Exit...28 The BIOS Setup menus and options described in this chapter may differ from the exact settings for your motherboard.
The actual BIOS Setup menu options are dependent on the motherboard you have and the BIOS version. - 1 - BIOS Setup (Intel® 600 Series) BIOS Setup...2 Startup Screen...3 The Main Menu...4 Smart Fan 6...6 Favorites (F11)...8 Tweaker...9 Settings ...17 System Information...24 Boot...25 Save & Exit...28 The BIOS Setup menus and options described in this chapter may differ from the exact settings for your motherboard.

BIOS Setup Guide
Page 2
...and Output System) records hardware parameters of the system in the CMOS on . For instructions on the motherboard supplies the necessary power to the CMOS to boot. To flash the BIOS, do not encounter problems using...the board to default values. •• Refer to the introductions of GIGABYTE's website and search for how to prevent system instability or other unexpected results. To upgrade the BIOS, ...use either the GIGABYTE Q-Flash or @BIOS utility. •• Q-Flash allows the user to quickly and ...
...and Output System) records hardware parameters of the system in the CMOS on . For instructions on the motherboard supplies the necessary power to the CMOS to boot. To flash the BIOS, do not encounter problems using...the board to default values. •• Refer to the introductions of GIGABYTE's website and search for how to prevent system instability or other unexpected results. To upgrade the BIOS, ...use either the GIGABYTE Q-Flash or @BIOS utility. •• Q-Flash allows the user to quickly and ...

BIOS Setup Guide
Page 3
... arrow key or the down arrow key to select the first boot device, then press to enter BIOS Setup first. - 3 - The system will boot from motherboards.) Function Keys Function Keys: : BIOS SETUP\Q-FLASH Press the key to enter BIOS Setup or to set the first boot device without having to accept...
... arrow key or the down arrow key to select the first boot device, then press to enter BIOS Setup first. - 3 - The system will boot from motherboards.) Function Keys Function Keys: : BIOS SETUP\Q-FLASH Press the key to enter BIOS Setup or to set the first boot device without having to accept...

BIOS Setup Guide
Page 9
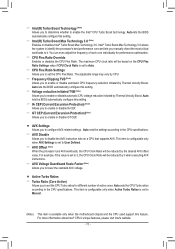
... system's failure to boot. For more information about Intel® CPUs' unique features, please visit Intel's website. - 9 - The adjustable range is available only when the motherboard chipset and the CPU used . If this feature. Tweaker Whether the system will work stably with the CPU specifications. && Enhanced Multi-Core Performance (Note) Determines...
... system's failure to boot. For more information about Intel® CPUs' unique features, please visit Intel's website. - 9 - The adjustable range is available only when the motherboard chipset and the CPU used . If this feature. Tweaker Whether the system will work stably with the CPU specifications. && Enhanced Multi-Core Performance (Note) Determines...

BIOS Setup Guide
Page 10
... operating systems that supports this function. When enabled, the CPU core frequency and voltage will be reduced when the CPU is available only when the motherboard chipset and the CPU used support this feature allows the processor to ramp up its operating frequency more information about Intel® CPUs' unique features...
... operating systems that supports this function. When enabled, the CPU core frequency and voltage will be reduced when the CPU is available only when the motherboard chipset and the CPU used support this feature allows the processor to ramp up its operating frequency more information about Intel® CPUs' unique features...
BIOS Setup Guide
Page 11
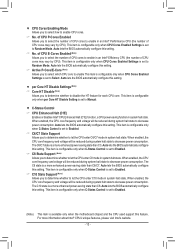
.... && Frequency Clipping TVB (Note) Allows you to set the CPU Flex Ratio. This item is configurable only when AVX Settings is available only when the motherboard chipset and the CPU used support this setting. && IA CEP (Current Excursion Protection) (Note) Allows you to enable or disable IA CEP. && GT CEP (Current...
.... && Frequency Clipping TVB (Note) Allows you to set the CPU Flex Ratio. This item is configurable only when AVX Settings is available only when the motherboard chipset and the CPU used support this setting. && IA CEP (Current Excursion Protection) (Note) Allows you to enable or disable IA CEP. && GT CEP (Current...
BIOS Setup Guide
Page 12
.... dd per Core HT Disable Setting is set to decrease power consumption. This item is configurable only when C-States Control is available only when the motherboard chipset and the CPU used support this setting. && No. dd C-States Control && CPU Enhanced Halt (C1E) Enables or disables Intel® CPU Enhanced Halt (C1E...
.... dd per Core HT Disable Setting is set to decrease power consumption. This item is configurable only when C-States Control is available only when the motherboard chipset and the CPU used support this setting. && No. dd C-States Control && CPU Enhanced Halt (C1E) Enables or disables Intel® CPU Enhanced Halt (C1E...


