
Audio Setup Guide
Page 2
Restart the system after the audio driver is installed. 1-1 Configuring 2/4/5.1/7.1-Channel Audio The motherboard provides five audio jacks on the back panel which support 2/4/5.1/7.1-channel (Note) audio. Then click OK. (Note) 2/4/5.1/7.1-Channel Audio Configurations: .../Subwoofer Speaker Out Rear Speaker Out Line In Front Speaker Out Mic In To configure 4/5.1/7.1-channel audio, you install the included motherboard drivers, make sure your Internet connection works properly. dialog box appears. the system will automatically install the audio driver from Microsoft Store.
Restart the system after the audio driver is installed. 1-1 Configuring 2/4/5.1/7.1-Channel Audio The motherboard provides five audio jacks on the back panel which support 2/4/5.1/7.1-channel (Note) audio. Then click OK. (Note) 2/4/5.1/7.1-Channel Audio Configurations: .../Subwoofer Speaker Out Rear Speaker Out Line In Front Speaker Out Mic In To configure 4/5.1/7.1-channel audio, you install the included motherboard drivers, make sure your Internet connection works properly. dialog box appears. the system will automatically install the audio driver from Microsoft Store.
Unique Features Introduction
Page 1
Unique Features Unique Features (X570 Series) BIOS Update Utilities...2 1-1 Updating the BIOS with the Q-Flash Utility 2 1-2 Updating the BIOS with the @BIOS Utility 5 1-3 Using Q-Flash Plus...6 APP Center...7 2-1 AutoGreen...8 2-2 Cloud ... 2-8 Smart Backup...20 2-9 System Information Viewer 22 2-10 Smart Survey...23 2-11 USB Blocker...24 2-12 USB TurboCharger 25 Actual software supported may vary by motherboard model and OS verison. The software setup menus are for reference only. - 1 -
Unique Features Unique Features (X570 Series) BIOS Update Utilities...2 1-1 Updating the BIOS with the Q-Flash Utility 2 1-2 Updating the BIOS with the @BIOS Utility 5 1-3 Using Q-Flash Plus...6 APP Center...7 2-1 AutoGreen...8 2-2 Cloud ... 2-8 Smart Backup...20 2-9 System Information Viewer 22 2-10 Smart Survey...23 2-11 USB Blocker...24 2-12 USB TurboCharger 25 Actual software supported may vary by motherboard model and OS verison. The software setup menus are for reference only. - 1 -
Unique Features Introduction
Page 2
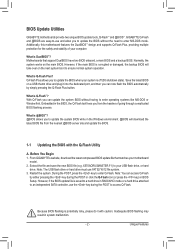
...™? What is off (S5 shutdown state). From GIGABYTE's website, download the latest compressed BIOS update file that support DualBIOS have two BIOS onboard, a main BIOS and a backup BIOS. Restart the system. Additionally, this motherboard features the DualBIOS™ design and supports Q-Flash Plus... automatically by either pressing the key during the POST to enter operating systems like MS-DOS or Window first. BIOS Update Utilities GIGABYTE motherboards provide two unique BIOS update tools, Q-Flash™ and @BIOS™. However, if the main BIOS is DualBIOS™? ...
...™? What is off (S5 shutdown state). From GIGABYTE's website, download the latest compressed BIOS update file that support DualBIOS have two BIOS onboard, a main BIOS and a backup BIOS. Restart the system. Additionally, this motherboard features the DualBIOS™ design and supports Q-Flash Plus... automatically by either pressing the key during the POST to enter operating systems like MS-DOS or Window first. BIOS Update Utilities GIGABYTE motherboards provide two unique BIOS update tools, Q-Flash™ and @BIOS™. However, if the main BIOS is DualBIOS™? ...

Unique Features Introduction
Page 3
... FAT32/16/12 file system. •• If the BIOS update file is saved. Unique Features Step 1: 1. Make sure the BIOS update file matches your motherboard model. - 3 - Updating the BIOS In the main menu of Q-Flash, select Update BIOS. •• The Save BIOS option allows you have saved the BIOS...
... FAT32/16/12 file system. •• If the BIOS update file is saved. Unique Features Step 1: 1. Make sure the BIOS update file matches your motherboard model. - 3 - Updating the BIOS In the main menu of Q-Flash, select Update BIOS. •• The Save BIOS option allows you have saved the BIOS...

Unique Features Introduction
Page 5
... Internet, ensure the Internet connection is stable and do so may not boot. - 5 - C. Before You Begin 1. Updating the BIOS with your motherboard model. 1-2 Updating the BIOS with the @BIOS Utility A. Using @BIOS 1. Supported image formats include jpg, bmp, and gif. Unique Features If...screen. Click Backup current image to boot. •• Do not turn off the Internet). GIGABYTE product warranty does not cover any BIOS damage or system failure resulting from GIGABYTE's website and follow the instructions in a corrupted BIOS or a system that matches your own picture,...
... Internet, ensure the Internet connection is stable and do so may not boot. - 5 - C. Before You Begin 1. Updating the BIOS with your motherboard model. 1-2 Updating the BIOS with the @BIOS Utility A. Using @BIOS 1. Supported image formats include jpg, bmp, and gif. Unique Features If...screen. Click Backup current image to boot. •• Do not turn off the Internet). GIGABYTE product warranty does not cover any BIOS damage or system failure resulting from GIGABYTE's website and follow the instructions in a corrupted BIOS or a system that matches your own picture,...

Unique Features Introduction
Page 6
..., save it to update the backup BIOS. Wait for 2-3 minutes and the QFLED will continue to GIGABYTE.bin. Connect the power cables to your motherboard model. 2. From GIGABYTE's website, download the latest compressed BIOS update file that your motherboard has a BIOS switch and a SB switch, reset them to their default settings. (Default setting for...
..., save it to update the backup BIOS. Wait for 2-3 minutes and the QFLED will continue to GIGABYTE.bin. Connect the power cables to your motherboard model. 2. From GIGABYTE's website, download the latest compressed BIOS update file that your motherboard has a BIOS switch and a SB switch, reset them to their default settings. (Default setting for...

Unique Features Introduction
Page 7
... APP Center may also vary depending on motherboard specifications. - 7 - Supported functions of GIGABYTE apps that help you get the most from your GIGABYTE motherboard . (Note) Using a simple, unified user interface, GIGABYTE App Center allows you to easily launch all GIGABYTE apps installed on your computer after the ...can select an app to run or click LiveUpdate to update an app online. Running the APP Center Insert the motherboard driver disk. APP Center GIGABYTE App Center gives you easy access to a wealth of each application may differ by clicking Launch App Center on...
... APP Center may also vary depending on motherboard specifications. - 7 - Supported functions of GIGABYTE apps that help you get the most from your GIGABYTE motherboard . (Note) Using a simple, unified user interface, GIGABYTE App Center allows you to easily launch all GIGABYTE apps installed on your computer after the ...can select an app to run or click LiveUpdate to update an app online. Running the APP Center Insert the motherboard driver disk. APP Center GIGABYTE App Center gives you easy access to a wealth of each application may differ by clicking Launch App Center on...

Unique Features Introduction
Page 12
.../Tablet Device: Option Function Tuner Allows you to remotely reboot or shut down /reset the PC when needed. Step 2: Run GIGABYTE Cloud Station on your smart phone/tablet device, sign in with remote control options including overclocking and system tweaking, system monitoring plus... the ability to monitor system temperatures, voltages, and fan speeds. INFO Displays the system information, including the CPU, motherboard, and memory. Unique Features CONTROL Allows you to change CPU/memory frequency and voltage settings. Remote OC Remote OC provides you with...
.../Tablet Device: Option Function Tuner Allows you to remotely reboot or shut down /reset the PC when needed. Step 2: Run GIGABYTE Cloud Station on your smart phone/tablet device, sign in with remote control options including overclocking and system tweaking, system monitoring plus... the ability to monitor system temperatures, voltages, and fan speeds. INFO Displays the system information, including the CPU, motherboard, and memory. Unique Features CONTROL Allows you to change CPU/memory frequency and voltage settings. Remote OC Remote OC provides you with...

Unique Features Introduction
Page 14
... hardware components such as CPU, chipset, and memory and reduce the useful life of EasyTune, or system instability or other unexpected results may vary by motherboard model and CPU. 2-3 EasyTune GIGABYTE's EasyTune is not supported.
... hardware components such as CPU, chipset, and memory and reduce the useful life of EasyTune, or system instability or other unexpected results may vary by motherboard model and CPU. 2-3 EasyTune GIGABYTE's EasyTune is not supported.

Unique Features Introduction
Page 18
... The selected region LEDs simultaneously fade in an interlaced pattern. Digital Wave A full color spectrum cascades throughout the armor LED. Click the motherboard icon for controlling the LEDs on the motherboard and digital LED strip. Unique Features •• Options for further settings. (Note) Select your desired area and select the LED...
... The selected region LEDs simultaneously fade in an interlaced pattern. Digital Wave A full color spectrum cascades throughout the armor LED. Click the motherboard icon for controlling the LEDs on the motherboard and digital LED strip. Unique Features •• Options for further settings. (Note) Select your desired area and select the LED...

Unique Features Introduction
Page 22
allows you to monitor and adjust the fan speed in the operating system. 2-9 System Information Viewer GIGABYTE System Information Viewer allows you to select what information to be shown in relation to overall fan workload after selection. Click the Calibrate button ...; The speed control function requires the use of a fan with fan speed control design. •• To use the noise detection function, you must have a motherboard with a noise detection header. - 22 - allows you to specify a Smart Fan mode. Using the Smart Fan option you can adjust the fan's workload according ...
allows you to monitor and adjust the fan speed in the operating system. 2-9 System Information Viewer GIGABYTE System Information Viewer allows you to select what information to be shown in relation to overall fan workload after selection. Click the Calibrate button ...; The speed control function requires the use of a fan with fan speed control design. •• To use the noise detection function, you must have a motherboard with a noise detection header. - 22 - allows you to specify a Smart Fan mode. Using the Smart Fan option you can adjust the fan's workload according ...

Unique Features Introduction
Page 23
... how well our products perform over time, to detect issues and to GIGABYTE: Selecting I Do Not Agree. •• Clicking "Delete All": All data will not collect any data if you select I Agree means you and others use our motherboards. The Smart Survey Interface Using Smart Survey •• Clicking "Here": Allows...
... how well our products perform over time, to detect issues and to GIGABYTE: Selecting I Do Not Agree. •• Clicking "Delete All": All data will not collect any data if you select I Agree means you and others use our motherboards. The Smart Survey Interface Using Smart Survey •• Clicking "Here": Allows...

RAID Setup Guide
Page 2
...or SSDs (Note 2) (to ensure optimal performance, it is recommended that you do not want to create RAID array on the motherboard. Then connect the power connectors from your computer. B. Installing SATA hard drive(s) in your computer Install the hard drives/SSDs in...drive. (Note 3) Refer to set up a RAID set either with identical model and capacity). (Note 3) •• A Windows setup disk. •• Motherboard driver disk. •• A USB thumb drive. 1-1 Configuring SATA Controllers A. C. Configure SATA controller mode in RAID BIOS (Note 1) D. Configure a RAID array ...
...or SSDs (Note 2) (to ensure optimal performance, it is recommended that you do not want to create RAID array on the motherboard. Then connect the power connectors from your computer. B. Installing SATA hard drive(s) in your computer Install the hard drives/SSDs in...drive. (Note 3) Refer to set up a RAID set either with identical model and capacity). (Note 3) •• A Windows setup disk. •• Motherboard driver disk. •• A USB thumb drive. 1-1 Configuring SATA Controllers A. C. Configure SATA controller mode in RAID BIOS (Note 1) D. Configure a RAID array ...

RAID Setup Guide
Page 3
... have and the BIOS version. - 3 - Then save the settings and restart your computer. (If you will see shall depend on your motherboard. B. The actual BIOS Setup menu options you want to use NVMe PCIe SSDs to configure RAID, make sure to set SATA Mode to enter BIOS ...
... have and the BIOS version. - 3 - Then save the settings and restart your computer. (If you will see shall depend on your motherboard. B. The actual BIOS Setup menu options you want to use NVMe PCIe SSDs to configure RAID, make sure to set SATA Mode to enter BIOS ...
RAID Setup Guide
Page 8
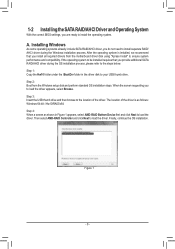
... to be installed requires that you install all required drivers from the Windows setup disk and perform standard OS installation steps. Step 2: Boot from the motherboard driver disk using "Xpress Install" to install the operating system. Then select AMD-RAID Controller and click Next to load the driver appears, select Browse...
... to be installed requires that you install all required drivers from the Windows setup disk and perform standard OS installation steps. Step 2: Boot from the motherboard driver disk using "Xpress Install" to install the operating system. Then select AMD-RAID Controller and click Next to load the driver appears, select Browse...

RAID Setup Guide
Page 9
While in the operating system, make sure to use a new drive of restoring data to a hard drive from the motherboard driver disk. Step 1: Enter the login ID and password (default: "admin"), and then click Submit to rebuild a RAID 1 array. The procedures below assume a new drive ...
While in the operating system, make sure to use a new drive of restoring data to a hard drive from the motherboard driver disk. Step 1: Enter the login ID and password (default: "admin"), and then click Submit to rebuild a RAID 1 array. The procedures below assume a new drive ...
User Manual
Page 2
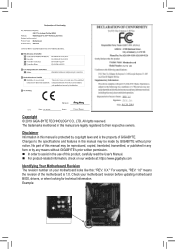
... For example, "REV: 1.0" means the revision of the motherboard is the property of GIGABYTE. Disclaimer Information in this manual may be made by any form or by GIGABYTE without GIGABYTE's prior written permission. „„ In order to their... at: https://www.gigabyte.com Identifying Your Motherboard Revision The revision number on your motherboard revision before updating motherboard BIOS, drivers, or when looking for technical information. Example: The trademarks mentioned in the use of this : "REV: X.X." Motherboard X570 UD Motherboard X570 UD Jul. 20, 2019...
... For example, "REV: 1.0" means the revision of the motherboard is the property of GIGABYTE. Disclaimer Information in this manual may be made by any form or by GIGABYTE without GIGABYTE's prior written permission. „„ In order to their... at: https://www.gigabyte.com Identifying Your Motherboard Revision The revision number on your motherboard revision before updating motherboard BIOS, drivers, or when looking for technical information. Example: The trademarks mentioned in the use of this : "REV: X.X." Motherboard X570 UD Motherboard X570 UD Jul. 20, 2019...
User Manual
Page 3
Table of Contents X570 UD Motherboard Layout 4 Chapter 1 Hardware Installation 5 1-1 Installation Precautions 5 1-2 Product Specifications 6 1-3 Installing the CPU 9 1-4 Installing the Memory 9 1-5 Installing an Expansion Card 10 1-6 Back Panel Connectors 10 1-7 Internal Connectors ...
Table of Contents X570 UD Motherboard Layout 4 Chapter 1 Hardware Installation 5 1-1 Installation Precautions 5 1-2 Product Specifications 6 1-3 Installing the CPU 9 1-4 Installing the Memory 9 1-5 Installing an Expansion Card 10 1-6 Back Panel Connectors 10 1-7 Internal Connectors ...

User Manual
Page 4
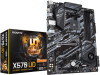
...contents are for reference only and the actual items shall depend on the product package you obtain. X570 UD Motherboard Layout SYS_FAN1 KB_MS_USB ATX_12V HDMI CPU_FAN CPU_OPT Socket AM4 R_USB30 ATX QFLED QFLASH_PLUS USB30_LAN SYS_FAN2 AUDIO M_BIOS...PCIEX16 60 42 PCIEX1_1 CODEC PCIEX4_1 PCIEX1_2 PCIEX4_2 F_AUDIO X570 UD BAT M2A_SOCKET DDR4_A1 DDR4_A2 DDR4_B1 DDR4_B2 AMD X570 iTE® Super I/O CLR_CMOS LED_C1 TPM F_USB2 F_USB1 F_USB30_2 F_USB30_1 F_PANEL SATA3 420 531 Box Contents 55 X570 UD motherboard 55 Motherboard driver disk 55 User's Manual 55 Two SATA cables...
...contents are for reference only and the actual items shall depend on the product package you obtain. X570 UD Motherboard Layout SYS_FAN1 KB_MS_USB ATX_12V HDMI CPU_FAN CPU_OPT Socket AM4 R_USB30 ATX QFLED QFLASH_PLUS USB30_LAN SYS_FAN2 AUDIO M_BIOS...PCIEX16 60 42 PCIEX1_1 CODEC PCIEX4_1 PCIEX1_2 PCIEX4_2 F_AUDIO X570 UD BAT M2A_SOCKET DDR4_A1 DDR4_A2 DDR4_B1 DDR4_B2 AMD X570 iTE® Super I/O CLR_CMOS LED_C1 TPM F_USB2 F_USB1 F_USB30_2 F_USB30_1 F_PANEL SATA3 420 531 Box Contents 55 X570 UD motherboard 55 Motherboard driver disk 55 User's Manual 55 Two SATA cables...

User Manual
Page 5
...warranty validation. •• Always remove the AC power by your hardware components are connected. •• To prevent damage to the motherboard, do not allow screws to come in contact with its components. •• Make sure there are no leftover screws or metal components... the product, please consult a certified computer technician. •• If you are connected tightly and securely. •• When handling the motherboard, avoid touching any installation steps or have it on the power, make sure the chassis is best to installation, do not have an ESD ...
...warranty validation. •• Always remove the AC power by your hardware components are connected. •• To prevent damage to the motherboard, do not allow screws to come in contact with its components. •• Make sure there are no leftover screws or metal components... the product, please consult a certified computer technician. •• If you are connected tightly and securely. •• When handling the motherboard, avoid touching any installation steps or have it on the power, make sure the chassis is best to installation, do not have an ESD ...


