Gigabyte X299 AORUS Gaming 3 Support and Manuals
Get Help and Manuals for this Gigabyte item
View All Support Options Below
Free Gigabyte X299 AORUS Gaming 3 manuals!
Problems with Gigabyte X299 AORUS Gaming 3?
Ask a Question
Free Gigabyte X299 AORUS Gaming 3 manuals!
Problems with Gigabyte X299 AORUS Gaming 3?
Ask a Question
Gigabyte X299 AORUS Gaming 3 Videos

Test X299 Aorus Gaming 3 - LIFE Informàtica
Duration: :55
Total Views: 187
Duration: :55
Total Views: 187
GIGABYTE X299 AORUS Gaming 3
Duration: 4:28
Total Views: 11
Duration: 4:28
Total Views: 11
????? ??????????? ????? Gigabyte X299 AORUS Gaming 3
Duration: 3:12
Total Views: 3,676
Duration: 3:12
Total Views: 3,676
Intel 7900K X Series 10 Core CPU Gigabyte X299 Aorus Gaming 3 Motherboard Unboxing | Tech Land
Duration: 2:16
Total Views: 127
Duration: 2:16
Total Views: 127
Popular Gigabyte X299 AORUS Gaming 3 Manual Pages
RAID Setup Guide - Page 6

Save the changes and exit BIOS Setup. UEFI RAID Configuration Step 1: In BIOS Setup, go to BIOS and set CSM Support to Disabled (Figure 6). Figure 6 Step 2: After the system reboot, enter BIOS Setup again.
C-2. Figure 7 - 6 - Then enter the Peripherals\Intel(R) Rapid Storage Technology sub-menu (Figure 7).
RAID Setup Guide - Page 10

...BIOS Setup, go to BIOS and set CSM Support...10 -
Press + to Non-RAID
[ MAIN MENU ]
4. RAID Volumes : None defined. Intel(R) Rapid Storage Technology - Skip this step and proceed with the installation ...of Windows operating system for a message which says "Press to enter Configuration Utility... Exit
RAID Volumes : None defined.
Physical Devices : ID Device Model ...
RAID Setup Guide - Page 16
... Operating System
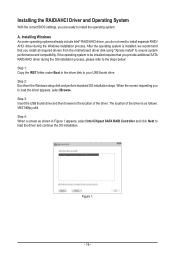
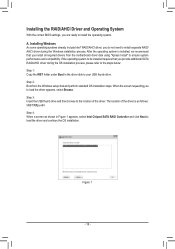
With the correct BIOS settings, you are ready to ensure system performance and compatibility. After the operating system is as follows: \IRST\f6flpy-x64 Step 4: When a screen as shown in the driver disk to the location of the driver. Step 2: Boot from the motherboard driver disk using "Xpress Install" to install the operating system. A. The location...
RAID VROC manual - Page 6

UEFI RAID Configuration Step 1: In BIOS Setup, go to BIOS and set CSM Support to Disabled (Figure 6). Figure 7 - 6 - Then enter the Peripherals\Intel(R) Rapid Storage Technology sub-menu (Figure 7).
Save the changes and exit BIOS Setup.
Figure 6 Step 2: After the system reboot, enter BIOS Setup again. C-2.
RAID VROC manual - Page 10

... Disks to configure a RAID array.
C-3. Configuring Legacy RAID ROM Enter the Intel® legacy RAID BIOS setup utility to Non-RAID
[ MAIN MENU ]
4.
Exit
RAID Volumes : None defined. Delete RAID Volume 3. Step 1: In BIOS Setup, go to BIOS and set CSM Support to Enabled and Storage Boot Option Control to enter the RAID Configuration Utility. Figure 13...
RAID VROC manual - Page 16
... Operating System
With the correct BIOS settings, you provide additional SATA RAID/AHCI driver during the Windows installation process. Step 3: Insert the USB thumb drive and then browse to the location of the driver is installed, we recommend that you are ready to be installed requires that you install all required drivers from the Windows setup disk and perform standard...
RAID VROC manual - Page 21

... a
X299 AORUS Gaming 7/X299 AORUS Ultra Gaming (Pro)
PCIe Slot
PCIEX16_1
PCIEX4_1
44-lane CPU Installed
r
a
28-lane CPU Installed
a
r
a: Same VMD, r: Not the Same VMD. PCIEX16_2 r r
PCIEX8 a r
If you use SSDs with
identical model and capacity).
An Intel® VROC Upgrade Key (purchased separately) 3.
PCIEX16_2 r r
PCIEX8 a a
X299 AORUS Gaming 3 (Pro)/X299 UD4 (Pro) (EX...
Users Manual - Page 3

Table of Contents
X299 AORUS Gaming 3 Motherboard Layout 4
Chapter 1 Hardware Installation 5 1-1 Installation Precautions 5 1-2 Product Specifications 6 1-3 Installing the CPU 9 1-4 Installing the Memory 9 1-5 Installing an Expansion Card 10 1-6 Setting up AMD CrossFire™/NVIDIA® SLI™ Configuration 11 1-7 Back Panel Connectors 12 1-8 Onboard Buttons and LEDs 13 1-9 ...
Users Manual - Page 6

1-2 Product Specifications
CPU
ŠŠ Support for Intel® Core™ X series processors in the LGA2066 package
(Go to GIGABYTE's website for the latest CPU support list.)
ŠŠ L3 cache varies with CPU
Chipset
ŠŠ Intel® X299 Express Chipset
Memory Audio
ŠŠ 8 x DDR4 DIMM sockets supporting up to 128 GB of system memory (Note 1) ŠŠ 4 x ...
Users Manual - Page 9

... the motherboard supports the CPU.
(Go to GIGABYTE's website for details on the CPU.
Please visit GIGABYTE's website for the latest CPU support list.) •• Always turn off the computer and unplug the power cord from the power outlet before installing the
CPU to prevent hardware damage. •• Locate the pin one direction. Save the cover properly and replace it...
Users Manual - Page 22

... Defaults) or manually configure the BIOS settings (refer to Chapter 2, "BIOS Setup," for 5 seconds.) 3. USB 0_ B
You may occur if the battery is
replaced with an incorrect model. •• Contact the place of the battery (the positive side should face up). •• Used batteries must be used to connected an Intel® VROC Upgrade Key.
1
SF...
Users Manual - Page 23

... Internet
and updates the BIOS. •• Because BIOS flashing is potentially risky, if you can use either the GIGABYTE Q-Flash or @BIOS utility. •• Q-Flash allows the user to quickly and easily upgrade or back up BIOS without entering the operating system. •• @BIOS is a Windows-based utility that you not alter the default settings (unless...
Users Manual - Page 25

... Ratio. The adjustable range is present only when you install a CPU that supports this setting. (Default: Auto)
&& No. Auto sets the power limit according to the CPU specifications. (Default: Auto)
&& Active Cores Control (Note) Allows you to select the number of CPU cores may vary by CPU). The maximum CPU clock ratio will automatically reduce the core frequency in order...
Users Manual - Page 43

... are installed, they will appear. Press the key on configuring a RAID array.
- 43 - To see more detailed information, press on the volume to check for details on the hard drives to begin creating the RAID array. C-3. Skip this volume, press to confirm or to Legacy. Steps: 1. In BIOS Setup, go to BIOS and set CSM Support...
Users Manual - Page 44

...driver disk to your USB thumb drive. 2. Intel® Optane™ memory 2. Launch the Intel(R) Optane Memory application from the Windows setup disk and perform standard OS installation steps. Doing so will appear on -screen instructions...3.
Click Yes to install the operating system. Installing the RAID/AHCI Driver and Operating System
With the correct BIOS settings, you are going ...
Gigabyte X299 AORUS Gaming 3 Reviews
We have not received any reviews for Gigabyte yet.