Manual
Page 2
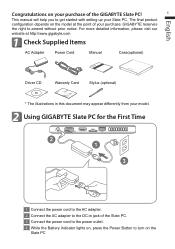
... AC Adapter Power Cord Manual Case(optional) Driver CD Warranty Card Stylus (optional) * The illustrations in this document may appear differently from your model. 2 Using GIGABYTE Slate PC for the First Time 2 1 3 1 Connect the power cord to the AC adapter. 2 Connect the AC adapter to the DC-in jack of your Slate PC. English Congratulations on the Slate PC GIGABYTE reserves the right to get started with setting up...
... AC Adapter Power Cord Manual Case(optional) Driver CD Warranty Card Stylus (optional) * The illustrations in this document may appear differently from your model. 2 Using GIGABYTE Slate PC for the First Time 2 1 3 1 Connect the power cord to the AC adapter. 2 Connect the AC adapter to the DC-in jack of your Slate PC. English Congratulations on the Slate PC GIGABYTE reserves the right to get started with setting up...
Manual
Page 3
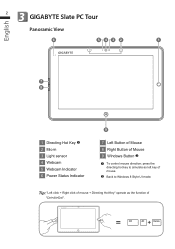
press the directing hot key to Windows 8 Style UI mode. Ctrl Alt Delete Tip: "Left click + Right click of mouse + Directing Hot Key" operate as left key of Mouse 9 Windows Button To control mouse direction; English 3 2 GIGABYTE Slate PC Tour Panoramic View 6 543 2 1 7 8 1 Directing Hot Key 2 Mic-in 3 Light sensor 4 Webcam 5 Webcam Indicator 6 Power Status Indicator 9 7 Left Button of Mouse 8 Right Button of mouse. Back to simulate as the function of "Ctrl+Alt+Del".
press the directing hot key to Windows 8 Style UI mode. Ctrl Alt Delete Tip: "Left click + Right click of mouse + Directing Hot Key" operate as left key of Mouse 9 Windows Button To control mouse direction; English 3 2 GIGABYTE Slate PC Tour Panoramic View 6 543 2 1 7 8 1 Directing Hot Key 2 Mic-in 3 Light sensor 4 Webcam 5 Webcam Indicator 6 Power Status Indicator 9 7 Left Button of Mouse 8 Right Button of mouse. Back to simulate as the function of "Ctrl+Alt+Del".
Manual
Page 4
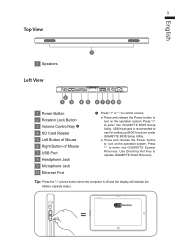
.... English 3 Top View 1 1 Speakers Left View 2 13 4 5 6 7 8 9 10 1 Power Button 2 Rotation Lock Button 3 Volume Control Key 4 SD Card Reader 5 Left Button of Mouse 6 Right Button of Mouse 7 USB Port 8 Headphone Jack 9 Microphone Jack 10 Ethernet Port Press "+" or "-" to control volume. ● Press and release the Power button to turn on the operation system. Press "-" to operate GIGABYTE Smart Recovery. USB Keyboard is off and the display will indicate the battery capacity status. Use Directing Hot Key to enter into GIGABYTE BIOS Setup Utility. Press...
.... English 3 Top View 1 1 Speakers Left View 2 13 4 5 6 7 8 9 10 1 Power Button 2 Rotation Lock Button 3 Volume Control Key 4 SD Card Reader 5 Left Button of Mouse 6 Right Button of Mouse 7 USB Port 8 Headphone Jack 9 Microphone Jack 10 Ethernet Port Press "+" or "-" to control volume. ● Press and release the Power button to turn on the operation system. Press "-" to operate GIGABYTE Smart Recovery. USB Keyboard is off and the display will indicate the battery capacity status. Use Directing Hot Key to enter into GIGABYTE BIOS Setup Utility. Press...
Manual
Page 5
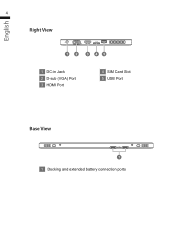
English 4 Right View 12 3 45 1 DC-in Jack 2 D-sub (VGA) Port 3 HDMI Port 4 SIM Card Slot 5 USB Port Base View 1 1 Docking and extended battery connection ports
English 4 Right View 12 3 45 1 DC-in Jack 2 D-sub (VGA) Port 3 HDMI Port 4 SIM Card Slot 5 USB Port Base View 1 1 Docking and extended battery connection ports
Manual
Page 6
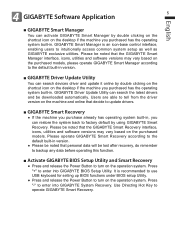
... any data before operating this function. ■ Activate GIGABYTE BIOS Setup Utility and Smart Recovery ● Press and release the Power Button to turn on the operation system. GIGABYTE Driver Update Utility can restore the system back to update drivers. ■ GIGABYTE Smart Recovery ● If the machine you purchased has the operating system built-in. It is an icon-base control interface, enabling users to operate GIGABYTE Smart Recovery. GIGABYTE Smart Manager is recommended to use USB keyboard for setting up BIOS functions under BIOS setup Utility. ●...
... any data before operating this function. ■ Activate GIGABYTE BIOS Setup Utility and Smart Recovery ● Press and release the Power Button to turn on the operation system. GIGABYTE Driver Update Utility can restore the system back to update drivers. ■ GIGABYTE Smart Recovery ● If the machine you purchased has the operating system built-in. It is an icon-base control interface, enabling users to operate GIGABYTE Smart Recovery. GIGABYTE Smart Manager is recommended to use USB keyboard for setting up BIOS functions under BIOS setup Utility. ●...
Manual
Page 7
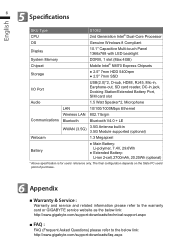
... Type CPU S1082 2nd Generation Intel® Dual-Core Processor OS Genuine Windows 8 Compliant Display 10.1" Capacitive Multi-touch Panel 1366x768 with LED backlight System Memory DDRIII, 1 slot (Max 4GB) Chipset Mobile Intel® NM70 Express Chipsets Storage ● 2.5" 7mm HDD 5400rpm ● 2.5" 7mm SSD I/O Port USB(2.0)*2, D-sub, HDMI, RJ45, Mic-in, Earphone-out, SD card reader, DC-in jack, Docking Station/Extended Battery Port, SIM card slot...
... Type CPU S1082 2nd Generation Intel® Dual-Core Processor OS Genuine Windows 8 Compliant Display 10.1" Capacitive Multi-touch Panel 1366x768 with LED backlight System Memory DDRIII, 1 slot (Max 4GB) Chipset Mobile Intel® NM70 Express Chipsets Storage ● 2.5" 7mm HDD 5400rpm ● 2.5" 7mm SSD I/O Port USB(2.0)*2, D-sub, HDMI, RJ45, Mic-in, Earphone-out, SD card reader, DC-in jack, Docking Station/Extended Battery Port, SIM card slot...


