Manual
Page 1
... VGA card, this may void the warranty of this VGA card Due to rapid change in technology, some of the specifications might be out of date before publication of this document nor does the author make a commitment to update the information contained herein. GV-RX80L512V Radeon X800 XL Graphics Accelerator User's Manual Rev. 101 12MD-RX80L512V-101 Copyright © 2005 GIGABYTE TECHNOLOGY CO., LTD Copyright by GIGA-BYTE TECHNOLOGY CO., LTD. ("GBT"). No part...
... VGA card, this may void the warranty of this VGA card Due to rapid change in technology, some of the specifications might be out of date before publication of this document nor does the author make a commitment to update the information contained herein. GV-RX80L512V Radeon X800 XL Graphics Accelerator User's Manual Rev. 101 12MD-RX80L512V-101 Copyright © 2005 GIGABYTE TECHNOLOGY CO., LTD Copyright by GIGA-BYTE TECHNOLOGY CO., LTD. ("GBT"). No part...
Manual
Page 2
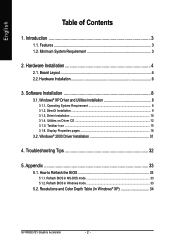
...Reflash BIOS in Windows mode 33 5.2. Introduction 3 1.1. Board Layout 4 2.2. Windows® XP Driver and Utilities Installation 8 3.1.1. Operating System Requirement 8 3.1.2. Driver Installation ...10 3.1.4. Utilities on Driver CD 12 3.1.5. Windows® 2000 Driver Installation 31 4. Resolutions and Color Depth Table (In Windows® XP 34 GV-RX80L512V Graphics Accelerator - 2 - Hardware Installation 6 3. How to Reflash the BIOS 33 5.1.1. Hardware Installation 4 2.1. Troubleshooting Tips 32 5. Appendix 33 5.1. DirectX Installation ...9 3.1.3. Display...
...Reflash BIOS in Windows mode 33 5.2. Introduction 3 1.1. Board Layout 4 2.2. Windows® XP Driver and Utilities Installation 8 3.1.1. Operating System Requirement 8 3.1.2. Driver Installation ...10 3.1.4. Utilities on Driver CD 12 3.1.5. Windows® 2000 Driver Installation 31 4. Resolutions and Color Depth Table (In Windows® XP 34 GV-RX80L512V Graphics Accelerator - 2 - Hardware Installation 6 3. How to Reflash the BIOS 33 5.1.1. Hardware Installation 4 2.1. Troubleshooting Tips 32 5. Appendix 33 5.1. DirectX Installation ...9 3.1.3. Display...
Manual
Page 3
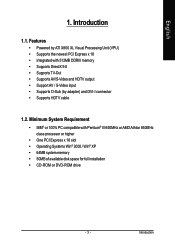
Minimum System Requirement • IBM® or 100% PC compatible with 512MB DDRIII memory • Supports DirectX 9.0 • Supports TV-Out • Supports AV/S-Video and HDTV output • Support AV / S-Video input • Supports D-Sub (by adapter) and DVI-I connector • Supports HDTV cable 1.2. Introduction Introduction 1.1. Features • Powered by ATI X800 XL Visual Processing Unit (VPU) • Supports the newest PCI Express x 16 • Integrated with Pentium® III 650MHz or AMD Athlon 650MHz...
Minimum System Requirement • IBM® or 100% PC compatible with 512MB DDRIII memory • Supports DirectX 9.0 • Supports TV-Out • Supports AV/S-Video and HDTV output • Support AV / S-Video input • Supports D-Sub (by adapter) and DVI-I connector • Supports HDTV cable 1.2. Introduction Introduction 1.1. Features • Powered by ATI X800 XL Visual Processing Unit (VPU) • Supports the newest PCI Express x 16 • Integrated with Pentium® III 650MHz or AMD Athlon 650MHz...

Manual
Page 6
... and monitor, then disconnect the display cable from your computer. 2. Remove any on the motherboard. Or, if your computer, you are ready to disable it on -board graphics capability, you computer documentation. To install your computer's manual for help in removing the cover. 3. English 2.2. Hardware Installation Installing Your Graphics card. Now that you have prepared your computer has any existing graphics card from the back of your computer. GV-RX80L512V Graphics Accelerator...
... and monitor, then disconnect the display cable from your computer. 2. Remove any on the motherboard. Or, if your computer, you are ready to disable it on -board graphics capability, you computer documentation. To install your computer's manual for help in removing the cover. 3. English 2.2. Hardware Installation Installing Your Graphics card. Now that you have prepared your computer has any existing graphics card from the back of your computer. GV-RX80L512V Graphics Accelerator...
Manual
Page 7
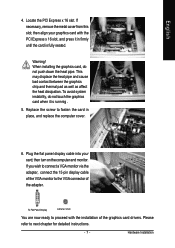
... the adapter. To Flat Panel Display 9-Pin for detailed instructions. - 7 - If necessary, remove the metal cover from this slot; Replace the screw to fasten the card in firmly until the card is runnnig . 5. Hardware Installation To avoid system instability, do not push down the heat pipe. If you wish to connect a VGA monitor via the adapter, connect the 15-pin display cable of the VGA monitor to proceed with the PCI Express...
... the adapter. To Flat Panel Display 9-Pin for detailed instructions. - 7 - If necessary, remove the metal cover from this slot; Replace the screw to fasten the card in firmly until the card is runnnig . 5. Hardware Installation To avoid system instability, do not push down the heat pipe. If you wish to connect a VGA monitor via the adapter, connect the 15-pin display cable of the VGA monitor to proceed with the PCI Express...

Manual
Page 8
... into your graphics accelerator.) 3.1. GV-RX80L512V Graphics Accelerator - 8 - Then you can see the AUTORUN window (if it does not show up, run "D:\setup.exe"). English 3. Operating System Requirement • When loading the graphics card drivers for the system, please make sure your graphics card driver. (Please follow the guides to setup your system has installed DirectX 9 or later version. • If you can follow the subsection 3.1.3 "Driver installation" to be Drive D: The installation of SIS...
... into your graphics accelerator.) 3.1. GV-RX80L512V Graphics Accelerator - 8 - Then you can see the AUTORUN window (if it does not show up, run "D:\setup.exe"). English 3. Operating System Requirement • When loading the graphics card drivers for the system, please make sure your graphics card driver. (Please follow the guides to setup your system has installed DirectX 9 or later version. • If you can follow the subsection 3.1.3 "Driver installation" to be Drive D: The installation of SIS...
Manual
Page 10
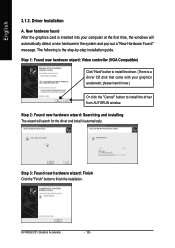
... a new hardware in the system and pop out a "New Hardware Found" message. GV-RX80L512V Graphics Accelerator - 10 - The following is inserted into your graphics accelerator, please insert it automatically. Step 1: Found new hardware wizard: Video controller (VGA Compatible) Click "Next" button to finish the installation. New hardware found After the graphics card is the step-by-step installation guide. Step 3: Found new hardware wizard: Finish Click the "Finish" button to install the driver. (There is a driver CD disk that...
... a new hardware in the system and pop out a "New Hardware Found" message. GV-RX80L512V Graphics Accelerator - 10 - The following is inserted into your graphics accelerator, please insert it automatically. Step 1: Found new hardware wizard: Video controller (VGA Compatible) Click "Next" button to finish the installation. New hardware found After the graphics card is the step-by-step installation guide. Step 3: Found new hardware wizard: Finish Click the "Finish" button to install the driver. (There is a driver CD disk that...
Manual
Page 11
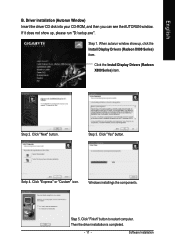
... show up , please run "D:\setup.exe". Step 1. Click the Install Display Drivers (Radeon X800 Series) item. Step 5. Driver installation (Autorun Window) Insert the driver CD disk into your CD-ROM, and then you can see the AUTORUN window. Setp 4. Then the driver installation is completed. - 11 - Click "Express" or "Custom" icon. Software Installation When autorun window show up , click the Install Display Drivers (Radeon X800 Series) item. Click "Next" button. Step 3. Windows installings the components. English...
... show up , please run "D:\setup.exe". Step 1. Click the Install Display Drivers (Radeon X800 Series) item. Step 5. Driver installation (Autorun Window) Insert the driver CD disk into your CD-ROM, and then you can see the AUTORUN window. Setp 4. Then the driver installation is completed. - 11 - Click "Express" or "Custom" icon. Software Installation When autorun window show up , click the Install Display Drivers (Radeon X800 Series) item. Click "Next" button. Step 3. Windows installings the components. English...
Manual
Page 12
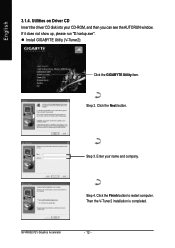
Click the Finish button to restart computer. Utilities on Driver CD Insert the driver CD disk into your name and company. z Install GIGABYTE Utility (V-Tuner2): Click the GIGABYTE Utility item. Click the Next button. GV-RX80L512V Graphics Accelerator - 12 - If it does not show up, please run "D:\setup.exe". Then the V-Tuner2 installation is completed. English 3.1.4. Step 3. Step 2. Enter your CD-ROM, and then you can see the AUTORUN window. Step 4.
Click the Finish button to restart computer. Utilities on Driver CD Insert the driver CD disk into your name and company. z Install GIGABYTE Utility (V-Tuner2): Click the GIGABYTE Utility item. Click the Next button. GV-RX80L512V Graphics Accelerator - 12 - If it does not show up, please run "D:\setup.exe". Then the V-Tuner2 installation is completed. English 3.1.4. Step 3. Step 2. Enter your CD-ROM, and then you can see the AUTORUN window. Step 4.

Manual
Page 15
... GIGABYTE control panel, showing a menu composed of shortcut of the display drivers, you will find a GIGABYTE icon on the taskbar's status area. Right click the icon. Click "VGA Information" item into the "VGA Info" and "Color Adjust"tabs. You may click the "Display Properties" item, and then click Settings. Software Installation Taskbar Icon After installation of the graphics card's enhanced and other information. - 15 - You can link to change...
... GIGABYTE control panel, showing a menu composed of shortcut of the display drivers, you will find a GIGABYTE icon on the taskbar's status area. Right click the icon. Click "VGA Information" item into the "VGA Info" and "Color Adjust"tabs. You may click the "Display Properties" item, and then click Settings. Software Installation Taskbar Icon After installation of the graphics card's enhanced and other information. - 15 - You can link to change...
Manual
Page 17
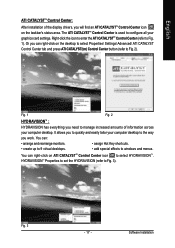
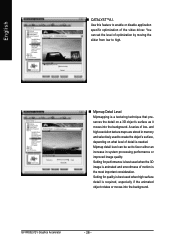
... you need to manage increased amounts of the display drivers, you will find an ATI CATALYSTTM Control Center icon on the desktop to select Properties\ Settings\ Advanced\ ATI CATALYST Control Center tab and press ATI CATALYST(tm) Control Center button (refer to select HYDRAVISIONTM. Fig. 3 - 17 - Right-click the icon to enter the ATI CATALYSTTM Control Center (refer to configure all your graphics card settings. English ATI CATALYSTTM Control Center: After installation of...
... you need to manage increased amounts of the display drivers, you will find an ATI CATALYSTTM Control Center icon on the desktop to select Properties\ Settings\ Advanced\ ATI CATALYST Control Center tab and press ATI CATALYST(tm) Control Center button (refer to select HYDRAVISIONTM. Fig. 3 - 17 - Right-click the icon to enter the ATI CATALYSTTM Control Center (refer to configure all your graphics card settings. English ATI CATALYSTTM Control Center: After installation of...
Manual
Page 18
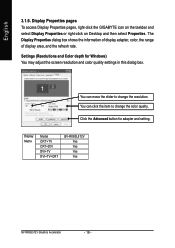
... the information of display adapter, color, the range of display area, and the refresh rate. Click the Advanced button for Windows) You may adjust the screen resolution and color quality settings in this dialog box. English 3.1.6. Display Matrix Model CRT+TV CRT+DVI DVI+TV DVI+TV+CRT GV-RX80L512V Yes Yes Yes Yes GV-RX80L512V Graphics Accelerator - 18 - You can click the item to change the color quality. Display Properties pages To access Display Properties pages, right-click the GIGABYTE icon on...
... the information of display adapter, color, the range of display area, and the refresh rate. Click the Advanced button for Windows) You may adjust the screen resolution and color quality settings in this dialog box. English 3.1.6. Display Matrix Model CRT+TV CRT+DVI DVI+TV DVI+TV+CRT GV-RX80L512V Yes Yes Yes Yes GV-RX80L512V Graphics Accelerator - 18 - You can click the item to change the color quality. Display Properties pages To access Display Properties pages, right-click the GIGABYTE icon on...
Manual
Page 19
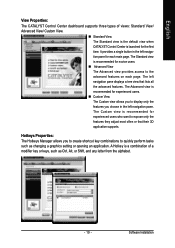
... changing a graphics setting or opening an application. Hotkeys Properties: The Hotkeys Manager allows you choose in the left navigation pane displays a tree view that their 3D application supports. The left navigation pane for each page. A Hotkey is a combination of views: Standard View/ Advanced View/ Custom View. „ Standard View The Standard view is the default view when CATALYST Control Center is recommended for novice users. „ Advanced View The Advanced view...
... changing a graphics setting or opening an application. Hotkeys Properties: The Hotkeys Manager allows you choose in the left navigation pane displays a tree view that their 3D application supports. The left navigation pane for each page. A Hotkey is a combination of views: Standard View/ Advanced View/ Custom View. „ Standard View The Standard view is the default view when CATALYST Control Center is recommended for novice users. „ Advanced View The Advanced view...
Manual
Page 20
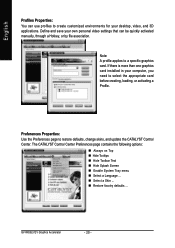
... than one graphics card installed in your desktop, video, and 3D applications. English Profiles Properties: You can be quickly activated manually, through a Hotkey, or by file association. Define and save your own personal video settings that can use profiles to create customized environments for your computer, you need to select the appropriate card before creating, loading, or activating a Profile. Preferences Properties: Use the Preferences page to a specific graphics card. The CATALYST Control Center Preferences...
... than one graphics card installed in your desktop, video, and 3D applications. English Profiles Properties: You can be quickly activated manually, through a Hotkey, or by file association. Define and save your own personal video settings that can use profiles to create customized environments for your computer, you need to select the appropriate card before creating, loading, or activating a Profile. Preferences Properties: Use the Preferences page to a specific graphics card. The CATALYST Control Center Preferences...

Manual
Page 21
... DirectX. „ The System Hardware tab includes information such as the installed CPU type and speed, the installed BIOS and version, and the installed motherboard chipset. „ The Graphics Software tab includes information such as installed 2D and 3D driver versions and OpenGL version. „ The Graphics Hardware tab includes information such as the installed graphics ID, bus type, and BIOS version. - 21 - English Help Properties: The CATALYST Control Center Help feature allows you require...
... DirectX. „ The System Hardware tab includes information such as the installed CPU type and speed, the installed BIOS and version, and the installed motherboard chipset. „ The Graphics Software tab includes information such as installed 2D and 3D driver versions and OpenGL version. „ The Graphics Hardware tab includes information such as the installed graphics ID, bus type, and BIOS version. - 21 - English Help Properties: The CATALYST Control Center Help feature allows you require...
Manual
Page 26
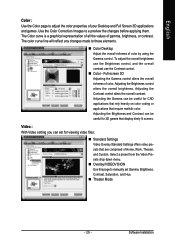
Use this feature to enable or disable application specific optimization of low- GV-RX80L512V Graphics Accelerator - 26 - Mipmap detail level can set to favor either an increase in memory and selectively used to high. „ Mipmap Detail Level Mipmapping is a texturing technique that preserves the detail on what level of motion is the most important consideration. and high-resolution texture maps are stored in...
Use this feature to enable or disable application specific optimization of low- GV-RX80L512V Graphics Accelerator - 26 - Mipmap detail level can set to favor either an increase in memory and selectively used to high. „ Mipmap Detail Level Mipmapping is a texturing technique that preserves the detail on what level of motion is the most important consideration. and high-resolution texture maps are stored in...
Manual
Page 29
... control. „ Color - Adjusting the Gamma can be useful for 3D games that display dimly lit scenes. Video : With Video setting you can be useful for viewing video files: „ Standard Settings Video Overlay Standard Settings offers video presets that require realistic color. Software Installation The color curve line will reflect any changes made to these elements. „ Color Desktop Adjust the overall richness of your Desktop and Full Screen 3D applications and games. Adjusting the Contrast control...
... control. „ Color - Adjusting the Gamma can be useful for 3D games that display dimly lit scenes. Video : With Video setting you can be useful for viewing video files: „ Standard Settings Video Overlay Standard Settings offers video presets that require realistic color. Software Installation The color curve line will reflect any changes made to these elements. „ Color Desktop Adjust the overall richness of your Desktop and Full Screen 3D applications and games. Adjusting the Contrast control...
Manual
Page 31
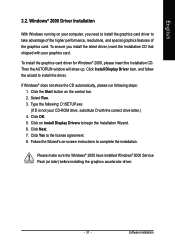
... have installed Windows® 2000 Service Pack (or later) before installing the graphics accelerator driver. - 31 - Type the following steps: 1. Windows® 2000 Driver Installation With Windows running on Install Display Drivers to take advantage of the higher performance, resolutions, and special graphics features of the graphics card. Click Next. 7. To ensure you need to install the graphics card driver to begin the Installation Wizard. 6. Then the AUTORUN window will show the CD automatically, please run following : D:\SETUP...
... have installed Windows® 2000 Service Pack (or later) before installing the graphics accelerator driver. - 31 - Type the following steps: 1. Windows® 2000 Driver Installation With Windows running on Install Display Drivers to take advantage of the higher performance, resolutions, and special graphics features of the graphics card. Click Next. 7. To ensure you need to install the graphics card driver to begin the Installation Wizard. 6. Then the AUTORUN window will show the CD automatically, please run following : D:\SETUP...
Manual
Page 32
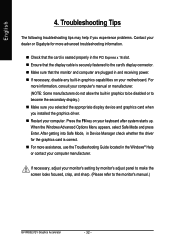
... whether the driver for more advanced troubleshooting information. „ Check that the card is seated properly in the PCI Express x 16 slot. „ Ensure that the monitor and computer are plugged in and receiving power. „ If necessary, disable any built-in graphics to be disabled or to the monitor's manual.) GV-RX80L512V Graphics Accelerator - 32 - Troubleshooting Tips The following troubleshooting tips may help if you installed the graphics driver. „...
... whether the driver for more advanced troubleshooting information. „ Check that the card is seated properly in the PCI Express x 16 slot. „ Ensure that the monitor and computer are plugged in and receiving power. „ If necessary, disable any built-in graphics to be disabled or to the monitor's manual.) GV-RX80L512V Graphics Accelerator - 32 - Troubleshooting Tips The following troubleshooting tips may help if you installed the graphics driver. „...
Manual
Page 33
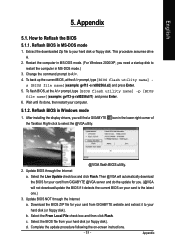
... click Flash. c. Restart the computer in MS-DOS mode. (For Windows 2000/XP, you need a startup disk to your card is the latest one.) 3. Appendix 5.1. Change the command prompt to Reflash the BIOS 5.1.1. Update BIOS through the Internet a. Download the BIOS ZIP file for your card from GIGABYTE @VGA server and do the update for your card from GIGABYTE website and extract it detects the current BIOS on -screen instructions. - 33...
... click Flash. c. Restart the computer in MS-DOS mode. (For Windows 2000/XP, you need a startup disk to your card is the latest one.) 3. Appendix 5.1. Change the command prompt to Reflash the BIOS 5.1.1. Update BIOS through the Internet a. Download the BIOS ZIP file for your card from GIGABYTE @VGA server and do the update for your card from GIGABYTE website and extract it detects the current BIOS on -screen instructions. - 33...


