Manual
Page 1
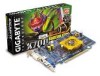
... from without the expressed, written permission of GBT. Notice Please do not remove any errors or omissions that may be out of date before publication of their respective owners. GV-RX70256D/ GV-RX70128DE Radeon X700 Graphics Accelerator User's Manual Rev. 101 12MD-RX70256D-101 Copyright © 2005 GIGABYTE TECHNOLOGY CO., LTD Copyright by GIGA-BYTE TECHNOLOGY CO., LTD. ("GBT"). No part of this VGA card Due to update the information contained...
... from without the expressed, written permission of GBT. Notice Please do not remove any errors or omissions that may be out of date before publication of their respective owners. GV-RX70256D/ GV-RX70128DE Radeon X700 Graphics Accelerator User's Manual Rev. 101 12MD-RX70256D-101 Copyright © 2005 GIGABYTE TECHNOLOGY CO., LTD Copyright by GIGA-BYTE TECHNOLOGY CO., LTD. ("GBT"). No part of this VGA card Due to update the information contained...
Manual
Page 2
...174; XP Driver and Utilities Installation 9 3.1.1. Operating System Requirement 9 3.1.2. Win® 2000 Driver Installation 32 4. Introduction 3 1.1. DirectX Installation 10 3.1.3. Appendix 34 5.1. Features ...3 1.2. Taskbar Icon 16 3.1.6. Troubleshooting Tips 33 5. Minimum System Requirement 3 2. Board Layout 4 2.2. Hardware Installation 4 2.1. Software Installation 9 3.1. Reflash BIOS in Windows mode 34 5.2. Driver Installation 11 3.1.4. Resolutions and Color Depth Table (In Windows® XP 35 GV-RX70256D(128DE) Graphics Accelerator - 2 - How to...
...174; XP Driver and Utilities Installation 9 3.1.1. Operating System Requirement 9 3.1.2. Win® 2000 Driver Installation 32 4. Introduction 3 1.1. DirectX Installation 10 3.1.3. Appendix 34 5.1. Features ...3 1.2. Taskbar Icon 16 3.1.6. Troubleshooting Tips 33 5. Minimum System Requirement 3 2. Board Layout 4 2.2. Hardware Installation 4 2.1. Software Installation 9 3.1. Reflash BIOS in Windows mode 34 5.2. Driver Installation 11 3.1.4. Resolutions and Color Depth Table (In Windows® XP 35 GV-RX70256D(128DE) Graphics Accelerator - 2 - How to...

Manual
Page 3
... higher • One PCI Express x 16 slot • Operating Systems Win® 2000 / Win® XP • 64MB system memory • 50MB of available disk space for full installation • CD-ROM or DVD-ROM drive - 3 - Minimum System Requirement • IBM® or 100% PC compatible with 128MB DDR memory (For GV-RX70128DE only) • Supports DirectX 9.0 • Support AV / S-Video and HDTV output • Supports TV-Out and D-Sub connector • Supports DVI-I connector 1.2. English 1.
... higher • One PCI Express x 16 slot • Operating Systems Win® 2000 / Win® XP • 64MB system memory • 50MB of available disk space for full installation • CD-ROM or DVD-ROM drive - 3 - Minimum System Requirement • IBM® or 100% PC compatible with 128MB DDR memory (For GV-RX70128DE only) • Supports DirectX 9.0 • Support AV / S-Video and HDTV output • Supports TV-Out and D-Sub connector • Supports DVI-I connector 1.2. English 1.
Manual
Page 5
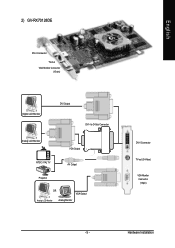
Hardware Installation 2) GV-RX70128DE English DVI-I Connector TV-Out VGA Monitor Connector (15-pin) Digital LCD Monitor DVI Output DVI-I to D-Sub Connector Analog LCD Monitor VGA Output NTSC / PAL TV AV Output Projector OR VGA Output Analog LCD Monitor Analog Monitor DVI-I Connector TV-out (S-Video) VGA Monitor Connector (15pin) - 5 -
Hardware Installation 2) GV-RX70128DE English DVI-I Connector TV-Out VGA Monitor Connector (15-pin) Digital LCD Monitor DVI Output DVI-I to D-Sub Connector Analog LCD Monitor VGA Output NTSC / PAL TV AV Output Projector OR VGA Output Analog LCD Monitor Analog Monitor DVI-I Connector TV-out (S-Video) VGA Monitor Connector (15pin) - 5 -
Manual
Page 7
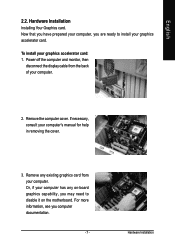
... your computer, you may need to disable it on -board graphics capability, you are ready to install your computer has any existing graphics card from the back of your computer's manual for help in removing the cover. 3. Power off the computer and monitor, then disconnect the display cable from your graphics accelerator card: 1. Remove any on the motherboard. To install your computer. Or, if your graphics accelerator card. For more information...
... your computer, you may need to disable it on -board graphics capability, you are ready to install your computer has any existing graphics card from the back of your computer's manual for help in removing the cover. 3. Power off the computer and monitor, then disconnect the display cable from your graphics accelerator card: 1. Remove any on the motherboard. To install your computer. Or, if your graphics accelerator card. For more information...

Manual
Page 8
... VCR To VGA Monitor You are now ready to next chapter for detailed instructions. then turn on the computer and monitor. Please refer to proceed with the installation of the graphics card drivers. then align your graphics card with a DVI connector, you can connect a flat panel display to fasten the card in firmly until the card is fully seated. 5. Plug the display cable into your graphics card came with the PCI Express x 16 slot...
... VCR To VGA Monitor You are now ready to next chapter for detailed instructions. then turn on the computer and monitor. Please refer to proceed with the installation of the graphics card drivers. then align your graphics card with a DVI connector, you can connect a flat panel display to fasten the card in firmly until the card is fully seated. 5. Plug the display cable into your graphics card came with the PCI Express x 16 slot...
Manual
Page 9
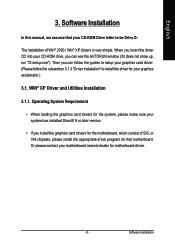
... your graphics accelerator.) 3.1. Operating System Requirement • When loading the graphics card drivers for the system, please make sure your CD-ROM drive, you install the graphics card drivers for the motherboard, which consist of Win® 2000 / Win® XP drivers is very simple. When you insert the driver CD into your system has installed DirectX 9 or later version. • If you can follow the guides to setup your graphics card driver. (Please...
... your graphics accelerator.) 3.1. Operating System Requirement • When loading the graphics card drivers for the system, please make sure your CD-ROM drive, you install the graphics card drivers for the motherboard, which consist of Win® 2000 / Win® XP drivers is very simple. When you insert the driver CD into your system has installed DirectX 9 or later version. • If you can follow the guides to setup your graphics card driver. (Please...
Manual
Page 11
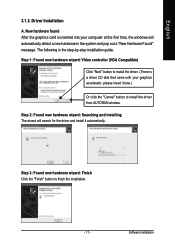
... 1: Found new hardware wizard: Video controller (VGA Compatible) Click "Next" button to install the driver. (There is the step-by-step installation guide. The following is a driver CD disk that came with your computer at the first time, the windows will search for the driver and install it now.) Or click the "Cancel" button to finish the installation. - 11 - Step 2: Found new hardware wizard: Searching and installing The wizard...
... 1: Found new hardware wizard: Video controller (VGA Compatible) Click "Next" button to install the driver. (There is the step-by-step installation guide. The following is a driver CD disk that came with your computer at the first time, the windows will search for the driver and install it now.) Or click the "Cancel" button to finish the installation. - 11 - Step 2: Found new hardware wizard: Searching and installing The wizard...
Manual
Page 12
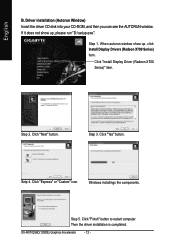
... , click Install Display Drivers (Radeon X700 Series) item. Click "Install Display Driver (Radeon X700 Series)" item. Click "Next" button. Click "Express" or "Custom" icon. Step 5. Then the driver installation is completed. Step 3. GV-RX70256D(128DE) Graphics Accelerator - 12 - English B. Step 1. If it does not show up , please run "D:\setup.exe". Step 2. Click "Yes" button. Setp 4. Windows installings the components. Click "Finish" button to restart computer. Driver installation (Autorun Window) Insert the driver CD disk into...
... , click Install Display Drivers (Radeon X700 Series) item. Click "Install Display Driver (Radeon X700 Series)" item. Click "Next" button. Click "Express" or "Custom" icon. Step 5. Then the driver installation is completed. Step 3. GV-RX70256D(128DE) Graphics Accelerator - 12 - English B. Step 1. If it does not show up , please run "D:\setup.exe". Step 2. Click "Yes" button. Setp 4. Windows installings the components. Click "Finish" button to restart computer. Driver installation (Autorun Window) Insert the driver CD disk into...

Manual
Page 16
... "VGA Info" and "Color Adjust"tabs. You can link to change your display settings. Click "Advanced" after clickng Settings. Click the appropriate tab to GBT website for updated information about the graphics accelerator, latest drivers, and other functions. Taskbar Icon After installation of the graphics card's enhanced and other information. Right-clicking this icon opens the GBT control panel, showing a menu composed of shortcute of the display drivers...
... "VGA Info" and "Color Adjust"tabs. You can link to change your display settings. Click "Advanced" after clickng Settings. Click the appropriate tab to GBT website for updated information about the graphics accelerator, latest drivers, and other functions. Taskbar Icon After installation of the graphics card's enhanced and other information. Right-clicking this icon opens the GBT control panel, showing a menu composed of shortcute of the display drivers...
Manual
Page 18
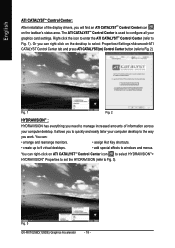
... press ATI CATALYST(tm) Control Center button (refer to configure all your computer desktop. You can right-click on the taskbar's status area. The ATI CATALYSTTM Control Center is used to Fig. 2). Right-click the icon to enter the ATI CATALYSTTM Control Center (refer to windows and menus. Fig. 3 GV-RX70256D(128DE) Graphics Accelerator - 18 - English ATI CATALYSTTM Control Center: After installation of information across your graphics card settings. Or...
... press ATI CATALYST(tm) Control Center button (refer to configure all your computer desktop. You can right-click on the taskbar's status area. The ATI CATALYSTTM Control Center is used to Fig. 2). Right-click the icon to enter the ATI CATALYSTTM Control Center (refer to windows and menus. Fig. 3 GV-RX70256D(128DE) Graphics Accelerator - 18 - English ATI CATALYSTTM Control Center: After installation of information across your graphics card settings. Or...
Manual
Page 19
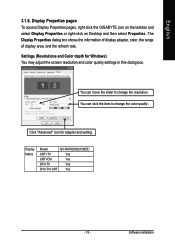
... adjust the screen resolution and color quality settings in this dialog box. Display Matrix Model GV-RX70256D(128DE) CRT+TV Yes CRT+DVI Yes DVI+TV Yes DVI+TV+CRT Yes - 19 - You can click the item to change the color quality. Display Properties pages To access Display Properties pages, right-click the GIGABYTE icon on the taskbar and select Display Properties or right-click on Desktop and then select Properties. Settings (Resolutions and Color depth for adapter and setting. Software Installation...
... adjust the screen resolution and color quality settings in this dialog box. Display Matrix Model GV-RX70256D(128DE) CRT+TV Yes CRT+DVI Yes DVI+TV Yes DVI+TV+CRT Yes - 19 - You can click the item to change the color quality. Display Properties pages To access Display Properties pages, right-click the GIGABYTE icon on the taskbar and select Display Properties or right-click on Desktop and then select Properties. Settings (Resolutions and Color depth for adapter and setting. Software Installation...

Manual
Page 21
... your computer, you need to a specific graphics card. If there is more than one graphics card installed in your own personal video settings that can use profiles to restore defaults, change skins, and update the CATALYST Control Center. Software Installation English Profiles Properties: You can be quickly activated manually, through a Hotkey, or by file association. Preferences Properties: The Preferences page helps to create customized environments for your desktop, video, and 3D applications. The CATALYST Control Center Preferences page contains...
... your computer, you need to a specific graphics card. If there is more than one graphics card installed in your own personal video settings that can use profiles to restore defaults, change skins, and update the CATALYST Control Center. Software Installation English Profiles Properties: You can be quickly activated manually, through a Hotkey, or by file association. Preferences Properties: The Preferences page helps to create customized environments for your desktop, video, and 3D applications. The CATALYST Control Center Preferences page contains...
Manual
Page 22
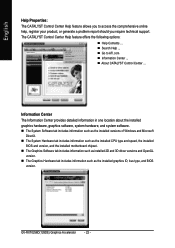
... CATALYST Control Center ... GV-RX70256D(128DE) Graphics Accelerator - 22 - Information Center The Information Center provides detailed information in one location about the installed graphics hardware, graphics software, system hardware, and system software. „ The System Software tab includes information such as the installed versions of Windows and Microsoft DirectX. „ The System Hardware tab includes information such as the installed CPU type and speed, the installed BIOS and version, and the installed motherboard chipset. „ The Graphics Software tab...
... CATALYST Control Center ... GV-RX70256D(128DE) Graphics Accelerator - 22 - Information Center The Information Center provides detailed information in one location about the installed graphics hardware, graphics software, system hardware, and system software. „ The System Software tab includes information such as the installed versions of Windows and Microsoft DirectX. „ The System Hardware tab includes information such as the installed CPU type and speed, the installed BIOS and version, and the installed motherboard chipset. „ The Graphics Software tab...

Manual
Page 27
... can set to favor either an increase in memory and selectively used to enable or disable application specific optimization of motion is required, especially if the animated object rotates or moves into the background. Setting for performance is best used when ...low to high. „ Mipmap Detail Level Mipmapping is needed. and high-resolution texture maps are stored in system processing performance or improved image quality: Setting for quality is best used when the 3D image is animated and smoothness of the video driver. English „ CATALYSTTM A.I . Software Installation...
... can set to favor either an increase in memory and selectively used to enable or disable application specific optimization of motion is required, especially if the animated object rotates or moves into the background. Setting for performance is best used when ...low to high. „ Mipmap Detail Level Mipmapping is needed. and high-resolution texture maps are stored in system processing performance or improved image quality: Setting for quality is best used when the 3D image is animated and smoothness of the video driver. English „ CATALYSTTM A.I . Software Installation...
Manual
Page 28
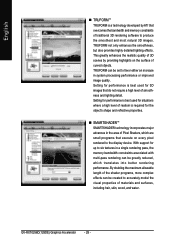
... of materials and surfaces, including hair, skin, wood, and water. GV-RX70256D(128DE) Graphics Accelerator - 28 - Setting for performance is required for the object's shape and reflective properties. „ SMARTSHADERTM SMARTSHADER technology incorporates major advances in a single rendering pass, the memory bandwidth constraints associated with multi-pass rendering can be greatly reduced, which are small programs that do not...
... of materials and surfaces, including hair, skin, wood, and water. GV-RX70256D(128DE) Graphics Accelerator - 28 - Setting for performance is required for the object's shape and reflective properties. „ SMARTSHADERTM SMARTSHADER technology incorporates major advances in a single rendering pass, the memory bandwidth constraints associated with multi-pass rendering can be greatly reduced, which are small programs that do not...

Manual
Page 30
...; Color Desktop Adjust the overall richness of color. Adjusting the Contrast control alters the overall contrast. Adjusting the Brightness and Contrast can set Gamma, Brightness, Contrast, Saturation, and Hue. „ Theater Mode Use Theater Mode to e preview the changes before applying them. English Color : The Color page helps to adjust the color properties of Home, Work, Theater, and Custom. Video : With Video setting you view streaming video. GV-RX70256D(128DE) Graphics Accelerator - 30 - The Color curve is a graphical...
...; Color Desktop Adjust the overall richness of color. Adjusting the Contrast control alters the overall contrast. Adjusting the Brightness and Contrast can set Gamma, Brightness, Contrast, Saturation, and Hue. „ Theater Mode Use Theater Mode to e preview the changes before applying them. English Color : The Color page helps to adjust the color properties of Home, Work, Theater, and Custom. Video : With Video setting you view streaming video. GV-RX70256D(128DE) Graphics Accelerator - 30 - The Color curve is a graphical...
Manual
Page 32
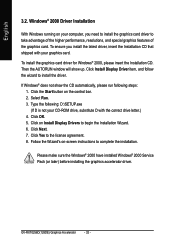
... begin the Installation Wizard. 6. Click on -screen instructions to the license agreement. 8. GV-RX70256D(128DE) Graphics Accelerator - 32 - Type the following steps: 1. Please make sure the Windows® 2000 have installed Windows® 2000 Service Pack (or later) before installing the graphics accelerator driver. Click the Start button on your graphics card. Click OK. 5. English 3.2. Then the AUTORUN window will show the CD automatically, please run following : D:\SETUP.exe...
... begin the Installation Wizard. 6. Click on -screen instructions to the license agreement. 8. GV-RX70256D(128DE) Graphics Accelerator - 32 - Type the following steps: 1. Please make sure the Windows® 2000 have installed Windows® 2000 Service Pack (or later) before installing the graphics accelerator driver. Click the Start button on your graphics card. Click OK. 5. English 3.2. Then the AUTORUN window will show the CD automatically, please run following : D:\SETUP.exe...
Manual
Page 33
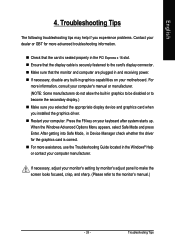
..., adjust your monitor's setting by monitor's adjust panel to make the screen looks focused, crisp, and sharp. (Please refer to the card's display connector. „ Make sure that the monitor and computer are plugged in and receiving power. „ If necessary, disable any built-in graphics capabilities on your motherboard. When the Windows Advanced Options Menu appears, select Safe Mode and press Enter. English 4. Troubleshooting Tips The following troubleshooting...
..., adjust your monitor's setting by monitor's adjust panel to make the screen looks focused, crisp, and sharp. (Please refer to the card's display connector. „ Make sure that the monitor and computer are plugged in and receiving power. „ If necessary, disable any built-in graphics capabilities on your motherboard. When the Windows Advanced Options Menu appears, select Safe Mode and press Enter. English 4. Troubleshooting Tips The following troubleshooting...
Manual
Page 34
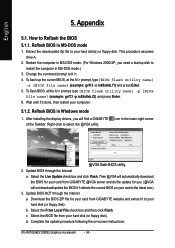
... assumes drive A. 2. Change the command prompt to restart the computer in MS-DOS mode 1. Reflash BIOS in the lower-right corner @VGA flash BIOS utility. 2. Reflash BIOS in MS-DOS mode.) 3. Extract the downloaded Zip file to your hard disk (or floppy disk). Then @VGA will automatically download the BIOS for you. (@VGA will find a GIGABYTE of the Taskbar. Update BIOS NOT through the Internet a. After installing the display drivers, you need a startup disk to...
... assumes drive A. 2. Change the command prompt to restart the computer in MS-DOS mode 1. Reflash BIOS in the lower-right corner @VGA flash BIOS utility. 2. Reflash BIOS in MS-DOS mode.) 3. Extract the downloaded Zip file to your hard disk (or floppy disk). Then @VGA will automatically download the BIOS for you. (@VGA will find a GIGABYTE of the Taskbar. Update BIOS NOT through the Internet a. After installing the display drivers, you need a startup disk to...


