Manual
Page 3
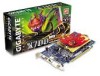
... GBT. No part of this manual may void the warranty of this VGA card Due to rapid change in any labels on VGA card, this may be reproduced or transmitted in technology, some of the specifications might be out of date before publication of their respective owners. GV-RX70128D Radeon X700 Graphics Accelerator User's Manual Rev. 101 12MD-RX70128D-101 Copyright © 2004 GIGABYTE TECHNOLOGY CO., LTD Copyright by GIGA-BYTE TECHNOLOGY CO., LTD...
... GBT. No part of this manual may void the warranty of this VGA card Due to rapid change in any labels on VGA card, this may be reproduced or transmitted in technology, some of the specifications might be out of date before publication of their respective owners. GV-RX70128D Radeon X700 Graphics Accelerator User's Manual Rev. 101 12MD-RX70128D-101 Copyright © 2004 GIGABYTE TECHNOLOGY CO., LTD Copyright by GIGA-BYTE TECHNOLOGY CO., LTD...

Manual
Page 4
... BIOS 33 5.1.1. Resolutions and Color Depth Table (In Windows® XP 34 GV-RX70128D Graphics Accelerator - 2 - Introduction 3 1.1. Utilities on Driver CD ...12 3.1.5. Windows® 2000 Driver Installation 31 4. Reflash BIOS in Windows mode 33 5.2. Windows® XP Driver and Utilities Installation 8 3.1.1. Troubleshooting Tips 32 5. English Table of Contents 1. Minimum System Requirement 3 2. Reflash BIOS in MS-DOS mode 33 5.1.2. DirectX Installation ...9 3.1.3. Appendix 33 5.1. Software Installation 8 3.1. Board Layout 4 2.2. Driver...
... BIOS 33 5.1.1. Resolutions and Color Depth Table (In Windows® XP 34 GV-RX70128D Graphics Accelerator - 2 - Introduction 3 1.1. Utilities on Driver CD ...12 3.1.5. Windows® 2000 Driver Installation 31 4. Reflash BIOS in Windows mode 33 5.2. Windows® XP Driver and Utilities Installation 8 3.1.1. Troubleshooting Tips 32 5. English Table of Contents 1. Minimum System Requirement 3 2. Reflash BIOS in MS-DOS mode 33 5.1.2. DirectX Installation ...9 3.1.3. Appendix 33 5.1. Software Installation 8 3.1. Board Layout 4 2.2. Driver...
Manual
Page 5
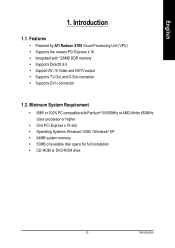
... processor or higher • One PCI Express x 16 slot • Operating Systems Windows® 2000 / Windows® XP • 64MB system memory • 50MB of available disk space for full installation • CD-ROM or DVD-ROM drive - 3 - Introduction 1.1. Minimum System Requirement • IBM® or 100% PC compatible with 128MB DDR memory • Supports DirectX 9.0 • Support AV / S-Video and HDTV output • Supports TV-Out and D-Sub connector • Supports DVI-I connector 1.2.
... processor or higher • One PCI Express x 16 slot • Operating Systems Windows® 2000 / Windows® XP • 64MB system memory • 50MB of available disk space for full installation • CD-ROM or DVD-ROM drive - 3 - Introduction 1.1. Minimum System Requirement • IBM® or 100% PC compatible with 128MB DDR memory • Supports DirectX 9.0 • Support AV / S-Video and HDTV output • Supports TV-Out and D-Sub connector • Supports DVI-I connector 1.2.

Manual
Page 8
... graphics accelerator card: 1. Or, if your computer. 2. For more information, see you may need to install your computer. Remove any existing graphics card from the back of your computer has any on the motherboard. Now that you have prepared your computer, you are ready to disable it on -board graphics capability, you computer documentation. Hardware Installation Installing Your Graphics card. English 2.2. Power off the computer and monitor, then disconnect the display cable...
... graphics accelerator card: 1. Or, if your computer. 2. For more information, see you may need to install your computer. Remove any existing graphics card from the back of your computer has any on the motherboard. Now that you have prepared your computer, you are ready to disable it on -board graphics capability, you computer documentation. Hardware Installation Installing Your Graphics card. English 2.2. Power off the computer and monitor, then disconnect the display cable...
Manual
Page 9
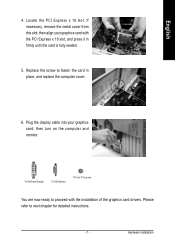
... proceed with the PCI Express x 16 slot, and press it in place, and replace the computer cover. 6. To Flat Panel Display To VGA Monitor 7-Pin for detailed instructions. - 7 - If necessary, remove the metal cover from this slot; Hardware Installation English 4. then align your graphics card; Please refer to next chapter for TV-out only You are now ready to fasten the card in firmly until...
... proceed with the PCI Express x 16 slot, and press it in place, and replace the computer cover. 6. To Flat Panel Display To VGA Monitor 7-Pin for detailed instructions. - 7 - If necessary, remove the metal cover from this slot; Hardware Installation English 4. then align your graphics card; Please refer to next chapter for TV-out only You are now ready to fasten the card in firmly until...
Manual
Page 10
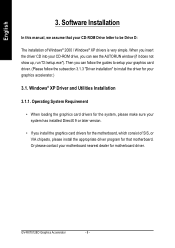
... graphics accelerator.) 3.1. Windows® XP Driver and Utilities Installation 3.1.1. GV-RX70128D Graphics Accelerator - 8 - Operating System Requirement • When loading the graphics card drivers for the motherboard, which consist of Windows® 2000 / Windows® XP drivers is very simple. Then you can follow the guides to setup your graphics card driver. (Please follow the subsection 3.1.3 "Driver installation" to be Drive D: The installation of SIS, or VIA chipsets, please install the appropriate driver program for your system has installed DirectX 9 or later version...
... graphics accelerator.) 3.1. Windows® XP Driver and Utilities Installation 3.1.1. GV-RX70128D Graphics Accelerator - 8 - Operating System Requirement • When loading the graphics card drivers for the motherboard, which consist of Windows® 2000 / Windows® XP drivers is very simple. Then you can follow the guides to setup your graphics card driver. (Please follow the subsection 3.1.3 "Driver installation" to be Drive D: The installation of SIS, or VIA chipsets, please install the appropriate driver program for your system has installed DirectX 9 or later version...
Manual
Page 12
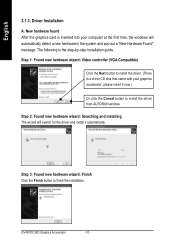
... new hardware wizard: Video controller (VGA Compatible) Click the Next button to install the driver. (There is a driver CD disk that came with your computer at the first time, the windows will search for the driver and install it now.) Or click the Cancel button to finish the installation. Step 3: Found new hardware wizard: Finish Click the Finish button to install the driver from AUTORUN window. GV-RX70128D Graphics Accelerator - 10 - Driver Installation A. Step 2: Found new hardware...
... new hardware wizard: Video controller (VGA Compatible) Click the Next button to install the driver. (There is a driver CD disk that came with your computer at the first time, the windows will search for the driver and install it now.) Or click the Cancel button to finish the installation. Step 3: Found new hardware wizard: Finish Click the Finish button to install the driver from AUTORUN window. GV-RX70128D Graphics Accelerator - 10 - Driver Installation A. Step 2: Found new hardware...

Manual
Page 13
... Window) Insert the driver CD disk into your CD-ROM, and then you can see the AUTORUN window. Click Next button. Click Express or Custom icon. Step 5. Software Installation Windows installings the components. If it does not show up , please run "D:\setup.exe". Click the Finish button to restart computer. Click the Install Display Drivers (Radeon X700 Series) item. English B. When autorun window show up , click the Install Display Drivers (Radeon...
... Window) Insert the driver CD disk into your CD-ROM, and then you can see the AUTORUN window. Click Next button. Click Express or Custom icon. Step 5. Software Installation Windows installings the components. If it does not show up , please run "D:\setup.exe". Click the Finish button to restart computer. Click the Install Display Drivers (Radeon X700 Series) item. English B. When autorun window show up , click the Install Display Drivers (Radeon...
Manual
Page 14
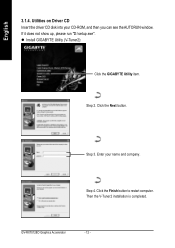
Step 3. Step 2. Then the V-Tuner2 installation is completed. Click the Next button. Step 4. English 3.1.4. z Install GIGABYTE Utility (V-Tuner2): Click the GIGABYTE Utility item. GV-RX70128D Graphics Accelerator - 12 - Click the Finish button to restart computer. Utilities on Driver CD Insert the driver CD disk into your name and company. If it does not show up, please run "D:\setup.exe". Enter your CD-ROM, and then you can see the AUTORUN window.
Step 3. Step 2. Then the V-Tuner2 installation is completed. Click the Next button. Step 4. English 3.1.4. z Install GIGABYTE Utility (V-Tuner2): Click the GIGABYTE Utility item. GV-RX70128D Graphics Accelerator - 12 - Click the Finish button to restart computer. Utilities on Driver CD Insert the driver CD disk into your name and company. If it does not show up, please run "D:\setup.exe". Enter your CD-ROM, and then you can see the AUTORUN window.
Manual
Page 17
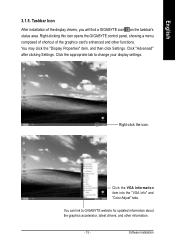
You can link to change your display settings. Taskbar Icon After installation of the graphics card's enhanced and other information. - 15 - Click "Advanced" after clicking Settings. Software Installation Right-click the icon. English 3.1.5. You may click the "Display Properties" item, and then click Settings. Right-clicking this icon opens the GIGABYTE control panel, showing a menu composed of shortcut of the display drivers, you will find a GIGABYTE icon on the...
You can link to change your display settings. Taskbar Icon After installation of the graphics card's enhanced and other information. - 15 - Click "Advanced" after clicking Settings. Software Installation Right-click the icon. English 3.1.5. You may click the "Display Properties" item, and then click Settings. Right-clicking this icon opens the GIGABYTE control panel, showing a menu composed of shortcut of the display drivers, you will find a GIGABYTE icon on the...
Manual
Page 19
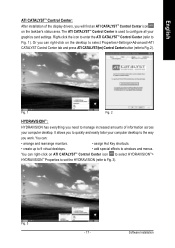
... CATALYSTTM Control Center (refer to configure all your graphics card settings. Fig. 1 Fig. 2 HYDRAVISIONTM : HYDRAVISION has everything you work. You can right-click on the desktop to select Properties>Settings>Advanced>ATI CATALYST Control Center tab and press ATI CATALYST(tm) Control Center button (refer to Fig. 2). Software Installation Fig. 3 - 17 - Or you will find an ATI CATALYSTTM Control Center icon on the taskbar's status area. The ATI CATALYSTTM Control Center is used...
... CATALYSTTM Control Center (refer to configure all your graphics card settings. Fig. 1 Fig. 2 HYDRAVISIONTM : HYDRAVISION has everything you work. You can right-click on the desktop to select Properties>Settings>Advanced>ATI CATALYST Control Center tab and press ATI CATALYST(tm) Control Center button (refer to Fig. 2). Software Installation Fig. 3 - 17 - Or you will find an ATI CATALYSTTM Control Center icon on the taskbar's status area. The ATI CATALYSTTM Control Center is used...
Manual
Page 20
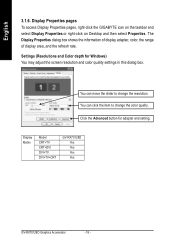
... Display Properties dialog box shows the information of display adapter, color, the range of display area, and the refresh rate. You can click the item to change the color quality. Display Matrix Model CRT+TV CRT+DVI DVI+TV DVI+TV+CRT GV-RX70128D Yes Yes Yes Yes GV-RX70128D Graphics Accelerator - 18 - Settings (Resolutions and Color depth for adapter and setting. Display Properties pages To access Display Properties pages, right-click the GIGABYTE icon on the taskbar and select Display Properties or right-click on Desktop...
... Display Properties dialog box shows the information of display adapter, color, the range of display area, and the refresh rate. You can click the item to change the color quality. Display Matrix Model CRT+TV CRT+DVI DVI+TV DVI+TV+CRT GV-RX70128D Yes Yes Yes Yes GV-RX70128D Graphics Accelerator - 18 - Settings (Resolutions and Color depth for adapter and setting. Display Properties pages To access Display Properties pages, right-click the GIGABYTE icon on the taskbar and select Display Properties or right-click on Desktop...

Manual
Page 21
... a single button in the left navigation pane. The left navigation pane for novice users. „ Advanced View The Advanced view provides access to expose only the features they adjust most often or that lists all the advanced features. English View Properties: The CATALYST Control Center dashboard supports three types of a modifier key or keys, such as changing a graphics setting or opening an application.
... a single button in the left navigation pane. The left navigation pane for novice users. „ Advanced View The Advanced view provides access to expose only the features they adjust most often or that lists all the advanced features. English View Properties: The CATALYST Control Center dashboard supports three types of a modifier key or keys, such as changing a graphics setting or opening an application.

Manual
Page 22
... Preferences page helps to a specific graphics card. If there is more than one graphics card installed in your desktop, video, and 3D applications. GV-RX70128D Graphics Accelerator - 20 - English Profiles Properties: You can be quickly activated manually, through a Hotkey, or by file association. The CATALYST Control Center Preferences page contains the following options: „ Always on Top „ Hide Tooltips „ Hide Toolbar Text „ Enable System Tray menu „...
... Preferences page helps to a specific graphics card. If there is more than one graphics card installed in your desktop, video, and 3D applications. GV-RX70128D Graphics Accelerator - 20 - English Profiles Properties: You can be quickly activated manually, through a Hotkey, or by file association. The CATALYST Control Center Preferences page contains the following options: „ Always on Top „ Hide Tooltips „ Hide Toolbar Text „ Enable System Tray menu „...
Manual
Page 23
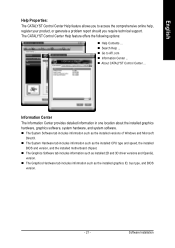
... online help, register your product, or generate a problem report should you require technical support. Software Installation English Help Properties: The CATALYST Control Center Help feature allows you to ATI.com „ Information Center ... „ About CATALYST Control Center ... Information Center The Information Center provides detailed information in one location about the installed graphics hardware, graphics software, system hardware, and system software. „ The System Software tab includes information such as the installed versions of Windows and Microsoft DirectX...
... online help, register your product, or generate a problem report should you require technical support. Software Installation English Help Properties: The CATALYST Control Center Help feature allows you to ATI.com „ Information Center ... „ About CATALYST Control Center ... Information Center The Information Center provides detailed information in one location about the installed graphics hardware, graphics software, system hardware, and system software. „ The System Software tab includes information such as the installed versions of Windows and Microsoft DirectX...

Manual
Page 28
... by moving the slider from low to high. „ Mipmap Detail Level Mipmapping is needed. A series of the video driver. Mipmap detail level can set to favor either an increase in memory and selectively used to enable or disable application specific optimization of low- Setting for performance is best used when high surface detail is the most important consideration. GV-RX70128D Graphics Accelerator - 26 - helps to create the...
... by moving the slider from low to high. „ Mipmap Detail Level Mipmapping is needed. A series of the video driver. Mipmap detail level can set to favor either an increase in memory and selectively used to enable or disable application specific optimization of low- Setting for performance is best used when high surface detail is the most important consideration. GV-RX70128D Graphics Accelerator - 26 - helps to create the...

Manual
Page 31
... values of color. The color curve line will reflect any changes made to adjust the color properties of your Desktop and Full Screen 3D applications and games. Adjusting the Brightness and Contrast can be useful for 3D games that require realistic color. English Color : The Color page helps to these elements. „ Color Desktop Adjust the overall richness of color by using the Gamma control. Select a preset from the Video Presets...
... values of color. The color curve line will reflect any changes made to adjust the color properties of your Desktop and Full Screen 3D applications and games. Adjusting the Brightness and Contrast can be useful for 3D games that require realistic color. English Color : The Color page helps to these elements. „ Color Desktop Adjust the overall richness of color by using the Gamma control. Select a preset from the Video Presets...

Manual
Page 33
... correct drive letter.) 4. Click Install Display Driver item, and follow the wizard to begin the Installation Wizard. 6. Select Run. 3. Click the Start button on your graphics card. Software Installation Click on -screen instructions to the license agreement. 8. Click Next. 7. English 3.2. Type the following steps: 1. Follow the Wizard's on Install Display Drivers to install the driver. To ensure you need to install the graphics card driver to take advantage of the higher performance, resolutions...
... correct drive letter.) 4. Click Install Display Driver item, and follow the wizard to begin the Installation Wizard. 6. Select Run. 3. Click the Start button on your graphics card. Software Installation Click on -screen instructions to the license agreement. 8. Click Next. 7. English 3.2. Type the following steps: 1. Follow the Wizard's on Install Display Drivers to install the driver. To ensure you need to install the graphics card driver to take advantage of the higher performance, resolutions...
Manual
Page 34
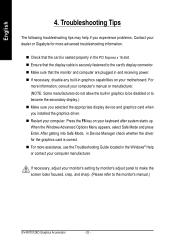
... or Gigabyte for the graphics card is correct. „ For more advanced troubleshooting information. „ Check that the card is seated properly in the PCI Express x 16 slot. „ Ensure that the display cable is securely fastened to the card's display connector. „ Make sure that the monitor and computer are plugged in and receiving power. „ If necessary, disable any built-in the Windows®...
... or Gigabyte for the graphics card is correct. „ For more advanced troubleshooting information. „ Check that the card is seated properly in the PCI Express x 16 slot. „ Ensure that the display cable is securely fastened to the card's display connector. „ Make sure that the monitor and computer are plugged in and receiving power. „ If necessary, disable any built-in the Windows®...
Manual
Page 35
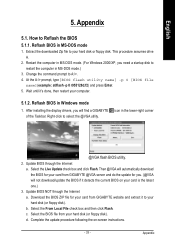
... @VGA utility. After installing the display drivers, you will not download/update the BIOS if it detects the current BIOS on -screen instructions. - 33 - Right-click to A:\>. 4. b. Appendix How to your hard disk (or floppy disk). Restart the computer in MS-DOS mode. (For Windows 2000/XP, you . (@VGA will find a GIGABYTE of the Taskbar. Wait until it to Reflash the BIOS 5.1.1. Reflash BIOS in the lower-right corner @VGA flash BIOS utility. 2. Update BIOS...
... @VGA utility. After installing the display drivers, you will not download/update the BIOS if it detects the current BIOS on -screen instructions. - 33 - Right-click to A:\>. 4. b. Appendix How to your hard disk (or floppy disk). Restart the computer in MS-DOS mode. (For Windows 2000/XP, you . (@VGA will find a GIGABYTE of the Taskbar. Wait until it to Reflash the BIOS 5.1.1. Reflash BIOS in the lower-right corner @VGA flash BIOS utility. 2. Update BIOS...


