
Manual
Page 1
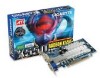
... owners. Reverse engineering or disassembly is protected by GIGA-BYTE TECHNOLOGY CO., LTD. ("GBT"). AMD® Graphics Accelerator User's Manual Rev. 104 Copyright © 2012 GIGABYTE TECHNOLOGY CO., LTD Copyright by U.S. The author assumes no responsibility for home and other intellectual property rights.
... owners. Reverse engineering or disassembly is protected by GIGA-BYTE TECHNOLOGY CO., LTD. ("GBT"). AMD® Graphics Accelerator User's Manual Rev. 104 Copyright © 2012 GIGABYTE TECHNOLOGY CO., LTD Copyright by U.S. The author assumes no responsibility for home and other intellectual property rights.

Manual
Page 2
Introduction...3 1.1. Display Properties Pages 21 4. Appendix...37 - 2 - Software Installation ...7 3.1. Driver Installation...7 3.1.2. Minimum System Requirements 3 2. GIGABYTE OC Guru II...9 3.2. Hardware Installation 4 2.1. Driver and Utility Installation 7 3.1.1. AMD Eyefinity ...36 5. AMD Crossfire ...5 3. Table of Contents 1. Taskbar Icon ...19 3.3. Hardware Installation ...4 2.1.1.
Introduction...3 1.1. Display Properties Pages 21 4. Appendix...37 - 2 - Software Installation ...7 3.1. Driver Installation...7 3.1.2. Minimum System Requirements 3 2. GIGABYTE OC Guru II...9 3.2. Hardware Installation 4 2.1. Driver and Utility Installation 7 3.1.1. AMD Eyefinity ...36 5. AMD Crossfire ...5 3. Table of Contents 1. Taskbar Icon ...19 3.3. Hardware Installation ...4 2.1.1.
Manual
Page 3
Intel®Pentium®4 / CoreTM 2 or AMD AthlonTM / PhenomTM - 1 GB or more of system memory for software installation (CD-ROM or DVD-ROM drive) • Operating System - Introduction Windows®XP with Service Pack 2 (SP2) - Windows®XP Professional x64 Edition - 3 - 1. Windows ® 8 - Windows ® Vista - Minimum System Requirements • Hardware - Windows ® 7 - Optical drive for best performance - Introduction 1.1.
Intel®Pentium®4 / CoreTM 2 or AMD AthlonTM / PhenomTM - 1 GB or more of system memory for software installation (CD-ROM or DVD-ROM drive) • Operating System - Introduction Windows®XP with Service Pack 2 (SP2) - Windows®XP Professional x64 Edition - 3 - 1. Windows ® 8 - Windows ® Vista - Minimum System Requirements • Hardware - Windows ® 7 - Optical drive for best performance - Introduction 1.1.
Manual
Page 4
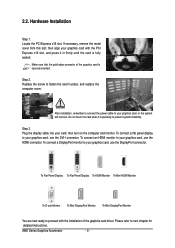
then align your graphics card with the installation of the graphics card is fully seated. Step 2. Step 3. To connect a flat panel display to prevent system instability. Please refer to fasten the card in firmly until the card is securely inserted. If necessary, remove the metal cover from this slot; Plug the display cable into your graphics card, use the DVI-I connector. Locate the PCI Express x16 slot. Make sure that the gold edge connector of the graphics card driver. then turn on the computer and monitor. Do not touch the card when it in place, and ...
then align your graphics card with the installation of the graphics card is fully seated. Step 2. Step 3. To connect a flat panel display to prevent system instability. Please refer to fasten the card in firmly until the card is securely inserted. If necessary, remove the metal cover from this slot; Plug the display cable into your graphics card, use the DVI-I connector. Locate the PCI Express x16 slot. Make sure that the gold edge connector of the graphics card driver. then turn on the computer and monitor. Do not touch the card when it in place, and ...
Manual
Page 5
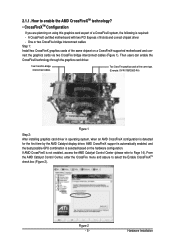
...-supported motherboard and connect the graphics cards via two CrossFire bridge interconnect cables (Figure 1). Hardware Installation Two CrossFire graphics cards of the same type. (Example: GV-RX195P256D-RH) Figure 1 Step 2: After installing graphics card driver in operating system, when an AMD CrossFireX configuration is detected for the first time...
...-supported motherboard and connect the graphics cards via two CrossFire bridge interconnect cables (Figure 1). Hardware Installation Two CrossFire graphics cards of the same type. (Example: GV-RX195P256D-RH) Figure 1 Step 2: After installing graphics card driver in operating system, when an AMD CrossFireX configuration is detected for the first time...

Manual
Page 6
... not have one, touch both audio and video signals. If you work correctly, please use official GIGABYTE BIOS only. The card contains sensitive electric components, which can handle both of ficial GIGABYTE BIOS might cause problem(s) on the graphics card. Using non-of your system. If no shipping and...
... not have one, touch both audio and video signals. If you work correctly, please use official GIGABYTE BIOS only. The card contains sensitive electric components, which can handle both of ficial GIGABYTE BIOS might cause problem(s) on the graphics card. Using non-of your system. If no shipping and...

Manual
Page 7
3. Driver and Utility Installation 3.1.1. For software MPEG support in Windows XP, you exactly see on your optical drive. Software Installation Make sure your system has installed the appropriate motherboard drivers (for the motherboard drivers, please contact the motherboard manufacturer.) Notice : The photos in the screen shot below. (If the driver Autorun screen does not appear automatically, go to install DirectX separately. - 7 - The driver Autorun screen is automatically displayed which looks like that shown in this manual are for reference only and may not match ...
3. Driver and Utility Installation 3.1.1. For software MPEG support in Windows XP, you exactly see on your optical drive. Software Installation Make sure your system has installed the appropriate motherboard drivers (for the motherboard drivers, please contact the motherboard manufacturer.) Notice : The photos in the screen shot below. (If the driver Autorun screen does not appear automatically, go to install DirectX separately. - 7 - The driver Autorun screen is automatically displayed which looks like that shown in this manual are for reference only and may not match ...

Manual
Page 8
Then the driver installation is installing the components. Setp 4: Click the Express or Custom icon and then click Next. Step 6: Click the Finish button to restart the computer. The system is completed. AMD Series Graphics Accelerator - 8 - Step 5: Click the Accept button.
Then the driver installation is installing the components. Setp 4: Click the Express or Custom icon and then click Next. Step 6: Click the Finish button to restart the computer. The system is completed. AMD Series Graphics Accelerator - 8 - Step 5: Click the Accept button.
Manual
Page 9
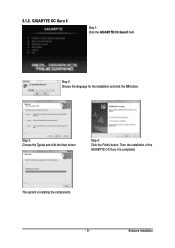
The system is completed. 3.1.2. Then the installation of the GIGABYTE OC Guru II is installing the components. - 9 - Software Installation GIGABYTE OC Guru II Step 1: Click the GIGABYTE OC Guru II item. Step 3: Choose the Typical and click the Next button Step 4: Click the Finish button. Step 2: Choose the language for the installation and click the OK button.
The system is completed. 3.1.2. Then the installation of the GIGABYTE OC Guru II is installing the components. - 9 - Software Installation GIGABYTE OC Guru II Step 1: Click the GIGABYTE OC Guru II item. Step 3: Choose the Typical and click the Next button Step 4: Click the Finish button. Step 2: Choose the language for the installation and click the OK button.
Manual
Page 10
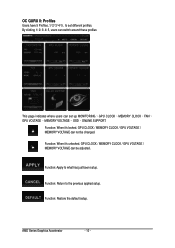
By clicking 1/ 2/ 3/ 4/ 5, users can switch around these profiles This page indicates where users can set different profiles. AMD Series Graphics Accelerator - 10 - Function: Apply to the previous applied setup. OC GURU II: Profiles Users have 5 Profiles, 1/ 2/ 3/ 4/ 5 , to set up MONITORING、GPU CLOCK、MEMORY CLOCK、FAN、 GPU VOLTAGE、MEMORY VOLTAGE、OSD、ONLINE SUPPORT. Function: Restore the default setup. Function: When it 's locked, GPU CLOCK / MEMORY CLOCK / GPU VOLTAGE / MEMORY VOLTAGE can be changed....
By clicking 1/ 2/ 3/ 4/ 5, users can switch around these profiles This page indicates where users can set different profiles. AMD Series Graphics Accelerator - 10 - Function: Apply to the previous applied setup. OC GURU II: Profiles Users have 5 Profiles, 1/ 2/ 3/ 4/ 5 , to set up MONITORING、GPU CLOCK、MEMORY CLOCK、FAN、 GPU VOLTAGE、MEMORY VOLTAGE、OSD、ONLINE SUPPORT. Function: Restore the default setup. Function: When it 's locked, GPU CLOCK / MEMORY CLOCK / GPU VOLTAGE / MEMORY VOLTAGE can be changed....
Manual
Page 11
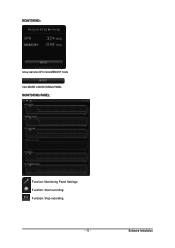
MONITORING: Show real time GPU Clock/MEMORY Clock Click MORE to MONITORING PANEL MONITORING PANEL: Function: Monitoring Panel Settings. Function: Stop recording. - 11 - Function: Start recording. Software Installation
MONITORING: Show real time GPU Clock/MEMORY Clock Click MORE to MONITORING PANEL MONITORING PANEL: Function: Monitoring Panel Settings. Function: Stop recording. - 11 - Function: Start recording. Software Installation

Manual
Page 12
Function: Save the settings. Function: Set up a folder to MONITORING Page. Function: Return to save the recorded files. AMD Series Graphics Accelerator - 12 - Monitoring panel settings: Function: Show the chosen items on the MONITORING PANEL. Function: Restore the default setup.
Function: Save the settings. Function: Set up a folder to MONITORING Page. Function: Return to save the recorded files. AMD Series Graphics Accelerator - 12 - Monitoring panel settings: Function: Show the chosen items on the MONITORING PANEL. Function: Restore the default setup.
Manual
Page 13
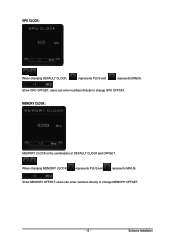
When changing MEMORY CLOCK, represents PLUS and represents MINUS. Show MEMORY OFFSET, users can enter numbers directly to change GPU OFFSET. Software Installation GPU CLOCK: When changing DEFAULT CLOCK, represents PLUS and represents MINUS. Show GPU OFFSET, users can enter numbers directly to change MEMORY OFFSET. - 13 - MEMORY CLOCK: MEMORY CLOCK is the combination of DEFAULT CLOCK and OFFSET.
When changing MEMORY CLOCK, represents PLUS and represents MINUS. Show MEMORY OFFSET, users can enter numbers directly to change GPU OFFSET. Software Installation GPU CLOCK: When changing DEFAULT CLOCK, represents PLUS and represents MINUS. Show GPU OFFSET, users can enter numbers directly to change MEMORY OFFSET. - 13 - MEMORY CLOCK: MEMORY CLOCK is the combination of DEFAULT CLOCK and OFFSET.
Manual
Page 14
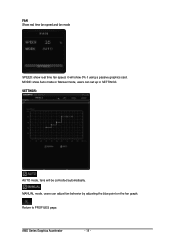
AMD Series Graphics Accelerator - 14 - MODE: show Auto mode or Manual mode, users can adjust fan behavior by adjusting the blue point on the fan graph. MANUAL mode, users can set up in SETTINGS SETTINGS: AUTO mode, fans will show real time fan speed, it will be controlled automatically. Return to PROFILES page. FAN Show real time fan speed and fan mode SPEED: show 0% if using a passive graphics card.
AMD Series Graphics Accelerator - 14 - MODE: show Auto mode or Manual mode, users can adjust fan behavior by adjusting the blue point on the fan graph. MANUAL mode, users can set up in SETTINGS SETTINGS: AUTO mode, fans will show real time fan speed, it will be controlled automatically. Return to PROFILES page. FAN Show real time fan speed and fan mode SPEED: show 0% if using a passive graphics card.
Manual
Page 15
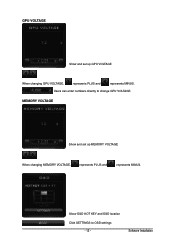
Software Installation Users can enter numbers directly to OSD settings - 15 - GPU VOLTAGE Show and set up GPU VOLTAGE When changing GPU VOLTAGE, represents PLUS and represents MINUS. Show OSD HOT KEY and OSD location Click SETTINGS to change GPU VOLTAGE. MEMORY VOLTAGE Show and set up MEMORY VOLTAGE When changing MEMORY VOLTAGE, represents PLUS and represents MINUS.
Software Installation Users can enter numbers directly to OSD settings - 15 - GPU VOLTAGE Show and set up GPU VOLTAGE When changing GPU VOLTAGE, represents PLUS and represents MINUS. Show OSD HOT KEY and OSD location Click SETTINGS to change GPU VOLTAGE. MEMORY VOLTAGE Show and set up MEMORY VOLTAGE When changing MEMORY VOLTAGE, represents PLUS and represents MINUS.
Manual
Page 16
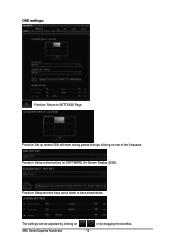
OSD settings: Function: Return to save screenshots. The settings can be adjusted by dragging the scrollbar. Function: Setup shortcut keys and a folder to SETTINGS Page. Function: Setup a shortcut key for SOFTWARE On-Screen Display (OSD). or by clicking on one of the 9 squares. Function: Set up where OSD will show during games through clicking on AMD Series Graphics Accelerator - 16 -
OSD settings: Function: Return to save screenshots. The settings can be adjusted by dragging the scrollbar. Function: Setup shortcut keys and a folder to SETTINGS Page. Function: Setup a shortcut key for SOFTWARE On-Screen Display (OSD). or by clicking on one of the 9 squares. Function: Set up where OSD will show during games through clicking on AMD Series Graphics Accelerator - 16 -

Manual
Page 17
ONLINE SUPPORT ONLINE SUPPORT: Click to enter ONLINE SUPPORT 1.Update BIOS: The BIOS version of your VGA is shown in the page. You can download the updated BIOS version and it installs automatically. - 17 - Software Installation By clicking the item while you are connected to the internet, the software detects if there is an updated DRIVER version available. By clicking the item while you are connected to the internet, the software detects if there is an updated BIOS version available. You can download the updated DRIVER version and it installs automatically. 2....
ONLINE SUPPORT ONLINE SUPPORT: Click to enter ONLINE SUPPORT 1.Update BIOS: The BIOS version of your VGA is shown in the page. You can download the updated BIOS version and it installs automatically. - 17 - Software Installation By clicking the item while you are connected to the internet, the software detects if there is an updated DRIVER version available. By clicking the item while you are connected to the internet, the software detects if there is an updated BIOS version available. You can download the updated DRIVER version and it installs automatically. 2....
Manual
Page 18
When you are connected to the internet, clicking the item will link to the official GIGABYTE CONTECT US page. AMD Series Graphics Accelerator - 18 - 3.Update OC GURU The OC GURU version of ficial GIGABYTE product FAQ page. You can download the updated OC GURU version and it installs automatically. 4.PRODUCT... shown in the page. By clicking the item while you are connected to the internet, clicking the item will link to the official GIGABYTE product page. 6.FAQ When you are connected to the of your VGA is an updated OC GURU version available.
When you are connected to the internet, clicking the item will link to the official GIGABYTE CONTECT US page. AMD Series Graphics Accelerator - 18 - 3.Update OC GURU The OC GURU version of ficial GIGABYTE product FAQ page. You can download the updated OC GURU version and it installs automatically. 4.PRODUCT... shown in the page. By clicking the item while you are connected to the internet, clicking the item will link to the official GIGABYTE product page. 6.FAQ When you are connected to the of your VGA is an updated OC GURU version available.
Manual
Page 19
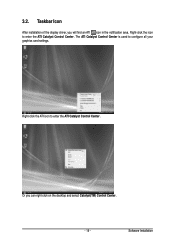
3.2. Right-click the ATI icon to configure all your graphics card settings. Software Installation The ATI Catalyst Control Center is used to enter the ATI Catalyst Control Center. Right-click the icon to enter the ATI Catalyst Control Center. Or you will find an ATI icon in the notification area. Taskbar Icon After installation of the display driver, you can right-click on the desktop and select Catalyst(TM) Control Center. - 19 -
3.2. Right-click the ATI icon to configure all your graphics card settings. Software Installation The ATI Catalyst Control Center is used to enter the ATI Catalyst Control Center. Right-click the icon to enter the ATI Catalyst Control Center. Or you will find an ATI icon in the notification area. Taskbar Icon After installation of the display driver, you can right-click on the desktop and select Catalyst(TM) Control Center. - 19 -

Manual
Page 20
Otherwise, select Digital Output Device (SPDIF), which is the onboard audio controller. Step 1: Go to be the default Sound Playback device, select Digital Output Device (HDMI). Using the picture to the left as the example, to set HDMI audio to Start > Control Panel > Hardware and Sound > Manage audio devices. AMD Series Graphics Accelerator - 20 - Configuring Audio Output Configure the default audio output device based upon your needs. Figure 1 Figure 2 Figure 3 Step 2: In the Manage audio devices dialog box, click the Playback tab.
Otherwise, select Digital Output Device (SPDIF), which is the onboard audio controller. Step 1: Go to be the default Sound Playback device, select Digital Output Device (HDMI). Using the picture to the left as the example, to set HDMI audio to Start > Control Panel > Hardware and Sound > Manage audio devices. AMD Series Graphics Accelerator - 20 - Configuring Audio Output Configure the default audio output device based upon your needs. Figure 1 Figure 2 Figure 3 Step 2: In the Manage audio devices dialog box, click the Playback tab.