Manual
Page 1
GV-RX365512H RadeonTM HD 3650 Graphics Accelerator User's Manual Rev. 101 12MD-RX3655H-101R Copyright © 2008 GIGABYTE TECHNOLOGY CO., LTD Copyright by U.S. Due to update the information contained herein. Use of this this copyright protection technology must be authorized by Macrovision. No part of this card. patents and other limited viewing uses only unless otherwise authorized by Macrovision, and is intended for any errors or omissions that...
GV-RX365512H RadeonTM HD 3650 Graphics Accelerator User's Manual Rev. 101 12MD-RX3655H-101R Copyright © 2008 GIGABYTE TECHNOLOGY CO., LTD Copyright by U.S. Due to update the information contained herein. Use of this this copyright protection technology must be authorized by Macrovision. No part of this card. patents and other limited viewing uses only unless otherwise authorized by Macrovision, and is intended for any errors or omissions that...

Manual
Page 4
... Unit (GPU) • Supports PCI Express 2.0 • Integrated with two PCI Express x16 slots and correct chipset driver - Minimum System Requirements • Hardware - Intel® Pentium® 4 or AMD AthlonTM - 512 MB of certified power supplies, go to HDMI adapter) 1.2. Two GV-RX365512H - The power supply should be with a peak dissipation above 100-watt. Two CrossFire bridge interconnect cables GV-RX365512H Graphics Accelerator - 4 - Windows® Vista - Features • Powered by adapter, only the blue DVI-I Connector supports the DVI-I to http://ati.amd.com...
... Unit (GPU) • Supports PCI Express 2.0 • Integrated with two PCI Express x16 slots and correct chipset driver - Minimum System Requirements • Hardware - Intel® Pentium® 4 or AMD AthlonTM - 512 MB of certified power supplies, go to HDMI adapter) 1.2. Two GV-RX365512H - The power supply should be with a peak dissipation above 100-watt. Two CrossFire bridge interconnect cables GV-RX365512H Graphics Accelerator - 4 - Windows® Vista - Features • Powered by adapter, only the blue DVI-I Connector supports the DVI-I to http://ati.amd.com...

Manual
Page 6
... default Sound Playback device to obtain audio output from the system. GV-RX365512H Graphics Accelerator - 6 - Inspect the card carton for HDMI output function, set the onboard audio controller or the external sound card to be left in its original packing until it is activated. If you work correctly, please use official GIGABYTE BIOS only. Place components on a grounded antistatic pad or on a grounded anti-static mat. The operator should be disabled...
... default Sound Playback device to obtain audio output from the system. GV-RX365512H Graphics Accelerator - 6 - Inspect the card carton for HDMI output function, set the onboard audio controller or the external sound card to be left in its original packing until it is activated. If you work correctly, please use official GIGABYTE BIOS only. Place components on a grounded antistatic pad or on a grounded anti-static mat. The operator should be disabled...

Manual
Page 7
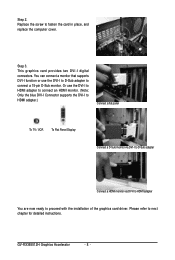
... the display cable from the back of the graphics card is fully seated. * Please make sure that you have prepared your computer, you are ready to install your graphics card with the PCI Express x16 slot, and press it in removing the cover. then align your graphics card. If necessary, remove the metal cover from your computer. Hardware Installation Now that the gold edge connector...
... the display cable from the back of the graphics card is fully seated. * Please make sure that you have prepared your computer, you are ready to install your graphics card with the PCI Express x16 slot, and press it in removing the cover. then align your graphics card. If necessary, remove the metal cover from your computer. Hardware Installation Now that the gold edge connector...
Manual
Page 8
... that supports DVI-I function or use the DVI-I to HDMI adapter to connect an HDMI monitor. (Note: Only the blue DVI-I Connector supports the DVI-I to HDMI adapter.) Connect a flat panel To TV / VCR To Flat Panel Display Connect a D-Sub monitor via DVI-I to D-Sub adapter Connect a HDMI monitor via DVI-I to HDMI adapter You are now ready to connect a 15-pin D-Sub monitor. GV-RX365512H Graphics Accelerator - 8 - This graphics card provides two DVI-I to D-Sub adapter to proceed with the installation of the graphics card driver. Please refer to fasten the card in place, and replace...
... that supports DVI-I function or use the DVI-I to HDMI adapter to connect an HDMI monitor. (Note: Only the blue DVI-I Connector supports the DVI-I to HDMI adapter.) Connect a flat panel To TV / VCR To Flat Panel Display Connect a D-Sub monitor via DVI-I to D-Sub adapter Connect a HDMI monitor via DVI-I to HDMI adapter You are now ready to connect a 15-pin D-Sub monitor. GV-RX365512H Graphics Accelerator - 8 - This graphics card provides two DVI-I to D-Sub adapter to proceed with the installation of the graphics card driver. Please refer to fasten the card in place, and replace...
Manual
Page 10
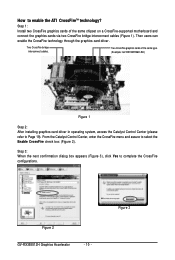
...CrossFire bridge interconnect cables (Figure 1). Figure 3 Two CrossFire bridge interconnect cables. Figure 2 GV-RX365512H Graphics Accelerator - 10 - Step 3: When the next confirmation dialog box appears (Figure 3), click Yes to Page 19). Then users can enable the CrossFire technology through the graphics card driver. How to select the Enable CrossFire check box (Figure 2). Step 1: Install two CrossFire graphics cards of the same type. (Example: GV-RX195P256D-RH) Figure 1 Step 2: After installing graphics card driver in operating system, access the Catalyst Control Center...
...CrossFire bridge interconnect cables (Figure 1). Figure 3 Two CrossFire bridge interconnect cables. Figure 2 GV-RX365512H Graphics Accelerator - 10 - Step 3: When the next confirmation dialog box appears (Figure 3), click Yes to Page 19). Then users can enable the CrossFire technology through the graphics card driver. How to select the Enable CrossFire check box (Figure 2). Step 1: Install two CrossFire graphics cards of the same type. (Example: GV-RX195P256D-RH) Figure 1 Step 2: After installing graphics card driver in operating system, access the Catalyst Control Center...

Manual
Page 11
....) - 11 - Software Installation Software Installation In this manual, we assume that your system has installed DirectX 9 or later version. 2. First make sure your CD-ROM drive letter to setup your graphics card.) 3.1. Operating System Requirements Notice the following guidelines before installing the drivers: 1. Windows® XP Driver and Utilities Installation 3.1.1. Make sure your system has installed the appropriate motherboard drivers (for your graphics card driver. (Please follow the instructions to be Drive D: The installation of Windows Vista/XP drivers is very...
....) - 11 - Software Installation Software Installation In this manual, we assume that your system has installed DirectX 9 or later version. 2. First make sure your CD-ROM drive letter to setup your graphics card.) 3.1. Operating System Requirements Notice the following guidelines before installing the drivers: 1. Windows® XP Driver and Utilities Installation 3.1.1. Make sure your system has installed the appropriate motherboard drivers (for your graphics card driver. (Please follow the instructions to be Drive D: The installation of Windows Vista/XP drivers is very...

Manual
Page 12
... the autorun window shows up, click the Install DirectX 9 item. The system is completed. Step 4. 3.1.2. For software MPEG support in Windows Vista/XP, you must install DirectX first. Step 3. Click Finish to install DirectX separately. Step 2. Choose I accept the agreement and click the Next button. Click the Next button. Then the DirectX 9 installation is installing the components. GV-RX365512H Graphics Accelerator - 12 - DirectX Installation Install Microsoft DirectX to enable 3D hardware acceleration support for Windows Vista/XP to...
... the autorun window shows up, click the Install DirectX 9 item. The system is completed. Step 4. 3.1.2. For software MPEG support in Windows Vista/XP, you must install DirectX first. Step 3. Click Finish to install DirectX separately. Step 2. Choose I accept the agreement and click the Next button. Click the Next button. Then the DirectX 9 installation is installing the components. GV-RX365512H Graphics Accelerator - 12 - DirectX Installation Install Microsoft DirectX to enable 3D hardware acceleration support for Windows Vista/XP to...
Manual
Page 13
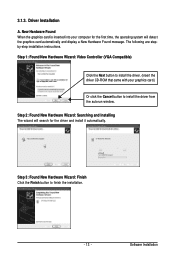
...-step installation instructions. Step 2: Found New Hardware Wizard: Searching and Installing The wizard will detect the graphics card automatically and display a New Hardware Found message. Step 1: Found New Hardware Wizard: Video Controller (VGA Compatible) Click the Next button to install the driver. (Insert the driver CD-ROM that came with your computer for the first time, the operating system will search for the driver and install it automatically. Software Installation 3.1.3. Step 3: Found New Hardware Wizard...
...-step installation instructions. Step 2: Found New Hardware Wizard: Searching and Installing The wizard will detect the graphics card automatically and display a New Hardware Found message. Step 1: Found New Hardware Wizard: Video Controller (VGA Compatible) Click the Next button to install the driver. (Insert the driver CD-ROM that came with your computer for the first time, the operating system will search for the driver and install it automatically. Software Installation 3.1.3. Step 3: Found New Hardware Wizard...

Manual
Page 14
The autorun window will appear. When the autorun window shows up , please run "D:\setup.exe". Setp 4. Click the Finish button to restart the computer. Click the Express or Custom icon. Driver Installation (Autorun Window) Insert the driver CD-ROM into your CD-ROM drive. The system is completed. GV-RX365512H Graphics Accelerator - 14 - Step 5. Click the Yes button. Step 2. Step 1. If it does not show up , click the Install Display Driver item. Click the Next button. Then the driver installation is installing the components. B. Step 3.
The autorun window will appear. When the autorun window shows up , please run "D:\setup.exe". Setp 4. Click the Finish button to restart the computer. Click the Express or Custom icon. Driver Installation (Autorun Window) Insert the driver CD-ROM into your CD-ROM drive. The system is completed. GV-RX365512H Graphics Accelerator - 14 - Step 5. Click the Yes button. Step 2. Step 1. If it does not show up , click the Install Display Driver item. Click the Next button. Then the driver installation is installing the components. B. Step 3.

Manual
Page 15
When the autorun window shows up , please run "D:\setup.exe". The system is installing the components. Software Installation Click the Next button. Click the Install button. Step 1. Step 3. If it does not show up , click the GIGABYTE Utility item. Step 4. 3.1.4. Utilities Installation Insert the driver CD disk into your CD-ROM, and then you can see the AUTORUN window. Click the Finish button to complete the installation. - 15 - Step 2.
When the autorun window shows up , please run "D:\setup.exe". The system is installing the components. Software Installation Click the Next button. Click the Install button. Step 1. Step 3. If it does not show up , click the GIGABYTE Utility item. Step 4. 3.1.4. Utilities Installation Insert the driver CD disk into your CD-ROM, and then you can see the AUTORUN window. Click the Finish button to complete the installation. - 15 - Step 2.

Manual
Page 16
...-clicking this icon opens the GIGABYTE control panel, showing a menu composed of shortcut of the display drivers, you will find a GIGABYTE icon on the taskbar's status area. Click Advanced after clicking Settings. Taskbar Icons GIGABYTE Control Panel After installation of the graphics card's enhanced and other information. 3.1.5. Select About GIGABYTE to link to the GIGABYTE website for updated information about the graphics accelerator, latest drivers, and other functions. GV-RX365512H Graphics Accelerator - 16 -
...-clicking this icon opens the GIGABYTE control panel, showing a menu composed of shortcut of the display drivers, you will find a GIGABYTE icon on the taskbar's status area. Click Advanced after clicking Settings. Taskbar Icons GIGABYTE Control Panel After installation of the graphics card's enhanced and other information. 3.1.5. Select About GIGABYTE to link to the GIGABYTE website for updated information about the graphics accelerator, latest drivers, and other functions. GV-RX365512H Graphics Accelerator - 16 -

Manual
Page 17
... default setting. If the utility should hang, restart your card have Hardware Monitor function, you will see the change of the graphic engine and video memory (Core Clock and Memory Clock). To rechange clock, uncheck the "Fixed Clock" mode and then adjust. The window will lock the GPU and memory clock you choose, whether you saved last time. Displays 2D/3D core clock status Displays memory clock status Adjust 2D core clock Auto-Optimized core / memory clock Adjust 3D core clock Fixed Clock Adjust memory clock Hardware Monitor...
... default setting. If the utility should hang, restart your card have Hardware Monitor function, you will see the change of the graphic engine and video memory (Core Clock and Memory Clock). To rechange clock, uncheck the "Fixed Clock" mode and then adjust. The window will lock the GPU and memory clock you choose, whether you saved last time. Displays 2D/3D core clock status Displays memory clock status Adjust 2D core clock Auto-Optimized core / memory clock Adjust 3D core clock Fixed Clock Adjust memory clock Hardware Monitor...

Manual
Page 21
.... Software Installation You can move the slider to change the resolution. Settings (Resolutions and Color Quality for advanced settings. 3.1.6. Display Matrix Model CRT+TV (Note 1) CRT+DVI CRT+CRT DVI+TV DVI+TV+CRT DVI +DVI HDMI+TV (Note 2) HDMI+DVI (Note 2) HDMI+CRT (Note 2) GV-RX365512H Yes Yes Yes Yes No Yes Yes Yes Yes (Note 1) The CRT+TV configuration requires that you connect your CRT display to the DVI-I Connector 2 on the card using the DVI-I to D-Sub adapter to ensure normal operation. (Note 2) To connect an HDMI monitor, you need...
.... Software Installation You can move the slider to change the resolution. Settings (Resolutions and Color Quality for advanced settings. 3.1.6. Display Matrix Model CRT+TV (Note 1) CRT+DVI CRT+CRT DVI+TV DVI+TV+CRT DVI +DVI HDMI+TV (Note 2) HDMI+DVI (Note 2) HDMI+CRT (Note 2) GV-RX365512H Yes Yes Yes Yes No Yes Yes Yes Yes (Note 1) The CRT+TV configuration requires that you connect your CRT display to the DVI-I Connector 2 on the card using the DVI-I to D-Sub adapter to ensure normal operation. (Note 2) To connect an HDMI monitor, you need...
Manual
Page 24
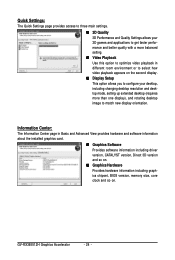
... version and so on. „ Graphics Hardware Provides hardware information including graphics chipset, BIOS version, memory size, core clock and so on the second display. „ Display Setup This option allows you to configure your desktop, including changing desktop resolution and desktop mode, setting up extended desktop (requires more than one display), and rotating desktop image to select how video playback appears on . Information Center: The Information Center page in different room environment or to match new display orientation. GV-RX365512H Graphics Accelerator...
... version and so on. „ Graphics Hardware Provides hardware information including graphics chipset, BIOS version, memory size, core clock and so on the second display. „ Display Setup This option allows you to configure your desktop, including changing desktop resolution and desktop mode, setting up extended desktop (requires more than one display), and rotating desktop image to select how video playback appears on . Information Center: The Information Center page in different room environment or to match new display orientation. GV-RX365512H Graphics Accelerator...
Manual
Page 26
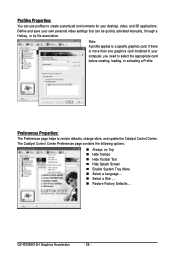
GV-RX365512H Graphics Accelerator - 26 - Profiles Properties: You can be quickly activated manually, through a Hotkey, or by file association. Note: A profile applies to create customized environments for your desktop, video, and 3D applications. Define and save your computer, you need to restore defaults, change skins, and update the Catalyst Control Center. If there is more than one graphics card installed in your own personal video settings that can use profiles to a specific graphics card. Preferences Properties: The Preferences page helps...
GV-RX365512H Graphics Accelerator - 26 - Profiles Properties: You can be quickly activated manually, through a Hotkey, or by file association. Note: A profile applies to create customized environments for your desktop, video, and 3D applications. Define and save your computer, you need to restore defaults, change skins, and update the Catalyst Control Center. If there is more than one graphics card installed in your own personal video settings that can use profiles to a specific graphics card. Preferences Properties: The Preferences page helps...

Manual
Page 28
... a fullscreen application or game has a default refresh rate that may not be automatically detected, use Force TV detection. Displays Manager: Displays Manager is the central location for configuring your display devices and arranging your desktop in a multimonitor environment, and enable TV Out. Use Displays Manager to configure panning on systems running Windows Vista. Note: On systems running Windows Vista the 3D Refresh Rate Override and the Display Detection Option to quickly change your display setup, arrange your...
... a fullscreen application or game has a default refresh rate that may not be automatically detected, use Force TV detection. Displays Manager: Displays Manager is the central location for configuring your display devices and arranging your desktop in a multimonitor environment, and enable TV Out. Use Displays Manager to configure panning on systems running Windows Vista. Note: On systems running Windows Vista the 3D Refresh Rate Override and the Display Detection Option to quickly change your display setup, arrange your...
Manual
Page 36
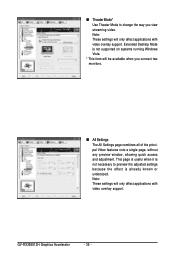
... view streaming video. GV-RX365512H Graphics Accelerator - 36 - Extended Desktop Mode is not supported on systems running Windows Vista. * This item will only affect applications with video overlay support. This page is useful when it is not necessary to change the way you connect two monitors. „ All Settings The All Settings page combines all of the principal Video features onto a single page, without any preview window, allowing quick access and adjustment. Note: These settings...
... view streaming video. GV-RX365512H Graphics Accelerator - 36 - Extended Desktop Mode is not supported on systems running Windows Vista. * This item will only affect applications with video overlay support. This page is useful when it is not necessary to change the way you connect two monitors. „ All Settings The All Settings page combines all of the principal Video features onto a single page, without any preview window, allowing quick access and adjustment. Note: These settings...
Manual
Page 37
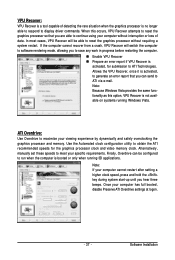
... graphics processor clock and video memory clock. Note: Because Windows Vista provides the same functionality as this occurs, VPU Recover attempts to reset the graphics processor so that you are able to meet your viewing experience by dynamically and safely overclocking the graphics processor and memory. Alternatively, manually set these speeds to continue using your computer has full booted, disable Preserve ATI Overdrive settings at logon. - 37 - Software Installation...
... graphics processor clock and video memory clock. Note: Because Windows Vista provides the same functionality as this occurs, VPU Recover attempts to reset the graphics processor so that you are able to meet your viewing experience by dynamically and safely overclocking the graphics processor and memory. Alternatively, manually set these speeds to continue using your computer has full booted, disable Preserve ATI Overdrive settings at logon. - 37 - Software Installation...

Manual
Page 39
..., adjust your computer. For more assistance, use the Troubleshooting Guide located in the Windows Help or contact your motherboard. 4. Troubleshooting Tips After getting into Safe Mode, in Device Manager check whether the driver for more advanced troubleshooting information. „ Check that the card is seated properly in the PCI Express x16 slot. „ Ensure that the monitor and computer are plugged in and receiving power...
..., adjust your computer. For more assistance, use the Troubleshooting Guide located in the Windows Help or contact your motherboard. 4. Troubleshooting Tips After getting into Safe Mode, in Device Manager check whether the driver for more advanced troubleshooting information. „ Check that the card is seated properly in the PCI Express x16 slot. „ Ensure that the monitor and computer are plugged in and receiving power...


