Manual
Page 1
... in this document nor does the author make a commitment to rapid change in any form without the expressed, written permission of the specifications might be authorized by GIGA-BYTE TECHNOLOGY CO., LTD. ("GBT"). Use of this this card. No part of this manual may void the warranty of their respective owners. GV-RX345256H RadeonTM HD 3450 Graphics Accelerator User's Manual Rev. 101 12MD-RX3452H-101R Copyright © 2008 GIGABYTE TECHNOLOGY CO...
... in this document nor does the author make a commitment to rapid change in any form without the expressed, written permission of the specifications might be authorized by GIGA-BYTE TECHNOLOGY CO., LTD. ("GBT"). Use of this this card. No part of this manual may void the warranty of their respective owners. GV-RX345256H RadeonTM HD 3450 Graphics Accelerator User's Manual Rev. 101 12MD-RX3452H-101R Copyright © 2008 GIGABYTE TECHNOLOGY CO...
Manual
Page 4
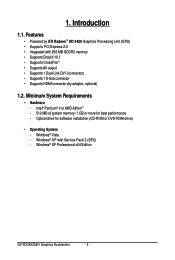
...• Supports DirectX 10.1 • Supports CrossFireTM • Supports AV output • Supports 1 Dual-Link DVI-I connectors • Supports 1 D-Sub connector • Supports HDMI connector (by ATI RadeonTM HD 3450 Graphics Processing Unit (GPU) • Supports PCI Express 2.0 • Integrated with Service Pack 2 (SP2) - Intel® Pentium® 4 or AMD AthlonTM - 512 MB of system memory; 1 GB or more for software installation (CD-ROM or DVD-ROM drive) • Operating System - Introduction 1.1. Windows® Vista - Minimum System Requirements • Hardware -
...• Supports DirectX 10.1 • Supports CrossFireTM • Supports AV output • Supports 1 Dual-Link DVI-I connectors • Supports 1 D-Sub connector • Supports HDMI connector (by ATI RadeonTM HD 3450 Graphics Processing Unit (GPU) • Supports PCI Express 2.0 • Integrated with Service Pack 2 (SP2) - Intel® Pentium® 4 or AMD AthlonTM - 512 MB of system memory; 1 GB or more for software installation (CD-ROM or DVD-ROM drive) • Operating System - Introduction 1.1. Windows® Vista - Minimum System Requirements • Hardware -
Manual
Page 5
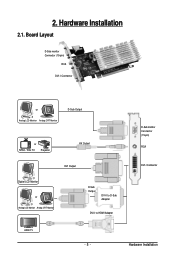
Board Layout D-Sub monitor Connector (15-pin) RCA DVI-I Connector or Analog LCD Monitor Analog CRT Monitor D-Sub Output or NTSC / PAL TV Projector AV Output DVI Output Digital LCD Monitor or Analog LCD Monitor Analog CRT Monitor D-Sub Output DVI-I to D-Sub Adapter DVI-I to HDMI Adapter D-Sub monitor Connector (15-pin) RCA DVI-I Connector HDMI TV - 5 - 2. Hardware Installation Hardware Installation 2.1.
Board Layout D-Sub monitor Connector (15-pin) RCA DVI-I Connector or Analog LCD Monitor Analog CRT Monitor D-Sub Output or NTSC / PAL TV Projector AV Output DVI Output Digital LCD Monitor or Analog LCD Monitor Analog CRT Monitor D-Sub Output DVI-I to D-Sub Adapter DVI-I to HDMI Adapter D-Sub monitor Connector (15-pin) RCA DVI-I Connector HDMI TV - 5 - 2. Hardware Installation Hardware Installation 2.1.
Manual
Page 6
..., touch both audio and video signals. Shipping and handling may cause damage to ensure that came with the components whenever the components are no need for obvious damage. GV-RX345256H Graphics Accelerator - 6 - If you work correctly, please use official GIGABYTE BIOS only. The card contains sensitive electric components, which can handle both of your system. The entire Radeon HD 3450 series support HDMI output which can be...
..., touch both audio and video signals. Shipping and handling may cause damage to ensure that came with the components whenever the components are no need for obvious damage. GV-RX345256H Graphics Accelerator - 6 - If you work correctly, please use official GIGABYTE BIOS only. The card contains sensitive electric components, which can handle both of your system. The entire Radeon HD 3450 series support HDMI output which can be...
Manual
Page 7
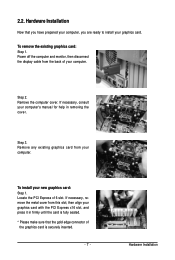
... are ready to install your graphics card. Step 3. If necessary, remove the metal cover from the back of the graphics card is securely inserted. - 7 - Hardware Installation Power off the computer and monitor, then disconnect the display cable from this slot; then align your computer. To install your computer. Remove any existing graphics card from your new graphics card: Step 1. Locate the PCI Express x16 slot. 2.2. To remove the existing graphics card: Step...
... are ready to install your graphics card. Step 3. If necessary, remove the metal cover from the back of the graphics card is securely inserted. - 7 - Hardware Installation Power off the computer and monitor, then disconnect the display cable from this slot; then align your computer. To install your computer. Remove any existing graphics card from your new graphics card: Step 1. Locate the PCI Express x16 slot. 2.2. To remove the existing graphics card: Step...
Manual
Page 8
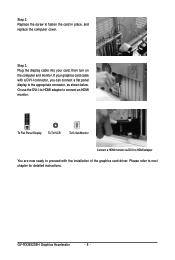
..., and replace the computer cover. GV-RX345256H Graphics Accelerator - 8 - then turn on the computer and monitor. Plug the display cable into your graphics card came with the installation of the graphics card driver. Step 3. To Flat Panel Display To TV/VCR To D-Sub Monitor Connect a HDMI monitor via DVI-I -to-HDMI adapter to proceed with a DVI-I connector, you can connect a flat panel display to the appropriate connector, as shown below. Or use the DVI-I to HDMI adapter You are now ready to connect an HDMI monitor. Replace the...
..., and replace the computer cover. GV-RX345256H Graphics Accelerator - 8 - then turn on the computer and monitor. Plug the display cable into your graphics card came with the installation of the graphics card driver. Step 3. To Flat Panel Display To TV/VCR To D-Sub Monitor Connect a HDMI monitor via DVI-I -to-HDMI adapter to proceed with a DVI-I connector, you can connect a flat panel display to the appropriate connector, as shown below. Or use the DVI-I to HDMI adapter You are now ready to connect an HDMI monitor. Replace the...
Manual
Page 9
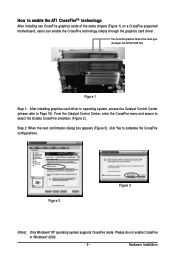
Hardware Installation Figure 2 Figure 3 (Note): Only Windows® XP operating system supports CrossFire mode. Please do not enable CrossFire in operating system, access the Catalyst Control Center (please refer to select the Enable CrossFire checkbox (Figure 2). Two CrossFire graphics cards of the same chipset (Figure 1) on a CrossFire-supported motherboard, users can enable the CrossFire technology simply through the graphics card driver . Step 2: When the next confirmation dialog box appears (Figure 3), click Yes to enable the ATI CrossFireTM technology: After...
Hardware Installation Figure 2 Figure 3 (Note): Only Windows® XP operating system supports CrossFire mode. Please do not enable CrossFire in operating system, access the Catalyst Control Center (please refer to select the Enable CrossFire checkbox (Figure 2). Two CrossFire graphics cards of the same chipset (Figure 1) on a CrossFire-supported motherboard, users can enable the CrossFire technology simply through the graphics card driver . Step 2: When the next confirmation dialog box appears (Figure 3), click Yes to enable the ATI CrossFireTM technology: After...
Manual
Page 10
... not show up, run "D:\setup.exe"). When you insert the driver CD into your CD-ROM drive letter to install the driver for the motherboard drivers, please contact the motherboard manufacturer.) GV-RX345256H Graphics Accelerator - 10 - Then you can follow the instructions to setup your system has installed DirectX 9 or later version. 2. First make sure your graphics card driver. (Please follow the subsection "3.1.3 Driver Installation" to be Drive D: The installation of Windows Vista/XP drivers is very simple...
... not show up, run "D:\setup.exe"). When you insert the driver CD into your CD-ROM drive letter to install the driver for the motherboard drivers, please contact the motherboard manufacturer.) GV-RX345256H Graphics Accelerator - 10 - Then you can follow the instructions to setup your system has installed DirectX 9 or later version. 2. First make sure your graphics card driver. (Please follow the subsection "3.1.3 Driver Installation" to be Drive D: The installation of Windows Vista/XP drivers is very simple...
Manual
Page 12
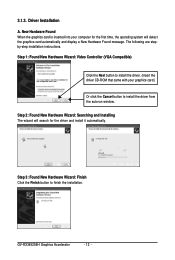
...-step installation instructions. GV-RX345256H Graphics Accelerator - 12 - Driver Installation A. Step 3: Found New Hardware Wizard: Finish Click the Finish button to install the driver from the autorun window. Step 1: Found New Hardware Wizard: Video Controller (VGA Compatible) Click the Next button to install the driver. (Insert the driver CD-ROM that came with your computer for the first time, the operating system will search for the driver and install it automatically. Step 2: Found New Hardware Wizard...
...-step installation instructions. GV-RX345256H Graphics Accelerator - 12 - Driver Installation A. Step 3: Found New Hardware Wizard: Finish Click the Finish button to install the driver from the autorun window. Step 1: Found New Hardware Wizard: Video Controller (VGA Compatible) Click the Next button to install the driver. (Insert the driver CD-ROM that came with your computer for the first time, the operating system will search for the driver and install it automatically. Step 2: Found New Hardware Wizard...
Manual
Page 14
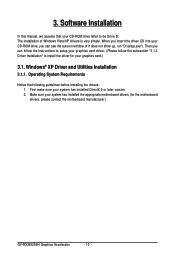
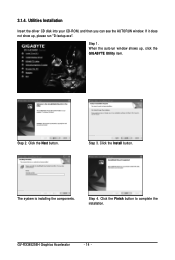
3.1.4. The system is installing the components. When the autorun window shows up , please run "D:\setup.exe". Click the Install button. Step 1. Click the Finish button to complete the installation. Step 4. Click the Next button. Step 3. GV-RX345256H Graphics Accelerator - 14 - Utilities Installation Insert the driver CD disk into your CD-ROM, and then you can see the AUTORUN window. If it does not show up , click the GIGABYTE Utility item. Step 2.
3.1.4. The system is installing the components. When the autorun window shows up , please run "D:\setup.exe". Click the Install button. Step 1. Click the Finish button to complete the installation. Step 4. Click the Next button. Step 3. GV-RX345256H Graphics Accelerator - 14 - Utilities Installation Insert the driver CD disk into your CD-ROM, and then you can see the AUTORUN window. If it does not show up , click the GIGABYTE Utility item. Step 2.

Manual
Page 15
... relative settings. Software Installation Right-click the GIGABYTE icon. Taskbar Icons GIGABYTE Control Panel After installation of the graphics card's enhanced and other information. - 15 - Right-clicking this icon opens the GIGABYTE control panel, showing a menu composed of shortcut of the display drivers, you will find a GIGABYTE icon on the taskbar's status area. Select About GIGABYTE to link to the GIGABYTE website for updated information about the graphics accelerator, latest drivers, and...
... relative settings. Software Installation Right-click the GIGABYTE icon. Taskbar Icons GIGABYTE Control Panel After installation of the graphics card's enhanced and other information. - 15 - Right-clicking this icon opens the GIGABYTE control panel, showing a menu composed of shortcut of the display drivers, you will find a GIGABYTE icon on the taskbar's status area. Select About GIGABYTE to link to the GIGABYTE website for updated information about the graphics accelerator, latest drivers, and...

Manual
Page 16
... Memory Clock). If your card have Hardware Monitor function, you restart your system or not. GV-RX345256H Graphics Accelerator - 16 - If the utility should hang, restart your system. The V-Tuner3 clock configuration utility will determine the recommended GPU and memory clock setting your system and then enter "Auto-Optimized" mode. To rechange clock, uncheck the "Fixed Clock" mode and then adjust. V-Tuner 3 V-Tuner 3 lets you will see the extend window. The window will display the GPU temperature...
... Memory Clock). If your card have Hardware Monitor function, you restart your system or not. GV-RX345256H Graphics Accelerator - 16 - If the utility should hang, restart your system. The V-Tuner3 clock configuration utility will determine the recommended GPU and memory clock setting your system and then enter "Auto-Optimized" mode. To rechange clock, uncheck the "Fixed Clock" mode and then adjust. V-Tuner 3 V-Tuner 3 lets you will see the extend window. The window will display the GPU temperature...

Manual
Page 18
Or you will find an ATI icon in your graphics card settings. Right-click the ATI icon to configure all your system tray. ATI Control Panel After installation of the display driver, you can right-click on the desktop and select ATI CATALYST(R) Control Center. The Catalyst® Control Center is used to enter the Catalyst® Control Center. GV-RX345256H Graphics Accelerator - 18 - Right-click the icon to enter the Catalyst® Control Center.
Or you will find an ATI icon in your graphics card settings. Right-click the ATI icon to configure all your system tray. ATI Control Panel After installation of the display driver, you can right-click on the desktop and select ATI CATALYST(R) Control Center. The Catalyst® Control Center is used to enter the Catalyst® Control Center. GV-RX345256H Graphics Accelerator - 18 - Right-click the icon to enter the Catalyst® Control Center.
Manual
Page 19
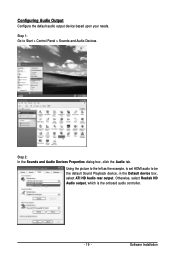
Using the picture to the left as the example, to set HDMI audio to Start > Control Panel > Sounds and Audio Devices. Step 1: Go to be the default Sound Playback device, in the Default device box, select ATI HD Audio rear output. Configuring Audio Output Configure the default audio output device based upon your needs. Software Installation Otherwise, select Realtek HD Audio output, which is the onboard audio controller. - 19 - Step 2: In the Sounds and Audio Devices Properties dialog box, click the Audio tab.
Using the picture to the left as the example, to set HDMI audio to Start > Control Panel > Sounds and Audio Devices. Step 1: Go to be the default Sound Playback device, in the Default device box, select ATI HD Audio rear output. Configuring Audio Output Configure the default audio output device based upon your needs. Software Installation Otherwise, select Realtek HD Audio output, which is the onboard audio controller. - 19 - Step 2: In the Sounds and Audio Devices Properties dialog box, click the Audio tab.
Manual
Page 20
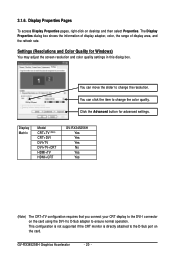
... card using the DVI-I to D-Sub adapter to the D-Sub port on desktop and then select Properties. This configuration is not supported if the CRT monitor is directly attached to ensure normal operation. 3.1.6. The Display Properties dialog box shows the information of display adapter, color, the range of display area, and the refresh rate. Click the Advanced button for Windows) You may adjust the screen resolution and color quality settings in this dialog box. GV-RX345256H Graphics Accelerator - 20 - Settings (Resolutions...
... card using the DVI-I to D-Sub adapter to the D-Sub port on desktop and then select Properties. This configuration is not supported if the CRT monitor is directly attached to ensure normal operation. 3.1.6. The Display Properties dialog box shows the information of display adapter, color, the range of display area, and the refresh rate. Click the Advanced button for Windows) You may adjust the screen resolution and color quality settings in this dialog box. GV-RX345256H Graphics Accelerator - 20 - Settings (Resolutions...

Manual
Page 23
... your desktop, including changing desktop resolution and desktop mode, setting up extended desktop (requires more than one display), and rotating desktop image to optimize video playback in Basic and Advanced View provides hardware and software information about the installed graphics card. „ Graphics Software Provides software information including driver version, CATALYST version, Direct 3D version and so on. „ Graphics Hardware Provides hardware information including graphics chipset, BIOS version, memory size, core clock and so on the second display. „ Display Setup This...
... your desktop, including changing desktop resolution and desktop mode, setting up extended desktop (requires more than one display), and rotating desktop image to optimize video playback in Basic and Advanced View provides hardware and software information about the installed graphics card. „ Graphics Software Provides software information including driver version, CATALYST version, Direct 3D version and so on. „ Graphics Hardware Provides hardware information including graphics chipset, BIOS version, memory size, core clock and so on the second display. „ Display Setup This...

Manual
Page 25
... video settings that can use profiles to restore defaults, change skins, and update the Catalyst Control Center. Software Installation Define and save your computer, you need to a specific graphics card. Preferences Properties: The Preferences page helps to create customized environments for your desktop, video, and 3D applications. The Catalyst Control Center Preferences page contains the following options: „ Always on Top „ Hide Tooltips „ Hide Toolbar Text „ Hide Splash Screen „ Enable...
... video settings that can use profiles to restore defaults, change skins, and update the Catalyst Control Center. Software Installation Define and save your computer, you need to a specific graphics card. Preferences Properties: The Preferences page helps to create customized environments for your desktop, video, and 3D applications. The Catalyst Control Center Preferences page contains the following options: „ Always on Top „ Hide Tooltips „ Hide Toolbar Text „ Hide Splash Screen „ Enable...

Manual
Page 27
... configure panning on systems running Windows Vista the 3D Refresh Rate Override and the Display Detection Option to quickly change your display setup, arrange your choice when a fullscreen application or game has a default refresh rate that may not be automatically detected, use Force TV Detection. Note: The stretch vertically and horizontally options are not supported on displays with limited resolution capabilities are using an older TV or one of your desktop...
... configure panning on systems running Windows Vista the 3D Refresh Rate Override and the Display Detection Option to quickly change your display setup, arrange your choice when a fullscreen application or game has a default refresh rate that may not be automatically detected, use Force TV Detection. Note: The stretch vertically and horizontally options are not supported on displays with limited resolution capabilities are using an older TV or one of your desktop...
Manual
Page 34
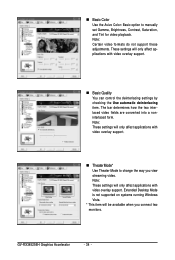
... Desktop Mode is not supported on systems running Windows Vista. * This item will only affect applications with video overlay support. Note: These settings will only affect applications with video overlay support. „ Theater Mode* Use Theater Mode to manually set Gamma, Brightness, Contrast, Saturation, and Tint for video playback. GV-RX345256H Graphics Accelerator - 34 - These settings will only affect applications with video overlay support. „ Basic Quality You can control the deinterlacing settings by checking the Use...
... Desktop Mode is not supported on systems running Windows Vista. * This item will only affect applications with video overlay support. Note: These settings will only affect applications with video overlay support. „ Theater Mode* Use Theater Mode to manually set Gamma, Brightness, Contrast, Saturation, and Tint for video playback. GV-RX345256H Graphics Accelerator - 34 - These settings will only affect applications with video overlay support. „ Basic Quality You can control the deinterlacing settings by checking the Use...
Manual
Page 37
... Safe Mode, in Device Manager check whether the driver for more assistance, use the Troubleshooting Guide located in graphics capabilities on your monitor's setting using monitor's adjust panel to make the screen look focused, crisp, and sharp. (Please refer to the card's display connector. „ Make sure that the display cable is correct. „ For more advanced troubleshooting information. „ Check that the card is seated properly in the PCI Express x16...
... Safe Mode, in Device Manager check whether the driver for more assistance, use the Troubleshooting Guide located in graphics capabilities on your monitor's setting using monitor's adjust panel to make the screen look focused, crisp, and sharp. (Please refer to the card's display connector. „ Make sure that the display cable is correct. „ For more advanced troubleshooting information. „ Check that the card is seated properly in the PCI Express x16...


