Manual
Page 4
... rapid change in any from without the expressed, written permission of this booklet. patents and other intellectual property rights owned by Macrovision Corporation and other limited viewing uses only unless otherwise authorized by Macrovision Corporation. English User's Manual Copyright Copyright by GIGA-BYTE TECHNOLOGY CO., LTD. ("GBT") No part of this manual may be reproduced or transmitted in technology, some of the specifications might...
... rapid change in any from without the expressed, written permission of this booklet. patents and other intellectual property rights owned by Macrovision Corporation and other limited viewing uses only unless otherwise authorized by Macrovision Corporation. English User's Manual Copyright Copyright by GIGA-BYTE TECHNOLOGY CO., LTD. ("GBT") No part of this manual may be reproduced or transmitted in technology, some of the specifications might...
Manual
Page 5
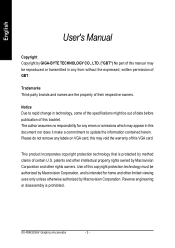
... 31 3.3. Troubleshooting Tips 32 5. HARDWARE INSTALLATION 7 3. BIOS FLASH UTILITY 31 4. PREFACE 4 1.2. Appendix 33 5.1. Resolutions and Color Depth Table (In Windows® XP 34 - 3 - HARDWARE INSTALLATION 5 2.1. UNPACKING 5 2.2. Operating system requirement 9 3.1.2. How to reflash the BIOS 33 5.2. Table of Contents 1. KEY FEATURES 4 2. Taskbar Icon ...18 3.1.6. Display Properties pages 22 3.2. Utilities on driver CD ...15 3.1.5. INTRODUCTION 4 1.1. DirectX Installation ...10 3.1.3. English Table of Content SOFTWARE INSTALLATION 9 3.1. Win®...
... 31 3.3. Troubleshooting Tips 32 5. HARDWARE INSTALLATION 7 3. BIOS FLASH UTILITY 31 4. PREFACE 4 1.2. Appendix 33 5.1. Resolutions and Color Depth Table (In Windows® XP 34 - 3 - HARDWARE INSTALLATION 5 2.1. UNPACKING 5 2.2. Operating system requirement 9 3.1.2. How to reflash the BIOS 33 5.2. Table of Contents 1. KEY FEATURES 4 2. Taskbar Icon ...18 3.1.6. Display Properties pages 22 3.2. Utilities on driver CD ...15 3.1.5. INTRODUCTION 4 1.1. DirectX Installation ...10 3.1.3. English Table of Content SOFTWARE INSTALLATION 9 3.1. Win®...
Manual
Page 6
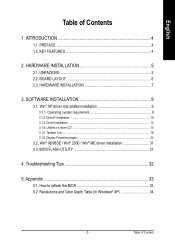
... vertex data to be transferred faster from system memory to accelerate video „ Supports CRT, DVI-I and VIVO connectors GV-R96X256V Graphics Accelerator - 4 - INTRODUCTION 1.1. KEY FEATURES „ Powered by RADEON™ 9600 XT Visual Processing Unit (VPU) „ Supports DirectX® 9.0 „ Supports the new AGP 8X standard „ 4-pixel pipeline architecture „ 128-bit memory interface „ 256MB DDR memory accelerates the latest 3D games „ Supports pixel shaders to the chip. 1.2. English...
... vertex data to be transferred faster from system memory to accelerate video „ Supports CRT, DVI-I and VIVO connectors GV-R96X256V Graphics Accelerator - 4 - INTRODUCTION 1.1. KEY FEATURES „ Powered by RADEON™ 9600 XT Visual Processing Unit (VPU) „ Supports DirectX® 9.0 „ Supports the new AGP 8X standard „ 4-pixel pipeline architecture „ 128-bit memory interface „ 256MB DDR memory accelerates the latest 3D games „ Supports pixel shaders to the chip. 1.2. English...
Manual
Page 7
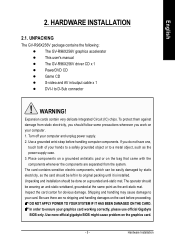
... card. Hardware Installation HARDWARE INSTALLATION 2.1. To protect them against damage from the system. Unpacking and installation should be left in /output cable x 1 z DVI-I to a metal object, such as the anti-static mat. UNPACKING The GV-R96X256V package contains the following: z The GV-R96X256V graphics accelerator z This user's manual z The GV-R96X256V driver CD x 1 z PowerDVD CD z Game CD z S-video and AV in its original packing until it is installed. Use none official gigabyte BIOS might cause problem...
... card. Hardware Installation HARDWARE INSTALLATION 2.1. To protect them against damage from the system. Unpacking and installation should be left in /output cable x 1 z DVI-I to a metal object, such as the anti-static mat. UNPACKING The GV-R96X256V package contains the following: z The GV-R96X256V graphics accelerator z This user's manual z The GV-R96X256V driver CD x 1 z PowerDVD CD z Game CD z S-video and AV in its original packing until it is installed. Use none official gigabyte BIOS might cause problem...
Manual
Page 9
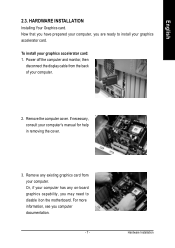
... you are ready to disable it on the motherboard. To install your computer's manual for help in removing the cover. 3. Remove any on-board graphics capability, you may need to install your computer. Power off the computer and monitor, then disconnect the display cable from your graphics accelerator card. Hardware Installation Or, if your computer has any existing graphics card from the back of your computer, you computer documentation. - 7 - HARDWARE INSTALLATION Installing Your Graphics card. Remove...
... you are ready to disable it on the motherboard. To install your computer's manual for help in removing the cover. 3. Remove any on-board graphics capability, you may need to install your computer. Power off the computer and monitor, then disconnect the display cable from your graphics accelerator card. Hardware Installation Or, if your computer has any existing graphics card from the back of your computer, you computer documentation. - 7 - HARDWARE INSTALLATION Installing Your Graphics card. Remove...
Manual
Page 10
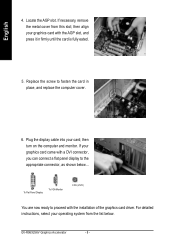
... your graphics card came with the installation of the graphics card driver. To Flat Panel Display To VGA Monitor 9 Pin (VIVO) You are now ready to proceed with a DVI connector, you can connect a flat panel display to fasten the card in firmly until the card is fully eated. 5. Plug the display cable into your operating system from this slot; Replace the screw to the appropriate connector, as shown below . GV-R96X256V Graphics Accelerator - 8 - For detailed instructions, select your card...
... your graphics card came with the installation of the graphics card driver. To Flat Panel Display To VGA Monitor 9 Pin (VIVO) You are now ready to proceed with a DVI connector, you can connect a flat panel display to fasten the card in firmly until the card is fully eated. 5. Plug the display cable into your operating system from this slot; Replace the screw to the appropriate connector, as shown below . GV-R96X256V Graphics Accelerator - 8 - For detailed instructions, select your card...
Manual
Page 11
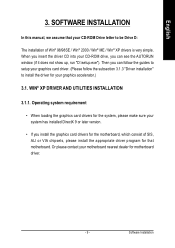
... manual, we assume that motherboard. WIN® XP DRIVER AND UTILITIES INSTALLATION 3.1.1. Then you can see the AUTORUN window (if it does not show up, run "D:\setup.exe"). Operating system requirement • When loading the graphics card drivers for the system, please make sure your graphics card driver. (Please follow the guides to setup your system has installed DirectX 9 or later version. • If you can follow the subsection 3.1.3 "Driver installation" to be Drive...
... manual, we assume that motherboard. WIN® XP DRIVER AND UTILITIES INSTALLATION 3.1.1. Then you can see the AUTORUN window (if it does not show up, run "D:\setup.exe"). Operating system requirement • When loading the graphics card drivers for the system, please make sure your graphics card driver. (Please follow the guides to setup your system has installed DirectX 9 or later version. • If you can follow the subsection 3.1.3 "Driver installation" to be Drive...
Manual
Page 12
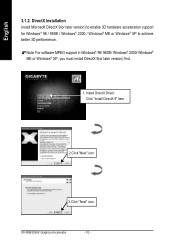
Note: For software MPEG support in Windows® 98/ 98SE/ Windows® 2000/ Windows® ME or Windows® XP, you must install DirectX 9(or later version) first. 1. Install DirectX Driver: Click "Install DirectX 9" Item. 2.Click "Next" icon. 3.Click "Next" icon. GV-R96X256V Graphics Accelerator - 10 - DirectX Installation Install Microsoft DirectX 9(or later version) to enable 3D hardware acceleration support for Windows® 98 / 98SE / Windows® 2000 / Windows® ME or Windows® XP to achieve better 3D performence. English 3.1.2.
Note: For software MPEG support in Windows® 98/ 98SE/ Windows® 2000/ Windows® ME or Windows® XP, you must install DirectX 9(or later version) first. 1. Install DirectX Driver: Click "Install DirectX 9" Item. 2.Click "Next" icon. 3.Click "Next" icon. GV-R96X256V Graphics Accelerator - 10 - DirectX Installation Install Microsoft DirectX 9(or later version) to enable 3D hardware acceleration support for Windows® 98 / 98SE / Windows® 2000 / Windows® ME or Windows® XP to achieve better 3D performence. English 3.1.2.
Manual
Page 14
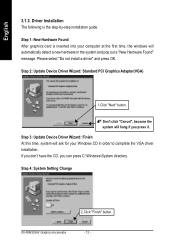
... press C:\Windows\System directory. Don't click "Cancel", because the system will automatically detect a new hardware in order to complete the VGA driver installation. Step 2: Update Device Driver Wizard: Standard PCI Graphics Adapter(VGA) 1.Click "Next" button. Step 4: System Setting Change 2.Click "Finish" button. If you don't have the CD, you press it. Please select "Do not install a driver" and press OK. English 3.1.3. Step 1: New Hardware Found After graphics card is...
... press C:\Windows\System directory. Don't click "Cancel", because the system will automatically detect a new hardware in order to complete the VGA driver installation. Step 2: Update Device Driver Wizard: Standard PCI Graphics Adapter(VGA) 1.Click "Next" button. Step 4: System Setting Change 2.Click "Finish" button. If you don't have the CD, you press it. Please select "Do not install a driver" and press OK. English 3.1.3. Step 1: New Hardware Found After graphics card is...
Manual
Page 20
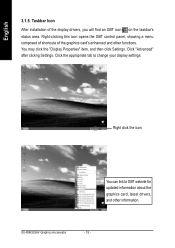
GV-R96X256V Graphics Accelerator - 18 - Taskbar Icon After installation of the graphics card's enhanced and other information. Click "Advanced" after clickng Settings. Click the appropriate tab to GBT website for updated information about the graphics card, latest drivers, and other functions. Right click the icon. English 3.1.5. Right-clicking this icon opens the GBT control panel, showing a menu composed of shortcute of the display drivers, you will find...
GV-R96X256V Graphics Accelerator - 18 - Taskbar Icon After installation of the graphics card's enhanced and other information. Click "Advanced" after clickng Settings. Click the appropriate tab to GBT website for updated information about the graphics card, latest drivers, and other functions. Right click the icon. English 3.1.5. Right-clicking this icon opens the GBT control panel, showing a menu composed of shortcute of the display drivers, you will find...
Manual
Page 23
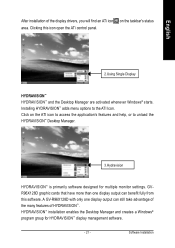
.... HYDRAVISION™ installation enables the Desktop Manager and creates a Windows® program group for multiple monitor settings. Click on the taskbar's status area. Software Installation GVR96X128D graphic cards that have more than one display output can benefit fully from this icon open the ATi control panel. 2.Using Single Display HYDRAVISION™ HYDRAVISION™ and the Desktop Manager are activated whenever Windows® starts. Clicking this software. English After installation of HYDRAVISION...
.... HYDRAVISION™ installation enables the Desktop Manager and creates a Windows® program group for multiple monitor settings. Click on the taskbar's status area. Software Installation GVR96X128D graphic cards that have more than one display output can benefit fully from this icon open the ATi control panel. 2.Using Single Display HYDRAVISION™ HYDRAVISION™ and the Desktop Manager are activated whenever Windows® starts. Clicking this software. English After installation of HYDRAVISION...
Manual
Page 24
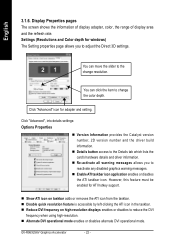
.... „ Disable quick resolution feature is accessible by left-clicking the ATI icon in the taskbar. „ Reduce DVI frequency on high-resolution displays enables or disables to change resolution. Click "Advanced" icon for windows) The Setting properties page allows you to the change the color depth. GV-R96X256V Graphics Accelerator - 22 - Display Properties pages The screen shows the information of display adapter, color, the range of display area and the refresh rate. Settings (Resolutions and Color depth for adapter and setting. English 3.1.6.
.... „ Disable quick resolution feature is accessible by left-clicking the ATI icon in the taskbar. „ Reduce DVI frequency on high-resolution displays enables or disables to change resolution. Click "Advanced" icon for windows) The Setting properties page allows you to the change the color depth. GV-R96X256V Graphics Accelerator - 22 - Display Properties pages The screen shows the information of display adapter, color, the range of display area and the refresh rate. Settings (Resolutions and Color depth for adapter and setting. English 3.1.6.
Manual
Page 25
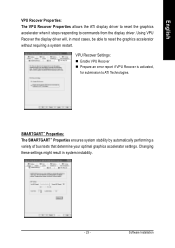
... a variety of bus tests that determine your optimal graphics accelerator settings. VPU Recover Settings: „ Enable VPU Recover „ Prepare an error report if VPU Recover is activated, for submission to commands from the display driver. English VPU Recover Properties: The VPU Recover Properties allows the ATI display driver to reset the graphics accelerator when it stops responding to ATI Technologies. Software Installation Using VPU Recover the display driver will, in...
... a variety of bus tests that determine your optimal graphics accelerator settings. VPU Recover Settings: „ Enable VPU Recover „ Prepare an error report if VPU Recover is activated, for submission to commands from the display driver. English VPU Recover Properties: The VPU Recover Properties allows the ATI display driver to reset the graphics accelerator when it stops responding to ATI Technologies. Software Installation Using VPU Recover the display driver will, in...
Manual
Page 27
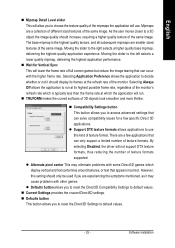
... access advanced settings that can solve compatibility issues for Vertical Sync This will lower the frame rate of full screen games but reduce the image tearing that can only support a limited number of texture formats. z Alternate pixel center This may cause problems with the higher frame rate. Software Installation By selecting Disabled, the driver will use this setting should only be used if you are a few specific Direct...
... access advanced settings that can solve compatibility issues for Vertical Sync This will lower the frame rate of full screen games but reduce the image tearing that can only support a limited number of texture formats. z Alternate pixel center This may cause problems with the higher frame rate. Software Installation By selecting Disabled, the driver will use this setting should only be used if you are a few specific Direct...

Manual
Page 29
... OpenGL Compatibility Settings to default values. „ Current Settings provides the cruuent OpenGL settings. „ Defaults button This button allows you to default values. - 27 - Selecting Application Preference allows the application to a 3D object the image quality should display its highest possible frame rate, regardless of the monitor. As the user moves closer to decide whether or not it should increase, requiring...
... OpenGL Compatibility Settings to default values. „ Current Settings provides the cruuent OpenGL settings. „ Defaults button This button allows you to default values. - 27 - Selecting Application Preference allows the application to a 3D object the image quality should display its highest possible frame rate, regardless of the monitor. As the user moves closer to decide whether or not it should increase, requiring...
Manual
Page 30
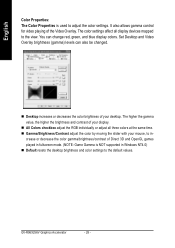
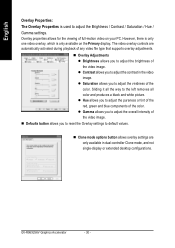
... adjust the color settings. crease or decrease the color gamma/brightness/contrast of the Video Overlay. You can also be changed. „ Desktop increases or decreases the color brightness of your desktop. English Color Properties: The Color Properties is NOT supported in - It also allows gamma control for video playing of Direct 3D and OpenGL games played in fullscreen mode. (NOTE: Game Gamma is used to the default values. GV-R96X256V Graphics Accelerator...
... adjust the color settings. crease or decrease the color gamma/brightness/contrast of the Video Overlay. You can also be changed. „ Desktop increases or decreases the color brightness of your desktop. English Color Properties: The Color Properties is NOT supported in - It also allows gamma control for video playing of Direct 3D and OpenGL games played in fullscreen mode. (NOTE: Game Gamma is used to the default values. GV-R96X256V Graphics Accelerator...
Manual
Page 31
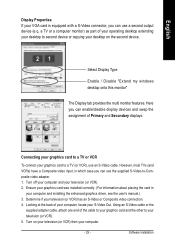
... your computer and your television (or VCR) has an S-Video or Composite video connection. 4. Turn on the second device. Software Installation Select Display Type Enable / Disable "Extend my windows desktop onto this monitor" The Display tab provides the multi monitor features. Looking at the back of the cable to your S-Video Out. Using an S-Video cable or the supplied adapter cable, attach one end of your computer, locate your graphics card and the other to -Composite video adapter. 1.
... your computer and your television (or VCR) has an S-Video or Composite video connection. 4. Turn on the second device. Software Installation Select Display Type Enable / Disable "Extend my windows desktop onto this monitor" The Display tab provides the multi monitor features. Looking at the back of the cable to your S-Video Out. Using an S-Video cable or the supplied adapter cable, attach one end of your computer, locate your graphics card and the other to -Composite video adapter. 1.
Manual
Page 32
... allows you to reset the Overlay settings to default values. „ Clone mode options button allows overlay settings are automatically activated during playback of any video file type that supports overlay adjustments. „ Overlay Adjustments z Brightness allows you to adjust the contrast in dual-controller Clone mode, and not single-display or extended desktop configurations. GV-R96X256V Graphics Accelerator - 30 - Sliding it all color and produces a black and white picture. z Saturation allows...
... allows you to reset the Overlay settings to default values. „ Clone mode options button allows overlay settings are automatically activated during playback of any video file type that supports overlay adjustments. „ Overlay Adjustments z Brightness allows you to adjust the contrast in dual-controller Clone mode, and not single-display or extended desktop configurations. GV-R96X256V Graphics Accelerator - 30 - Sliding it all color and produces a black and white picture. z Saturation allows...
Manual
Page 33
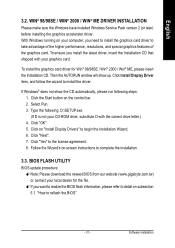
... the graphics card. Software Installation Click "Next". 7. English 3.2. WIN® 98/98SE / WIN® 2000 / WIN® ME DRIVER INSTALLATION Please make sure the Windows have installed Windows Service Pack version 2 (or later) before installing the graphics accelerator driver. Follow the Wizard's on your local dealer for Win® 98/98SE / Win® 2000 / Win® ME, please insert the Installation CD. BIOS FLASH UTILITY BIOS update procedure: 0Note: Please download the newest BIOS from our website (www.gigabyte.com...
... the graphics card. Software Installation Click "Next". 7. English 3.2. WIN® 98/98SE / WIN® 2000 / WIN® ME DRIVER INSTALLATION Please make sure the Windows have installed Windows Service Pack version 2 (or later) before installing the graphics accelerator driver. Follow the Wizard's on your local dealer for Win® 98/98SE / Win® 2000 / Win® ME, please insert the Installation CD. BIOS FLASH UTILITY BIOS update procedure: 0Note: Please download the newest BIOS from our website (www.gigabyte.com...

Manual
Page 34
..., use F8 to the monitor's manual.) GV-R96X256V Graphics Accelerator - 32 - In Windows® 98 SE and Windows® Me, press and hold the CTRL key until the Microsoft® Windows® Startup Menu appears on your computer in the AGP slot. „ Ensure that the display cable is securely fastened to the card's display connector. „ Make sure that the card is seated properly in Safe Mode. TROUBLESHOOTING...
..., use F8 to the monitor's manual.) GV-R96X256V Graphics Accelerator - 32 - In Windows® 98 SE and Windows® Me, press and hold the CTRL key until the Microsoft® Windows® Startup Menu appears on your computer in the AGP slot. „ Ensure that the display cable is securely fastened to the card's display connector. „ Make sure that the card is seated properly in Safe Mode. TROUBLESHOOTING...


