Manual
Page 5
... LAYOUT 6 2.3. Win® 98/98SE / Win® 2000 / Win® ME driver installation 31 3.3. Appendix 33 5.1. How to reflash the BIOS 33 5.2. HARDWARE INSTALLATION 7 3. Utilities on driver CD ...15 3.1.5. BIOS FLASH UTILITY 31 4. Troubleshooting Tips 32 5. English Table of Content Driver Installation ...12 3.1.4. Resolutions and Color Depth Table (In Windows® XP 34...
... LAYOUT 6 2.3. Win® 98/98SE / Win® 2000 / Win® ME driver installation 31 3.3. Appendix 33 5.1. How to reflash the BIOS 33 5.2. HARDWARE INSTALLATION 7 3. Utilities on driver CD ...15 3.1.5. BIOS FLASH UTILITY 31 4. Troubleshooting Tips 32 5. English Table of Content Driver Installation ...12 3.1.4. Resolutions and Color Depth Table (In Windows® XP 34...

Manual
Page 7
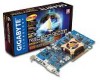
...the card before handling computer components. Inspect the card carton for obvious damage. Hardware Installation UNPACKING The GV-R96X128D package contains the following: z The GV-R96X128D graphics accelerator z This user's manual z The GV-R96X128D driver CD x 1 z PowerDVD CD z Game CD z One cable supports S-video and AV-Output ... point as the power supply case. 3. English 2. Turn off your graphics card working correctly, please use official Gigabyte BIOS only. Unpacking and installation should follow some precautions whenever you do not have one, touch both of your hands...
...the card before handling computer components. Inspect the card carton for obvious damage. Hardware Installation UNPACKING The GV-R96X128D package contains the following: z The GV-R96X128D graphics accelerator z This user's manual z The GV-R96X128D driver CD x 1 z PowerDVD CD z Game CD z One cable supports S-video and AV-Output ... point as the power supply case. 3. English 2. Turn off your graphics card working correctly, please use official Gigabyte BIOS only. Unpacking and installation should follow some precautions whenever you do not have one, touch both of your hands...

Manual
Page 10
... with the AGP slot, and press it in place, and replace the computer cover. 6. If your graphics card with the installation of the graphics card driver. Locate the AGP slot. For detailed instructions, select your card; GV-R96X128D Graphics Accelerator - 8 - English 4. Plug the display cable into your operating system from this slot;
... with the AGP slot, and press it in place, and replace the computer cover. 6. If your graphics card with the installation of the graphics card driver. Locate the AGP slot. For detailed instructions, select your card; GV-R96X128D Graphics Accelerator - 8 - English 4. Plug the display cable into your operating system from this slot;

Manual
Page 11
... the guides to setup your CD-ROM Drive letter to install the driver for the motherboard, which consist of Win® 98/98SE / Win® 2000 / Win® ME / Win® XP drivers is very simple. SOFTWARE INSTALLATION In this manual, we assume that motherboard.... When you insert the driver CD into your motherboard nearest dealer for that your graphics card driver. (Please follow the subsection 3.1.3 "Driver installation" to be Drive D: The installation of SIS, ALI or VIA chipsets, please install the appropriate driver program for motherboard driver. - 9 - Or please ...
... the guides to setup your CD-ROM Drive letter to install the driver for the motherboard, which consist of Win® 98/98SE / Win® 2000 / Win® ME / Win® XP drivers is very simple. SOFTWARE INSTALLATION In this manual, we assume that motherboard.... When you insert the driver CD into your motherboard nearest dealer for that your graphics card driver. (Please follow the subsection 3.1.3 "Driver installation" to be Drive D: The installation of SIS, ALI or VIA chipsets, please install the appropriate driver program for motherboard driver. - 9 - Or please ...

Manual
Page 12
Note: For software MPEG support in Windows® 98/ 98SE/ Windows® 2000/ Windows® ME or Windows® XP, you must install DirectX 9(or later version) first. 1. Install DirectX Driver: Click "Install DirectX 9" Item. 2.Click "Next" icon. 3.Click "Next" icon. GV-R96X128D Graphics Accelerator - 10 - DirectX Installation Install Microsoft DirectX 9(or later version) to enable 3D hardware acceleration support for Windows® 98 / 98SE / Windows® 2000 / Windows® ME or Windows® XP to achieve better 3D performence. English 3.1.2.
Note: For software MPEG support in Windows® 98/ 98SE/ Windows® 2000/ Windows® ME or Windows® XP, you must install DirectX 9(or later version) first. 1. Install DirectX Driver: Click "Install DirectX 9" Item. 2.Click "Next" icon. 3.Click "Next" icon. GV-R96X128D Graphics Accelerator - 10 - DirectX Installation Install Microsoft DirectX 9(or later version) to enable 3D hardware acceleration support for Windows® 98 / 98SE / Windows® 2000 / Windows® ME or Windows® XP to achieve better 3D performence. English 3.1.2.

Manual
Page 14
...: Standard PCI Graphics Adapter(VGA) 1.Click "Next" button. Don't click "Cancel", because the system will automatically detect a new hardware in order to complete the VGA driver installation. GV-R96X128D Graphics Accelerator - 12 - Step 4: System Setting Change 2.Click "Finish" button. If you don't have the CD, you press it. Step 1: New Hardware Found After...
...: Standard PCI Graphics Adapter(VGA) 1.Click "Next" button. Don't click "Cancel", because the system will automatically detect a new hardware in order to complete the VGA driver installation. GV-R96X128D Graphics Accelerator - 12 - Step 4: System Setting Change 2.Click "Finish" button. If you don't have the CD, you press it. Step 1: New Hardware Found After...
Manual
Page 15
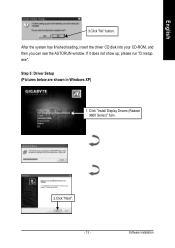
exe". Step 5: Driver Setup (Pictures below are shown in Windows XP) 1. If it does not show up, please run "D:\setup. After the system has finished loading, insert the driver CD disk into your CD-ROM, and then you can see the AUTORUN window. English 3.Click "No" button. Click "Install Display Drivers (Radeon 9600 Series)" item. 2.Click "Next". - 13 - Software Installation
exe". Step 5: Driver Setup (Pictures below are shown in Windows XP) 1. If it does not show up, please run "D:\setup. After the system has finished loading, insert the driver CD disk into your CD-ROM, and then you can see the AUTORUN window. English 3.Click "No" button. Click "Install Display Drivers (Radeon 9600 Series)" item. 2.Click "Next". - 13 - Software Installation
Manual
Page 17
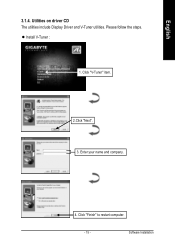
z Install V-Tuner : 1. Software Installation English 3.1.4. Please follow the steps. Click "V-Tuner" item. 2.Click "Next". 3. Click "Finish" to restart computer. - 15 - Enter your name and company. 4. Utilities on driver CD The utilities include Display Driver and V-Tuner utilities.
z Install V-Tuner : 1. Software Installation English 3.1.4. Please follow the steps. Click "V-Tuner" item. 2.Click "Next". 3. Click "Finish" to restart computer. - 15 - Enter your name and company. 4. Utilities on driver CD The utilities include Display Driver and V-Tuner utilities.

Manual
Page 20
...click the icon. You may click the "Display Properties" item, and then click Settings. You can link to change your display settings. GV-R96X128D Graphics Accelerator - 18 - Click "Advanced" after clickng Settings. Taskbar Icon After installation of the graphics card's enhanced and other information.... Right-clicking this icon opens the GBT control panel, showing a menu composed of shortcute of the display drivers, you will find an GBT icon on the taskbar's status area. Click the appropriate tab to GBT website for updated information about...
...click the icon. You may click the "Display Properties" item, and then click Settings. You can link to change your display settings. GV-R96X128D Graphics Accelerator - 18 - Click "Advanced" after clickng Settings. Taskbar Icon After installation of the graphics card's enhanced and other information.... Right-clicking this icon opens the GBT control panel, showing a menu composed of shortcute of the display drivers, you will find an GBT icon on the taskbar's status area. Click the appropriate tab to GBT website for updated information about...

Manual
Page 23
.... 2.Using Single Display HYDRAVISION™ HYDRAVISION™ and the Desktop Manager are activated whenever Windows® starts. A GV-R96X128D with only one display output can still take advantage of the many features of the display drivers, you will find an ATi icon on the ATI icon to access the application's features and help...
.... 2.Using Single Display HYDRAVISION™ HYDRAVISION™ and the Desktop Manager are activated whenever Windows® starts. A GV-R96X128D with only one display output can still take advantage of the many features of the display drivers, you will find an ATi icon on the ATI icon to access the application's features and help...
Manual
Page 24
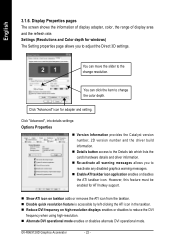
... ATI icon in the taskbar. „ Reduce DVI frequency on high-resolution displays enables or disables to adjust the Direct 3D settings. GV-R96X128D Graphics Accelerator - 22 - You can click the item to change resolution. Settings (Resolutions and Color depth for adapter and setting. Click...132; Version Information provides the Catalyst version number, 2D version number and the driver build information. „ Details button access to the Details tab which lists the card's hardware details and driver information. „ Re-activate all warning messages allows you to reduce the DVI...
... ATI icon in the taskbar. „ Reduce DVI frequency on high-resolution displays enables or disables to adjust the Direct 3D settings. GV-R96X128D Graphics Accelerator - 22 - You can click the item to change resolution. Settings (Resolutions and Color depth for adapter and setting. Click...132; Version Information provides the Catalyst version number, 2D version number and the driver build information. „ Details button access to the Details tab which lists the card's hardware details and driver information. „ Re-activate all warning messages allows you to reduce the DVI...
Manual
Page 25
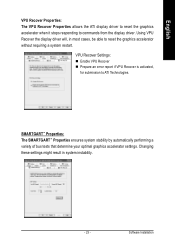
...VPU Recover Settings: „ Enable VPU Recover „ Prepare an error report if VPU Recover is activated, for submission to commands from the display driver. SMARTGART™ Properties: The SMARTGART™ Properties ensures system stability by automatically performing a variety of bus tests that determine your optimal graphics accelerator ... accelerator without requiring a system restart. Software Installation English VPU Recover Properties: The VPU Recover Properties allows the ATI display driver to reset the graphics accelerator when it stops responding to ATI Technologies.
...VPU Recover Settings: „ Enable VPU Recover „ Prepare an error report if VPU Recover is activated, for submission to commands from the display driver. SMARTGART™ Properties: The SMARTGART™ Properties ensures system stability by automatically performing a variety of bus tests that determine your optimal graphics accelerator ... accelerator without requiring a system restart. Software Installation English VPU Recover Properties: The VPU Recover Properties allows the ATI display driver to reset the graphics accelerator when it stops responding to ATI Technologies.
Manual
Page 27
... the frame rate of full screen games but reduce the image tearing that can only support a limited number of texture formats. By selecting Disabled, the driver will use this setting should increase, requiring a higher quality texture of the same image. However, this kind of texture format. z Support DTX texture formats allows...
... the frame rate of full screen games but reduce the image tearing that can only support a limited number of texture formats. By selecting Disabled, the driver will use this setting should increase, requiring a higher quality texture of the same image. However, this kind of texture format. z Support DTX texture formats allows...

Manual
Page 31
... Out. Connecting your graphics card to second device or copying your desktop on your television (or VCR) then your computer and installing the enhanced graphics driver, see the user's manual.) 3. Looking at the back of the cable to your graphics card and the other to your VGA card is equipped with...
... Out. Connecting your graphics card to second device or copying your desktop on your television (or VCR) then your computer and installing the enhanced graphics driver, see the user's manual.) 3. Looking at the back of the cable to your graphics card and the other to your VGA card is equipped with...

Manual
Page 33
... BIOS FLASH UTILITY BIOS update procedure: 0Note: Please download the newest BIOS from our website (www.gigabyte.com.tw) or contact your computer, you need to install the graphics card driver to take advantage of the higher performance, resolutions, and special graphics features of the graphics card. WIN... running on -screen instructions to begin the Installation Wizard. 6. To ensure you want to realize the BIOS flash information, please refer to install the driver. Type the following steps: 1. Follow the Wizard's on your local dealer for Win® 98/98SE / Win® 2000 / Win®...
... BIOS FLASH UTILITY BIOS update procedure: 0Note: Please download the newest BIOS from our website (www.gigabyte.com.tw) or contact your computer, you need to install the graphics card driver to take advantage of the higher performance, resolutions, and special graphics features of the graphics card. WIN... running on -screen instructions to begin the Installation Wizard. 6. To ensure you want to realize the BIOS flash information, please refer to install the driver. Type the following steps: 1. Follow the Wizard's on your local dealer for Win® 98/98SE / Win® 2000 / Win®...

Manual
Page 34
...computer's manual or manufacturer. (NOTE: Some manufacturers do not allow the built-in graphics to be disabled or to the monitor's manual.) GV-R96X128D Graphics Accelerator - 32 - TROUBLESHOOTING TIPS The following troubleshooting tips may help if you are plugged in and receiving power. „ If ...refer to become the secondary display.) „ Make sure you selected the appropriate display device and graphics card when you installed the graphics driver. „ If you have problems during bootup, start your computer in the Windows® Help or contact your motherboard. In Windows...
...computer's manual or manufacturer. (NOTE: Some manufacturers do not allow the built-in graphics to be disabled or to the monitor's manual.) GV-R96X128D Graphics Accelerator - 32 - TROUBLESHOOTING TIPS The following troubleshooting tips may help if you are plugged in and receiving power. „ If ...refer to become the secondary display.) „ Make sure you selected the appropriate display device and graphics card when you installed the graphics driver. „ If you have problems during bootup, start your computer in the Windows® Help or contact your motherboard. In Windows...

