Manual
Page 5
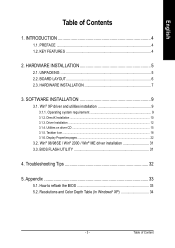
... ...12 3.1.4. Display Properties pages 22 3.2. How to reflash the BIOS 33 5.2. HARDWARE INSTALLATION 7 3. PREFACE 4 1.2. Utilities on driver CD ...15 3.1.5. Taskbar Icon ...18 3.1.6. BIOS FLASH UTILITY 31 4. HARDWARE INSTALLATION 5 2.1. SOFTWARE INSTALLATION 9 3.1. Table of Contents 1. INTRODUCTION 4... Appendix 33 5.1. Resolutions and Color Depth Table (In Windows® XP 34 - 3 - Troubleshooting Tips 32 5. Win® XP driver and utilities installation 9 3.1.1. English Table of Content UNPACKING 5 2.2. Win® 98/98SE / Win® 2000 / Win® ME...
... ...12 3.1.4. Display Properties pages 22 3.2. How to reflash the BIOS 33 5.2. HARDWARE INSTALLATION 7 3. PREFACE 4 1.2. Utilities on driver CD ...15 3.1.5. Taskbar Icon ...18 3.1.6. BIOS FLASH UTILITY 31 4. HARDWARE INSTALLATION 5 2.1. SOFTWARE INSTALLATION 9 3.1. Table of Contents 1. INTRODUCTION 4... Appendix 33 5.1. Resolutions and Color Depth Table (In Windows® XP 34 - 3 - Troubleshooting Tips 32 5. Win® XP driver and utilities installation 9 3.1.1. English Table of Content UNPACKING 5 2.2. Win® 98/98SE / Win® 2000 / Win® ME...

Manual
Page 7
... D-Sub connector WARNING! Expansion cards contain very delicate Integrated Circuit (IC) chips. Turn off your card. Use none official gigabyte BIOS might cause problem on a grounded anti-static mat. To protect them against damage from the system. Place components on... anti-static mat. If you work on the card before handling computer components. English 2. UNPACKING The GV-R96X128D package contains the following: z The GV-R96X128D graphics accelerator z This user's manual z The GV-R96X128D driver CD x 1 z PowerDVD CD z Game CD z One cable supports S-video and AV-Output z...
... D-Sub connector WARNING! Expansion cards contain very delicate Integrated Circuit (IC) chips. Turn off your card. Use none official gigabyte BIOS might cause problem on a grounded anti-static mat. To protect them against damage from the system. Place components on... anti-static mat. If you work on the card before handling computer components. English 2. UNPACKING The GV-R96X128D package contains the following: z The GV-R96X128D graphics accelerator z This user's manual z The GV-R96X128D driver CD x 1 z PowerDVD CD z Game CD z One cable supports S-video and AV-Output z...

Manual
Page 10
GV-R96X128D Graphics Accelerator - 8 - If necessary, remove the metal cover from the list below ... Replace the screw to proceed with the installation of the graphics card driver. Plug the display cable into your graphics card with a DVI connector, you can connect a flat panel display to the appropriate connector, as shown below . then ...
GV-R96X128D Graphics Accelerator - 8 - If necessary, remove the metal cover from the list below ... Replace the screw to proceed with the installation of the graphics card driver. Plug the display cable into your graphics card with a DVI connector, you can connect a flat panel display to the appropriate connector, as shown below . then ...

Manual
Page 11
..., which consist of Win® 98/98SE / Win® 2000 / Win® ME / Win® XP drivers is very simple. When you can follow the guides to setup your graphics card driver. (Please follow the subsection 3.1.3 "Driver installation" to be Drive D: The installation of SIS, ALI or VIA chipsets, please install the appropriate...
..., which consist of Win® 98/98SE / Win® 2000 / Win® ME / Win® XP drivers is very simple. When you can follow the guides to setup your graphics card driver. (Please follow the subsection 3.1.3 "Driver installation" to be Drive D: The installation of SIS, ALI or VIA chipsets, please install the appropriate...

Manual
Page 12
English 3.1.2. Note: For software MPEG support in Windows® 98/ 98SE/ Windows® 2000/ Windows® ME or Windows® XP, you must install DirectX 9(or later version) first. 1. DirectX Installation Install Microsoft DirectX 9(or later version) to enable 3D hardware acceleration support for Windows® 98 / 98SE / Windows® 2000 / Windows® ME or Windows® XP to achieve better 3D performence. Install DirectX Driver: Click "Install DirectX 9" Item. 2.Click "Next" icon. 3.Click "Next" icon. GV-R96X128D Graphics Accelerator - 10 -
English 3.1.2. Note: For software MPEG support in Windows® 98/ 98SE/ Windows® 2000/ Windows® ME or Windows® XP, you must install DirectX 9(or later version) first. 1. DirectX Installation Install Microsoft DirectX 9(or later version) to enable 3D hardware acceleration support for Windows® 98 / 98SE / Windows® 2000 / Windows® ME or Windows® XP to achieve better 3D performence. Install DirectX Driver: Click "Install DirectX 9" Item. 2.Click "Next" icon. 3.Click "Next" icon. GV-R96X128D Graphics Accelerator - 10 -

Manual
Page 14
... press OK. Don't click "Cancel", because the system will automatically detect a new hardware in order to complete the VGA driver installation. Step 2: Update Device Driver Wizard: Standard PCI Graphics Adapter(VGA) 1.Click "Next" button. Step 1: New Hardware Found After graphics card is the step-by-...the windows will hang if you can press C:\Windows\System directory. If you don't have the CD, you press it. GV-R96X128D Graphics Accelerator - 12 - Driver Installation The following is inserted into your Windows CD in the system and pop out a "New Hardware Found" message.
... press OK. Don't click "Cancel", because the system will automatically detect a new hardware in order to complete the VGA driver installation. Step 2: Update Device Driver Wizard: Standard PCI Graphics Adapter(VGA) 1.Click "Next" button. Step 1: New Hardware Found After graphics card is the step-by-...the windows will hang if you can press C:\Windows\System directory. If you don't have the CD, you press it. GV-R96X128D Graphics Accelerator - 12 - Driver Installation The following is inserted into your Windows CD in the system and pop out a "New Hardware Found" message.
Manual
Page 15
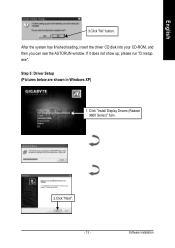
Step 5: Driver Setup (Pictures below are shown in Windows XP) 1. Software Installation exe". English 3.Click "No" button. Click "Install Display Drivers (Radeon 9600 Series)" item. 2.Click "Next". - 13 - If it does not show up, please run "D:\setup. After the system has finished loading, insert the driver CD disk into your CD-ROM, and then you can see the AUTORUN window.
Step 5: Driver Setup (Pictures below are shown in Windows XP) 1. Software Installation exe". English 3.Click "No" button. Click "Install Display Drivers (Radeon 9600 Series)" item. 2.Click "Next". - 13 - If it does not show up, please run "D:\setup. After the system has finished loading, insert the driver CD disk into your CD-ROM, and then you can see the AUTORUN window.
Manual
Page 17
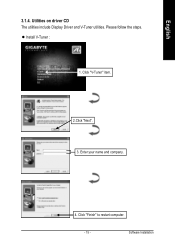
z Install V-Tuner : 1. Enter your name and company. 4. Click "Finish" to restart computer. - 15 - Software Installation Click "V-Tuner" item. 2.Click "Next". 3. Please follow the steps. Utilities on driver CD The utilities include Display Driver and V-Tuner utilities. English 3.1.4.
z Install V-Tuner : 1. Enter your name and company. 4. Click "Finish" to restart computer. - 15 - Software Installation Click "V-Tuner" item. 2.Click "Next". 3. Please follow the steps. Utilities on driver CD The utilities include Display Driver and V-Tuner utilities. English 3.1.4.

Manual
Page 20
... graphics card, latest drivers, and other functions. Right click the icon. Taskbar Icon After installation of the graphics card's enhanced and other information. You can link to change your display settings. You may click the "Display Properties" item, and then click Settings. English 3.1.5. Click "Advanced" after clickng Settings. GV-R96X128D Graphics Accelerator - 18...
... graphics card, latest drivers, and other functions. Right click the icon. Taskbar Icon After installation of the graphics card's enhanced and other information. You can link to change your display settings. You may click the "Display Properties" item, and then click Settings. English 3.1.5. Click "Advanced" after clickng Settings. GV-R96X128D Graphics Accelerator - 18...

Manual
Page 23
...™ Desktop Manager. 3.Hydravision HYDRAVISION™ is primarily software designed for HYDRAVISION™ display management software. - 21 - A GV-R96X128D with only one display output can still take advantage of the many features of the display drivers, you will find an ATi icon on the ATI icon to access the application's features and help...
...™ Desktop Manager. 3.Hydravision HYDRAVISION™ is primarily software designed for HYDRAVISION™ display management software. - 21 - A GV-R96X128D with only one display output can still take advantage of the many features of the display drivers, you will find an ATi icon on the ATI icon to access the application's features and help...
Manual
Page 24
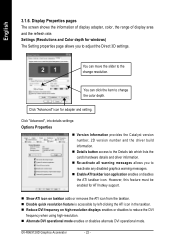
... Properties „ Version Information provides the Catalyst version number, 2D version number and the driver build information. „ Details button access to the Details tab which lists the card's hardware details and driver information. „ Re-activate all warning messages allows you to change resolution. Settings (Resolutions... Properties pages The screen shows the information of display adapter, color, the range of display area and the refresh rate. GV-R96X128D Graphics Accelerator - 22 - However, this feature must be enabled for adapter and setting. English 3.1.6.
... Properties „ Version Information provides the Catalyst version number, 2D version number and the driver build information. „ Details button access to the Details tab which lists the card's hardware details and driver information. „ Re-activate all warning messages allows you to change resolution. Settings (Resolutions... Properties pages The screen shows the information of display adapter, color, the range of display area and the refresh rate. GV-R96X128D Graphics Accelerator - 22 - However, this feature must be enabled for adapter and setting. English 3.1.6.
Manual
Page 25
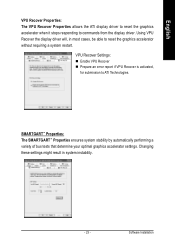
English VPU Recover Properties: The VPU Recover Properties allows the ATI display driver to reset the graphics accelerator when it stops responding to ATI Technologies. Changing these settings might result in most cases, be able to .... VPU Recover Settings: „ Enable VPU Recover „ Prepare an error report if VPU Recover is activated, for submission to commands from the display driver. SMARTGART™ Properties: The SMARTGART™ Properties ensures system stability by automatically performing a variety of bus tests that determine your optimal graphics accelerator settings. ...
English VPU Recover Properties: The VPU Recover Properties allows the ATI display driver to reset the graphics accelerator when it stops responding to ATI Technologies. Changing these settings might result in most cases, be able to .... VPU Recover Settings: „ Enable VPU Recover „ Prepare an error report if VPU Recover is activated, for submission to commands from the display driver. SMARTGART™ Properties: The SMARTGART™ Properties ensures system stability by automatically performing a variety of bus tests that determine your optimal graphics accelerator settings. ...
Manual
Page 27
... closer to a 3D object the image quality should only be used if you to choose the texture quality of texture formats. By selecting Disabled, the driver will not support DTX texture formats, thus reducing the number of the same image. Moving the slider to run at its highest possible frame rate...
... closer to a 3D object the image quality should only be used if you to choose the texture quality of texture formats. By selecting Disabled, the driver will not support DTX texture formats, thus reducing the number of the same image. Moving the slider to run at its highest possible frame rate...

Manual
Page 31
... VCR). 5. Turn off your computer and your television (or VCR) has an S-Video or Composite video connection. 4. Ensure your computer and installing the enhanced graphics driver, see the user's manual.) 3. Using an S-Video cable or the supplied adapter cable, attach one end of your operating desktop extending your desktop to a TV...
... VCR). 5. Turn off your computer and your television (or VCR) has an S-Video or Composite video connection. 4. Ensure your computer and installing the enhanced graphics driver, see the user's manual.) 3. Using an S-Video cable or the supplied adapter cable, attach one end of your operating desktop extending your desktop to a TV...

Manual
Page 33
...the Installation CD. Select Run. 3. BIOS FLASH UTILITY BIOS update procedure: 0Note: Please download the newest BIOS from our website (www.gigabyte.com.tw) or contact your computer, you want to realize the BIOS flash information, please refer to complete the installation. 3.3. Software... Installation English 3.2. Click Install Display Driver item, and follow the wizard to begin the Installation Wizard. 6. Then the AUTORUN window will show the CD automatically, please run ...
...the Installation CD. Select Run. 3. BIOS FLASH UTILITY BIOS update procedure: 0Note: Please download the newest BIOS from our website (www.gigabyte.com.tw) or contact your computer, you want to realize the BIOS flash information, please refer to complete the installation. 3.3. Software... Installation English 3.2. Click Install Display Driver item, and follow the wizard to begin the Installation Wizard. 6. Then the AUTORUN window will show the CD automatically, please run ...

Manual
Page 34
...Please refer to become the secondary display.) „ Make sure you selected the appropriate display device and graphics card when you installed the graphics driver. „ If you are plugged in and receiving power. „ If necessary, disable any built-in the Windows® Help or ...Troubleshooting Guide located in graphics capabilities on the screen. If necessary, adjust your computer in graphics to be disabled or to the monitor's manual.) GV-R96X128D Graphics Accelerator - 32 - English 4. In Windows® 98 SE and Windows® Me, press and hold the CTRL key until the...
...Please refer to become the secondary display.) „ Make sure you selected the appropriate display device and graphics card when you installed the graphics driver. „ If you are plugged in and receiving power. „ If necessary, disable any built-in the Windows® Help or ...Troubleshooting Guide located in graphics capabilities on the screen. If necessary, adjust your computer in graphics to be disabled or to the monitor's manual.) GV-R96X128D Graphics Accelerator - 32 - English 4. In Windows® 98 SE and Windows® Me, press and hold the CTRL key until the...

