Manual
Page 7
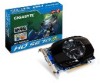
...-512I/GV-R567HM-1GI/GV-R567ZL-1GI/GV-R567OC-1GI rev1.0/1.1/ GV-R567OC-1GI rev2.0 - The power supply should be with a known brand and certified to conform to safety regulations. (For the list of certified power supplies, go to dynamically share the available system memory. A CrossFireX certified motherboard with Service Pack 2 (SP2) - Two CrossFire bridge interconnect cables - 7 - 1. Features • Powered by ATI RadeonTMHD 5670 Graphics Processing Unit (GPU) • Supports PCI Express 2.1 • GV-R567HM-1GI supports ATI HyperMemoryTM technology which enables graphics card...
...-512I/GV-R567HM-1GI/GV-R567ZL-1GI/GV-R567OC-1GI rev1.0/1.1/ GV-R567OC-1GI rev2.0 - The power supply should be with a known brand and certified to conform to safety regulations. (For the list of certified power supplies, go to dynamically share the available system memory. A CrossFireX certified motherboard with Service Pack 2 (SP2) - Two CrossFire bridge interconnect cables - 7 - 1. Features • Powered by ATI RadeonTMHD 5670 Graphics Processing Unit (GPU) • Supports PCI Express 2.1 • GV-R567HM-1GI supports ATI HyperMemoryTM technology which enables graphics card...
Manual
Page 15
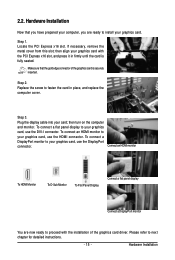
... the PCI Express x16 slot. To connect an HDMI monitor to your card; To connect a DisplayPort monitor to your graphics card, use the DisplayPort connector. Hardware Installation Plug the display cable into your graphics card, use the DVI-I connector. then turn on the computer and monitor. If necessary, remove the metal cover from this slot; Make sure that you have prepared your computer, you are now ready to next chapter for detailed instructions. - 15 - Hardware Installation...
... the PCI Express x16 slot. To connect an HDMI monitor to your card; To connect a DisplayPort monitor to your graphics card, use the DisplayPort connector. Hardware Installation Plug the display cable into your graphics card, use the DVI-I connector. then turn on the computer and monitor. If necessary, remove the metal cover from this slot; Make sure that you have prepared your computer, you are now ready to next chapter for detailed instructions. - 15 - Hardware Installation...

Manual
Page 16
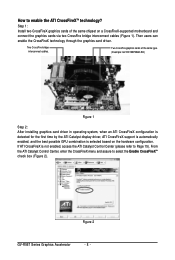
... CrossFireX is selected based on a CrossFireX-supported motherboard and connect the graphics cards via two CrossFire bridge interconnect cables (Figure 1). Step 1: Install two CrossFireX graphics cards of the same type. (Example: GV-RX195P256D-RH) Figure 1 Step 2: After installing graphics card driver in operating system, when an ATI CrossFireX configuration is detected for the first time by the ATI Catalyst display driver, ATI CrossFireX support is automatically enabled, and the best possible GPU combination is not enabled, access the ATI Catalyst Control Center...
... CrossFireX is selected based on a CrossFireX-supported motherboard and connect the graphics cards via two CrossFire bridge interconnect cables (Figure 1). Step 1: Install two CrossFireX graphics cards of the same type. (Example: GV-RX195P256D-RH) Figure 1 Step 2: After installing graphics card driver in operating system, when an ATI CrossFireX configuration is detected for the first time by the ATI Catalyst display driver, ATI CrossFireX support is automatically enabled, and the best possible GPU combination is not enabled, access the ATI Catalyst Control Center...
Manual
Page 21
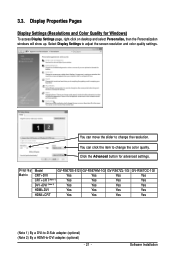
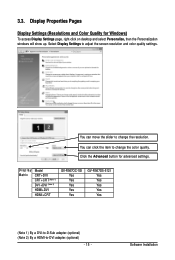
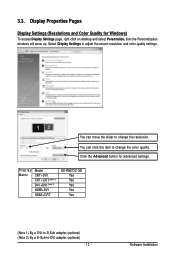
...to change the color quality. Display Matrix Model GV-R567D5-512I GV-R567HM-1GI GV-R567ZL-1GI GV-R567OC-1GI CRT+DVI Yes Yes Yes Yes CRT+CRT(Note 1) Yes Yes Yes Yes DVI +DVI (Note 2) Yes Yes Yes Yes HDMI+DVI Yes Yes Yes Yes HDMI+CRT Yes Yes Yes Yes (Note 1) By a DVI-to-D-Sub adapter.(optional) (Note 2) By a HDMI-to adjust the screen resolution and color quality settings. Display Properties Pages Display Settings (Resolutions and Color Quality for advanced settings. Select Display Settings to -DVI adapter.(optional) - 21 - Software Installation 3.3.
...to change the color quality. Display Matrix Model GV-R567D5-512I GV-R567HM-1GI GV-R567ZL-1GI GV-R567OC-1GI CRT+DVI Yes Yes Yes Yes CRT+CRT(Note 1) Yes Yes Yes Yes DVI +DVI (Note 2) Yes Yes Yes Yes HDMI+DVI Yes Yes Yes Yes HDMI+CRT Yes Yes Yes Yes (Note 1) By a DVI-to-D-Sub adapter.(optional) (Note 2) By a HDMI-to adjust the screen resolution and color quality settings. Display Properties Pages Display Settings (Resolutions and Color Quality for advanced settings. Select Display Settings to -DVI adapter.(optional) - 21 - Software Installation 3.3.
Manual
Page 23
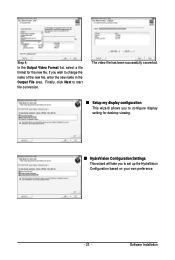
The video file has been successfully converted. „ Setup my display configuration This wizard allows you to configure display setting for the new file. If you wish to start file conversion. Software Installation Step 4: In the Output Video Format list, select a file format for desktop viewing. „ HydraVision Configuration Settings This wizard will take you to set up the HydraVision Configuration based on your own preference. - 23 - Finally, click Next to change the name of the new file, enter the new name in the Output File area.
The video file has been successfully converted. „ Setup my display configuration This wizard allows you to configure display setting for the new file. If you wish to start file conversion. Software Installation Step 4: In the Output Video Format list, select a file format for desktop viewing. „ HydraVision Configuration Settings This wizard will take you to set up the HydraVision Configuration based on your own preference. - 23 - Finally, click Next to change the name of the new file, enter the new name in the Output File area.

Manual
Page 24
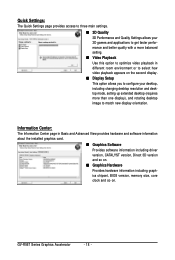
...; Video Playback Use this option to optimize video playback in Basic and Advanced View provides hardware and software information about the installed graphics card. „ Graphics Software Provides software information including driver version, CATALYST version, Direct 3D version and so on. „ Graphics Hardware Provides hardware information including graphics chipset, BIOS version, memory size, core clock and so on the second display. „ Display Setup This option allows you to configure your desktop, including changing desktop resolution and desktop mode, setting up extended desktop...
...; Video Playback Use this option to optimize video playback in Basic and Advanced View provides hardware and software information about the installed graphics card. „ Graphics Software Provides software information including driver version, CATALYST version, Direct 3D version and so on. „ Graphics Hardware Provides hardware information including graphics chipset, BIOS version, memory size, core clock and so on the second display. „ Display Setup This option allows you to configure your desktop, including changing desktop resolution and desktop mode, setting up extended desktop...

Manual
Page 34
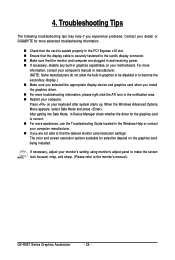
... on your motherboard. When the Windows Advanced Options Menu appears, select Safe Mode and press . Troubleshooting Tips The following troubleshooting tips may help if you install the graphics driver. „ For more advanced troubleshooting information. „ Check that the card is seated properly in the PCI Express x16 slot. „ Ensure that the display cable is correct. „ For more assistance, use the Troubleshooting Guide located in...
... on your motherboard. When the Windows Advanced Options Menu appears, select Safe Mode and press . Troubleshooting Tips The following troubleshooting tips may help if you install the graphics driver. „ For more advanced troubleshooting information. „ Check that the card is seated properly in the PCI Express x16 slot. „ Ensure that the display cable is correct. „ For more assistance, use the Troubleshooting Guide located in...
Manual
Page 5
... memory for software installation (CD-ROM or DVD-ROM drive) - A power supply that provides at least 450-watt is required. Optical drive for best performance - Features • Powered by ATI RadeonTMHD 5670 Graphics Processing Unit (GPU) • Supports PCI Express 2.1 • Integrated with two PCI Express x16 slots and correct chipset driver - Windows® Vista - The power supply should be with Service Pack 2 (SP2) - Two CrossFire bridge interconnect cables - 5 - Intel® Pentium® 4/CoreTM 2 or AMD...
... memory for software installation (CD-ROM or DVD-ROM drive) - A power supply that provides at least 450-watt is required. Optical drive for best performance - Features • Powered by ATI RadeonTMHD 5670 Graphics Processing Unit (GPU) • Supports PCI Express 2.1 • Integrated with two PCI Express x16 slots and correct chipset driver - Windows® Vista - The power supply should be with Service Pack 2 (SP2) - Two CrossFire bridge interconnect cables - 5 - Intel® Pentium® 4/CoreTM 2 or AMD...

Manual
Page 9
... inserted. Locate the PCI Express x16 slot. To connect a flat panel display to install your graphics card, use the HDMI connector. then turn on the computer and monitor. Hardware Installation Now that the gold edge connector of the graphics card driver. Make sure that you have prepared your computer, you are now ready to your graphics card with the installation of the graphics card is fully seated. Replace the screw to next chapter for detailed instructions. - 9 - Hardware Installation
... inserted. Locate the PCI Express x16 slot. To connect a flat panel display to install your graphics card, use the HDMI connector. then turn on the computer and monitor. Hardware Installation Now that the gold edge connector of the graphics card driver. Make sure that you have prepared your computer, you are now ready to your graphics card with the installation of the graphics card is fully seated. Replace the screw to next chapter for detailed instructions. - 9 - Hardware Installation

Manual
Page 10
... ATI Catalyst display driver, ATI CrossFireX support is automatically enabled, and the best possible GPU combination is not enabled, access the ATI Catalyst Control Center (please refer to select the Enable CrossFireXTM check box (Figure 2). If ATI CrossFireX is selected based on a CrossFireX-supported motherboard and connect the graphics cards via two CrossFire bridge interconnect cables (Figure 1). From the ATI Catalyst Control Center, enter the CrossFireX menu and assure to Page 15). Figure 2 GV-R567 Series Graphics Accelerator - 10 - Two CrossFire graphics cards...
... ATI Catalyst display driver, ATI CrossFireX support is automatically enabled, and the best possible GPU combination is not enabled, access the ATI Catalyst Control Center (please refer to select the Enable CrossFireXTM check box (Figure 2). If ATI CrossFireX is selected based on a CrossFireX-supported motherboard and connect the graphics cards via two CrossFire bridge interconnect cables (Figure 1). From the ATI Catalyst Control Center, enter the CrossFireX menu and assure to Page 15). Figure 2 GV-R567 Series Graphics Accelerator - 10 - Two CrossFire graphics cards...
Manual
Page 15
... the Advanced button for Windows) To access Display Settings page, right-click on desktop and select Personalize, then the Personalization windows will show up. Software Installation Display Properties Pages Display Settings (Resolutions and Color Quality for advanced settings. Display Matrix Model CRT+DVI CRT+CRT(Note 1) DVI +DVI (Note 2) HDMI+DVI HDMI+CRT GV-R567OC-1GI Yes Yes Yes Yes Yes GV-R567D5-512I Yes Yes Yes Yes Yes (Note 1) By a DVI-to-D-Sub adapter.(optional) (Note 2) By a HDMI-to adjust the screen resolution and color quality settings.
... the Advanced button for Windows) To access Display Settings page, right-click on desktop and select Personalize, then the Personalization windows will show up. Software Installation Display Properties Pages Display Settings (Resolutions and Color Quality for advanced settings. Display Matrix Model CRT+DVI CRT+CRT(Note 1) DVI +DVI (Note 2) HDMI+DVI HDMI+CRT GV-R567OC-1GI Yes Yes Yes Yes Yes GV-R567D5-512I Yes Yes Yes Yes Yes (Note 1) By a DVI-to-D-Sub adapter.(optional) (Note 2) By a HDMI-to adjust the screen resolution and color quality settings.
Manual
Page 18
...; Video Playback Use this option to optimize video playback in Basic and Advanced View provides hardware and software information about the installed graphics card. „ Graphics Software Provides software information including driver version, CATALYST version, Direct 3D version and so on. „ Graphics Hardware Provides hardware information including graphics chipset, BIOS version, memory size, core clock and so on the second display. „ Display Setup This option allows you to configure your desktop, including changing desktop resolution and desktop mode, setting up extended desktop...
...; Video Playback Use this option to optimize video playback in Basic and Advanced View provides hardware and software information about the installed graphics card. „ Graphics Software Provides software information including driver version, CATALYST version, Direct 3D version and so on. „ Graphics Hardware Provides hardware information including graphics chipset, BIOS version, memory size, core clock and so on the second display. „ Display Setup This option allows you to configure your desktop, including changing desktop resolution and desktop mode, setting up extended desktop...
Manual
Page 28
... monitor's manual.) GV-R567 Series Graphics Accelerator - 28 - Press on your keyboard after system starts up. After getting into Safe Mode, in Device Manager check whether the driver for more advanced troubleshooting information. „ Check that the card is seated properly in the PCI Express x16 slot. „ Ensure that the monitor and computer are not able to find the desired monitor color/resolution settings: The color and screen resolution...
... monitor's manual.) GV-R567 Series Graphics Accelerator - 28 - Press on your keyboard after system starts up. After getting into Safe Mode, in Device Manager check whether the driver for more advanced troubleshooting information. „ Check that the card is seated properly in the PCI Express x16 slot. „ Ensure that the monitor and computer are not able to find the desired monitor color/resolution settings: The color and screen resolution...

Manual
Page 4
... correct chipset driver - Minimum System Requirements • Hardware - The power supply should be with 1 GB GDDR5 memory • Supports DirectX 11 • Supports CrossFireXTM • Supports 1 Dual-Link DVI-I connector • Supports 1 D-Sub connector • Supports 1 HDMI connector 1.2. Optical drive for best performance - Windows® Vista - Two GV-R567OC-1GI - Features • Powered by ATI RadeonTMHD 5670 Graphics Processing Unit (GPU) • Supports PCI Express 2.1 • Integrated with a known brand and certified to conform to http://ati.amd.com...
... correct chipset driver - Minimum System Requirements • Hardware - The power supply should be with 1 GB GDDR5 memory • Supports DirectX 11 • Supports CrossFireXTM • Supports 1 Dual-Link DVI-I connector • Supports 1 D-Sub connector • Supports 1 HDMI connector 1.2. Optical drive for best performance - Windows® Vista - Two GV-R567OC-1GI - Features • Powered by ATI RadeonTMHD 5670 Graphics Processing Unit (GPU) • Supports PCI Express 2.1 • Integrated with a known brand and certified to conform to http://ati.amd.com...

Manual
Page 7
... turn on the computer and monitor. If necessary, remove the metal cover from this slot; Connect an HDMI monitor To HDMI Monitor To D-Sub Monitor To Flat Panel Display Connect a flat panel display Connect a DisplayPort monitor You are ready to your graphics card. Please refer to fasten the card in firmly until the card is securely inserted. Hardware Installation Now that the gold edge connector of the graphics card driver. To connect a DisplayPort monitor to install your graphics card, use the DVI-I connector.
... turn on the computer and monitor. If necessary, remove the metal cover from this slot; Connect an HDMI monitor To HDMI Monitor To D-Sub Monitor To Flat Panel Display Connect a flat panel display Connect a DisplayPort monitor You are ready to your graphics card. Please refer to fasten the card in firmly until the card is securely inserted. Hardware Installation Now that the gold edge connector of the graphics card driver. To connect a DisplayPort monitor to install your graphics card, use the DVI-I connector.
Manual
Page 8
... Catalyst Control Center, enter the CrossFireX menu and assure to enable the ATI CrossFireXTM technology? Figure 2 GV-R567 Series Graphics Accelerator - 8 - If ATI CrossFireX is selected based on a CrossFireX-supported motherboard and connect the graphics cards via two CrossFire bridge interconnect cables (Figure 1). Step 1: Install two CrossFireX graphics cards of the same type. (Example: GV-RX195P256D-RH) Figure 1 Step 2: After installing graphics card driver in operating system, when an ATI CrossFireX configuration is detected for the first time by the ATI Catalyst display...
... Catalyst Control Center, enter the CrossFireX menu and assure to enable the ATI CrossFireXTM technology? Figure 2 GV-R567 Series Graphics Accelerator - 8 - If ATI CrossFireX is selected based on a CrossFireX-supported motherboard and connect the graphics cards via two CrossFire bridge interconnect cables (Figure 1). Step 1: Install two CrossFireX graphics cards of the same type. (Example: GV-RX195P256D-RH) Figure 1 Step 2: After installing graphics card driver in operating system, when an ATI CrossFireX configuration is detected for the first time by the ATI Catalyst display...
Manual
Page 13
... Display Settings page, right-click on desktop and select Personalize, then the Personalization windows will show up. Display Matrix Model CRT+DVI CRT+CRT(Note 1) DVI +DVI (Note 2) HDMI+DVI HDMI+CRT GV-R567OC-1GI Yes Yes Yes Yes Yes (Note 1) By a DVI-to-D-Sub adapter.(optional) (Note 2) By a D-Sub-to adjust the screen resolution and color quality settings. You can click the item to change the color quality. You can move the slider to change the resolution. Software Installation 3.3. Display Properties Pages Display Settings (Resolutions and Color...
... Display Settings page, right-click on desktop and select Personalize, then the Personalization windows will show up. Display Matrix Model CRT+DVI CRT+CRT(Note 1) DVI +DVI (Note 2) HDMI+DVI HDMI+CRT GV-R567OC-1GI Yes Yes Yes Yes Yes (Note 1) By a DVI-to-D-Sub adapter.(optional) (Note 2) By a D-Sub-to adjust the screen resolution and color quality settings. You can click the item to change the color quality. You can move the slider to change the resolution. Software Installation 3.3. Display Properties Pages Display Settings (Resolutions and Color...

Manual
Page 15
The video file has been successfully converted. „ Setup my display configuration This wizard allows you to configure display setting for the new file. Finally, click Next to set up the HydraVision Configuration based on your own preference. - 15 - If you to start file conversion. Software Installation Step 4: In the Output Video Format list, select a file format for desktop viewing. „ HydraVision Configuration Settings This wizard will take you wish to change the name of the new file, enter the new name in the Output File area.
The video file has been successfully converted. „ Setup my display configuration This wizard allows you to configure display setting for the new file. Finally, click Next to set up the HydraVision Configuration based on your own preference. - 15 - If you to start file conversion. Software Installation Step 4: In the Output Video Format list, select a file format for desktop viewing. „ HydraVision Configuration Settings This wizard will take you wish to change the name of the new file, enter the new name in the Output File area.

Manual
Page 16
...GV-R567 Series Graphics Accelerator - 16 - Quick Settings: The Quick Settings page provides access to three main settings. „ 3D Quality 3D Performance and Quality Settings allows your desktop, including changing desktop resolution and desktop mode, setting up extended desktop (requires more than one display), and rotating desktop image to optimize video playback in Basic and Advanced View provides hardware and software information about the installed graphics card. „ Graphics Software Provides software information including driver version, CATALYST version, Direct 3D version...
...GV-R567 Series Graphics Accelerator - 16 - Quick Settings: The Quick Settings page provides access to three main settings. „ 3D Quality 3D Performance and Quality Settings allows your desktop, including changing desktop resolution and desktop mode, setting up extended desktop (requires more than one display), and rotating desktop image to optimize video playback in Basic and Advanced View provides hardware and software information about the installed graphics card. „ Graphics Software Provides software information including driver version, CATALYST version, Direct 3D version...

Manual
Page 26
... PCI Express x16 slot. „ Ensure that the display cable is securely fastened to the card's display connector. „ Make sure that the monitor and computer are not able to find the desired monitor color/resolution settings: The color and screen resolution options available for the graphics card is correct. „ For more troubleshooting information, please right-click the ATI icon in graphics to be disabled or to the monitor's manual.) GV-R567 Series Graphics Accelerator...
... PCI Express x16 slot. „ Ensure that the display cable is securely fastened to the card's display connector. „ Make sure that the monitor and computer are not able to find the desired monitor color/resolution settings: The color and screen resolution options available for the graphics card is correct. „ For more troubleshooting information, please right-click the ATI icon in graphics to be disabled or to the monitor's manual.) GV-R567 Series Graphics Accelerator...


