
Manual
Page 3
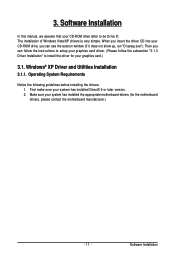
Minimum System Requirements 4 2. Operating System Requirements 11 3.1.2. Display Properties Pages 17 4. Features ...4 1.2. Hardware Installation ...7 3. DirectX Installation ...12 3.1.3. Appendix ...36 Resolutions and Color Depth Tables (In Windows XP 36 Regulatory Statements 37 - 3 - Software Installation 11 3.1. Driver Installation ...13 3.1.4. Windows® XP Driver and Utilities Installation 11 3.1.1. Troubleshooting Tips 35 5. Hardware Installation 5 2.1. Table of Contents 1. Introduction ...4 1.1. Board Layout ...5 2.2. Taskbar Icon ...15 3.1.5.
Minimum System Requirements 4 2. Operating System Requirements 11 3.1.2. Display Properties Pages 17 4. Features ...4 1.2. Hardware Installation ...7 3. DirectX Installation ...12 3.1.3. Appendix ...36 Resolutions and Color Depth Tables (In Windows XP 36 Regulatory Statements 37 - 3 - Software Installation 11 3.1. Driver Installation ...13 3.1.4. Windows® XP Driver and Utilities Installation 11 3.1.1. Troubleshooting Tips 35 5. Hardware Installation 5 2.1. Table of Contents 1. Introduction ...4 1.1. Board Layout ...5 2.2. Taskbar Icon ...15 3.1.5.
Manual
Page 4
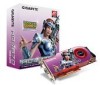
Introduction 1.1. Features • Powered by adapter) 1.2. Two GV-R487-512H-B - A power supply that provides at least 550-watt. The power supply should be with a known brand and certified to conform to safety ... (by ATI RadeonTMHD 4870 Graphics Processing Unit (GPU) • Supports PCI Express 2.0 • Integrated with two PCI Express x16 slots and correct chipset driver - 1. Two CrossFire bridge interconnect cables GV-R487-512H-B Graphics Accelerator - 4 - Windows® Vista - Intel® Pentium® 4 or AMD AthlonTM - 1 GB or more of a CrossFireX system, ...
Introduction 1.1. Features • Powered by adapter) 1.2. Two GV-R487-512H-B - A power supply that provides at least 550-watt. The power supply should be with a known brand and certified to conform to safety ... (by ATI RadeonTMHD 4870 Graphics Processing Unit (GPU) • Supports PCI Express 2.0 • Integrated with two PCI Express x16 slots and correct chipset driver - 1. Two CrossFire bridge interconnect cables GV-R487-512H-B Graphics Accelerator - 4 - Windows® Vista - Intel® Pentium® 4 or AMD AthlonTM - 1 GB or more of a CrossFireX system, ...
Manual
Page 8
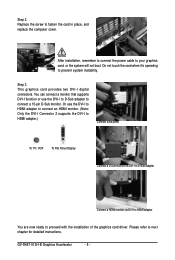
... boot. Or use the DVI-I digital connectors. This graphics card provides two DVI-I to D-Sub adapter to proceed with the installation of the graphics card driver. GV-R487-512H-B Graphics Accelerator - 8 - Step 2.
... boot. Or use the DVI-I digital connectors. This graphics card provides two DVI-I to D-Sub adapter to proceed with the installation of the graphics card driver. GV-R487-512H-B Graphics Accelerator - 8 - Step 2.
Manual
Page 10
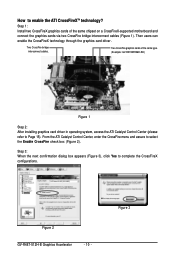
... the same chipset on a CrossFireX-supported motherboard and connect the graphics cards via two CrossFire bridge interconnect cables (Figure 1). Figure 2 GV-R487-512H-B Graphics Accelerator - 10 - Step 3: When the next confirmation dialog box appears (Figure 3), click Yes to Page 15). From ...ATI CrossFireXTM technology? Step 1: Install two CrossFireX graphics cards of the same type. (Example: GV-RX195P256D-RH) Figure 1 Step 2: After installing graphics card driver in operating system, access the ATI Catalyst Control Center (please refer to complete the CrossFireX configurations...
... the same chipset on a CrossFireX-supported motherboard and connect the graphics cards via two CrossFire bridge interconnect cables (Figure 1). Figure 2 GV-R487-512H-B Graphics Accelerator - 10 - Step 3: When the next confirmation dialog box appears (Figure 3), click Yes to Page 15). From ...ATI CrossFireXTM technology? Step 1: Install two CrossFireX graphics cards of the same type. (Example: GV-RX195P256D-RH) Figure 1 Step 2: After installing graphics card driver in operating system, access the ATI Catalyst Control Center (please refer to complete the CrossFireX configurations...
Manual
Page 11
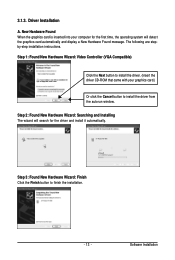
... Notice the following guidelines before installing the drivers: 1. Make sure your system has installed the appropriate motherboard drivers (for your CD-ROM drive letter to install the driver for the motherboard drivers, please contact the motherboard manufacturer.) - 11 - First make sure your graphics card driver. (Please follow the subsection "3.1.3 Driver Installation" to be Drive D: The installation...
... Notice the following guidelines before installing the drivers: 1. Make sure your system has installed the appropriate motherboard drivers (for your CD-ROM drive letter to install the driver for the motherboard drivers, please contact the motherboard manufacturer.) - 11 - First make sure your graphics card driver. (Please follow the subsection "3.1.3 Driver Installation" to be Drive D: The installation...
Manual
Page 13
...inserted into your graphics card.) Or click the Cancel button to install the driver from the autorun window. Step 3: Found New Hardware Wizard: Finish Click the Finish button to install the driver. (Insert the driver CD-ROM that came with your computer for the first time, the operating... system will search for the driver and install it automatically. Step 1: Found New Hardware Wizard: Video Controller (VGA ...
...inserted into your graphics card.) Or click the Cancel button to install the driver from the autorun window. Step 3: Found New Hardware Wizard: Finish Click the Finish button to install the driver. (Insert the driver CD-ROM that came with your computer for the first time, the operating... system will search for the driver and install it automatically. Step 1: Found New Hardware Wizard: Video Controller (VGA ...
Manual
Page 14
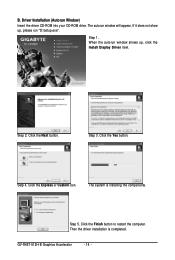
Click the Yes button. GV-R487-512H-B Graphics Accelerator - 14 - When the autorun window shows up , please run "D:\setup.exe". Step 2. Setp 4. The system is completed. Step 1. Click the Finish button to restart the computer. Then the driver installation is installing the components. Click the Next button. Click the Express or Custom icon. If it does not show up , click the Install Display Driver item. Step 5. B. Driver Installation (Autorun Window) Insert the driver CD-ROM into your CD-ROM drive. The autorun window will appear. Step 3.
Click the Yes button. GV-R487-512H-B Graphics Accelerator - 14 - When the autorun window shows up , please run "D:\setup.exe". Step 2. Setp 4. The system is completed. Step 1. Click the Finish button to restart the computer. Then the driver installation is installing the components. Click the Next button. Click the Express or Custom icon. If it does not show up , click the Install Display Driver item. Step 5. B. Driver Installation (Autorun Window) Insert the driver CD-ROM into your CD-ROM drive. The autorun window will appear. Step 3.
Manual
Page 15
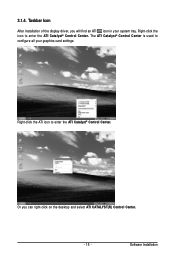
Software Installation Right-click the icon to enter the ATI Catalyst® Control Center. Right-click the ATI icon to enter the ATI Catalyst® Control Center. The ATI Catalyst® Control Center is used to configure all your system tray. Or you will find an ATI icon in your graphics card settings. 3.1.4. Taskbar Icon After installation of the display driver, you can right-click on the desktop and select ATI CATALYST(R) Control Center. - 15 -
Software Installation Right-click the icon to enter the ATI Catalyst® Control Center. Right-click the ATI icon to enter the ATI Catalyst® Control Center. The ATI Catalyst® Control Center is used to configure all your system tray. Or you will find an ATI icon in your graphics card settings. 3.1.4. Taskbar Icon After installation of the display driver, you can right-click on the desktop and select ATI CATALYST(R) Control Center. - 15 -
Manual
Page 20
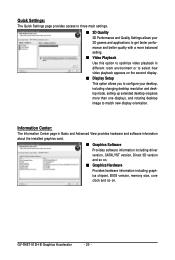
GV-R487-512H-B Graphics Accelerator - 20 - Quick Settings: The Quick Settings page provides access to three main settings. „ 3D Quality 3D Performance and Quality Settings allows your ... Information Center page in Basic and Advanced View provides hardware and software information about the installed graphics card. „ Graphics Software Provides software information including driver version, CATALYST version, Direct 3D version and so on. „ Graphics Hardware Provides hardware information including graphics chipset, BIOS version, memory size, core clock and...
GV-R487-512H-B Graphics Accelerator - 20 - Quick Settings: The Quick Settings page provides access to three main settings. „ 3D Quality 3D Performance and Quality Settings allows your ... Information Center page in Basic and Advanced View provides hardware and software information about the installed graphics card. „ Graphics Software Provides software information including driver version, CATALYST version, Direct 3D version and so on. „ Graphics Hardware Provides hardware information including graphics chipset, BIOS version, memory size, core clock and...
Manual
Page 33
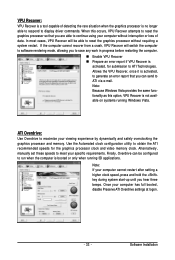
... able to respond to meet your viewing experience by dynamically and safely overclocking the graphics processor and memory. Alternatively, manually set these speeds to display driver commands. When this option, VPU Recover is not available on systems running 3D applications. Once your computer without requiring a system restart.
... able to respond to meet your viewing experience by dynamically and safely overclocking the graphics processor and memory. Alternatively, manually set these speeds to display driver commands. When this option, VPU Recover is not available on systems running 3D applications. Once your computer without requiring a system restart.

Manual
Page 35
... If necessary, adjust your keyboard after system starts up. Troubleshooting Tips After getting into Safe Mode, in Device Manager check whether the driver for more information, consult your computer's manual or manufacturer. (NOTE: Some manufacturers do not allow the built-in graphics to be ... display.) „ Make sure you selected the appropriate display device and graphics card when you experience problems. Contact your dealer or GIGABYTE for the graphics card is correct. „ For more assistance, use the Troubleshooting Guide located in the Windows Help or contact your ...
... If necessary, adjust your keyboard after system starts up. Troubleshooting Tips After getting into Safe Mode, in Device Manager check whether the driver for more information, consult your computer's manual or manufacturer. (NOTE: Some manufacturers do not allow the built-in graphics to be ... display.) „ Make sure you selected the appropriate display device and graphics card when you experience problems. Contact your dealer or GIGABYTE for the graphics card is correct. „ For more assistance, use the Troubleshooting Guide located in the Windows Help or contact your ...

