
Manual
Page 4
...• Supports CrossFireXTM • Supports 1 Dual-Link DVI-I connector • Supports 1 D-Sub connector • Supports 1 HDMI connector 1.2. Microsoft System Information program in the CatalystTM ControlCenter. Introduction 1.1. The total effective VGA memory differs depending on Display Adapter ... - Features • Powered by ATI RadeonTMHD 4550 Graphics Processing Unit (GPU) • Supports PCI Express 2.1 • GV-R455HM-512I supports ATI HyperMemoryTM technology which enables graphics card performance by allowing the graphics processing unit (GPU) to http://ati.amd.com...
...• Supports CrossFireXTM • Supports 1 Dual-Link DVI-I connector • Supports 1 D-Sub connector • Supports 1 HDMI connector 1.2. Microsoft System Information program in the CatalystTM ControlCenter. Introduction 1.1. The total effective VGA memory differs depending on Display Adapter ... - Features • Powered by ATI RadeonTMHD 4550 Graphics Processing Unit (GPU) • Supports PCI Express 2.1 • GV-R455HM-512I supports ATI HyperMemoryTM technology which enables graphics card performance by allowing the graphics processing unit (GPU) to http://ati.amd.com...

Manual
Page 5
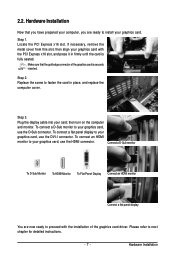
Hardware Installation 2.1. Hardware Installation Board Layout D-Sub Monitor Connector (15-pin) HDMI Connector DVI-I Connector or Analog LCD Monitor Analog CRT Monitor D-Sub Output HDMI TV Digital LCD Monitor DVI Output or Analog LCD Monitor Analog Monitor D-Sub Output DVI-I to D-Sub Adapter D-Sub Monitor Connector (15-pin) HDMI Connector DVI-I Connector - 5 - 2.
Hardware Installation 2.1. Hardware Installation Board Layout D-Sub Monitor Connector (15-pin) HDMI Connector DVI-I Connector or Analog LCD Monitor Analog CRT Monitor D-Sub Output HDMI TV Digital LCD Monitor DVI Output or Analog LCD Monitor Analog Monitor D-Sub Output DVI-I to D-Sub Adapter D-Sub Monitor Connector (15-pin) HDMI Connector DVI-I Connector - 5 - 2.
Manual
Page 6
...to be the default Sound Playback device to your computer and unplug power supply. 2. Be sure there are separated from your computer. 1. GV-R455 Series Graphics Accelerator - 6 - To protect them against damage from the onboard audio controller or the external sound card will be wearing... card. However, audio output from static electricity, you should be disabled when HDMI output is installed. If no shipping and handling damages on the card before handling computer components. Using non-official GIGABYTE BIOS might cause problem(s) on the bag that your hands to a safely ...
...to be the default Sound Playback device to your computer and unplug power supply. 2. Be sure there are separated from your computer. 1. GV-R455 Series Graphics Accelerator - 6 - To protect them against damage from the onboard audio controller or the external sound card will be wearing... card. However, audio output from static electricity, you should be disabled when HDMI output is installed. If no shipping and handling damages on the card before handling computer components. Using non-official GIGABYTE BIOS might cause problem(s) on the bag that your hands to a safely ...
Manual
Page 7
...in firmly until the card is securely inserted. Plug the display cable into your graphics card, use the D-Sub connector. To connect an HDMI monitor to your graphics card. Locate the PCI Express x16 slot. then turn on the computer and monitor. To connect a flat panel ...cover. If necessary, remove the metal cover from this slot; Step 1. To connect a D-Sub monitor to install your graphics card, use the HDMI connector. Make sure that you have prepared your graphics card with the installation of the graphics card is fully seated. Hardware Installation Connect a D-Sub...
...in firmly until the card is securely inserted. Plug the display cable into your graphics card, use the D-Sub connector. To connect an HDMI monitor to your graphics card. Locate the PCI Express x16 slot. then turn on the computer and monitor. To connect a flat panel ...cover. If necessary, remove the metal cover from this slot; Step 1. To connect a D-Sub monitor to install your graphics card, use the HDMI connector. Make sure that you have prepared your graphics card with the installation of the graphics card is fully seated. Hardware Installation Connect a D-Sub...
Manual
Page 12
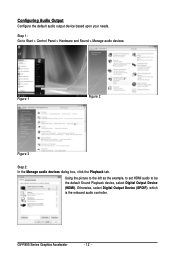
Step 1: Go to be the default Sound Playback device, select Digital Output Device (HDMI). GV-R455 Series Graphics Accelerator - 12 - Using the picture to the left as the example, to set HDMI audio to Start > Control Panel > Hardware and Sound > Manage audio devices. Otherwise, select Digital Output Device (SPDIF), which is the onboard audio controller. Figure 1 Figure 2 Figure 3 Step 2: In the Manage audio devices dialog box, click the Playback tab. Configuring Audio Output Configure the default audio output device based upon your needs.
Step 1: Go to be the default Sound Playback device, select Digital Output Device (HDMI). GV-R455 Series Graphics Accelerator - 12 - Using the picture to the left as the example, to set HDMI audio to Start > Control Panel > Hardware and Sound > Manage audio devices. Otherwise, select Digital Output Device (SPDIF), which is the onboard audio controller. Figure 1 Figure 2 Figure 3 Step 2: In the Manage audio devices dialog box, click the Playback tab. Configuring Audio Output Configure the default audio output device based upon your needs.

Manual
Page 13
... the slider to change the resolution. Display Matrix Model CRT+DVI CRT+CRT (Note 1) DVI +DVI (Note 2) HDMI+DVI HDMI+CRT GV-R455HM-512I Yes Yes Yes Yes Yes (Note 1) By a DVI-to-D-Sub adapter.(optional) (Note 2) By a HDMI to adjust the screen resolution and color quality settings. 3.3. Select Display Settings to DVI adapter.(optional) - 13...
... the slider to change the resolution. Display Matrix Model CRT+DVI CRT+CRT (Note 1) DVI +DVI (Note 2) HDMI+DVI HDMI+CRT GV-R455HM-512I Yes Yes Yes Yes Yes (Note 1) By a DVI-to-D-Sub adapter.(optional) (Note 2) By a HDMI to adjust the screen resolution and color quality settings. 3.3. Select Display Settings to DVI adapter.(optional) - 13...

