
Manual
Page 5
... Contents 1. Display Properties Pages 23 3.1.7. How to Reflash the BIOS in MS-DOS Mode 39 5.2. Resolutions and Color Depth Tables (In Windows XP 40 5.3. Features ...6 1.2. Software Installation 14 3.1. Driver Installation ...16 3.1.4. Windows® XP Driver and Utilities Installation 14 3.1.1. Hardware Installation ...10 3. Minimum System Requirements 6 2. Taskbar Icons ...20 3.1.6. Appendix ...39...
... Contents 1. Display Properties Pages 23 3.1.7. How to Reflash the BIOS in MS-DOS Mode 39 5.2. Resolutions and Color Depth Tables (In Windows XP 40 5.3. Features ...6 1.2. Software Installation 14 3.1. Driver Installation ...16 3.1.4. Windows® XP Driver and Utilities Installation 14 3.1.1. Hardware Installation ...10 3. Minimum System Requirements 6 2. Taskbar Icons ...20 3.1.6. Appendix ...39...
Manual
Page 6
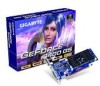
...• Integrated with 256 MB GDDR2 memory (for GV-NX84S256HP/GV-NX84S256HE only) • Integrated with 512 MB GDDR2 memory (for GV-NX84S512HP/GV-NX84S512H only) • Supports DirectX 10 • Supports AV output (for GV-NX84S256HP/ GV-NX84S512HP only) • Supports HDCP (High-Bandwidth ... more for software installation (CD-ROM or DVD-ROM drive) - A power supply with Service Pack 2 (SP2) - Windows® Vista - Features • The graphics card supports NVIDIA TurboCache technology, which enhances graphics card performance by adapter) (for GV-NX84S256HE/GV-NX84S512H only) &#...
...• Integrated with 256 MB GDDR2 memory (for GV-NX84S256HP/GV-NX84S256HE only) • Integrated with 512 MB GDDR2 memory (for GV-NX84S512HP/GV-NX84S512H only) • Supports DirectX 10 • Supports AV output (for GV-NX84S256HP/ GV-NX84S512HP only) • Supports HDCP (High-Bandwidth ... more for software installation (CD-ROM or DVD-ROM drive) - A power supply with Service Pack 2 (SP2) - Windows® Vista - Features • The graphics card supports NVIDIA TurboCache technology, which enhances graphics card performance by adapter) (for GV-NX84S256HE/GV-NX84S512H only) &#...
Manual
Page 14
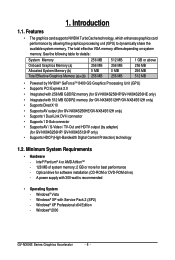
...system has installed the appropriate motherboard drivers (for your graphics card driver. (Please follow the subsection "3.1.3 Driver Installation" to setup your graphics card.) 3.1. Software Installation In this manual, we assume that your system has installed DirectX 9.0c or later version. 2. Operating System Requirements Notice the following guidelines before ... and Utilities Installation 3.1.1. Then you can follow the instructions to install the driver for the motherboard drivers, please contact the motherboard manufacturer.) GV-NX84S Series Graphics Accelerator - 14 - 3.
...system has installed the appropriate motherboard drivers (for your graphics card driver. (Please follow the subsection "3.1.3 Driver Installation" to setup your graphics card.) 3.1. Software Installation In this manual, we assume that your system has installed DirectX 9.0c or later version. 2. Operating System Requirements Notice the following guidelines before ... and Utilities Installation 3.1.1. Then you can follow the instructions to install the driver for the motherboard drivers, please contact the motherboard manufacturer.) GV-NX84S Series Graphics Accelerator - 14 - 3.
Manual
Page 15
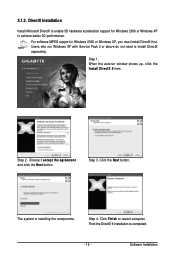
... 2 or above do not need to restart computer. When the autorun window shows up, click the Install DirectX 9 item. Step 3. Software Installation Step 1. The system is completed. - 15 - Step 2. For software MPEG support in Windows 2000 or Windows XP, you must install DirectX first. Choose I accept the agreement and click the Next...
... 2 or above do not need to restart computer. When the autorun window shows up, click the Install DirectX 9 item. Step 3. Software Installation Step 1. The system is completed. - 15 - Step 2. For software MPEG support in Windows 2000 or Windows XP, you must install DirectX first. Choose I accept the agreement and click the Next...
Manual
Page 17
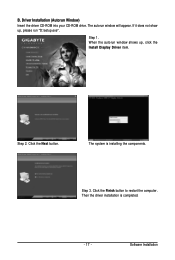
B. If it does not show up , click the Install Display Driver item. Click the Next button. Software Installation When the autorun window shows up , please run "D:\setup.exe". Step 3. Click the Finish button to restart the computer. Step 2. Then the driver installation is installing the components. The system is completed. - 17 - The autorun window will appear. Step 1. Driver Installation (Autorun Window) Insert the driver CD-ROM into your CD-ROM drive.
B. If it does not show up , click the Install Display Driver item. Click the Next button. Software Installation When the autorun window shows up , please run "D:\setup.exe". Step 3. Click the Finish button to restart the computer. Step 2. Then the driver installation is installing the components. The system is completed. - 17 - The autorun window will appear. Step 1. Driver Installation (Autorun Window) Insert the driver CD-ROM into your CD-ROM drive.

Manual
Page 19
V-Tuner 3 V-Tuner 3 lets you adjust the working frequency of thermal curve from now on. Software Installation The window will see the extend window. Opens Help page - 19 - To rechange clock, uncheck the "Fixed Clock" mode and then adjust If your ...
V-Tuner 3 V-Tuner 3 lets you adjust the working frequency of thermal curve from now on. Software Installation The window will see the extend window. Opens Help page - 19 - To rechange clock, uncheck the "Fixed Clock" mode and then adjust If your ...

Manual
Page 21
Color Adjust Color Adjust allows you to make color adjustments, such as brightness, contrast and gamma values for each or all of RGB colors. VGA Info VGA Info lists the relevant information about your card. - 21 - Software Installation
Color Adjust Color Adjust allows you to make color adjustments, such as brightness, contrast and gamma values for each or all of RGB colors. VGA Info VGA Info lists the relevant information about your card. - 21 - Software Installation
Manual
Page 23
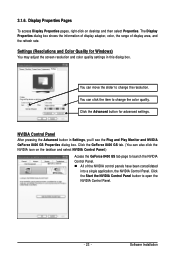
.... You can move the slider to open the NVIDIA Control Panel. - 23 - Click the Start the NVIDIA Control Panel button to change the color quality. Software Installation Settings (Resolutions and Color Quality for advanced settings. You can also click the NVIDIA icon on desktop and then select Properties. Click the GeForce...
.... You can move the slider to open the NVIDIA Control Panel. - 23 - Click the Start the NVIDIA Control Panel button to change the color quality. Software Installation Settings (Resolutions and Color Quality for advanced settings. You can also click the NVIDIA icon on desktop and then select Properties. Click the GeForce...

Manual
Page 25
Software Installation „ Adjust Image Settings with Preview If you are unfamiliar with 3D technology or not an advanced graphics user, use the Adjust Image Settings ...
Software Installation „ Adjust Image Settings with Preview If you are unfamiliar with 3D technology or not an advanced graphics user, use the Adjust Image Settings ...
Manual
Page 27
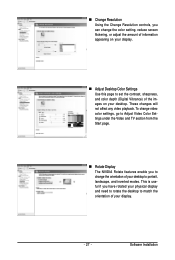
... The NVIDIA Rotate features enable you have rotated your physical display and need to rotate the desktop to match the orientation of your display. - 27 - Software Installation This is useful if you to change the color setting, reduce screen flickering, or adjust the amount of information appearing on your display. „...
... The NVIDIA Rotate features enable you have rotated your physical display and need to rotate the desktop to match the orientation of your display. - 27 - Software Installation This is useful if you to change the color setting, reduce screen flickering, or adjust the amount of information appearing on your display. „...
Manual
Page 29
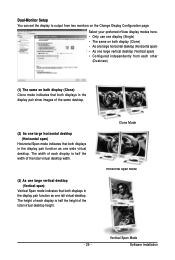
... pair function as one wide virtual desktop. The width of each display is half the height of the total virtual desktop height. Vertical Span Mode Software Installation Dual-Monitor Setup You can set the display to output from each other (Dualview) (1) The same on the Change Display Configuration page.
... pair function as one wide virtual desktop. The width of each display is half the height of the total virtual desktop height. Vertical Span Mode Software Installation Dual-Monitor Setup You can set the display to output from each other (Dualview) (1) The same on the Change Display Configuration page.
Manual
Page 31
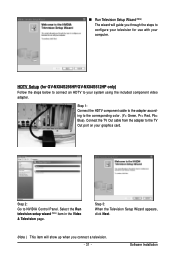
..., Pr= Red, Pb= Blue). „ Run Television Setup Wizard (Note) The wizard will show up when you through the steps to configure your television for GV-NX84S256HP/GV-NX84S512HP only) Follow the steps below to connect an HDTV to the TV Out port on your computer...
..., Pr= Red, Pb= Blue). „ Run Television Setup Wizard (Note) The wizard will show up when you through the steps to configure your television for GV-NX84S256HP/GV-NX84S512HP only) Follow the steps below to connect an HDTV to the TV Out port on your computer...
Manual
Page 33
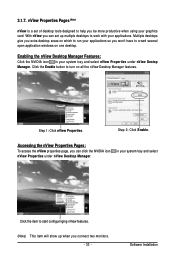
... the nView Desktop Manager features. Step 1: Click nView Properties. Step 2: Click Enable. in your graphics card. With nView you won't have to run your applications. Software Installation nView Properties Pages (Note) nView is a set up when you be more productive when using your system tray and select nView Properties under nView...
... the nView Desktop Manager features. Step 1: Click nView Properties. Step 2: Click Enable. in your graphics card. With nView you won't have to run your applications. Software Installation nView Properties Pages (Note) nView is a set up when you be more productive when using your system tray and select nView Properties under nView...
Manual
Page 34
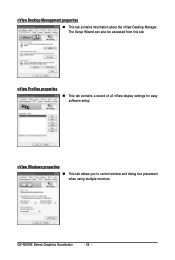
GV-NX84S Series Graphics Accelerator - 34 - The Setup Wizard can also be accessed from this tab. nView Desktop Management properties „ This tab contains information about the nView Desktop Manager. nView Profiles properties „ This tab contains a record of all nView display settings for easy software setup. nView Windows properties „ This tab allows you to control window and dialog box placement when using multiple monitors.
GV-NX84S Series Graphics Accelerator - 34 - The Setup Wizard can also be accessed from this tab. nView Desktop Management properties „ This tab contains information about the nView Desktop Manager. nView Profiles properties „ This tab contains a record of all nView display settings for easy software setup. nView Windows properties „ This tab allows you to control window and dialog box placement when using multiple monitors.

Manual
Page 35
nView Applications properties „ This tab allows you to create up to control nView settings depending on different applications. nView Desktops properties „ This tab allows you to 32 unique desktops. nView User Interface properties „ This tab allows for customization of the nView user interface. - 35 - Software Installation
nView Applications properties „ This tab allows you to create up to control nView settings depending on different applications. nView Desktops properties „ This tab allows you to 32 unique desktops. nView User Interface properties „ This tab allows for customization of the nView user interface. - 35 - Software Installation
Manual
Page 37
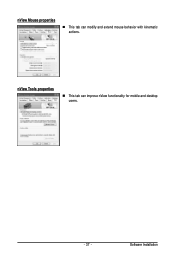
nView Tools properties „ This tab can modify and extend mouse behavior with kinematic actions. Software Installation nView Mouse properties „ This tab can improve nView functionality for mobile and desktop users. - 37 -
nView Tools properties „ This tab can modify and extend mouse behavior with kinematic actions. Software Installation nView Mouse properties „ This tab can improve nView functionality for mobile and desktop users. - 37 -