
Manual
Page 5
... Mode 39 5.2. Board Layout ...7 2.2. Windows® XP Driver and Utilities Installation 14 3.1.1. Troubleshooting Tips 39 5. Operating System Requirements 14 3.1.2. DirectX Installation ...15 3.1.3. Taskbar Icons ...20 3.1.6. Resolutions and Color Depth Tables (In Windows XP 40 5.3. Software Installation 14 3.1. nView Properties Pages (Note 33 3.2. Hardware Installation ...10 3. Display Properties Pages 23 3.1.7. Features ...6 1.2. Windows® 2000 Driver...
... Mode 39 5.2. Board Layout ...7 2.2. Windows® XP Driver and Utilities Installation 14 3.1.1. Troubleshooting Tips 39 5. Operating System Requirements 14 3.1.2. DirectX Installation ...15 3.1.3. Taskbar Icons ...20 3.1.6. Resolutions and Color Depth Tables (In Windows XP 40 5.3. Software Installation 14 3.1. nView Properties Pages (Note 33 3.2. Hardware Installation ...10 3. Display Properties Pages 23 3.1.7. Features ...6 1.2. Windows® 2000 Driver...
Manual
Page 6
...(for GV-NX84S256HP/GV-NX84S256HE only) • Integrated with 512 MB GDDR2 memory (for GV-NX84S512HP/GV-NX84S512H only) • Supports DirectX 10 • Supports AV output (for GV-NX84S256HP/ GV-NX84S512HP ...only) • Supports HDCP (High-Bandwidth Digital Content Protection) technology 1.2. Introduction 1.1. A power supply with Service Pack 2 (SP2) - Intel® Pentium® 4 or AMD AthlonTM - 128 MB of system memory; 2 GB or more for software installation...
...(for GV-NX84S256HP/GV-NX84S256HE only) • Integrated with 512 MB GDDR2 memory (for GV-NX84S512HP/GV-NX84S512H only) • Supports DirectX 10 • Supports AV output (for GV-NX84S256HP/ GV-NX84S512HP ...only) • Supports HDCP (High-Bandwidth Digital Content Protection) technology 1.2. Introduction 1.1. A power supply with Service Pack 2 (SP2) - Intel® Pentium® 4 or AMD AthlonTM - 128 MB of system memory; 2 GB or more for software installation...
Manual
Page 7
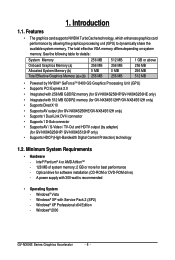
Hardware Installation 2.1. 2. GV-NX84S256HP/GV-NX84S512HP SPDIF In Connector D-Sub monitor Connector (15-pin) TV-Out DVI-I Connector or Analog LCD Monitor Analog Monitor D-Sub Output HDTV or NTSC / PAL TV Projector or NTSC / PAL TV Projector Y Pr Pb/AV Output S-Video Output DVI Output D-Sub monitor Connector (15-pin) TV-Out DVI-I Connector Digital LCD Monitor or Analog LCD Monitor Analog CRT Monitor D-Sub Output DVI-I to D-Sub Adapter - 7 - Hardware Installation Board Layout 1.
Hardware Installation 2.1. 2. GV-NX84S256HP/GV-NX84S512HP SPDIF In Connector D-Sub monitor Connector (15-pin) TV-Out DVI-I Connector or Analog LCD Monitor Analog Monitor D-Sub Output HDTV or NTSC / PAL TV Projector or NTSC / PAL TV Projector Y Pr Pb/AV Output S-Video Output DVI Output D-Sub monitor Connector (15-pin) TV-Out DVI-I Connector Digital LCD Monitor or Analog LCD Monitor Analog CRT Monitor D-Sub Output DVI-I to D-Sub Adapter - 7 - Hardware Installation Board Layout 1.

Manual
Page 9
...To protect them against damage from the system. In order to a metal object, such as the anti-static mat. Using non-official GIGABYTE BIOS might cause problem(s) on your graphics card can be easily damaged by static electricity, so the card should be wearing an anti-...static wristband, grounded at the same point as the power supply case. 3. Hardware Installation Unpacking and installation should follow some precautions whenever you work correctly, please use official GIGABYTE BIOS only. The operator should be done on the card before handling computer components. DO...
...To protect them against damage from the system. In order to a metal object, such as the anti-static mat. Using non-official GIGABYTE BIOS might cause problem(s) on your graphics card can be easily damaged by static electricity, so the card should be wearing an anti-...static wristband, grounded at the same point as the power supply case. 3. Hardware Installation Unpacking and installation should follow some precautions whenever you work correctly, please use official GIGABYTE BIOS only. The operator should be done on the card before handling computer components. DO...
Manual
Page 10
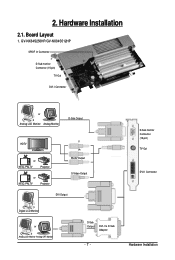
Step 2. GV-NX84S Series Graphics Accelerator - 10 - If necessary, consult your computer. Remove any existing graphics card from the back of your graphics card. 2.2. Hardware Installation Now that you have prepared your computer, you are ready to install your computer. Remove the computer cover. Power off the computer and monitor, then disconnect the display cable from your computer's manual for help in removing the cover. Step 3. To remove the existing graphics card: Step 1.
Step 2. GV-NX84S Series Graphics Accelerator - 10 - If necessary, consult your computer. Remove any existing graphics card from the back of your graphics card. 2.2. Hardware Installation Now that you have prepared your computer, you are ready to install your computer. Remove the computer cover. Power off the computer and monitor, then disconnect the display cable from your computer's manual for help in removing the cover. Step 3. To remove the existing graphics card: Step 1.
Manual
Page 11
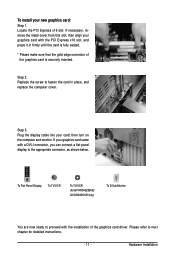
... TV/VCR To TV/VCR (for detailed instructions. - 11 - Hardware Installation Step 2. Plug the display cable into your new graphics card: Step 1. To install your card; then align your graphics card came with the installation of the graphics card is securely inserted. Step 3. If your graphics card...cover from this slot; Locate the PCI Express x16 slot. then turn on the computer and monitor. Please refer to next chapter for GV-NX84S256HE/ GV-NX84S512H only) To D-Sub Monitor You are now ready to proceed with a DVI-I connector, you can connect a flat panel display to ...
... TV/VCR To TV/VCR (for detailed instructions. - 11 - Hardware Installation Step 2. Plug the display cable into your new graphics card: Step 1. To install your card; then align your graphics card came with the installation of the graphics card is securely inserted. Step 3. If your graphics card...cover from this slot; Locate the PCI Express x16 slot. then turn on the computer and monitor. Please refer to next chapter for GV-NX84S256HE/ GV-NX84S512H only) To D-Sub Monitor You are now ready to proceed with a DVI-I connector, you can connect a flat panel display to ...

Manual
Page 13
... Silent Thermal Technology Passive Thermal Design - 13 - Please maintain passive thermal sink at a normal and clean environment. Hardware Installation GIGABYTE's passive thermal solution allows system to improve stability of the system. Please beware of silent pipes on heatsink may cause high ...system temperature. Extra dust on graphics card's thermal solution, and has been the leading company for silent thermal solution. GIGABYTE TECHNOLOGY's passive thermal design effectively implemented heat exchange, radiation and convection to work perfectly in chassis with 40~50 degrees...
... Silent Thermal Technology Passive Thermal Design - 13 - Please maintain passive thermal sink at a normal and clean environment. Hardware Installation GIGABYTE's passive thermal solution allows system to improve stability of the system. Please beware of silent pipes on heatsink may cause high ...system temperature. Extra dust on graphics card's thermal solution, and has been the leading company for silent thermal solution. GIGABYTE TECHNOLOGY's passive thermal design effectively implemented heat exchange, radiation and convection to work perfectly in chassis with 40~50 degrees...
Manual
Page 14
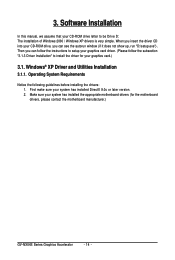
...Windows XP drivers is very simple. Windows® XP Driver and Utilities Installation 3.1.1. First make sure your CD-ROM drive letter to install the driver for the motherboard drivers, please contact the motherboard manufacturer.) GV-NX84S Series Graphics Accelerator - 14 - When you insert the driver CD... into your CD-ROM drive, you can see the autorun window (if it does not show up, run "D:\setup.exe"). Make sure your system has installed the appropriate motherboard drivers...
...Windows XP drivers is very simple. Windows® XP Driver and Utilities Installation 3.1.1. First make sure your CD-ROM drive letter to install the driver for the motherboard drivers, please contact the motherboard manufacturer.) GV-NX84S Series Graphics Accelerator - 14 - When you insert the driver CD... into your CD-ROM drive, you can see the autorun window (if it does not show up, run "D:\setup.exe"). Make sure your system has installed the appropriate motherboard drivers...
Manual
Page 15
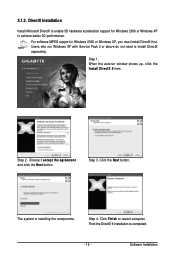
...Service Pack 2 or above do not need to restart computer. Step 1. 3.1.2. Click the Next button. Step 3. Click Finish to install DirectX separately. DirectX Installation Install Microsoft DirectX to enable 3D hardware acceleration support for Windows 2000 or Windows XP to achieve better 3D performance. For software MPEG support ...in Windows 2000 or Windows XP, you must install DirectX first. When the autorun window shows up, click the Install DirectX 9 item. Choose I accept the agreement and click the Next button.
...Service Pack 2 or above do not need to restart computer. Step 1. 3.1.2. Click the Next button. Step 3. Click Finish to install DirectX separately. DirectX Installation Install Microsoft DirectX to enable 3D hardware acceleration support for Windows 2000 or Windows XP to achieve better 3D performance. For software MPEG support ...in Windows 2000 or Windows XP, you must install DirectX first. When the autorun window shows up, click the Install DirectX 9 item. Choose I accept the agreement and click the Next button.
Manual
Page 16
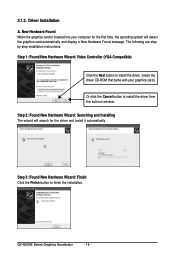
... (VGA Compatible) Click the Next button to install the driver. (Insert the driver CD-ROM that came with your computer for the first time, the operating system will search for the driver and install it automatically. GV-NX84S Series Graphics Accelerator - 16 - 3.1.3. The... following are stepby-step installation instructions. Step 2: Found New Hardware Wizard: Searching and Installing The wizard will detect the graphics card automatically and display...
... (VGA Compatible) Click the Next button to install the driver. (Insert the driver CD-ROM that came with your computer for the first time, the operating system will search for the driver and install it automatically. GV-NX84S Series Graphics Accelerator - 16 - 3.1.3. The... following are stepby-step installation instructions. Step 2: Found New Hardware Wizard: Searching and Installing The wizard will detect the graphics card automatically and display...
Manual
Page 17
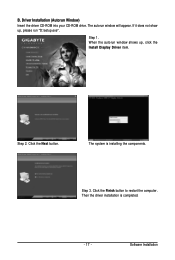
Click the Next button. The system is completed. - 17 - The autorun window will appear. Step 3. Step 2. Click the Finish button to restart the computer. Step 1. If it does not show up , click the Install Display Driver item. When the autorun window shows up , please run "D:\setup.exe". B. Driver Installation (Autorun Window) Insert the driver CD-ROM into your CD-ROM drive. Then the driver installation is installing the components. Software Installation
Click the Next button. The system is completed. - 17 - The autorun window will appear. Step 3. Step 2. Click the Finish button to restart the computer. Step 1. If it does not show up , click the Install Display Driver item. When the autorun window shows up , please run "D:\setup.exe". B. Driver Installation (Autorun Window) Insert the driver CD-ROM into your CD-ROM drive. Then the driver installation is installing the components. Software Installation
Manual
Page 18
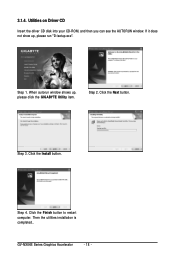
3.1.4. Step 3. If it does not show up , please click the GIGABYTE Utility item. When autorun window shows up , please run "D:\setup.exe". Click the Next button. Click the Install button. GV-NX84S Series Graphics Accelerator - 18 - Step 1. Then the utilities installation is completed.. Click the Finish button to restart computer. Step 2. Utilities on Driver CD Insert the driver CD disk into your CD-ROM, and then you can see the AUTORUN window. Step 4.
3.1.4. Step 3. If it does not show up , please click the GIGABYTE Utility item. When autorun window shows up , please run "D:\setup.exe". Click the Next button. Click the Install button. GV-NX84S Series Graphics Accelerator - 18 - Step 1. Then the utilities installation is completed.. Click the Finish button to restart computer. Step 2. Utilities on Driver CD Insert the driver CD disk into your CD-ROM, and then you can see the AUTORUN window. Step 4.

Manual
Page 19
... of thermal curve from now on. The window will see the change of the graphic engine and video memory (Core Clock and Memory Clock). Software Installation If the utility should hang, restart your system and then enter "Auto-Optimized" mode The V-Tuner3 clock configuration utility will lock the GPU and memory...
... of thermal curve from now on. The window will see the change of the graphic engine and video memory (Core Clock and Memory Clock). Software Installation If the utility should hang, restart your system and then enter "Auto-Optimized" mode The V-Tuner3 clock configuration utility will lock the GPU and memory...

Manual
Page 20
...Right click the icon. GV-NX84S Series Graphics Accelerator - 20 - You may click the Display Properties item, and then click Settings. Click the Color Correction and VGA Information items to change your display settings. Right-clicking this icon opens the GIGABYTE control panel, showing a ...menu composed of shortcut of the display drivers, you will find a GIGABYTE icon on the taskbar's status area. Taskbar Icons After installation of the graphics card's enhanced and other information. Click...
...Right click the icon. GV-NX84S Series Graphics Accelerator - 20 - You may click the Display Properties item, and then click Settings. Click the Color Correction and VGA Information items to change your display settings. Right-clicking this icon opens the GIGABYTE control panel, showing a ...menu composed of shortcut of the display drivers, you will find a GIGABYTE icon on the taskbar's status area. Taskbar Icons After installation of the graphics card's enhanced and other information. Click...

Manual
Page 21
Color Adjust Color Adjust allows you to make color adjustments, such as brightness, contrast and gamma values for each or all of RGB colors. Software Installation VGA Info VGA Info lists the relevant information about your card. - 21 -
Color Adjust Color Adjust allows you to make color adjustments, such as brightness, contrast and gamma values for each or all of RGB colors. Software Installation VGA Info VGA Info lists the relevant information about your card. - 21 -
Manual
Page 22
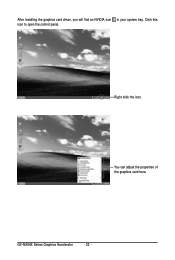
Click this icon to open the control panel. GV-NX84S Series Graphics Accelerator - 22 - After installing the graphics card driver, you will find an NVIDIA icon in your system tray. Right click the icon. You can adjust the properties of the graphics card here.
Click this icon to open the control panel. GV-NX84S Series Graphics Accelerator - 22 - After installing the graphics card driver, you will find an NVIDIA icon in your system tray. Right click the icon. You can adjust the properties of the graphics card here.
Manual
Page 23
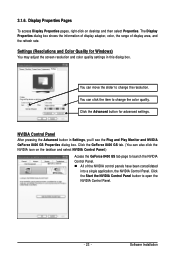
... shows the information of display adapter, color, the range of the NVIDIA control panels have been consolidated into a single application, the NVIDIA Control Panel. Software Installation Settings (Resolutions and Color Quality for advanced settings.
... shows the information of display adapter, color, the range of the NVIDIA control panels have been consolidated into a single application, the NVIDIA Control Panel. Software Installation Settings (Resolutions and Color Quality for advanced settings.

Manual
Page 25
... nTune utility, please visit NVIDIA's official web site for more information about nTune. (Note) This item is present only in Advanced view mode. - 25 - Software Installation
... nTune utility, please visit NVIDIA's official web site for more information about nTune. (Note) This item is present only in Advanced view mode. - 25 - Software Installation
Manual
Page 27
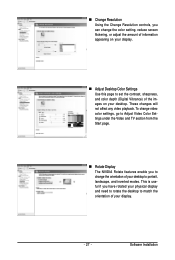
... your desktop. „ Change Resolution Using the Change Resolution controls, you can change the orientation of your desktop to portrait, landscape, and inverted modes. Software Installation To change video color settings, go to Adjust Video Color Settings under the Video and TV section from the Start page. „ Rotate Display The...
... your desktop. „ Change Resolution Using the Change Resolution controls, you can change the orientation of your desktop to portrait, landscape, and inverted modes. Software Installation To change video color settings, go to Adjust Video Color Settings under the Video and TV section from the Start page. „ Rotate Display The...
Manual
Page 29
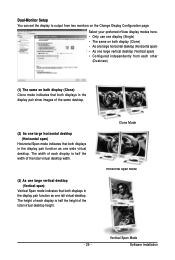
Clone Mode Horizontal Span Mode - 29 - Vertical Span Mode Software Installation The width of each display is half the height of the total virtual desktop height. Select your preferred nView display modes here. • Only use ...
Clone Mode Horizontal Span Mode - 29 - Vertical Span Mode Software Installation The width of each display is half the height of the total virtual desktop height. Select your preferred nView display modes here. • Only use ...