Manual
Page 7
...Reverse engineering or disassembly is protected by Macrovision, and is intended for any errors or omissions that is prohibited. GV-NX76G256D-RH / GV-NX76G256D-ZL-RH / GV-NX76G512P-RH GeForce™ 7600 GS Graphics Accelerator User's Manual Rev. 103 12MD-NX76G2R-103R * The WEEE marking on ... on the product indicates this product must not be disposed of with user's other intellectual property rights. Copyright © 2006 GIGABYTE TECHNOLOGY CO., LTD Copyright by Macrovision. Notice Please do not remove any from without the expressed, written permission of waste electrical...
...Reverse engineering or disassembly is protected by Macrovision, and is intended for any errors or omissions that is prohibited. GV-NX76G256D-RH / GV-NX76G256D-ZL-RH / GV-NX76G512P-RH GeForce™ 7600 GS Graphics Accelerator User's Manual Rev. 103 12MD-NX76G2R-103R * The WEEE marking on ... on the product indicates this product must not be disposed of with user's other intellectual property rights. Copyright © 2006 GIGABYTE TECHNOLOGY CO., LTD Copyright by Macrovision. Notice Please do not remove any from without the expressed, written permission of waste electrical...
Manual
Page 8
... 12 3.1.2. Display properties pages 21 3.1.7. How to a HDTV 34 5.3. Reflash BIOS in Windows mode 33 5.2. Resolutions and color depth table (In Windows® XP 35 GV-NX76G Series Graphics Accelerator - 2 - Utilities on driver CD ...16 3.1.5. Reflash BIOS in MS-DOS mode 33 5.1.2. Software Installation 12 3.1. Hardware Installation 4 2.1. Taskbar icon ...18 3.1.6. Windows...
... 12 3.1.2. Display properties pages 21 3.1.7. How to a HDTV 34 5.3. Reflash BIOS in Windows mode 33 5.2. Resolutions and color depth table (In Windows® XP 35 GV-NX76G Series Graphics Accelerator - 2 - Utilities on driver CD ...16 3.1.5. Reflash BIOS in MS-DOS mode 33 5.1.2. Software Installation 12 3.1. Hardware Installation 4 2.1. Taskbar icon ...18 3.1.6. Windows...
Manual
Page 9
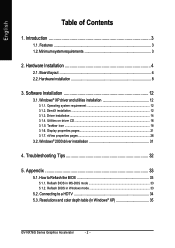
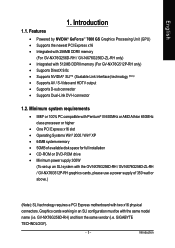
...8226; Supports Dual-Link DVI-I connector 1.2. GIGABYTE TECHNOLOGY). - 3 - Features • Powered by NVIDIA® GeForce™ 7600 GS Graphics Processing Unit (GPU) • Supports the newest PCI Express x16 • Integrated with 256MB DDRII memory (For GV-NX76G256D-RH / GV-NX76G256D-ZL-RH only) • Integrated with the same...CD-ROM or DVD-ROM drive • Minimum power supply 300W (To set up an SLI system with the GV-NX76G256D-RH / GV-NX76G256D-ZL-RH / GV-NX76G512P-RH graphics cards, please use a power supply of 350 watt or above.) (Note): SLI technology requires a PCI Express ...
...8226; Supports Dual-Link DVI-I connector 1.2. GIGABYTE TECHNOLOGY). - 3 - Features • Powered by NVIDIA® GeForce™ 7600 GS Graphics Processing Unit (GPU) • Supports the newest PCI Express x16 • Integrated with 256MB DDRII memory (For GV-NX76G256D-RH / GV-NX76G256D-ZL-RH only) • Integrated with the same...CD-ROM or DVD-ROM drive • Minimum power supply 300W (To set up an SLI system with the GV-NX76G256D-RH / GV-NX76G256D-ZL-RH / GV-NX76G512P-RH graphics cards, please use a power supply of 350 watt or above.) (Note): SLI technology requires a PCI Express ...
Manual
Page 10
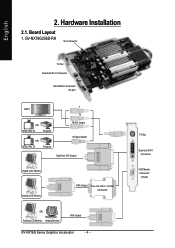
Board Layout 1. TV-Out Dual-Link DVI-I to D-Sub Connector OR Analog LCD Monitor Analog Monitor VGA Output GV-NX76G Series Graphics Accelerator - 4 - English 2. Hardware Installation 2.1. GV-NX76G256D-RH SLI Connector TV-Out Dual-Link DVI-I Connector VGA Monitor Connector (15-pin) HDTV OR NTSC / PAL TV Projector OR NTSC / PAL TV Projector Y Pr Pb/AV Output S-Video Output Dual-Link DVI Output Digital LCD Monitor Analog LCD Monitor VGA Output Dual-Link DVI-I Connector VGA Monitor Connector (15-pin)
Board Layout 1. TV-Out Dual-Link DVI-I to D-Sub Connector OR Analog LCD Monitor Analog Monitor VGA Output GV-NX76G Series Graphics Accelerator - 4 - English 2. Hardware Installation 2.1. GV-NX76G256D-RH SLI Connector TV-Out Dual-Link DVI-I Connector VGA Monitor Connector (15-pin) HDTV OR NTSC / PAL TV Projector OR NTSC / PAL TV Projector Y Pr Pb/AV Output S-Video Output Dual-Link DVI Output Digital LCD Monitor Analog LCD Monitor VGA Output Dual-Link DVI-I Connector VGA Monitor Connector (15-pin)

Manual
Page 13
...components whenever the components are no shipping and handling damages on your computer. 1. Inspect the card carton for obvious damage. Use none official Gigabyte BIOS might cause problem on a grounded anti-static mat. Be sure there are separated from static electricity, you should be left in ...should be done on the graphics card. - 7 - Shipping and handling may cause damage to your graphics card working correctly, please use official Gigabyte BIOS only. DO NOT APPLY POWER TO YOUR SYSTEM IF IT HAS BEEN DAMAGED ON THE CARD. Use a grounded wrist strap before proceeding. ...
...components whenever the components are no shipping and handling damages on your computer. 1. Inspect the card carton for obvious damage. Use none official Gigabyte BIOS might cause problem on a grounded anti-static mat. Be sure there are separated from static electricity, you should be left in ...should be done on the graphics card. - 7 - Shipping and handling may cause damage to your graphics card working correctly, please use official Gigabyte BIOS only. DO NOT APPLY POWER TO YOUR SYSTEM IF IT HAS BEEN DAMAGED ON THE CARD. Use a grounded wrist strap before proceeding. ...
Manual
Page 14
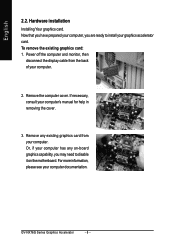
... on-board graphics capability, you may need to disable it on the motherboard. To remove the existing graphics card: 1. Or, if your graphics accelerator card. GV-NX76G Series Graphics Accelerator - 8 - English 2.2. Now that you have prepared your computer, you are ready to install your computer has any existing graphics card from...
... on-board graphics capability, you may need to disable it on the motherboard. To remove the existing graphics card: 1. Or, if your graphics accelerator card. GV-NX76G Series Graphics Accelerator - 8 - English 2.2. Now that you have prepared your computer, you are ready to install your computer has any existing graphics card from...

Manual
Page 15
Locate one PCI Express x16 slot. Replace the screws to proceed with the installation of the graphics card is securely inserted. 2. then turn on the computer and monitor. Hardware Installation then align your graphics card came with the PCI Express x16 slot, and press it in place, and replace the computer cover. 3. Plug the display cable into your new graphics card: 1. Please refer to the appropriate connector, as shown below... If your graphics card with a Dual-Link DVI-I connector, you can connect a flat panel display to next chapter for detailed instructions. - 9 - To ...
Locate one PCI Express x16 slot. Replace the screws to proceed with the installation of the graphics card is securely inserted. 2. then turn on the computer and monitor. Hardware Installation then align your graphics card came with the PCI Express x16 slot, and press it in place, and replace the computer cover. 3. Plug the display cable into your new graphics card: 1. Please refer to the appropriate connector, as shown below... If your graphics card with a Dual-Link DVI-I connector, you can connect a flat panel display to next chapter for detailed instructions. - 9 - To ...
Manual
Page 16
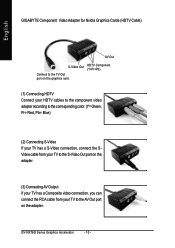
GIGABYTE Component Video Adapter for Nvidia Graphics Cards (HDTV Cable) English AV Out S-Video Out Connect to the AV Out port on the graphics card. HDTV ... Output If your TV has a Composite video connection, you can connect the RCA cable from your TV to the TV-Out port on the adapter. GV-NX76G Series Graphics Accelerator - 10 -
GIGABYTE Component Video Adapter for Nvidia Graphics Cards (HDTV Cable) English AV Out S-Video Out Connect to the AV Out port on the graphics card. HDTV ... Output If your TV has a Composite video connection, you can connect the RCA cable from your TV to the TV-Out port on the adapter. GV-NX76G Series Graphics Accelerator - 10 -
Manual
Page 17
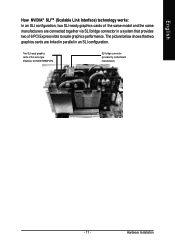
The picture below shows that two graphics cards are connected together via SLI bridge connector in an SLI configuration. Hardware Installation Two SLI-ready graphics cards of the same model and the same manufacturers are linked in parallel in a system that provides two x16 PCI Express slots to scale graphics performance. English How NVIDIA® SLITM (Scalable Link Interface) technology works: In an SLI configuration, two SLI-ready graphics cards of the same type. (Example: GV-NX66T256DP-RH) SLI bridge connector (provided by motherboard manufacturer) - 11 -
The picture below shows that two graphics cards are connected together via SLI bridge connector in an SLI configuration. Hardware Installation Two SLI-ready graphics cards of the same model and the same manufacturers are linked in parallel in a system that provides two x16 PCI Express slots to scale graphics performance. English How NVIDIA® SLITM (Scalable Link Interface) technology works: In an SLI configuration, two SLI-ready graphics cards of the same type. (Example: GV-NX66T256DP-RH) SLI bridge connector (provided by motherboard manufacturer) - 11 -
Manual
Page 18
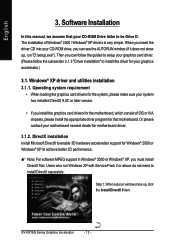
GV-NX76G Series Graphics Accelerator - 12 - Then you install the graphics card drivers for the motherboard, which consist of Windows® 2000 / Windows® XP drivers ...
GV-NX76G Series Graphics Accelerator - 12 - Then you install the graphics card drivers for the motherboard, which consist of Windows® 2000 / Windows® XP drivers ...
Manual
Page 19
Click the "Next" button. Then the DirectX 9 installation is completed. - 13 - Choose I accept the agreement and click the "Next" button. Step 3. Step 4. English Step 2. Software Installation Installing the components. Click "Finish" to restart computer.
Click the "Next" button. Then the DirectX 9 installation is completed. - 13 - Choose I accept the agreement and click the "Next" button. Step 3. Step 4. English Step 2. Software Installation Installing the components. Click "Finish" to restart computer.
Manual
Page 20
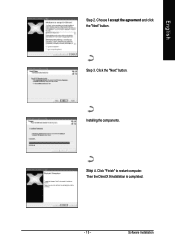
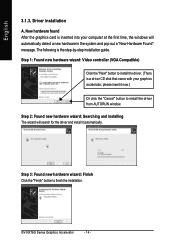
The following is inserted into your graphics accelerator, please insert it automatically. GV-NX76G Series Graphics Accelerator - 14 - English 3.1.3. New hardware found After the graphics card is the step-by-step installation guide. Step 1: Found new hardware wizard: ...
The following is inserted into your graphics accelerator, please insert it automatically. GV-NX76G Series Graphics Accelerator - 14 - English 3.1.3. New hardware found After the graphics card is the step-by-step installation guide. Step 1: Found new hardware wizard: ...

Manual
Page 21
Step 1. Click "Finish" button to restart computer. When autorun window show up , click Install Display Driver item. When autorun window show up, please run "D:\setup.exe". Windows installings the components. Software Installation English B. If it does not show up , click Display Driver item. Step 4. Then the driver installation is completed. - 15 - Step 3. Click "Next" button. Step 2. Driver installation (Autorun Window) Insert the driver CD disk into your CD-ROM, and then you can see the AUTORUN window.
Step 1. Click "Finish" button to restart computer. When autorun window show up , click Install Display Driver item. When autorun window show up, please run "D:\setup.exe". Windows installings the components. Software Installation English B. If it does not show up , click Display Driver item. Step 4. Then the driver installation is completed. - 15 - Step 3. Click "Next" button. Step 2. Driver installation (Autorun Window) Insert the driver CD disk into your CD-ROM, and then you can see the AUTORUN window.
Manual
Page 22
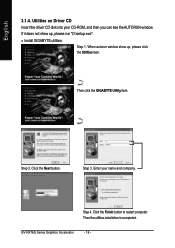
Utilities on Driver CD Insert the driver CD disk into your name and company. Step 3. Step 4. Then the utilities installation is completed. Then click the GIGABYTE Utility item. Step 2. If it does not show up , please run "D:\setup.exe". • Install GIGABYTE utilities: Step 1. Click the Finish button to restart computer. When autorun window show up , please click the Utilities item. Click the Next button. English 3.1.4. Enter your CD-ROM, and then you can see the AUTORUN window. GV-NX76G Series Graphics Accelerator - 16 -
Utilities on Driver CD Insert the driver CD disk into your name and company. Step 3. Step 4. Then the utilities installation is completed. Then click the GIGABYTE Utility item. Step 2. If it does not show up , please run "D:\setup.exe". • Install GIGABYTE utilities: Step 1. Click the Finish button to restart computer. When autorun window show up , please click the Utilities item. Click the Next button. English 3.1.4. Enter your CD-ROM, and then you can see the AUTORUN window. GV-NX76G Series Graphics Accelerator - 16 -

Manual
Page 23
Displays 2D/3D core clock status Displays memory clock status Adjust 2D core clock Auto-Optimized core / memory clock Adjust 3D core clock Fixed Clock Adjust memory clock Hardware Monitor Button DEFAULT SAVE LOAD Auto-Optimized Fixed Clock Hardware Monitor HELP Function You may click this button to restore to the default setting You may click this button to save the frequency you wanted After saving the specific value, you may click this button to adjust the frequencytime temperature of GPU, and you will display the GPU temperature and show the thermal curve. To rechange clock, uncheck...
Displays 2D/3D core clock status Displays memory clock status Adjust 2D core clock Auto-Optimized core / memory clock Adjust 3D core clock Fixed Clock Adjust memory clock Hardware Monitor Button DEFAULT SAVE LOAD Auto-Optimized Fixed Clock Hardware Monitor HELP Function You may click this button to restore to the default setting You may click this button to save the frequency you wanted After saving the specific value, you may click this button to adjust the frequencytime temperature of GPU, and you will display the GPU temperature and show the thermal curve. To rechange clock, uncheck...
Manual
Page 24
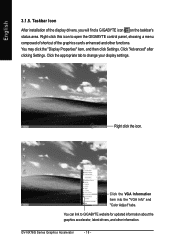
... Right click the icon. Right-click this icon to open the GIGABYTE control panel, showing a menu composed of shortcut of the display drivers, you will find a GIGABYTE icon on the taskbar's status area. GV-NX76G Series Graphics Accelerator - 18 - Taskbar Icon After installation of... the graphics card's enhanced and other information. Click the appropriate tab to GIGABYTE website for updated information about the graphics...
... Right click the icon. Right-click this icon to open the GIGABYTE control panel, showing a menu composed of shortcut of the display drivers, you will find a GIGABYTE icon on the taskbar's status area. GV-NX76G Series Graphics Accelerator - 18 - Taskbar Icon After installation of... the graphics card's enhanced and other information. Click the appropriate tab to GIGABYTE website for updated information about the graphics...
Manual
Page 25
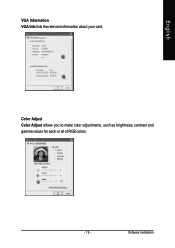
Color Adjust Color Adjust allows you to make color adjustments, such as brightness, contrast and gamma values for each or all of RGB colors. - 19 - English VGA Information VGA Info lists the relevant information about your card. Software Installation
Color Adjust Color Adjust allows you to make color adjustments, such as brightness, contrast and gamma values for each or all of RGB colors. - 19 - English VGA Information VGA Info lists the relevant information about your card. Software Installation
Manual
Page 26
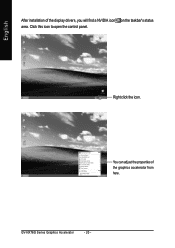
GV-NX76G Series Graphics Accelerator - 20 - You can adjust the properties of the display drivers, you will find a NVIDIA icon on the taskbar's status area. Click this icon to open the control panel. Right click the icon. English After installation of the graphics accelerator from here.
GV-NX76G Series Graphics Accelerator - 20 - You can adjust the properties of the display drivers, you will find a NVIDIA icon on the taskbar's status area. Click this icon to open the control panel. Right click the icon. English After installation of the graphics accelerator from here.
Manual
Page 27
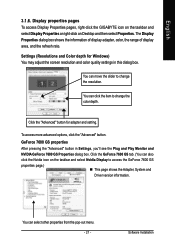
.... - 21 - You can also click the Nvidia icon on Desktop and then select Properties. Display properties pages To access Display Properties pages, right-click the GIGABYTE icon on the taskbar and select Display Properties or right-click on the taskbar and select Nvidia Display to change the resolution. Click the GeForce...
.... - 21 - You can also click the Nvidia icon on Desktop and then select Properties. Display properties pages To access Display Properties pages, right-click the GIGABYTE icon on the taskbar and select Display Properties or right-click on the taskbar and select Nvidia Display to change the resolution. Click the GeForce...
Manual
Page 28
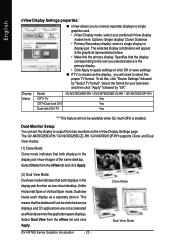
...; Make this , click "Device Settings" followed by "OK". This means that both displays in the display pair show images of the same desktop. The GV-NX76G256D-RH / GV-NX76G256D-ZL-RH / GV-NX76G512P-RH supports Clone and Dual View modes. (1) Clone Mode: Clone mode indicates that the taskbar will not be stretched across displays and 3D applications are not...
...; Make this , click "Device Settings" followed by "OK". This means that both displays in the display pair show images of the same desktop. The GV-NX76G256D-RH / GV-NX76G256D-ZL-RH / GV-NX76G512P-RH supports Clone and Dual View modes. (1) Clone Mode: Clone mode indicates that the taskbar will not be stretched across displays and 3D applications are not...