
Manual
Page 1
NVIDIA® Graphics Accelerator User's Manual Rev. 101 Copyright © 2012 GIGABYTE TECHNOLOGY CO., LTD Copyright by U.S. Doing so may appear in any labels on this card. Reverse engineering or disassembly is intended for any errors or omissions that is protected by GIGA-BYTE TECHNOLOGY CO...this manual may be reproduced or transmitted in this copyright protection technology must be out of date before publication of this graphics card. Trademarks Third-party brands and names are the properties of the specifications might be authorized by Rovi Corporation, and is ...
NVIDIA® Graphics Accelerator User's Manual Rev. 101 Copyright © 2012 GIGABYTE TECHNOLOGY CO., LTD Copyright by U.S. Doing so may appear in any labels on this card. Reverse engineering or disassembly is intended for any errors or omissions that is protected by GIGA-BYTE TECHNOLOGY CO...this manual may be reproduced or transmitted in this copyright protection technology must be out of date before publication of this graphics card. Trademarks Third-party brands and names are the properties of the specifications might be authorized by Rovi Corporation, and is ...

Manual
Page 4
...POWER TO YOUR SYSTEM IF THE GRAPHICS CARD IS DAMAGED. Be sure there are separated from static electricity, you should be left in its original packing until it is installed. If you work correctly, please use official GIGABYTE BIOS only. Place components on a ...by static electricity, so the card should follow some precautions whenever you do not have one, touch both of your computer and unplug power supply. 2. Using non-official GIGABYTE BIOS might cause problem(s) on the card before handling computer components. Expansion cards contain very delicate Integrated Circuit...
...POWER TO YOUR SYSTEM IF THE GRAPHICS CARD IS DAMAGED. Be sure there are separated from static electricity, you should be left in its original packing until it is installed. If you work correctly, please use official GIGABYTE BIOS only. Place components on a ...by static electricity, so the card should follow some precautions whenever you do not have one, touch both of your computer and unplug power supply. 2. Using non-official GIGABYTE BIOS might cause problem(s) on the card before handling computer components. Expansion cards contain very delicate Integrated Circuit...
Manual
Page 5
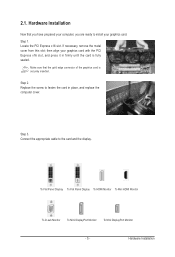
...DisplayPort Monitor - 5 - Hardware Installation Now that the gold edge connector of the graphics card is fully seated. Make sure that you have prepared your computer, you are ready to install your graphics card with the PCI Express x16 slot, and press it in place, and replace the ...computer cover. Replace the screw to the card and the display. Step 3. Connect the appropriate cable to fasten the card in firmly until the card is securely inserted. Hardware Installation...
...DisplayPort Monitor - 5 - Hardware Installation Now that the gold edge connector of the graphics card is fully seated. Make sure that you have prepared your computer, you are ready to install your graphics card with the PCI Express x16 slot, and press it in place, and replace the ...computer cover. Replace the screw to the card and the display. Step 3. Connect the appropriate cable to fasten the card in firmly until the card is securely inserted. Hardware Installation...

Manual
Page 6
...Express slots to scale graphics performance. SLI Configuration: SLI bridge connector (provided by motherboard manufacturer) Two SLI-ready graphics cards of the same type. (Example: GV-N28-1GH-B) 3-Way SLI Configuration: 3-Way SLI bridge connector (provided by motherboard manufacturer) Two SLI-ready graphics... cards of the same model and the same manufacturers are connected together via SLI bridge connector in an SLI configuration. ...
...Express slots to scale graphics performance. SLI Configuration: SLI bridge connector (provided by motherboard manufacturer) Two SLI-ready graphics cards of the same type. (Example: GV-N28-1GH-B) 3-Way SLI Configuration: 3-Way SLI bridge connector (provided by motherboard manufacturer) Two SLI-ready graphics... cards of the same model and the same manufacturers are connected together via SLI bridge connector in an SLI configuration. ...
Manual
Page 10
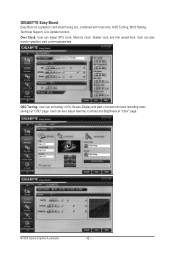
Over Clock: User can also monitor graphics card current parameters. OSD Turning: User can also adjust Gamma, Contrast and Brightness at "OSD" page. User can set hotkey of On-Screen-Display and path of screen shot and recording video savings at "Color" page. User can adjust GPU clock, Memory clock, Shader clock and Fan speed here. GIGABYTE Easy Boost Easy Boost is a graphics card smart tuning tool, combined with Overclock, OSD Turning, BIOS Setting, Technical Support, Live Update function. NVIDIA Series Graphics Accelerator - 10 -
Over Clock: User can also monitor graphics card current parameters. OSD Turning: User can also adjust Gamma, Contrast and Brightness at "OSD" page. User can set hotkey of On-Screen-Display and path of screen shot and recording video savings at "Color" page. User can adjust GPU clock, Memory clock, Shader clock and Fan speed here. GIGABYTE Easy Boost Easy Boost is a graphics card smart tuning tool, combined with Overclock, OSD Turning, BIOS Setting, Technical Support, Live Update function. NVIDIA Series Graphics Accelerator - 10 -
Manual
Page 13
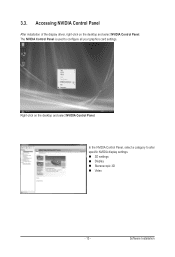
In the NVIDIA Control Panel, select a category to configure all your graphics card settings. 3.3. The NVIDIA Control Panel is used to alter specific NVIDIA display settings. 3D settings Display Stereoscopic 3D Video - 13 - Right-click on the desktop and select NVIDIA Control Panel. Accessing NVIDIA Control Panel After installation of the display driver, right-click on the desktop and select NVIDIA Control Panel. Software Installation
In the NVIDIA Control Panel, select a category to configure all your graphics card settings. 3.3. The NVIDIA Control Panel is used to alter specific NVIDIA display settings. 3D settings Display Stereoscopic 3D Video - 13 - Right-click on the desktop and select NVIDIA Control Panel. Accessing NVIDIA Control Panel After installation of the display driver, right-click on the desktop and select NVIDIA Control Panel. Software Installation

Manual
Page 21
... consult your computer's manual or manufacturer. (NOTE: Some manufacturers do not allow the built-in graphics capabilities on your dealer or GIGABYTE for selection depend on your monitor's setting using monitor's adjust panel to make the screen look focused, crisp, and sharp. ... If necessary, disable any built-in graphics to be disabled or to the monitor's manual.) - 21 - Press on the graphics card being installed. For more advanced troubleshooting information. If necessary, adjust your keyboard after system starts up. Troubleshooting Tips Restart your computer manufacturer...
... consult your computer's manual or manufacturer. (NOTE: Some manufacturers do not allow the built-in graphics capabilities on your dealer or GIGABYTE for selection depend on your monitor's setting using monitor's adjust panel to make the screen look focused, crisp, and sharp. ... If necessary, disable any built-in graphics to be disabled or to the monitor's manual.) - 21 - Press on the graphics card being installed. For more advanced troubleshooting information. If necessary, adjust your keyboard after system starts up. Troubleshooting Tips Restart your computer manufacturer...


