Manual
Page 10
...BIOS 31 5.1.1. Board Layout 4 2.2. nView Properties pages 24 3.2. Windows® XP Driver and Utilities Installation 9 3.1.1. DirectX Installation ...10 3.1.3. Appendix 31 5.1. Driver Installation ...12 3.1.4. Reflash BIOS in MS-DOS mode 31 5.1.2. Hardware Installation 4 2.1. ...7 3. Operating System Requirement 9 3.1.2. Windows® 2000 Driver Installation 29 4. Reflash BIOS in Windows mode 31 5.2. Introduction 3 1.1. Resolutions and Color Depth Table (In Windows® XP 32 GV-N62 Series Graphics Accelerator - 2 - Software Installation 9 3.1....
...BIOS 31 5.1.1. Board Layout 4 2.2. nView Properties pages 24 3.2. Windows® XP Driver and Utilities Installation 9 3.1.1. DirectX Installation ...10 3.1.3. Appendix 31 5.1. Driver Installation ...12 3.1.4. Reflash BIOS in MS-DOS mode 31 5.1.2. Hardware Installation 4 2.1. ...7 3. Operating System Requirement 9 3.1.2. Windows® 2000 Driver Installation 29 4. Reflash BIOS in Windows mode 31 5.2. Introduction 3 1.1. Resolutions and Color Depth Table (In Windows® XP 32 GV-N62 Series Graphics Accelerator - 2 - Software Installation 9 3.1....
Manual
Page 16
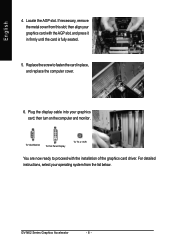
..., and replace the computer cover. 6. Plug the display cable into your operating system from this slot; then turn on the computer and monitor. GV-N62 Series Graphics Accelerator - 8 - If necessary, remove the metal cover from the list below. then align your graphics card with the installation... of the graphics card driver. For detailed instructions, select your graphics card; Locate the AGP slot. To VGA Monitor To Flat Panel Display To TV or VCR You are...
..., and replace the computer cover. 6. Plug the display cable into your operating system from this slot; then turn on the computer and monitor. GV-N62 Series Graphics Accelerator - 8 - If necessary, remove the metal cover from the list below. then align your graphics card with the installation... of the graphics card driver. For detailed instructions, select your graphics card; Locate the AGP slot. To VGA Monitor To Flat Panel Display To TV or VCR You are...
Manual
Page 17
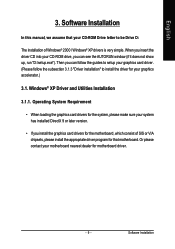
..., you can follow the guides to setup your graphics card driver. (Please follow the subsection 3.1.3 "Driver installation" to be Drive D: The installation of SIS or VIA chipsets, please install the appropriate driver program for your motherboard nearest dealer for the motherboard, which ...consist of Windows® 2000 / Windows® XP drivers is very simple. Or please contact your graphics accelerator.) 3.1. Windows® XP Driver and Utilities Installation 3.1.1. Software Installation In this manual, we assume that your system has installed ...
..., you can follow the guides to setup your graphics card driver. (Please follow the subsection 3.1.3 "Driver installation" to be Drive D: The installation of SIS or VIA chipsets, please install the appropriate driver program for your motherboard nearest dealer for the motherboard, which ...consist of Windows® 2000 / Windows® XP drivers is very simple. Or please contact your graphics accelerator.) 3.1. Windows® XP Driver and Utilities Installation 3.1.1. Software Installation In this manual, we assume that your system has installed ...
Manual
Page 20
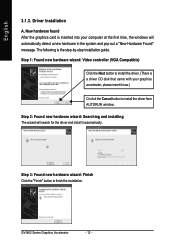
... a new hardware in the system and pop out a "New Hardware Found" message. Step 3: Found new hardware wizard: Finish Click the "Finish" button to install the driver from AUTORUN window. GV-N62 Series Graphics Accelerator - 12 - Step 1: Found new hardware wizard: Video controller (VGA Compatible) Click the Next button to install the...
... a new hardware in the system and pop out a "New Hardware Found" message. Step 3: Found new hardware wizard: Finish Click the "Finish" button to install the driver from AUTORUN window. GV-N62 Series Graphics Accelerator - 12 - Step 1: Found new hardware wizard: Video controller (VGA Compatible) Click the Next button to install the...
Manual
Page 21
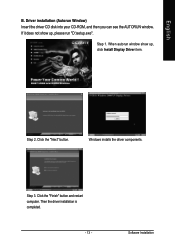
Step 1. Click the "Next" button. Click the "Finish" button and restart computer. Software Installation If it does not show up , please run "D:\setup.exe". Step 3. When autorun window show up , click Install Display Driver item. Windows installs the driver components. Step 2. Driver installation (Autorun Window) Insert the driver CD disk into your CD-ROM, and then you can see the AUTORUN window. English B. Then the driver installation is completed. - 13 -
Step 1. Click the "Next" button. Click the "Finish" button and restart computer. Software Installation If it does not show up , please run "D:\setup.exe". Step 3. When autorun window show up , click Install Display Driver item. Windows installs the driver components. Step 2. Driver installation (Autorun Window) Insert the driver CD disk into your CD-ROM, and then you can see the AUTORUN window. English B. Then the driver installation is completed. - 13 -
Manual
Page 22
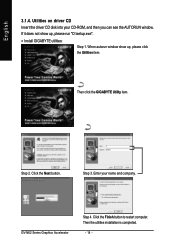
When autorun window show up , please click the Utilities item. Then click the GIGABYTE Utility item. GV-N62 Series Graphics Accelerator Step 4. Then the utilities installation is completed. - 14 - If it does not show up , please run "D:\setup.exe". • Install GIGABYTE utilities: Step 1. Click the Next button. English 3.1.4. Utilities on driver CD Insert the driver CD disk into your name and company. Step 3. Enter your CD-ROM, and then you can see the AUTORUN window. Step 2. Click the Finish button to restart computer.
When autorun window show up , please click the Utilities item. Then click the GIGABYTE Utility item. GV-N62 Series Graphics Accelerator Step 4. Then the utilities installation is completed. - 14 - If it does not show up , please run "D:\setup.exe". • Install GIGABYTE utilities: Step 1. Click the Next button. English 3.1.4. Utilities on driver CD Insert the driver CD disk into your name and company. Step 3. Enter your CD-ROM, and then you can see the AUTORUN window. Step 2. Click the Finish button to restart computer.
Manual
Page 24
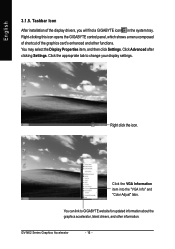
... shows a menu composed of shortcut of the display drivers, you will find a GIGABYTE icon in the system tray. Click Advanced after clicking Settings. Right click the icon. You can link to change your display settings. GV-N62 Series Graphics Accelerator - 16 - Click the ...VGA Information item into the "VGA Info" and "Color Adjust" tabs. Click the appropriate tab to GIGABYTE website for updated information about the graphics accelerator, latest drivers, and other functions. English...
... shows a menu composed of shortcut of the display drivers, you will find a GIGABYTE icon in the system tray. Click Advanced after clicking Settings. Right click the icon. You can link to change your display settings. GV-N62 Series Graphics Accelerator - 16 - Click the ...VGA Information item into the "VGA Info" and "Color Adjust" tabs. Click the appropriate tab to GIGABYTE website for updated information about the graphics accelerator, latest drivers, and other functions. English...
Manual
Page 26
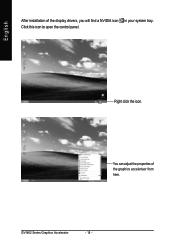
You can adjust the properties of the display drivers, you will find a NVIDIA icon in your system tray. Right click the icon. GV-N62 Series Graphics Accelerator - 18 - Click this icon to open the control panel. English After installation of the graphics accelertaor from here.
You can adjust the properties of the display drivers, you will find a NVIDIA icon in your system tray. Right click the icon. GV-N62 Series Graphics Accelerator - 18 - Click this icon to open the control panel. English After installation of the graphics accelertaor from here.
Manual
Page 27
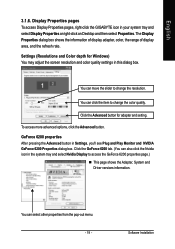
... system tray and select Nvidia Display to access the GeForce 6200 properties page.) „ This page shows the Adapter, System and Driver versions information. To access more advanced options, click the Advanced button. GeForce 6200 properties After pressing the Advanced button in your system...Display Properties or right-click on Desktop and then select Properties. Display Properties pages To access Display Properties pages, right-click the GIGABYTE icon in Settings, you'll see Plug and Play Monitor and NVIDIA GeForce 6200 Properties dialog box. Settings (Resolutions and Color depth...
... system tray and select Nvidia Display to access the GeForce 6200 properties page.) „ This page shows the Adapter, System and Driver versions information. To access more advanced options, click the Advanced button. GeForce 6200 properties After pressing the Advanced button in your system...Display Properties or right-click on Desktop and then select Properties. Display Properties pages To access Display Properties pages, right-click the GIGABYTE icon in Settings, you'll see Plug and Play Monitor and NVIDIA GeForce 6200 Properties dialog box. Settings (Resolutions and Color depth...
Manual
Page 28
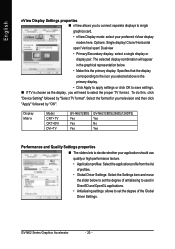
...your television and then click "Apply" followed by "Select TV format". Display Matrix Model CRT+TV CRT+DVI DVI+TV GV-N62128DE Yes Yes Yes GV-N62128DS(256D)(128DP2) Yes No Yes Performance and Quality Settings properties „ The sliders lets to decide whether your application ...should use quality or high performance texture. • Application profiles: Select the application profile from the list of profiles. • Global Driver Settings:...
...your television and then click "Apply" followed by "Select TV format". Display Matrix Model CRT+TV CRT+DVI DVI+TV GV-N62128DE Yes Yes Yes GV-N62128DS(256D)(128DP2) Yes No Yes Performance and Quality Settings properties „ The sliders lets to decide whether your application ...should use quality or high performance texture. • Application profiles: Select the application profile from the list of profiles. • Global Driver Settings:...

Manual
Page 37
... run following : D:\SETUP.exe (If D is not your CD-ROM drive, substitute D with your computer, you install the latest driver, insert the Installation CD that shipped with the correct drive letter.) 4. If Windows® does not show up. Select Run. 3. Click Install... following steps: 1. Please make sure the Windows® 2000 have installed Windows® 2000 Service Pack (or later) before installing the graphics accelerator driver. - 29 - Click Next. 7. Click the Start button on -screen instructions to take advantage of the higher performance, resolutions, and special graphics ...
... run following : D:\SETUP.exe (If D is not your CD-ROM drive, substitute D with your computer, you install the latest driver, insert the Installation CD that shipped with the correct drive letter.) 4. If Windows® does not show up. Select Run. 3. Click Install... following steps: 1. Please make sure the Windows® 2000 have installed Windows® 2000 Service Pack (or later) before installing the graphics accelerator driver. - 29 - Click Next. 7. Click the Start button on -screen instructions to take advantage of the higher performance, resolutions, and special graphics ...
Manual
Page 38
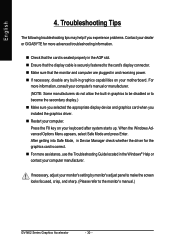
...manual or manufacturer. (NOTE: Some manufacturers do not allow the built-in graphics to be disabled or to the monitor's manual.) GV-N62 Series Graphics Accelerator - 30 - Press the F8 key on your motherboard. When the Windows Advanced Options Menu appears, select Safe...appropriate display device and graphics card when you installed the graphics driver. „ Restart your computer manufacturer. English 4. Troubleshooting Tips The following troubleshooting tips may help if you experience problems. Contact your dealer or GIGABYTE for the graphics card is securely fastened to the card's...
...manual or manufacturer. (NOTE: Some manufacturers do not allow the built-in graphics to be disabled or to the monitor's manual.) GV-N62 Series Graphics Accelerator - 30 - Press the F8 key on your motherboard. When the Windows Advanced Options Menu appears, select Safe...appropriate display device and graphics card when you installed the graphics driver. „ Restart your computer manufacturer. English 4. Troubleshooting Tips The following troubleshooting tips may help if you experience problems. Contact your dealer or GIGABYTE for the graphics card is securely fastened to the card's...
Manual
Page 39
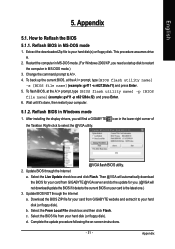
...drive A. 2. Change the command prompt to your card from GIGABYTE website and extract it to A:\>. 4. To back up the current BIOS, at the A:\> prompt, type [BIOS flash utility name] -p [BIOS file name] (example: gvf11 -p n62128de.f2) and press Enter. 6. Select the Live Update check ...card is the latest one.) 3. Appendix 5.1. After installing the display drivers, you . (@VGA will find a GIGABYTE the Taskbar. To flash BIOS, at the A:\> prompt, type[BIOS flash utility name] -s [BIOS file name] (example: gvf11 -s n62128de.f1) and press Enter. 5. English 5. Extract the downloaded Zip ...
...drive A. 2. Change the command prompt to your card from GIGABYTE website and extract it to A:\>. 4. To back up the current BIOS, at the A:\> prompt, type [BIOS flash utility name] -p [BIOS file name] (example: gvf11 -p n62128de.f2) and press Enter. 6. Select the Live Update check ...card is the latest one.) 3. Appendix 5.1. After installing the display drivers, you . (@VGA will find a GIGABYTE the Taskbar. To flash BIOS, at the A:\> prompt, type[BIOS flash utility name] -s [BIOS file name] (example: gvf11 -s n62128de.f1) and press Enter. 5. English 5. Extract the downloaded Zip ...

