
Manual
Page 1
... to rapid change in technology, some of the specifications might be reproduced or transmitted in this motherboard. GV-N57128DE/ GV-N57256DE/ GV-N57256V GeForce™ FX 5700 Graphics Accelerator User's Manual Rev. 101 12MD-N57256V-101 Copyright © 2003 GIGABYTE TECHNOLOGYCO., LTD Copyright by GIGA-BYTE TECHNOLOGY CO., LTD. ("GBT"). Due to update the information contained...
... to rapid change in technology, some of the specifications might be reproduced or transmitted in this motherboard. GV-N57128DE/ GV-N57256DE/ GV-N57256V GeForce™ FX 5700 Graphics Accelerator User's Manual Rev. 101 12MD-N57256V-101 Copyright © 2003 GIGABYTE TECHNOLOGYCO., LTD Copyright by GIGA-BYTE TECHNOLOGY CO., LTD. ("GBT"). Due to update the information contained...

Manual
Page 2
... installation 31 3.3. Troubleshooting Tips 32 5. Introduction 3 1.1. Minimum system requirement 3 2. Hardware installation 7 3. Display properties pages 21 3.1.7. Resolutions and color depth table (In Windows® XP 34 GV-N57 Series Graphics Accelerator - 2 - Board layout 5 2.3. DirectX installation 10 3.1.3. nView properties pages 26 3.2. Hardware Installation 4 2.1. How to reflash the BIOS 33 5.2. Software Installation 9 3.1. Operating system...
... installation 31 3.3. Troubleshooting Tips 32 5. Introduction 3 1.1. Minimum system requirement 3 2. Hardware installation 7 3. Display properties pages 21 3.1.7. Resolutions and color depth table (In Windows® XP 34 GV-N57 Series Graphics Accelerator - 2 - Board layout 5 2.3. DirectX installation 10 3.1.3. nView properties pages 26 3.2. Hardware Installation 4 2.1. How to reflash the BIOS 33 5.2. Software Installation 9 3.1. Operating system...

Manual
Page 3
...ME / Win® XP • 64MB system memory • 50MB of available disk space for video editing (VIVO)(For GV-N57256V only) • Supports Direct X 9.0 Spec 1.2. Introduction 1.1. Minimum system requirement • IBM® or 100% PC compatible with 256MB DDR memory...(For GV-N57256DE/GV-N57256V only) • Supports D-Sub and DVI-I connectors • Supports TV-Out connectors(For GV-N57128DE/GV-N57256DE only) • Supports video capture for full installation • CD-ROM or DVD-ROM drive...
...ME / Win® XP • 64MB system memory • 50MB of available disk space for video editing (VIVO)(For GV-N57256V only) • Supports Direct X 9.0 Spec 1.2. Introduction 1.1. Minimum system requirement • IBM® or 100% PC compatible with 256MB DDR memory...(For GV-N57256DE/GV-N57256V only) • Supports D-Sub and DVI-I connectors • Supports TV-Out connectors(For GV-N57128DE/GV-N57256DE only) • Supports video capture for full installation • CD-ROM or DVD-ROM drive...
Manual
Page 4
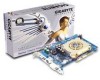
...In order to your hands to a safely grounded object or to D-Sub connector TV-Out cable x 1(For GV-N57128DE/GV-N57256DE only) S-video and AV in stalled. GV-N57 Series Graphics Accelerator - 4 - Use a grounded wrist strap before proceeding. Inspect the card carton for ...cause problem on your graphics card working correctly,please use official Gigabyte BIOS only. Hardware Installation 2.1. Unpacking The GV-N57 Series package contains the following: The GV-N57128DE or GV-N57256DE or GV-N57256V graphics accelerator GV-N57 Series user's manual NVIDIA Series driver and utility CD ...
...In order to your hands to a safely grounded object or to D-Sub connector TV-Out cable x 1(For GV-N57128DE/GV-N57256DE only) S-video and AV in stalled. GV-N57 Series Graphics Accelerator - 4 - Use a grounded wrist strap before proceeding. Inspect the card carton for ...cause problem on your graphics card working correctly,please use official Gigabyte BIOS only. Hardware Installation 2.1. Unpacking The GV-N57 Series package contains the following: The GV-N57128DE or GV-N57256DE or GV-N57256V graphics accelerator GV-N57 Series user's manual NVIDIA Series driver and utility CD ...

Manual
Page 5
English 2.2. Board layout 1) GV-N57128DE VGA Monitor Connector (15pin) S-Video DVI -I Connector 2) GV-N57256DE VGA Monitor Connector (15pin) S-Video DVI -I Connector OR VGA Output A nalog LC D M onitor A nalog Monitor NTSC / PAL TV Pr oj ec tor AV Output S-VideoOutput DVI Output Digital LCD M onitor DV I-I to D-Sub Connector A nalog LC D M onitor VGA Output - 5 - VGA Monitor C onnector (15pin) S-Video DVI Connector Hardware Installation
English 2.2. Board layout 1) GV-N57128DE VGA Monitor Connector (15pin) S-Video DVI -I Connector 2) GV-N57256DE VGA Monitor Connector (15pin) S-Video DVI -I Connector OR VGA Output A nalog LC D M onitor A nalog Monitor NTSC / PAL TV Pr oj ec tor AV Output S-VideoOutput DVI Output Digital LCD M onitor DV I-I to D-Sub Connector A nalog LC D M onitor VGA Output - 5 - VGA Monitor C onnector (15pin) S-Video DVI Connector Hardware Installation

Manual
Page 8
... necessary, remove the metal cover from the list below ... Replace the screw to fasten the card in firmly until the card is fully eated. 5. GV-N57 Series Graphics Accelerator - 8 - then align your graphics card came with a DVI connector, you can connect a flat panel display to proceed with... slot, and press it in place, and replace the computer cover. 6. To VGA Monitor To TV or V CR (For GV-N57128DE/GV-N57256DE only) 9 Pin(VIVO ) (For GV-N57256V only) To Flat Panel Display You are now ready to the appropriate connector, as shown below . For detailed instructions, select your...
... necessary, remove the metal cover from the list below ... Replace the screw to fasten the card in firmly until the card is fully eated. 5. GV-N57 Series Graphics Accelerator - 8 - then align your graphics card came with a DVI connector, you can connect a flat panel display to proceed with... slot, and press it in place, and replace the computer cover. 6. To VGA Monitor To TV or V CR (For GV-N57128DE/GV-N57256DE only) 9 Pin(VIVO ) (For GV-N57256V only) To Flat Panel Display You are now ready to the appropriate connector, as shown below . For detailed instructions, select your...

Manual
Page 10
...: For software MPEG support in Windows® 98/ 98SE/ Windows® 2000 / Windows® ME or Windows® XP, you must install DirectX first. Step 2. GV-N57 Series Graphics Accelerator - 10 - When autorun window show up, click Install DirectX 9 item. Click "Install DirectX 9" item. DirectX installation Install Microsoft DirectX to enable...
...: For software MPEG support in Windows® 98/ 98SE/ Windows® 2000 / Windows® ME or Windows® XP, you must install DirectX first. Step 2. GV-N57 Series Graphics Accelerator - 10 - When autorun window show up, click Install DirectX 9 item. Click "Install DirectX 9" item. DirectX installation Install Microsoft DirectX to enable...

Manual
Page 12
English 3.1.3. New hardware found After the graphics card is inserted into your graphics acce lerator, please inse rt it automatically. GV-N57 Series Graphics Accelerator - 12 - Step 1: Found new hardware wizard: Video controller (VGACompatible) Click "Next" button to install the driver. (There is the step-by-...
English 3.1.3. New hardware found After the graphics card is inserted into your graphics acce lerator, please inse rt it automatically. GV-N57 Series Graphics Accelerator - 12 - Step 1: Found new hardware wizard: Video controller (VGACompatible) Click "Next" button to install the driver. (There is the step-by-...

Manual
Page 14
Click "WDM Driver" item. If it does not show up , please run "D:\setup.exe". English Step 3. C. GV-N57 Series Graphics Accelerator - 14 - When autorun window show up , click Install Disp lay Driver item. Step 1. Driver installation (WDM Driver)(For GV-N57256V only) Insert the driver CD disk into your CD-ROM, and then you can see theAUTORUN window. Click "Install Display Driver" item. Click "Finish" button to restart computer. Then the driver installation is completed.
Click "WDM Driver" item. If it does not show up , please run "D:\setup.exe". English Step 3. C. GV-N57 Series Graphics Accelerator - 14 - When autorun window show up , click Install Disp lay Driver item. Step 1. Driver installation (WDM Driver)(For GV-N57256V only) Insert the driver CD disk into your CD-ROM, and then you can see theAUTORUN window. Click "Install Display Driver" item. Click "Finish" button to restart computer. Then the driver installation is completed.

Manual
Page 16
Step 2. Then the V-Tuner installation is completed. GV-N57 Series Graphics Accelerator - 16 - English 3.1.4. Step 3 . Utilities on driver CD Insert the driver CD disk into your name and co mpany. Click "Next" button. Enter your CD-ROM, and then you can see theAUTORUN window. If it does not show up , please run "D:\setup.exe". • Install V-Tuner: Step 1. Step 4. When autorun window show up , click V-Tu ner item. Click "Finish" button to restart computer. Click "V-Tuner" item.
Step 2. Then the V-Tuner installation is completed. GV-N57 Series Graphics Accelerator - 16 - English 3.1.4. Step 3 . Utilities on driver CD Insert the driver CD disk into your name and co mpany. Click "Next" button. Enter your CD-ROM, and then you can see theAUTORUN window. If it does not show up , please run "D:\setup.exe". • Install V-Tuner: Step 1. Step 4. When autorun window show up , click V-Tu ner item. Click "Finish" button to restart computer. Click "V-Tuner" item.

Manual
Page 18
English 3.1.5. Click "VGA Information" item into the "VGA Info" and "Color Adjust"ta bs. GV-N57 Series Graphics Accelerator - 18 - Click "Advanced" after clickng Settings. Right click the icon. Right-clicking this icon opens the GBT control panel, showing a menu ...
English 3.1.5. Click "VGA Information" item into the "VGA Info" and "Color Adjust"ta bs. GV-N57 Series Graphics Accelerator - 18 - Click "Advanced" after clickng Settings. Right click the icon. Right-clicking this icon opens the GBT control panel, showing a menu ...

Manual
Page 20
Right click the icon. You can enable the nView function. GV-N57 Series Graphics Accelerator - 20 - Clicking this icon open the control panel. You can adjust the properties of the display drivers, you will find a NVIDIA icon on the taskbar's status area. English After installation of the graphics accelertaor from here.
Right click the icon. You can enable the nView function. GV-N57 Series Graphics Accelerator - 20 - Clicking this icon open the control panel. You can adjust the properties of the display drivers, you will find a NVIDIA icon on the taskbar's status area. English After installation of the graphics accelertaor from here.

Manual
Page 22
... brightness (gamma) levels can change red, green, an d blue disp lay colors. The color settings affect all display devices mapped to adjust the color setting s. GV-N57 Series Graphics Accelerator - 22 - It also allows gamma control fo r video playin g of the Vide o Overlay. Note: On certain monitors, the screen may go...
... brightness (gamma) levels can change red, green, an d blue disp lay colors. The color settings affect all display devices mapped to adjust the color setting s. GV-N57 Series Graphics Accelerator - 22 - It also allows gamma control fo r video playin g of the Vide o Overlay. Note: On certain monitors, the screen may go...
Manual
Page 24
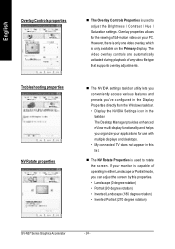
... operating in this properties. • Landscape (0 degree rotation) • Portrait (90 degree rotation) • Inverted Landscape (180 degree rotation) • Inverted Portrait (270 degree rotation) GV-N57 Series Graphics Accelerator - 24 - If your applications for th e viewing of full-motion video on the Primary display. n The NVIDIA settings taskbar utility lets...
... operating in this properties. • Landscape (0 degree rotation) • Portrait (90 degree rotation) • Inverted Landscape (180 degree rotation) • Inverted Portrait (270 degree rotation) GV-N57 Series Graphics Accelerator - 24 - If your applications for th e viewing of full-motion video on the Primary display. n The NVIDIA settings taskbar utility lets...
Manual
Page 26
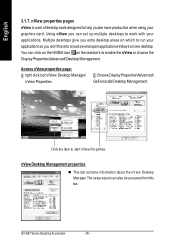
... using your applications so you won't have to help you extra desktop areas on one desktop. Multiple desktops give you be accessed from this ta b. GV-N57 Series Graphics Accelerator - 26 - English 3.1.7. nView properties pages nView is a set up multiple desktops to enable the nView or choose the Display Properties\Advanced...
... using your applications so you won't have to help you extra desktop areas on one desktop. Multiple desktops give you be accessed from this ta b. GV-N57 Series Graphics Accelerator - 26 - English 3.1.7. nView properties pages nView is a set up multiple desktops to enable the nView or choose the Display Properties\Advanced...

Manual
Page 28
GV-N57 Series Graphics Accelerator - 28 - nView Effects properties n This tab provides special windows effects thatyou can apply to 32 unique desktops. nView User Interface properties n This tab allows customization of the nView user interface. English nView Desktops properties n This tab allows you to create up to your applications.
GV-N57 Series Graphics Accelerator - 28 - nView Effects properties n This tab provides special windows effects thatyou can apply to 32 unique desktops. nView User Interface properties n This tab allows customization of the nView user interface. English nView Desktops properties n This tab allows you to create up to your applications.

Manual
Page 30
English nView Tools properties n This tab can improve nView functionality for mobile and desktop users. GV-N57 Series Graphics Accelerator - 30 -
English nView Tools properties n This tab can improve nView functionality for mobile and desktop users. GV-N57 Series Graphics Accelerator - 30 -

Manual
Page 32
n Check that the monitor and computer are only using one graphics card. n Make sure that the card is securely fastened to the monitor's manual.) GV-N57 Series Graphics Accelerator - 32 - If necessary, adjust your computer in the AGP slot. English 4. For more advanced troubleshooting information. n Ensure that the display cable ...
n Check that the monitor and computer are only using one graphics card. n Make sure that the card is securely fastened to the monitor's manual.) GV-N57 Series Graphics Accelerator - 32 - If necessary, adjust your computer in the AGP slot. English 4. For more advanced troubleshooting information. n Ensure that the display cable ...

Manual
Page 33
... ME/ Windows XP. How to reflash the BIOS We use the bootable disk to the file location C:\> or A:\> 4. How to the drive C: or A: 2. Please use GV-N4464D VGA card and NVFLASH BIOS flash utility as below : C:\> nvflash -f 5. Reflash BIOS command as example. Appendix Appendix 5.1. Restart your PC in MS-DOS mode...
... ME/ Windows XP. How to reflash the BIOS We use the bootable disk to the file location C:\> or A:\> 4. How to the drive C: or A: 2. Please use GV-N4464D VGA card and NVFLASH BIOS flash utility as below : C:\> nvflash -f 5. Reflash BIOS command as example. Appendix Appendix 5.1. Restart your PC in MS-DOS mode...

Manual
Page 34
Resolutions and color depth table (In Windows® XP) GV-N57128DE/GV-N57256DE/GV-N57256V Single Display Stardard Modes Display Screen Resolution 320 x 200 320 x 240 400 x 300 480 x 360 512 x 384 640 x 400... color) Standard mode P P P P P P P P P P P P P P P P P P P P P P P P P P P P P P P P P P P P P P P 16bpp(65K color) High mode P P P P P P P P P P P P P P P P P P P P P P P P P P P P P P P P P P P P P P P 32bpp(16.7M ) True mode P P P P P P P P P P P P P P P P P P P P P P P P P P P P P P P P P P P P P P P To be continued... GV-N57 Series Graphics Accelerator - 34 - English 5.2.
Resolutions and color depth table (In Windows® XP) GV-N57128DE/GV-N57256DE/GV-N57256V Single Display Stardard Modes Display Screen Resolution 320 x 200 320 x 240 400 x 300 480 x 360 512 x 384 640 x 400... color) Standard mode P P P P P P P P P P P P P P P P P P P P P P P P P P P P P P P P P P P P P P P 16bpp(65K color) High mode P P P P P P P P P P P P P P P P P P P P P P P P P P P P P P P P P P P P P P P 32bpp(16.7M ) True mode P P P P P P P P P P P P P P P P P P P P P P P P P P P P P P P P P P P P P P P To be continued... GV-N57 Series Graphics Accelerator - 34 - English 5.2.


