
Manual
Page 4
... installation 9 3.1.3. Appendix 30 5.1. Board layout 5 2.3. Utilities on driver CD 13 3.1.5. How to reflash the BIOS 30 5.2. Features ...3 1.2. Win® XP driver and utilities installation 8 3.1.1. nView properties pages 23 3.2. Software Installation 8 3.1. Operating system requirement 8 3.1.2. Driver installation 11 3.1.4. Resolutions and color depth table (In Windows® XP 31 GV-N56X128D-P Graphics Accelerator - 2 - Unpacking 4 2.2. Introduction 3 1.1. English Table of...
... installation 9 3.1.3. Appendix 30 5.1. Board layout 5 2.3. Utilities on driver CD 13 3.1.5. How to reflash the BIOS 30 5.2. Features ...3 1.2. Win® XP driver and utilities installation 8 3.1.1. nView properties pages 23 3.2. Software Installation 8 3.1. Operating system requirement 8 3.1.2. Driver installation 11 3.1.4. Resolutions and color depth table (In Windows® XP 31 GV-N56X128D-P Graphics Accelerator - 2 - Unpacking 4 2.2. Introduction 3 1.1. English Table of...

Manual
Page 6
.... 3. Be sure there are separated from static electricity, you should be left in its original packing until it is installed. GV-N56X128D-P Graphics Accelerator - 4 - If you work on the bag that came with the components whenever the components are no shipping... damage from the system. Turn off your graphics card working correctly, please use official Gigabyte BIOS only. Unpacking The GV-N56X128D-P package contains the following: The GV-N56X128D-P graphics accelerator GV-N56X128D-P user's manual NVIDIA Series driver and utility CD PowerDVD CD Game CD S-video cable x 1 DVI-I to a...
.... 3. Be sure there are separated from static electricity, you should be left in its original packing until it is installed. GV-N56X128D-P Graphics Accelerator - 4 - If you work on the bag that came with the components whenever the components are no shipping... damage from the system. Turn off your graphics card working correctly, please use official Gigabyte BIOS only. Unpacking The GV-N56X128D-P package contains the following: The GV-N56X128D-P graphics accelerator GV-N56X128D-P user's manual NVIDIA Series driver and utility CD PowerDVD CD Game CD S-video cable x 1 DVI-I to a...
Manual
Page 9
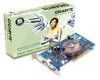
..., and press it in place, and replace the computer cover. 6. For detailed instructions, select your graphics card came with the installation of the graphics card driver. If necessary, remove the metal cover from the list below ... then turn on the computer and monitor. then align your card; Hardware Installation Replace the...
..., and press it in place, and replace the computer cover. 6. For detailed instructions, select your graphics card came with the installation of the graphics card driver. If necessary, remove the metal cover from the list below ... then turn on the computer and monitor. then align your card; Hardware Installation Replace the...

Manual
Page 10
... contact your motherboard nearest dealer for your graphics accelerator.) 3.1. GV-N56X128D-P Graphics Accelerator - 8 - Win® XP driver and utilities installation 3.1.1. Software Installation In this manual, we assume that motherboard. When you insert the driver CD into your CD-ROM drive, you install the graphics card drivers for the motherboard, which consist of SIS, ALI or...
... contact your motherboard nearest dealer for your graphics accelerator.) 3.1. GV-N56X128D-P Graphics Accelerator - 8 - Win® XP driver and utilities installation 3.1.1. Software Installation In this manual, we assume that motherboard. When you insert the driver CD into your CD-ROM drive, you install the graphics card drivers for the motherboard, which consist of SIS, ALI or...
Manual
Page 13
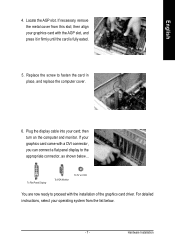
... detect a new hardware in the system and pop out a "New Hardware Found" message. Driver installation A. Step 3: Found new hardware wizard: Finish Click the "Finish" button to install the driver from AUTORUN window. Software Installation Step 1: Found new hardware wizard: Video controller (VGA Compatible)... Click "Next" button to install the driver. (There is a driver CD disk that came with your computer at the first time, the windows will search for the driver and install it now.) Or click the "Cancel" button to finish the installation...
... detect a new hardware in the system and pop out a "New Hardware Found" message. Driver installation A. Step 3: Found new hardware wizard: Finish Click the "Finish" button to install the driver from AUTORUN window. Software Installation Step 1: Found new hardware wizard: Video controller (VGA Compatible)... Click "Next" button to install the driver. (There is a driver CD disk that came with your computer at the first time, the windows will search for the driver and install it now.) Or click the "Cancel" button to finish the installation...

Manual
Page 14
Driver installation (Autorun Window) Insert the driver CD disk into your CD-ROM, and then you can see the AUTORUN window. Click "Install Display Driver" item. Click "Finish" button to restart computer. Step 3. Step 1. When autorun window show up , click Install Display Driver item. Click "Next" button. Then the driver installation is completed. If it does not show up , please run "D:\setup.exe". Windows installings the components. GV-N56X128D-P Graphics Accelerator - 12 - Step 2. English B.
Driver installation (Autorun Window) Insert the driver CD disk into your CD-ROM, and then you can see the AUTORUN window. Click "Install Display Driver" item. Click "Finish" button to restart computer. Step 3. Step 1. When autorun window show up , click Install Display Driver item. Click "Next" button. Then the driver installation is completed. If it does not show up , please run "D:\setup.exe". Windows installings the components. GV-N56X128D-P Graphics Accelerator - 12 - Step 2. English B.
Manual
Page 15
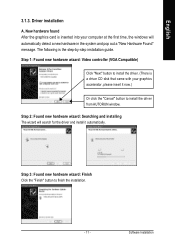
Click "V-Tuner" item. Software Installation If it does not show up , please run "D:\setup.exe". • Install V-Tuner: Step 1. Step 4. When autorun window show up , click V-Tuner item. Step 2. Step 3. English 3.1.4. Then the V-Tuner installation is completed. - 13 - Click "Finish" button to restart computer. Utilities on driver CD Insert the driver CD disk into your name and company. Click "Next" button. Enter your CD-ROM, and then you can see the AUTORUN window.
Click "V-Tuner" item. Software Installation If it does not show up , please run "D:\setup.exe". • Install V-Tuner: Step 1. Step 4. When autorun window show up , click V-Tuner item. Step 2. Step 3. English 3.1.4. Then the V-Tuner installation is completed. - 13 - Click "Finish" button to restart computer. Utilities on driver CD Insert the driver CD disk into your name and company. Click "Next" button. Enter your CD-ROM, and then you can see the AUTORUN window.
Manual
Page 17
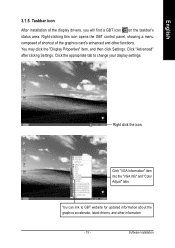
...'s enhanced and other information. - 15 - Click "Advanced" after clickng Settings. Click the appropriate tab to GBT website for updated information about the graphics accelerator, latest drivers, and other functions. Right-clicking this icon opens the GBT control panel, showing a menu composed of shortcut of the display...
...'s enhanced and other information. - 15 - Click "Advanced" after clickng Settings. Click the appropriate tab to GBT website for updated information about the graphics accelerator, latest drivers, and other functions. Right-clicking this icon opens the GBT control panel, showing a menu composed of shortcut of the display...

Manual
Page 19
Software Installation You can enable the nView function. - 17 - You can adjust the properties of the display drivers, you will find a NVIDIA icon on the taskbar's status area. Right-click this icon to open the control panel. Right click the icon. English After installation of the graphics accelertaor from here.
Software Installation You can enable the nView function. - 17 - You can adjust the properties of the display drivers, you will find a NVIDIA icon on the taskbar's status area. Right-click this icon to open the control panel. Right click the icon. English After installation of the graphics accelertaor from here.

Manual
Page 20
... you to change the color quality. Settings (Resolutions and Color depth for adapter and setting. You can select other properties from the pop-out menu. GV-N56X128D-P Graphics Accelerator - 18 - Display properties pages The screen shows the information of display adapter, color, the range of display area and the refresh rate. Click...
... you to change the color quality. Settings (Resolutions and Color depth for adapter and setting. You can select other properties from the pop-out menu. GV-N56X128D-P Graphics Accelerator - 18 - Display properties pages The screen shows the information of display adapter, color, the range of display area and the refresh rate. Click...

Manual
Page 30
... card. Click "OK". 5. Click "Yes" to reflash the BIOS". GV-N56X128D-P Graphics Accelerator - 28 - If Windows® does not show up. Select Run. 3. To ensure you install the latest driver, insert the Installation CD that shipped with the correct drive letter.) 4. Type... the following steps: 1. "How to the license agreement. 8. Follow the Wizard's on subsection 5.1. BIOS flash utility BIOS update procedure: 0Note: Please download the newest BIOS from our website (www.gigabyte...
... card. Click "OK". 5. Click "Yes" to reflash the BIOS". GV-N56X128D-P Graphics Accelerator - 28 - If Windows® does not show up. Select Run. 3. To ensure you install the latest driver, insert the Installation CD that shipped with the correct drive letter.) 4. Type... the following steps: 1. "How to the license agreement. 8. Follow the Wizard's on subsection 5.1. BIOS flash utility BIOS update procedure: 0Note: Please download the newest BIOS from our website (www.gigabyte...

Manual
Page 31
... sharp. (Please refer to become the secondary display.) „ Make sure you selected the appropriate display device and graphics card when you installed the graphics driver. „ If you are plugged in and receiving power. „ If necessary, disable any built-in the Windows® Help or contact your computer's manual...
... sharp. (Please refer to become the secondary display.) „ Make sure you selected the appropriate display device and graphics card when you installed the graphics driver. „ If you are plugged in and receiving power. „ If necessary, disable any built-in the Windows® Help or contact your computer's manual...

