
Manual
Page 1
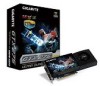
... author make a commitment to rapid change in any errors or omissions that is prohibited. No part of their respective owners. Reverse engineering or disassembly is protected by GIGA-BYTE TECHNOLOGY CO., LTD. ("GBT"). Notice Please do not remove any labels on this card. Due to update the information contained herein. GV-N275UD-896H NVIDIA® GeForceTM GTX 275 Graphics Accelerator User's Manual Rev. 101 12MM-N275U8H-101R Copyright...
... author make a commitment to rapid change in any errors or omissions that is prohibited. No part of their respective owners. Reverse engineering or disassembly is protected by GIGA-BYTE TECHNOLOGY CO., LTD. ("GBT"). Notice Please do not remove any labels on this card. Due to update the information contained herein. GV-N275UD-896H NVIDIA® GeForceTM GTX 275 Graphics Accelerator User's Manual Rev. 101 12MM-N275U8H-101R Copyright...

Manual
Page 3
... you connect two monitors. - 3 - Board Layout ...5 2.2. Resolutions and Color Depth Table (In Windows XP 28 5.3. Features ...4 1.2. Hardware Installation ...8 3. Taskbar Icon ...16 3.1.6. Appendix ...27 5.1. Hardware Installation 5 2.1. DirectX Installation ...11 3.1.3. Display Properties Pages 17 4. Table of Contents 1. GIGABYTE Gamer HUD Lite on Driver Disk ( for GV-N275UD-896H 14 3.1.5. Driver Installation ...12 3.1.4. Software Installation 10 3.1. Operating System Requirements 10 3.1.2. Troubleshooting Tips 26 5. Windows® XP Driver and Utilities...
... you connect two monitors. - 3 - Board Layout ...5 2.2. Resolutions and Color Depth Table (In Windows XP 28 5.3. Features ...4 1.2. Hardware Installation ...8 3. Taskbar Icon ...16 3.1.6. Appendix ...27 5.1. Hardware Installation 5 2.1. DirectX Installation ...11 3.1.3. Display Properties Pages 17 4. Table of Contents 1. GIGABYTE Gamer HUD Lite on Driver Disk ( for GV-N275UD-896H 14 3.1.5. Driver Installation ...12 3.1.4. Software Installation 10 3.1. Operating System Requirements 10 3.1.2. Troubleshooting Tips 26 5. Windows® XP Driver and Utilities...

Manual
Page 4
... requires a PCI Express motherboard with the same model name (e.g. Graphics cards working in an SLI configuration must be with two/three x16 physical connectors. GIGABYTE TECHNOLOGY). Intel® Pentium®/CoreTM 2 or AMD AthlonTM/PhenomTM - 512 MB of an SLI system, the following are required: - GV-N275UD-896H) and from the same vendor (e.g. Minimum System Requirements • Hardware - 550-watt system power supply specification or above is recommended. - Two GV-N275UD-896H for SLI configuration;Three GV-N275UD-896H for best performance - A power supply with Service...
... requires a PCI Express motherboard with the same model name (e.g. Graphics cards working in an SLI configuration must be with two/three x16 physical connectors. GIGABYTE TECHNOLOGY). Intel® Pentium®/CoreTM 2 or AMD AthlonTM/PhenomTM - 512 MB of an SLI system, the following are required: - GV-N275UD-896H) and from the same vendor (e.g. Minimum System Requirements • Hardware - 550-watt system power supply specification or above is recommended. - Two GV-N275UD-896H for SLI configuration;Three GV-N275UD-896H for best performance - A power supply with Service...
Manual
Page 6
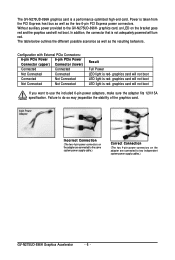
... power connectors on the adapter are connected to the same system power supply cable.) Correct Connection (The two 4-pin power connectors on the bracket goes red and the graphics card will not boot LED light is a performance optimized high-end card. Without auxiliary power provided to the GV-N275UD-896H- Configuration with External PCIe Connectors: 6-pin PCIe Power 6-pin PCIe Power Connector (upper) Connector (lower) Connected Connected Not Connected Connected Connected Not Connected Not Connected Not Connected Result Full Power LED light is taken from the PCI Express...
... power connectors on the adapter are connected to the same system power supply cable.) Correct Connection (The two 4-pin power connectors on the bracket goes red and the graphics card will not boot LED light is a performance optimized high-end card. Without auxiliary power provided to the GV-N275UD-896H- Configuration with External PCIe Connectors: 6-pin PCIe Power 6-pin PCIe Power Connector (upper) Connector (lower) Connected Connected Not Connected Connected Connected Not Connected Not Connected Not Connected Result Full Power LED light is taken from the PCI Express...

Manual
Page 8
... your graphics card with the PCI Express x16 slot, and press it 's operating to install your graphics card. After installation, remember to connect the power cable to your computer, you are ready to prevent system instability. Connect a flat panel To TV / VCR To Flat Panel Display Connect a D-Sub monitor via DVI-I to connect a 15-pin D-Sub monitor. Step 1. You can connect a monitor that supports DVI-I function or use the DVI-I digital connectors. Hardware Installation Now that the gold edge connector of the graphics card...
... your graphics card with the PCI Express x16 slot, and press it 's operating to install your graphics card. After installation, remember to connect the power cable to your computer, you are ready to prevent system instability. Connect a flat panel To TV / VCR To Flat Panel Display Connect a D-Sub monitor via DVI-I to connect a 15-pin D-Sub monitor. Step 1. You can connect a monitor that supports DVI-I function or use the DVI-I digital connectors. Hardware Installation Now that the gold edge connector of the graphics card...
Manual
Page 9
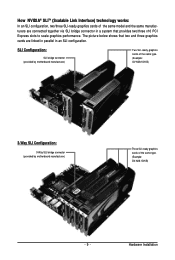
... below shows that provides two/three x16 PCI Express slots to scale graphics performance. SLI Configuration: SLI bridge connector (provided by motherboard manufacturer) Two SLI-ready graphics cards of the same type. (Example: GV-N28-1GH-B) 3-Way SLI Configuration: 3-Way SLI bridge connector (provided by motherboard manufacturer) Three SLI-ready graphics cards of the same model and the same manufacturers are linked in parallel in a system that two and three graphics cards are connected together via SLI bridge connector in an SLI configuration. Hardware Installation
... below shows that provides two/three x16 PCI Express slots to scale graphics performance. SLI Configuration: SLI bridge connector (provided by motherboard manufacturer) Two SLI-ready graphics cards of the same type. (Example: GV-N28-1GH-B) 3-Way SLI Configuration: 3-Way SLI bridge connector (provided by motherboard manufacturer) Three SLI-ready graphics cards of the same model and the same manufacturers are linked in parallel in a system that two and three graphics cards are connected together via SLI bridge connector in an SLI configuration. Hardware Installation

Manual
Page 10
... not show up, run "D:\setup.exe"). Operating System Requirements Notice the following guidelines before installing the drivers: 1. Software Installation In this manual, we assume that your graphics card.) 3.1. When you can follow the instructions to setup your graphics card driver. (Please follow the subsection "3.1.3 Driver Installation" to install the driver for the motherboard drivers, please contact the motherboard manufacturer.) GV-N275UD-896H Graphics Accelerator - 10 - Windows® XP Driver and Utilities Installation 3.1.1. Make sure your CD-ROM drive, you insert...
... not show up, run "D:\setup.exe"). Operating System Requirements Notice the following guidelines before installing the drivers: 1. Software Installation In this manual, we assume that your graphics card.) 3.1. When you can follow the instructions to setup your graphics card driver. (Please follow the subsection "3.1.3 Driver Installation" to install the driver for the motherboard drivers, please contact the motherboard manufacturer.) GV-N275UD-896H Graphics Accelerator - 10 - Windows® XP Driver and Utilities Installation 3.1.1. Make sure your CD-ROM drive, you insert...

Manual
Page 12
... button to install the driver from the autorun window. Driver Installation A. The following are stepby-step installation instructions. New Hardware Found When the graphics card is inserted into your graphics card.) Or click the Cancel button to finish the installation. Step 2: Found New Hardware Wizard: Searching and Installing The wizard will search for the first time, the operating system will detect the graphics card automatically and display a New Hardware Found message. GV-N275UD-896H Graphics Accelerator - 12...
... button to install the driver from the autorun window. Driver Installation A. The following are stepby-step installation instructions. New Hardware Found When the graphics card is inserted into your graphics card.) Or click the Cancel button to finish the installation. Step 2: Found New Hardware Wizard: Searching and Installing The wizard will search for the first time, the operating system will detect the graphics card automatically and display a New Hardware Found message. GV-N275UD-896H Graphics Accelerator - 12...

Manual
Page 14
Step 3: Click the Next button. Step 4: Click the Install button. Then the installation of the GIGABYTE Gamer HUD Lite is installing the components. GIGABYTE Gamer HUD Lite on Driver Disk ( for the installation and click the OK button. Step 5: Click the Finish button. Step 2: Choose the language for GV-N275UD-896H) Step 1: Click the GIGABYTE Gamer HUD Lite item. The system is completed. 3.1.4. GV-N275UD-896H Graphics Accelerator - 14 -
Step 3: Click the Next button. Step 4: Click the Install button. Then the installation of the GIGABYTE Gamer HUD Lite is installing the components. GIGABYTE Gamer HUD Lite on Driver Disk ( for the installation and click the OK button. Step 5: Click the Finish button. Step 2: Choose the language for GV-N275UD-896H) Step 1: Click the GIGABYTE Gamer HUD Lite item. The system is completed. 3.1.4. GV-N275UD-896H Graphics Accelerator - 14 -
Manual
Page 15
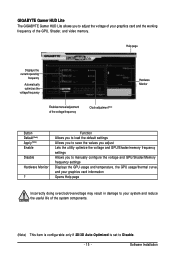
Software Installation Help page Displays the current operating frequency Automatically optimizes the voltage/frequency Enables manual adjustment of the GPU, Shader, and video memory. GIGABYTE Gamer HUD Lite The GIGABYTE Gamer HUD Lite allows you to manually configure the voltage and GPU/Shader/Memory frequency settings Displays the GPU usage and temperature, the GPU usage/thermal curve, and your graphics card information Opens Help page Incorrectly doing overclock/overvoltage may result in damage to Disable. - 15 - Function Allows you to load the default settings Allows...
Software Installation Help page Displays the current operating frequency Automatically optimizes the voltage/frequency Enables manual adjustment of the GPU, Shader, and video memory. GIGABYTE Gamer HUD Lite The GIGABYTE Gamer HUD Lite allows you to manually configure the voltage and GPU/Shader/Memory frequency settings Displays the GPU usage and temperature, the GPU usage/thermal curve, and your graphics card information Opens Help page Incorrectly doing overclock/overvoltage may result in damage to Disable. - 15 - Function Allows you to load the default settings Allows...
Manual
Page 16
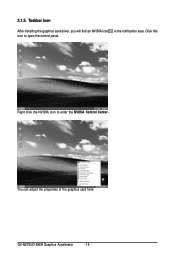
GV-N275UD-896H Graphics Accelerator - 16 - Right click the NVIDIA icon to open the control panel. You can adjust the properties of the graphics card here. Taskbar Icon After installing the graphics card driver, you will find an NVIDIA icon in the notification area. 3.1.5. Click this icon to enter the NVIDIA Control Center.
GV-N275UD-896H Graphics Accelerator - 16 - Right click the NVIDIA icon to open the control panel. You can adjust the properties of the graphics card here. Taskbar Icon After installing the graphics card driver, you will find an NVIDIA icon in the notification area. 3.1.5. Click this icon to enter the NVIDIA Control Center.
Manual
Page 17
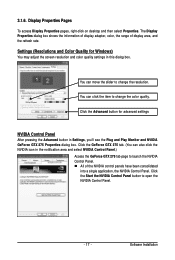
... refresh rate. Software Installation The Display Properties dialog box shows the information of display adapter, color, the range of the NVIDIA control panels have been consolidated into a single application, the NVIDIA Control Panel. Click the Advanced button for Windows) You may adjust the screen resolution and color quality settings in Settings, you'll see the Plug and Play Monitor and NVIDIA GeForce GTX 275 Properties dialog box. You can click the item to change the color...
... refresh rate. Software Installation The Display Properties dialog box shows the information of display adapter, color, the range of the NVIDIA control panels have been consolidated into a single application, the NVIDIA Control Panel. Click the Advanced button for Windows) You may adjust the screen resolution and color quality settings in Settings, you'll see the Plug and Play Monitor and NVIDIA GeForce GTX 275 Properties dialog box. You can click the item to change the color...

Manual
Page 18
The supported modes are : „ 3D Settings „ Display „ Video & Television In the NVIDIA Control Panel, change a view if you want. Select the view of your GPU and GPU memory to increase your GPU performance. • Assign specific 3D settings to alter specific NVIDIA display settings. The categories are : „ Standard „ Advanced „ Custom 3D Settings Tasks in the 3D Settings pages allow you . „ Standard Settings „ Advanced Settings The following...
The supported modes are : „ 3D Settings „ Display „ Video & Television In the NVIDIA Control Panel, change a view if you want. Select the view of your GPU and GPU memory to increase your GPU performance. • Assign specific 3D settings to alter specific NVIDIA display settings. The categories are : „ Standard „ Advanced „ Custom 3D Settings Tasks in the 3D Settings pages allow you . „ Standard Settings „ Advanced Settings The following...
Manual
Page 19
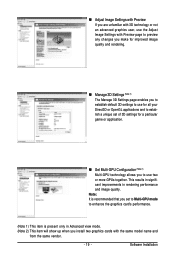
... application. „ Set Multi-GPU Configuration (Note 2) Multi-GPU technology allows you to enhance the graphics card's performance. (Note 1) This item is present only in rendering performance and image quality. „ Adjust Image Settings with Preview If you are unfamiliar with 3D technology or not an advanced graphics user, use the Adjust Image Settings with the same model name and from the same vendor. - 19 - Software Installation Note: It is...
... application. „ Set Multi-GPU Configuration (Note 2) Multi-GPU technology allows you to enhance the graphics card's performance. (Note 1) This item is present only in rendering performance and image quality. „ Adjust Image Settings with Preview If you are unfamiliar with 3D technology or not an advanced graphics user, use the Adjust Image Settings with the same model name and from the same vendor. - 19 - Software Installation Note: It is...
Manual
Page 20
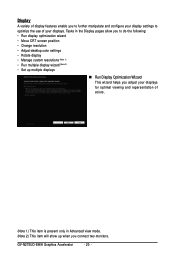
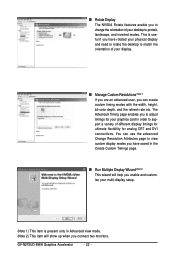
... only in the Display pages allow you to do the following: • Run display optimization wizard • Move CRT screen position • Change resolution • Adjust desktop color settings • Rotate display • Manage custom resolutions (Note 1) • Run multiple display wizard (Note 2) • Set up when you adjust your displays. Tasks in Advanced view mode. (Note 2) This item will show up multiple displays „ Run Display Optimization Wizard This wizard helps you connect two monitors. GV-N275UD-896H Graphics Accelerator - 20 -
... only in the Display pages allow you to do the following: • Run display optimization wizard • Move CRT screen position • Change resolution • Adjust desktop color settings • Rotate display • Manage custom resolutions (Note 1) • Run multiple display wizard (Note 2) • Set up when you adjust your displays. Tasks in Advanced view mode. (Note 2) This item will show up multiple displays „ Run Display Optimization Wizard This wizard helps you connect two monitors. GV-N275UD-896H Graphics Accelerator - 20 -
Manual
Page 22
... flexibility for your desktop to adjust timings for analog CRT and DVI connections. You can create custom timing modes with the width, height, bit-color depth, and the refresh rate etc. The Advanced Timing page enables you connect two monitors. GV-N275UD-896H Graphics Accelerator - 22 - This is useful if you have rotated your physical display and need to rotate the desktop to match the orientation of your display. „ Manage Custom Resolutions (Note 1) If...
... flexibility for your desktop to adjust timings for analog CRT and DVI connections. You can create custom timing modes with the width, height, bit-color depth, and the refresh rate etc. The Advanced Timing page enables you connect two monitors. GV-N275UD-896H Graphics Accelerator - 22 - This is useful if you have rotated your physical display and need to rotate the desktop to match the orientation of your display. „ Manage Custom Resolutions (Note 1) If...

Manual
Page 23
Dual-Monitor Setup You can set the display to output from each display is half the width of the displays (monitors) that are connected to your preferred nView display modes here. • Only use of the total virtual desktop width. Software Installation The width of each other (Dualview) (1) The same on both display (Clone) Clone mode indicates that both displays in the display pair show images of the same desktop. (2) As one large horizontal desktop (Horizontal...
Dual-Monitor Setup You can set the display to output from each display is half the width of the displays (monitors) that are connected to your preferred nView display modes here. • Only use of the total virtual desktop width. Software Installation The width of each other (Dualview) (1) The same on both display (Clone) Clone mode indicates that both displays in the display pair show images of the same desktop. (2) As one large horizontal desktop (Horizontal...
Manual
Page 25
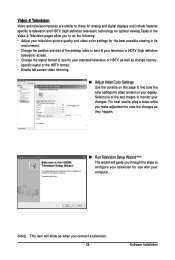
... desktop video to best fit your television or HDTV (high definition television) screen. • Change the signal format to use for your changes. specific signal or the HDTV format. • Enable full screen video mirroring. „ Adjust Video Color Settings Use the controls on this page to monitor your standard television or HDTV as well as change country- For best results, play a video while you make adjustment to view the changes as they happen. „ Run...
... desktop video to best fit your television or HDTV (high definition television) screen. • Change the signal format to use for your changes. specific signal or the HDTV format. • Enable full screen video mirroring. „ Adjust Video Color Settings Use the controls on this page to monitor your standard television or HDTV as well as change country- For best results, play a video while you make adjustment to view the changes as they happen. „ Run...
Manual
Page 26
... and receiving power. „ If necessary, disable any built-in the PCI Express x16 slot. „ Ensure that the display cable is seated properly in graphics capabilities on your monitor's setting using monitor's adjust panel to make the screen look focused, crisp, and sharp. (Please refer to the monitor's manual.) GV-N275UD-896H Graphics Accelerator - 26 - When the Windows Advanced Options Menu appears, select Safe Mode and press . For more advanced troubleshooting information. „...
... and receiving power. „ If necessary, disable any built-in the PCI Express x16 slot. „ Ensure that the display cable is seated properly in graphics capabilities on your monitor's setting using monitor's adjust panel to make the screen look focused, crisp, and sharp. (Please refer to the monitor's manual.) GV-N275UD-896H Graphics Accelerator - 26 - When the Windows Advanced Options Menu appears, select Safe Mode and press . For more advanced troubleshooting information. „...

Manual
Page 30
GV-N275UD-896H Graphics Accelerator - 30 - 5.3. Contravention will help you can responsibly recycle or reuse most major worldwide safety requirements. We believe that the information contained herein was accurate in all GIGABYTE motherboards fulfill European Union regulations for errors or omissions in a manner that do not use of our natural resources, GIGABYTE provides the following information on its packaging, which indicates that...
GV-N275UD-896H Graphics Accelerator - 30 - 5.3. Contravention will help you can responsibly recycle or reuse most major worldwide safety requirements. We believe that the information contained herein was accurate in all GIGABYTE motherboards fulfill European Union regulations for errors or omissions in a manner that do not use of our natural resources, GIGABYTE provides the following information on its packaging, which indicates that...


