Manual
Page 1
GV-N220OC-1GI/ GV-N220D2-1GI/ GV-N220OC-512I NVIDIA® GeForceTM GT 220 Graphics Accelerator User's Manual Rev. 103 12MM-N220OGI-103R Copyright © 2010 GIGABYTE TECHNOLOGY CO., LTD Copyright by Rovi Corporation. patents and other limited viewing uses only unless otherwise authorized by GIGA-BYTE TECHNOLOGY CO., LTD. ("GBT"). Notice ...
GV-N220OC-1GI/ GV-N220D2-1GI/ GV-N220OC-512I NVIDIA® GeForceTM GT 220 Graphics Accelerator User's Manual Rev. 103 12MM-N220OGI-103R Copyright © 2010 GIGABYTE TECHNOLOGY CO., LTD Copyright by Rovi Corporation. patents and other limited viewing uses only unless otherwise authorized by GIGA-BYTE TECHNOLOGY CO., LTD. ("GBT"). Notice ...
Manual
Page 5
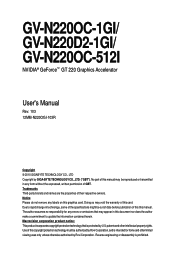
...memory; 2 GB or more for software installation (CD-ROM or DVD-ROM drive) - Windows® Vista - Windows® XP with 512MB GDDR3 memory (For GV-N220OC-512I only) • Supports DirectX 10.1 • Supports 1 HDMI connector • Supports 1 D-Sub connector • Supports 1 DVI-I connectors • Supports HDCP...NVIDIA® GeForceTM GT 220 Graphics Processing Unit (GPU) • Supports PCI Express 2.0 • Integrated with 1GB DDR3 memory (For GV-N220OC-1GI only) • Integrated with 1GB GDDR2 memory (For GV-N220D2-1GI only) • Integrated with Service Pack 2 (SP2) - 1.
...memory; 2 GB or more for software installation (CD-ROM or DVD-ROM drive) - Windows® Vista - Windows® XP with 512MB GDDR3 memory (For GV-N220OC-512I only) • Supports DirectX 10.1 • Supports 1 HDMI connector • Supports 1 D-Sub connector • Supports 1 DVI-I connectors • Supports HDCP...NVIDIA® GeForceTM GT 220 Graphics Processing Unit (GPU) • Supports PCI Express 2.0 • Integrated with 1GB DDR3 memory (For GV-N220OC-1GI only) • Integrated with 1GB GDDR2 memory (For GV-N220D2-1GI only) • Integrated with Service Pack 2 (SP2) - 1.
Manual
Page 6
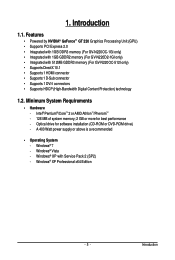
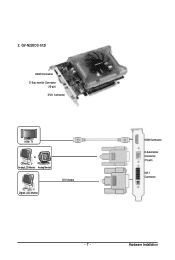
GV-N220OC-1GI/GV-N220D2-1GI HDMI Connector D-Sub monitor Connector (15-pin) DVI-I Connector HDMI TV or Analog LCD Monitor Analog Monitor Digital LCD Monitor DVI Output HDMI Connector D-Sub monitor Connector (15-pin) DVI-I Connector GV-N220 Series Graphics Accelerator - 6 - 2. Hardware Installation 2.1. Board Layout 1.
GV-N220OC-1GI/GV-N220D2-1GI HDMI Connector D-Sub monitor Connector (15-pin) DVI-I Connector HDMI TV or Analog LCD Monitor Analog Monitor Digital LCD Monitor DVI Output HDMI Connector D-Sub monitor Connector (15-pin) DVI-I Connector GV-N220 Series Graphics Accelerator - 6 - 2. Hardware Installation 2.1. Board Layout 1.
Manual
Page 7
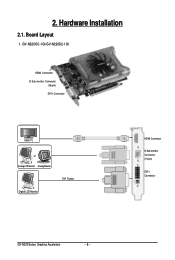
GV-N220OC-512I HDMI Connector D-Sub monitor Connector (15-pin) DVI-I Connector HDMI TV or Analog LCD Monitor Analog Monitor Digital LCD Monitor DVI Output HDMI Connector D-Sub monitor Connector (15-pin) DVI-I Connector - 7 - Hardware Installation 2.
GV-N220OC-512I HDMI Connector D-Sub monitor Connector (15-pin) DVI-I Connector HDMI TV or Analog LCD Monitor Analog Monitor Digital LCD Monitor DVI Output HDMI Connector D-Sub monitor Connector (15-pin) DVI-I Connector - 7 - Hardware Installation 2.
Manual
Page 8
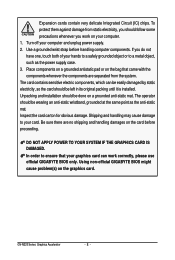
...and unplug power supply. 2. DO NOT APPLY POWER TO YOUR SYSTEM IF THE GRAPHICS CARD IS DAMAGED. GV-N220 Series Graphics Accelerator - 8 - If you work correctly, please use official GIGABYTE BIOS only. Place components on a grounded antistatic pad or on the bag that your graphics card can...card carton for obvious damage. To protect them against damage from the system. Use a grounded wrist strap before proceeding. Using non-official GIGABYTE BIOS might cause problem(s) on your hands to a safely grounded object or to ensure that came with the components whenever the components are...
...and unplug power supply. 2. DO NOT APPLY POWER TO YOUR SYSTEM IF THE GRAPHICS CARD IS DAMAGED. GV-N220 Series Graphics Accelerator - 8 - If you work correctly, please use official GIGABYTE BIOS only. Place components on a grounded antistatic pad or on the bag that your graphics card can...card carton for obvious damage. To protect them against damage from the system. Use a grounded wrist strap before proceeding. Using non-official GIGABYTE BIOS might cause problem(s) on your hands to a safely grounded object or to ensure that came with the components whenever the components are...
Manual
Page 10
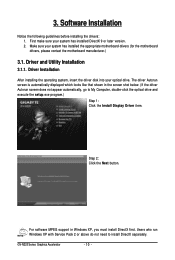
... version. 2. The driver Autorun screen is automatically displayed which looks like that shown in Windows XP, you must install DirectX first. Driver and Utility Installation 3.1.1. GV-N220 Series Graphics Accelerator - 10 - 3. Software Installation Notice the following guidelines before installing the drivers: 1.
... version. 2. The driver Autorun screen is automatically displayed which looks like that shown in Windows XP, you must install DirectX first. Driver and Utility Installation 3.1.1. GV-N220 Series Graphics Accelerator - 10 - 3. Software Installation Notice the following guidelines before installing the drivers: 1.
Manual
Page 12
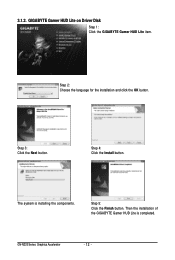
Step 4: Click the Install button. Step 2: Choose the language for the installation and click the OK button. The system is completed. Then the installation of the GIGABYTE Gamer HUD Lite is installing the components. Step 5: Click the Finish button. 3.1.2. GIGABYTE Gamer HUD Lite on Driver Disk Step 1: Click the GIGABYTE Gamer HUD Lite item. Step 3: Click the Next button. GV-N220 Series Graphics Accelerator - 12 -
Step 4: Click the Install button. Step 2: Choose the language for the installation and click the OK button. The system is completed. Then the installation of the GIGABYTE Gamer HUD Lite is installing the components. Step 5: Click the Finish button. 3.1.2. GIGABYTE Gamer HUD Lite on Driver Disk Step 1: Click the GIGABYTE Gamer HUD Lite item. Step 3: Click the Next button. GV-N220 Series Graphics Accelerator - 12 -
Manual
Page 14
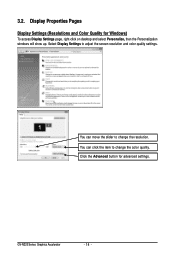
Click the Advanced button for Windows) To access Display Settings page, right-click on desktop and select Personalize, then the Personalization windows will show up. You can click the item to change the color quality. GV-N220 Series Graphics Accelerator - 14 - You can move the slider to change the resolution. Display Properties Pages Display Settings (Resolutions and Color Quality for advanced settings. Select Display Settings to adjust the screen resolution and color quality settings. 3.2.
Click the Advanced button for Windows) To access Display Settings page, right-click on desktop and select Personalize, then the Personalization windows will show up. You can click the item to change the color quality. GV-N220 Series Graphics Accelerator - 14 - You can move the slider to change the resolution. Display Properties Pages Display Settings (Resolutions and Color Quality for advanced settings. Select Display Settings to adjust the screen resolution and color quality settings. 3.2.
Manual
Page 16
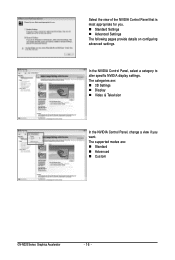
In the NVIDIA Control Panel, select a category to alter specific NVIDIA display settings. The categories are : „ Standard „ Advanced „ Custom GV-N220 Series Graphics Accelerator - 16 - The supported modes are : „ 3D Settings „ Display „ Video & Television In the NVIDIA Control Panel, change a view if you . „ Standard Settings „ Advanced Settings The following pages provide details on configuring advanced settings. Select the view of the NVIDIA Control Panel that is most appropriate for you want.
In the NVIDIA Control Panel, select a category to alter specific NVIDIA display settings. The categories are : „ Standard „ Advanced „ Custom GV-N220 Series Graphics Accelerator - 16 - The supported modes are : „ 3D Settings „ Display „ Video & Television In the NVIDIA Control Panel, change a view if you . „ Standard Settings „ Advanced Settings The following pages provide details on configuring advanced settings. Select the view of the NVIDIA Control Panel that is most appropriate for you want.
Manual
Page 18
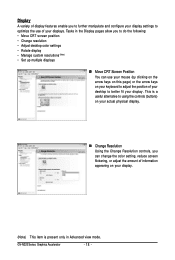
... your mouse (by clicking on the arrow keys on this page) or the arrow keys on your keyboard to adjust the position of your displays. GV-N220 Series Graphics Accelerator - 18 - This is present only in the Display pages allow you to do the following: • Move CRT screen position •...
... your mouse (by clicking on the arrow keys on this page) or the arrow keys on your keyboard to adjust the position of your displays. GV-N220 Series Graphics Accelerator - 18 - This is present only in the Display pages allow you to do the following: • Move CRT screen position •...
Manual
Page 20
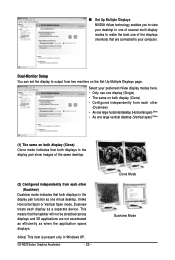
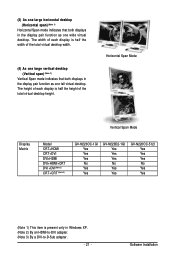
GV-N220 Series Graphics Accelerator - 20 - Clone Mode Dualview Mode „ Set Up Multiple Displays NVIDIA nView technology enables you to view your desktop in one ...
GV-N220 Series Graphics Accelerator - 20 - Clone Mode Dualview Mode „ Set Up Multiple Displays NVIDIA nView technology enables you to view your desktop in one ...
Manual
Page 21
... Matrix Model CRT+HDMI CRT+DVI DVI+HDMI DVI+HDMI+CRT DVI +DVI(Note 2) CRT+CRT (Note 3) GV-N220OC-1GI Yes Yes Yes No Yes Yes GV-N220D2-1GI Yes Yes Yes No Yes Yes GV-N220OC-512I Yes Yes Yes No Yes Yes (Note 1) This item is half the width of the total virtual desktop...
... Matrix Model CRT+HDMI CRT+DVI DVI+HDMI DVI+HDMI+CRT DVI +DVI(Note 2) CRT+CRT (Note 3) GV-N220OC-1GI Yes Yes Yes No Yes Yes GV-N220D2-1GI Yes Yes Yes No Yes Yes GV-N220OC-512I Yes Yes Yes No Yes Yes (Note 1) This item is half the width of the total virtual desktop...
Manual
Page 22
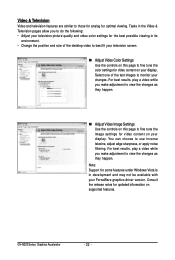
... may not be available with your changes. Video & Television Video and television features are similar to those for analog for updated information on supported features. GV-N220 Series Graphics Accelerator - 22 - For best results, play a video while you make adjustment to view the changes as they happen. „ Adjust Video Image...
... may not be available with your changes. Video & Television Video and television features are similar to those for analog for updated information on supported features. GV-N220 Series Graphics Accelerator - 22 - For best results, play a video while you make adjustment to view the changes as they happen. „ Adjust Video Image...
Manual
Page 24
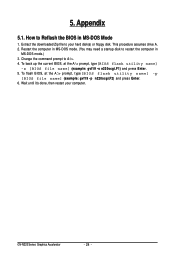
... name] (example: gvf19 -s n220ocgi.F1) and press Enter. 5. How to your computer. Restart the computer in MS-DOS mode. (You may need a startup disk to A:\>. 4. GV-N220 Series Graphics Accelerator - 24 - 5. This procedure assumes drive A. 2. To back up the current BIOS, at the A:\> prompt, type...
... name] (example: gvf19 -s n220ocgi.F1) and press Enter. 5. How to your computer. Restart the computer in MS-DOS mode. (You may need a startup disk to A:\>. 4. GV-N220 Series Graphics Accelerator - 24 - 5. This procedure assumes drive A. 2. To back up the current BIOS, at the A:\> prompt, type...

Manual
Page 26
Display Refresh Color Depth (bpp) Screen Rate 8bpp(256 color) 16bpp(65K color) 32bpp(16.7M) Resolution 1600 x 1200 (Hz) 60~100 Standard mode 3 High mode 3 True mode 3 120 3 3 X 1920 x 1080 (16:9) 60~85 3 3 3 100 3 3 X 1920 x 1200 (16:10) 60~85 3 3 3 100 3 3 X 1920 x 1440 60~85 3 3 3 2048 x 1536 60~85 3 3 3 2560 x 1600 60 3 3 3 (Dual-Link) * This table is for reference only. The actual resolutions supported depend on the monitor you use. GV-N220 Series Graphics Accelerator - 26 -
Display Refresh Color Depth (bpp) Screen Rate 8bpp(256 color) 16bpp(65K color) 32bpp(16.7M) Resolution 1600 x 1200 (Hz) 60~100 Standard mode 3 High mode 3 True mode 3 120 3 3 X 1920 x 1080 (16:9) 60~85 3 3 3 100 3 3 X 1920 x 1200 (16:10) 60~85 3 3 3 100 3 3 X 1920 x 1440 60~85 3 3 3 2048 x 1536 60~85 3 3 3 2560 x 1600 60 3 3 3 (Dual-Link) * This table is for reference only. The actual resolutions supported depend on the monitor you use. GV-N220 Series Graphics Accelerator - 26 -
Manual
Page 28
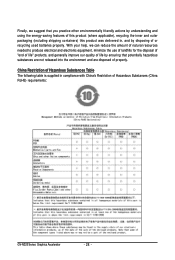
... properly. With your help, we suggest that potentially hazardous substances are not released into the environment and are disposed of Hazardous Substances (China RoHS) requirements: GV-N220 Series Graphics Accelerator - 28 -
... properly. With your help, we suggest that potentially hazardous substances are not released into the environment and are disposed of Hazardous Substances (China RoHS) requirements: GV-N220 Series Graphics Accelerator - 28 -


