Gigabyte GS-R1161-RH Support and Manuals
Get Help and Manuals for this Gigabyte item
View All Support Options Below
Free Gigabyte GS-R1161-RH manuals!
Problems with Gigabyte GS-R1161-RH?
Ask a Question
Free Gigabyte GS-R1161-RH manuals!
Problems with Gigabyte GS-R1161-RH?
Ask a Question
Popular Gigabyte GS-R1161-RH Manual Pages
Manual - Page 2
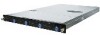
GS-R1161-RH Rack Mount Server
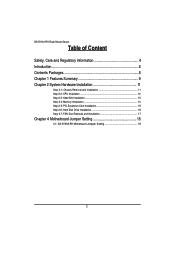
Table of Content
Safety, Care and Regulatory Information 4 Introduction 8 Contents Packages 8 Chapter 1 Features Summary 9 Chapter 2 System Hardware Installation 11
Step 2-1: Chassis Removal and Installation 11 Step 2-2: CPU Installation 12 Step 2-3: Heat Sink Installation 13 Step 2-4: Memory Installation 14 Step 2-5: PCI Expansion Card Installation 15 Step ...
Manual - Page 4

...:
* Do not connect or use a modem or telephone during a lightning storm. GS-R1161-RH Rack Mount Server
Safety, Care and Regulatory Information
/ Important safety information Read and follow all instructions marked on the product and in accordance with local and national electrical codes. The voltage selector switch is a safety feature. There may be in the...
Manual - Page 5
... to this information to your service temporarily. If possible, they will...installed and used in order to meet FCC emission limits. On this equipment is a label that may cause harmful interference to products fitted with USA modems) The modem complies with Part 68 of the FCC Rules. If your right to file a complaint with the FCC.
5 This device complies with the instruction manual...
Manual - Page 6
GS-R1161-RH Rack Mount Server
Your telephone company may make such connections themselves, but should contact the appropriate electric inspection authority, or electrician, as set out in... customer should be particularly important in some situations. Repairs to certified equipment should be installed using an acceptable method of service in rural areas. This precaution may give you ...
Manual - Page 8
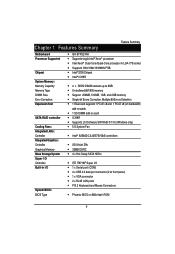
... to Gigabyte GS-R1161-RH Rack mount Server System Installation Guide. Driver CD for motherboard driver & utility
GA-5YXS2-RH Motherboard (Installed) FAN Duct x 1 Cables (RJ45)
* The items listed above are for the sever system. The procedures in this guidebook assume that your Gigabyte Server and retain for the GS-R1161-RH your vendor immediately.
; The guide provides instructions for...
Manual - Page 9
...
System Memory: Memory Capacity Memory Type DIMM Size Error Correction: Expansion Slot
SATA RAID controller
Cooling Fans: Integrated LANs: Controller Integrated Graphics: Controller Graphics Memory Mass Storage System Super I/O Controller Built-in I/O
System BIOS: BIOS Type
y GA-5YXS2-RH y Supports single Intel® Xeon® processor y Intel Xeon® Dual-Core/Quad-Core...
Manual - Page 10
GS-R1161-RH Rack Mount Server
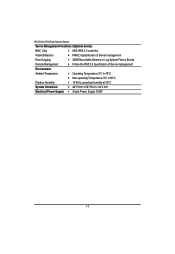
Server Management Functions: (Optional device)
BMC Chip
y H8S IPMI 2.0 controller
Failure Detection
y IPMI 2.0 specification of Server management
Event Logging
y 32KB Nonvolatile Memory to Log System Failure Events
Remote Management
y Follow the IPMI 2.0 specification of Server management
Environment
Ambient Temperature
y Operating Temperature: 5oC to 40oC...
Manual - Page 11
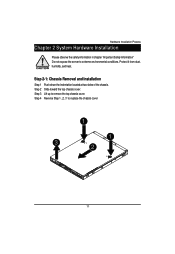
... cover.
Protect it from dust, humidity, and heat. Step 3 Lift up to replace the chassis cover
1 1
3 2
11 Step 2-1: Chassis Removal and Installation
Step 1 Push down the indentation located at two sides of the chassis. Hardware Installation Process
Chapter 2 System Hardware Installation
Please observe the safety information in chapter "Important Safety Information" Do not expose...
Manual - Page 12

Step 2 The CPU only fits in one orientation. Step 3 Push the metal lever back into locked position.
1 2
3
12 Insert the CPU with the correct orientation. Step 1 Raise the metal locking lever on the socket. GS-R1161-RH Rack Mount Server
Step 2-2: CPU Installation
Please make sure the CPU type and speed that are supported by the motherboard.
Manual - Page 14
... remove the DIMM module.
2 1 2
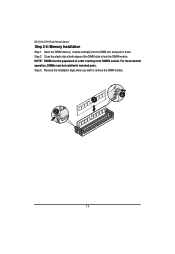
14 NOTE! Step 3. For dual-channel operation, DIMMs must be installed in order starting from DIMM6 socket. DIMM must be populated in matched pairs. GS-R1161-RH Rack Mount Server
Step 2-4: Memory Installation
Step 1. Reverse the installation steps when you wish to lock the DIMM module. Insert the DIMM memory module vertically...
Manual - Page 15
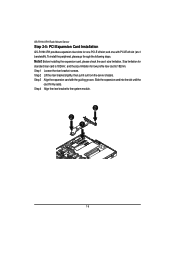
... x1 bandwidth). Slide the expansion card into the slot until the
card firmly seats. GS-R1161-RH Rack Mount Server
Step 2-5: PCI Expansion Card Installation
GS-R1161-RH provides expansion riser slots for one with the guiding groove. Step 1 Loosen the riser bracket screws. Before installing the expansion card, please check the card size limitation. Step 4 Align the riser...
Manual - Page 16
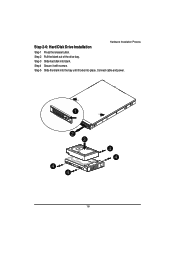
Step 3 Slide hard disk into place. Step 5 Slide the blank into the bay until it with screws. Hardware Installation Process
Step 2-6: Hard Disk Drive Installation
Step 1 Press the release button. Connect cable and power.
1
2 3 4 4
4 4
16 Step 2 Pull the blank out of the drive bay. Step 4 Secure it locks into blank.
Manual - Page 17
Guiding groove
17
Hardware Installation Process
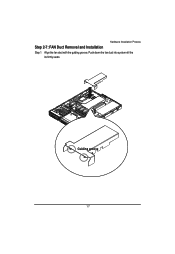
Step 2-7: FAN Duct Removal and Installation
Step 1 Align the fan duct with the guiding groove. Push down the fan duct into system ntil the its firmly seats.
Manual - Page 18

Motherboard Layout
Chapter 4 Motherboard Jumper Setting
4-1: GA-5YXS2-RH Motherboard Jumpper Setting
RECOVERY1 CLR_CMOS1
18
Manual - Page 19
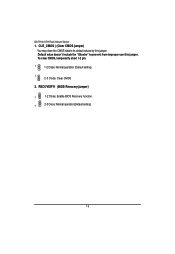
Default value doesn't include the "Shunter" to its default values by this jumper. GS-R1161-RH Rack Mount Server
1. To clear CMOS, temporarily short 1-2 pin.
1
1-2 Close: Normal operation (Default setting)
1 2-3 Close: Clear CMOS
2. CLR_CMOS ( (Clear CMOS jumper)
You may clear the CMOS data to prevent from improper use this jumper. RECOVERY1 (BIOS Revocery jumper)
1
1-2 Close...
Gigabyte GS-R1161-RH Reviews
We have not received any reviews for Gigabyte yet.