Gigabyte R270-D70 Support and Manuals
Get Help and Manuals for this Gigabyte item

View All Support Options Below
Free Gigabyte R270-D70 manuals!
Problems with Gigabyte R270-D70?
Ask a Question
Free Gigabyte R270-D70 manuals!
Problems with Gigabyte R270-D70?
Ask a Question
Popular Gigabyte R270-D70 Manual Pages
Manual - Page 1
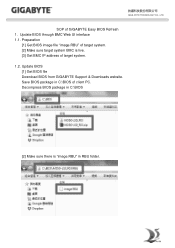
... BIOS file Download BIOS from GIGABYTE Support & Downloads website. GIGA -BYTE TECHNOLOGY CO., LTD. SOP of client PC. Update BIOS through BMC Web UI interface 1.1. Decompress BIOS package in C:\BIOS
[2] Make sure there is live. [3] Get BMC IP address of target system. 1.2. Preparation
[1] Get ...
Manual - Page 6

... table Update BIOS through free download). [5] Setup TFTP server for Windows client PC (e.g. GIGA -BYTE TECHNOLOGY CO., LTD.
2. Preparation
[1] Get BIOS image file "image.RBU" of target system. [2] Make sure target system BMC is live. [3] Get BMC IP address of target system. [4] Download TFTP service application for Linux client PC (Please users set up...
Manual - Page 8
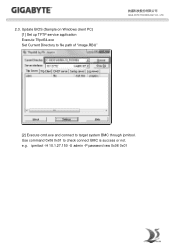
2.3. e.g. Update BIOS (Sample on Windows client PC) [1] Set up TFTP service application Execute Tftpd64.exe Set Current Directory to file path of "image.RBU"
GIGA -BYTE TECHNOLOGY CO., LTD.
[2] Execute cmd.exe and connect to check connect BMC is success or not. ipmitool -H 10.1.27.150 -U admin -P password raw 0x06 0x01 Use command 0x06 0x01 to target system BMC through ipmitool.
Manual - Page 10
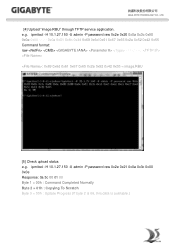
... Byte 1 = 00h : Command Completed Normally Byte 2 = 01h : Copying To Scratch Byte 3 = 00h : Update Progress (If byte 2 is 06, this data is available.) GIGA -BYTE TECHNOLOGY CO., LTD.
[4] Upload "image.RBU" through TFTP service application. ipmitool -H 10.1.27.150 -U admin -P password raw 0x2e 0x20 0x0a 0x3c 0x00 0x0e 0x00 0x00 0x0a 0x01 0x1b 0x34...
Manual - Page 12
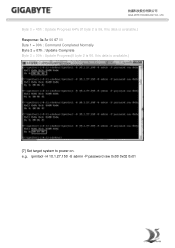
ipmitool -H 10.1.27.150 -U admin -P password raw 0x00 0x02 0x01 GIGA -BYTE TECHNOLOGY CO., LTD. Byte 3 = 40h : Update Progress 64% (If byte 2 is 06, this data is available.) Response: 0a 3c 00 07 00 Byte 1 = 00h : Command Completed Normally Byte 2 = 07h : Update Complete Byte 3 = 00h : Update Progress(If byte 2 is 06, this data is available.)
[7] Set target system to power on. e.g.
Manual - Page 2

... the following types of sales, marketing & technical materials at :
http://b2b.gigabyte.com
You are legally registered to the specifications and features in the use of this manual are a professional? All rights reserved. No part of GIGABYTE. Disclaimer Information in this manual is protected by any means without prior notice.
Copyright © 2014 GIGA-BYTE TECHNOLOGY...
Manual - Page 5

...to be up and running in detail.
1-2 Hardware Requirement
Before using Gigabyte Server Management Console, please check your system for the following required ... GB at least • Node servers : 255 maximum
1-3 Software Requirement
1-3-1 Prerequisites on remote management server Supported Browsers: • Internet Explorer 9 or later • Google Chrome 39.0.2171.65 m or later &#...
Manual - Page 9

Click Start Service, Tomcat will start running Gigabyte Server Management Console. 3. Open a browser and enter the client server IP address. 4. 1-4-2 Running Tomcat 1.
See Chapter 2 for configuration of Gigabyte Server Management Console.
- 9 - Right click the Tomcat icon from the system tool bar. 2. Gigabyte Server Management Console
Manual - Page 14

...wq to database pg_restore -h 127.0.0.1 -p 5432 -U postgres -d dbRMC -v "dbRMCv0XX.backup"
Gigabyte Server Management Console
- 14 - Modify pg_hba.conf file
vi /var/lib/pgsql/9.3/data/pg_hba.conf
2.
Create database createdb -U postgres dbRMC
5. Install PostgreSQL yum install postgresql93-server
7. Startup chkconfig postgresql-9.3 on
1-5-3 Restore dbRMCv0XX.backup 1. 6. Edit
TYPE...
Manual - Page 16

... .repo file, located: vi /etc/yum.repos.d/fedora.repo and /etc/yum.repos.d/fedora-updates.repo ([fedora] sections)
Install PGDG RPM file: curl -O http://yum.postgresql.org/9.3/redhat/rhel-6-x86_64/pgdg-centos93-9.3-1.noarch. rpm
Initialize: /usr/pgsql-9.3/postgresql93-setup initdb
Gigabyte Server Management Console
- 16 - Open a browser and enter Database IP address
localhost
2. 1-5-5 Login...
Manual - Page 19

... Group Info of power status: • ON • OFF • N/A Displays the Node power consumption support status. Displays the Node power limit status. Group Power Status
Power Consumption Power Limit Note
Displays the Node group information.
Gigabyte Server Management Console There are three type of the menu tree from left window. Note...
Manual - Page 2

...5 Install Java Tool ...5 Gigabyte Content Management Network Configuration 6 Using the Web UI...8 Gigabyte Content Management System Console Overview 9 Enter Gigabyte Content Management System Console 10 Properties ...10 Configuration ...11
Network...11 Network Security ...12 Security ...13
Users ...14 Services ...15 IPMI ...16 Time Setting ...18 Language ...19 Sessions ...20 LDAP ...21 Updates...
Manual - Page 6

...file icon to replace. 9. Close all Java downloads 5. Software Install
Prerequisites on remote management PC
Before installing Java tool, ...Supported Browsers: Internet Explorer 8~12 Google chrome Version 29.0.1547.66m Firefox 2.0
JAVA Recommended Version 8 Update 25 or later version (file size: ~ 623KB)
Install Java Tool
Please follow the instruction...
Manual - Page 7

Select BMC network Configuration 4. Save and Exit. 6. The BMC IP Address will appear on the IPv4 Address parameter.
6 Define Configuration Address source to enable the console redirection function. 1. Select Server Management. 3. Gigabyte Content Management Network Configuration
Please follow the instruction to DynamicBmcDhcp or Static. 5. Go to BIOS setup menu. 2.
Manual - Page 8

Save the configuration and exit BIOS setup menu. 7 7.
Gigabyte R270-D70 Reviews
We have not received any reviews for Gigabyte yet.