Manual
Page 2
... Cover 19 System Components 20 Removing Motherboard Metal Cover 21 Installing CPU ...22 Installing Heat Sink...23 Replacing Hard Disk Drive 24 Installing Memory...25 GB-AEDTK 2
... Cover 19 System Components 20 Removing Motherboard Metal Cover 21 Installing CPU ...22 Installing Heat Sink...23 Replacing Hard Disk Drive 24 Installing Memory...25 GB-AEDTK 2
Manual
Page 3
Installing WiFi Module 26 Troubleshooting...27 Frequently Asked Questions (FAQ 27 Power problems...27 Internet access problems...28 Display problems...29 Keyboard and mouse problems 30 Sound and microphone problems 31 Miscellaneous problems...32 Specifications...33 GB-AEDTK 3
Installing WiFi Module 26 Troubleshooting...27 Frequently Asked Questions (FAQ 27 Power problems...27 Internet access problems...28 Display problems...29 Keyboard and mouse problems 30 Sound and microphone problems 31 Miscellaneous problems...32 Specifications...33 GB-AEDTK 3

Manual
Page 4
... personal injury caused by improper use. CAUTION: Indicates important information to prevent potential damage to the risk of the above mentioned misuse or other hazards. GB-AEDTK 4 Document Type • Quick Start Guide provides information about using your computer. TIP: Indicates useful information for a particular situation. Non-printed documentation • Manual CD...
... personal injury caused by improper use. CAUTION: Indicates important information to prevent potential damage to the risk of the above mentioned misuse or other hazards. GB-AEDTK 4 Document Type • Quick Start Guide provides information about using your computer. TIP: Indicates useful information for a particular situation. Non-printed documentation • Manual CD...
Manual
Page 5
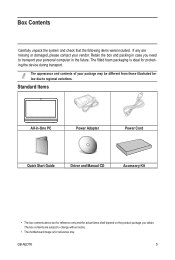
... Adapter Power Cord Quick Start Guide Driver and Manual CD Accessory Kit • The box contents above are missing or damaged, please contact your vendor. GB-AEDTK 5 The fitted foam packaging is for reference only. Retain the box and packing in case you obtain. Standard Items All-in the future. If any...
... Adapter Power Cord Quick Start Guide Driver and Manual CD Accessory Kit • The box contents above are missing or damaged, please contact your vendor. GB-AEDTK 5 The fitted foam packaging is for reference only. Retain the box and packing in case you obtain. Standard Items All-in the future. If any...
Manual
Page 6
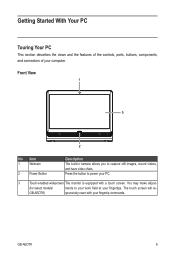
... 2 Power Button Description The built-in camera allows you to your work field at your computer. GB-AEDTK 6 Press the button to power your PC. 3 Touch-enabled widescreen The monitor is equipped with your fingertip commands. GB-AEDTK) sponsively react with a touch screen. The touch screen will re- You may make adjust- (for select...
... 2 Power Button Description The built-in camera allows you to your work field at your computer. GB-AEDTK 6 Press the button to power your PC. 3 Touch-enabled widescreen The monitor is equipped with your fingertip commands. GB-AEDTK) sponsively react with a touch screen. The touch screen will re- You may make adjust- (for select...

Manual
Page 7
GB-AEDTK 7 The internal fans blow hot air away from overheating. Rear View 1 2 No Item Description 1 Vents The design of dirt and dust, as blocking it may cause serious thermal problems. 2 Computer Stand You can adjust the computer stand for the best viewing angle. Keep the vents clean and free of the vents is to prevent the computer from heat-sensitive components in the computer.
GB-AEDTK 7 The internal fans blow hot air away from overheating. Rear View 1 2 No Item Description 1 Vents The design of dirt and dust, as blocking it may cause serious thermal problems. 2 Computer Stand You can adjust the computer stand for the best viewing angle. Keep the vents clean and free of the vents is to prevent the computer from heat-sensitive components in the computer.
Manual
Page 8
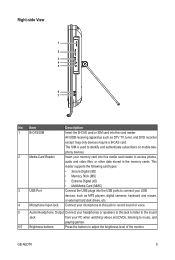
GB-AEDTK 8 phony devices. 2 Media Card Reader Insert your memory card into the USB ports to connect your USB devices, such as DTV TV, tuner, and DVD ...
GB-AEDTK 8 phony devices. 2 Media Card Reader Insert your memory card into the USB ports to connect your USB devices, such as DTV TV, tuner, and DVD ...
Manual
Page 10
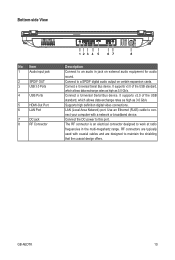
... cards. Connect to a SPDIF digital audio output on external audio equipment for audio sound. Connect the DC power to this port. GB-AEDTK 10 Use an Ethernet (RJ45) cable to connect your computer with coaxial cables and are designed to maintain the shielding that the coaxial.... It supports v2.0 of the USB standard, which allows data exchange rates as high as 5.0 Gb/s. It supports v3.0 of the USB standard, which allows data exchange rates as high as 3.0 Gb/s Supports high definition digital video connections. Connect a Universal Serial Bus device. Bottom-side View No...
... cards. Connect to a SPDIF digital audio output on external audio equipment for audio sound. Connect the DC power to this port. GB-AEDTK 10 Use an Ethernet (RJ45) cable to connect your computer with coaxial cables and are designed to maintain the shielding that the coaxial.... It supports v2.0 of the USB standard, which allows data exchange rates as high as 5.0 Gb/s. It supports v3.0 of the USB standard, which allows data exchange rates as high as 3.0 Gb/s Supports high definition digital video connections. Connect a Universal Serial Bus device. Bottom-side View No...

Manual
Page 11
... computer). Please ensure the computer stand has been pulled up to install your computer may cause overheating which could impact the performance of the screen. GB-AEDTK 11 Gently lay the screen face down on the desk for airflow as restricting the airflow may stand firm and upright. 3. It is suggested to...
... computer). Please ensure the computer stand has been pulled up to install your computer may cause overheating which could impact the performance of the screen. GB-AEDTK 11 Gently lay the screen face down on the desk for airflow as restricting the airflow may stand firm and upright. 3. It is suggested to...

Manual
Page 12
Now you are ready to access some ports on the side panel of the computer to the first detent position, so that your computer may stand firm and upright. GB-AEDTK 12 10 °~170 ° Please ensure the computer stand has been pulled up to make cable connections.
Now you are ready to access some ports on the side panel of the computer to the first detent position, so that your computer may stand firm and upright. GB-AEDTK 12 10 °~170 ° Please ensure the computer stand has been pulled up to make cable connections.
Manual
Page 13
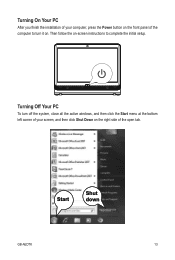
Then follow the on the right side of the open tab. Turning Off Your PC To turn it on. Start Shut down GB-AEDTK 13 Turning On Your PC After you finish the installation of your screen, and then click Shut Down on -screen instructions to turn off the system, close all the active windows, and then click the Start menu at the bottom left corner of your computer, press the Power button on the front panel of the computer to complete the initial setup.
Then follow the on the right side of the open tab. Turning Off Your PC To turn it on. Start Shut down GB-AEDTK 13 Turning On Your PC After you finish the installation of your screen, and then click Shut Down on -screen instructions to turn off the system, close all the active windows, and then click the Start menu at the bottom left corner of your computer, press the Power button on the front panel of the computer to complete the initial setup.

Manual
Page 14
Brightness control To adjust the brightness level of the monitor, press the Brightness Increase button to increase the brightness level or press the Brightness Decrease button to decrease the brightness level. GB-AEDTK 14
Brightness control To adjust the brightness level of the monitor, press the Brightness Increase button to increase the brightness level or press the Brightness Decrease button to decrease the brightness level. GB-AEDTK 14

Manual
Page 15
GB-AEDTK 15 Using Your PC This section describes more tasks your computer can browse the Web, send e-mail or exchange instant messages with friends and family. ...
GB-AEDTK 15 Using Your PC This section describes more tasks your computer can browse the Web, send e-mail or exchange instant messages with friends and family. ...
Manual
Page 16
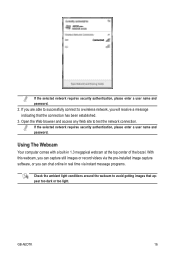
GB-AEDTK 16 If the selected network requires security authentication, please enter a user name and password. With this webcam, you can chat online in 1.3 megapixel webcam at ...
GB-AEDTK 16 If the selected network requires security authentication, please enter a user name and password. With this webcam, you can chat online in 1.3 megapixel webcam at ...

Manual
Page 17
You can also use it to burn CD-R/CD-RW or DVD±R/DVD+RW/DVD-RW/DVD-RAM discs. CD-Writable Drives Media Type CD-R CD-RW Read Yes Yes Write Yes Yes Rewritable Yes DVD-Writable Drives Media Type DVD+R DVD-R DVD+RW DVD-RW DVD-RAM Read Yes Yes Yes Yes Yes Write Yes Yes Yes Yes Yes Rewritable Yes Yes Yes GB-AEDTK 17 Using The Optical Disc Drive (Optional) Your computer comes with an optical disc drive, which formats are supported by the optical disc drive. The following tables show which supports music CDs, video CDs and DVDs.
You can also use it to burn CD-R/CD-RW or DVD±R/DVD+RW/DVD-RW/DVD-RAM discs. CD-Writable Drives Media Type CD-R CD-RW Read Yes Yes Write Yes Yes Rewritable Yes DVD-Writable Drives Media Type DVD+R DVD-R DVD+RW DVD-RW DVD-RAM Read Yes Yes Yes Yes Yes Write Yes Yes Yes Yes Yes Rewritable Yes Yes Yes GB-AEDTK 17 Using The Optical Disc Drive (Optional) Your computer comes with an optical disc drive, which formats are supported by the optical disc drive. The following tables show which supports music CDs, video CDs and DVDs.

Manual
Page 18
... is necessary to a power supply can be extremely dangerous. Do not flex or stress the circuit board. • Leave all components inside the computer case. GB-AEDTK 18
... is necessary to a power supply can be extremely dangerous. Do not flex or stress the circuit board. • Leave all components inside the computer case. GB-AEDTK 18

Manual
Page 19
Remove the back cover from the system. GB-AEDTK 19 Follow these instructions to an AC adapter. Removing PC Cover Before you remove or install the PC cover: • Make sure the computer is not turned on or connected to remove the system cover: 1. Loosen and remove the eight screws securing the back cover. 2.
Remove the back cover from the system. GB-AEDTK 19 Follow these instructions to an AC adapter. Removing PC Cover Before you remove or install the PC cover: • Make sure the computer is not turned on or connected to remove the system cover: 1. Loosen and remove the eight screws securing the back cover. 2.

Manual
Page 20
System Components 1 3 2 4 6 5 Item Description 1 Motherboard Metal Cover 2 Hard Disk Drive 3 Heat Sink 4 Battery 5 WiFi Module 6 Memory Module GB-AEDTK 20
System Components 1 3 2 4 6 5 Item Description 1 Motherboard Metal Cover 2 Hard Disk Drive 3 Heat Sink 4 Battery 5 WiFi Module 6 Memory Module GB-AEDTK 20

Manual
Page 21
Slide the metal cover away from the I/O ports then lift up. GB-AEDTK 21 Loosen and remove the screws securing the motherboard metal cover. 2. Removing Motherboard Metal Cover Follow these instructions to remove the motherboard metal cover: 1.
Slide the metal cover away from the I/O ports then lift up. GB-AEDTK 21 Loosen and remove the screws securing the motherboard metal cover. 2. Removing Motherboard Metal Cover Follow these instructions to remove the motherboard metal cover: 1.
Manual
Page 22
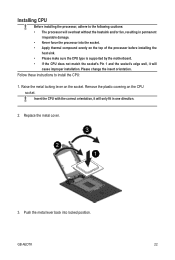
... one direction. 2. Insert the CPU with the correct orientation, it will cause improper installation. Remove the plastic covering on the socket. Replace the metal cover. 3. GB-AEDTK 22 Raise the metal locking lever on the CPU socket. Installing CPU Before installing the processor, adhere to install the CPU: 1. Please change the insert...
... one direction. 2. Insert the CPU with the correct orientation, it will cause improper installation. Remove the plastic covering on the socket. Replace the metal cover. 3. GB-AEDTK 22 Raise the metal locking lever on the CPU socket. Installing CPU Before installing the processor, adhere to install the CPU: 1. Please change the insert...
