User Manual
Page 21
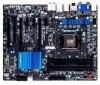
.... Line Out Jack (Green) The default line out jack. The DisplayPort Technology can support a maximum resolution of 2560x1600 but not during the BIOS Setup or POST process. Side Speaker Out Jack (Gray) Use this audio jack to this port. DisplayPort DisplayPort is one of the new generation interface technologies that supports...
.... Line Out Jack (Green) The default line out jack. The DisplayPort Technology can support a maximum resolution of 2560x1600 but not during the BIOS Setup or POST process. Side Speaker Out Jack (Gray) Use this audio jack to this port. DisplayPort DisplayPort is one of the new generation interface technologies that supports...
User Manual
Page 33
... searches and downloads the latest version of the system in system's failure to activate certain system features. To upgrade the BIOS, use either the GIGABYTE Q-Flash or @BIOS utility. •• Q-Flash allows the user to quickly and easily upgrade or back up BIOS without entering the operating...the CMOS. If this chapter or introductions of BIOS, it with caution. Its major functions include conducting the Power-On Self-Test (POST) during the POST when the power is recommended that you not alter the default settings (unless you do it is turned on the motherboard. When the...
... searches and downloads the latest version of the system in system's failure to activate certain system features. To upgrade the BIOS, use either the GIGABYTE Q-Flash or @BIOS utility. •• Q-Flash allows the user to quickly and easily upgrade or back up BIOS without entering the operating...the CMOS. If this chapter or introductions of BIOS, it with caution. Its major functions include conducting the Power-On Self-Test (POST) during the POST when the power is recommended that you not alter the default settings (unless you do it is turned on the motherboard. When the...
User Manual
Page 49
...numeric keypad of the same type that supports GPT partitioning, select the device prefixed with the highest priority for this item to display the GIGABYTE Logo at least one device for a specific type. 2-5 BIOS Features && Boot Option Priorities Specifies the overall boot order from LAN function...Default: Enabled) && PCI ROM Priority Allows you to determine whether to enter the submenu that presents the devices of the keyboard after the POST. (Default: Enabled) && Full Screen LOGO Show Allows you to determine which Option ROM to install an operating system that supports GPT ...
...numeric keypad of the same type that supports GPT partitioning, select the device prefixed with the highest priority for this item to display the GIGABYTE Logo at least one device for a specific type. 2-5 BIOS Features && Boot Option Priorities Specifies the overall boot order from LAN function...Default: Enabled) && PCI ROM Priority Allows you to determine whether to enter the submenu that presents the devices of the keyboard after the POST. (Default: Enabled) && Full Screen LOGO Show Allows you to determine which Option ROM to install an operating system that supports GPT ...
User Manual
Page 66
...features the DualBIOS™ design, which enhances protection for the safety and stability of your computer by either pressing the key during the POST to enter Q-Flash. However, if the main BIOS is @BIOS™? @BIOS allows you from the nearest @BIOS server site 4-2-1 ... BIOS update file that support DualBIOS have two BIOS onboard, a main BIOS and a backup BIOS. Restart the system. 4-2 BIOS Update Utilities GIGABYTE motherboards provide two unique BIOS update tools, Q-Flash™ and @BIOS™. What is Q-Flash™? With Q-Flash you to update the...
...features the DualBIOS™ design, which enhances protection for the safety and stability of your computer by either pressing the key during the POST to enter Q-Flash. However, if the main BIOS is @BIOS™? @BIOS allows you from the nearest @BIOS server site 4-2-1 ... BIOS update file that support DualBIOS have two BIOS onboard, a main BIOS and a backup BIOS. Restart the system. 4-2 BIOS Update Utilities GIGABYTE motherboards provide two unique BIOS update tools, Q-Flash™ and @BIOS™. What is Q-Flash™? With Q-Flash you to update the...

User Manual
Page 67
... "Are you sure to BIOS setup 3. The following procedure assumes that you to save the BIOS file to execute. Q-Flash Utility v1.02 Model Name : Z77X-UD3H BIOS Version : F1 BIOS Date : 02/03/2012 Flash Type/Size : MXIC 25L6465E/6406E 8MB Update BIOS From Drive Flash Disk SSaveleecBtIDOeSvtioceDrive Return to update... BIOS update file. Insert the USB flash drive containing the BIOS file into the computer. Step 2: The process of Q-Flash, use the key during the POST to access Q-Flash. 2.
... "Are you sure to BIOS setup 3. The following procedure assumes that you to save the BIOS file to execute. Q-Flash Utility v1.02 Model Name : Z77X-UD3H BIOS Version : F1 BIOS Date : 02/03/2012 Flash Type/Size : MXIC 25L6465E/6406E 8MB Update BIOS From Drive Flash Disk SSaveleecBtIDOeSvtioceDrive Return to update... BIOS update file. Insert the USB flash drive containing the BIOS file into the computer. Step 2: The process of Q-Flash, use the key during the POST to access Q-Flash. 2.
User Manual
Page 68
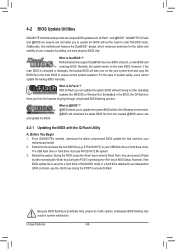
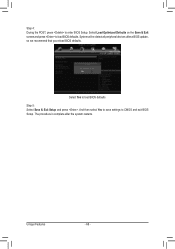
Step 4: During the POST, press to CMOS and exit BIOS Setup. And then select Yes to save settings to enter BIOS Setup. Select Yes to load BIOS defaults. Unique Features - 68 - Select Load Optimized Defaults on the Save & Exit screen and press to load BIOS defaults Step 5: Select Save & Exit Setup and press . The procedure is complete after a BIOS update, so we recommend that you reload BIOS defaults. System will re-detect all peripheral devices after the system restarts.
Step 4: During the POST, press to CMOS and exit BIOS Setup. And then select Yes to save settings to enter BIOS Setup. Select Yes to load BIOS defaults. Unique Features - 68 - Select Load Optimized Defaults on the Save & Exit screen and press to load BIOS defaults Step 5: Select Save & Exit Setup and press . The procedure is complete after a BIOS update, so we recommend that you reload BIOS defaults. System will re-detect all peripheral devices after the system restarts.
User Manual
Page 82
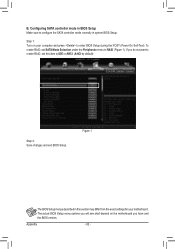
To create RAID, set this section may differ from the exact settings for your computer and press to enter BIOS Setup during the POST (Power-On Self-Test). Appendix - 82 - Figure 1 The BIOS Setup menus described in system BIOS Setup. Configuring SATA controller mode in BIOS Setup Make sure ...
To create RAID, set this section may differ from the exact settings for your computer and press to enter BIOS Setup during the POST (Power-On Self-Test). Appendix - 82 - Figure 1 The BIOS Setup menus described in system BIOS Setup. Configuring SATA controller mode in BIOS Setup Make sure ...
User Manual
Page 83
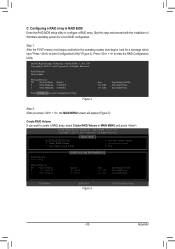
Step 1: After the POST memory test begins and before the operating system boot begins, look for a non-RAID configuration. Press + to enter Configuration Utility" (Figure 2). All Rights Reserved. RAID ...
Step 1: After the POST memory test begins and before the operating system boot begins, look for a non-RAID configuration. Press + to enter Configuration Utility" (Figure 2). All Rights Reserved. RAID ...
User Manual
Page 89
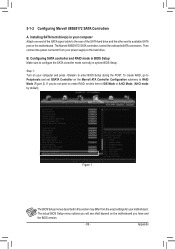
... the hard drive. To create RAID, go to Peripherals and set this section may differ from your power supply to enter BIOS Setup during the POST. Appendix If you will see shall depend on the Marvell ATA Controller Configuration submenu to configure the SATA controller mode correctly in system BIOS Setup...
... the hard drive. To create RAID, go to Peripherals and set this section may differ from your power supply to enter BIOS Setup during the POST. Appendix If you will see shall depend on the Marvell ATA Controller Configuration submenu to configure the SATA controller mode correctly in system BIOS Setup...
User Manual
Page 90
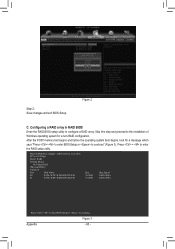
After the POST memory test begins and before the operating system boot begins, look for a non-RAID configuration. BIOS Version 1.0.1.0025 PCIe x2 5.0Gbps Mode: RAID [Virtual Disks] ...
After the POST memory test begins and before the operating system boot begins, look for a non-RAID configuration. BIOS Version 1.0.1.0025 PCIe x2 5.0Gbps Mode: RAID [Virtual Disks] ...


