
User Guide
Page 3
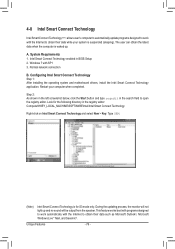
...; Mail, and Seesmic®. System Requirements 1. Step 2: As shown in the left screenshot below, click the Start button and type regedit in BIOS Setup 2. During the updating process, the monitor will not light up . Windows 7 with SP1 3. Restart your system is suspended (sleeping). Look for S3 mode only. ...no sound will be output from the speaker. Intel Smart Connect Technology Intel Smart Connect Technology (Note) allows user's computer to automatically update programs designed to work automatically with the Internet to obtain their data while your computer when completed.
...; Mail, and Seesmic®. System Requirements 1. Step 2: As shown in the left screenshot below, click the Start button and type regedit in BIOS Setup 2. During the updating process, the monitor will not light up . Windows 7 with SP1 3. Restart your system is suspended (sleeping). Look for S3 mode only. ...no sound will be output from the speaker. Intel Smart Connect Technology Intel Smart Connect Technology (Note) allows user's computer to automatically update programs designed to work automatically with the Internet to obtain their data while your computer when completed.
Manual
Page 3
... The trademarks mentioned in this manual is protected by copyright laws and is 1.0. Disclaimer Information in any form or by GIGABYTE without GIGABYTE's prior written permission. No part of this manual may be reproduced, copied, translated, transmitted, orpublished in this manual may...132;„ For quick set-up of GIGABYTE. For product-related information, check on our website at: http://www.gigabyte.com Identifying Your Motherboard Revision The revision number on your motherboard revision before updating motherboard BIOS, drivers, or when looking for technical information...
... The trademarks mentioned in this manual is protected by copyright laws and is 1.0. Disclaimer Information in any form or by GIGABYTE without GIGABYTE's prior written permission. No part of this manual may be reproduced, copied, translated, transmitted, orpublished in this manual may...132;„ For quick set-up of GIGABYTE. For product-related information, check on our website at: http://www.gigabyte.com Identifying Your Motherboard Revision The revision number on your motherboard revision before updating motherboard BIOS, drivers, or when looking for technical information...
Manual
Page 5
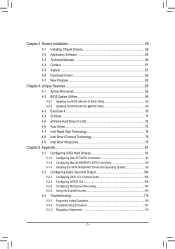
... 3-3 Technical Manuals 60 3-4 Contact...61 3-5 System...61 3-6 Download Center 62 3-7 New Program 62 Chapter 4 Unique Features 63 4-1 Xpress Recovery2 63 4-2 BIOS Update Utilities 66 4-2-1 Updating the BIOS with the Q-Flash Utility 66 4-2-2 Updating the BIOS with the @BIOS Utility 69 4-3 EasyTune 6...70 4-4 Q-Share...71 4-5 eXtreme Hard Drive (X.H.D 72 4-6 Auto Green...73 4-7 Intel Rapid Start Technology 74 4-8 Intel...
... 3-3 Technical Manuals 60 3-4 Contact...61 3-5 System...61 3-6 Download Center 62 3-7 New Program 62 Chapter 4 Unique Features 63 4-1 Xpress Recovery2 63 4-2 BIOS Update Utilities 66 4-2-1 Updating the BIOS with the Q-Flash Utility 66 4-2-2 Updating the BIOS with the @BIOS Utility 69 4-3 EasyTune 6...70 4-4 Q-Share...71 4-5 eXtreme Hard Drive (X.H.D 72 4-6 Auto Green...73 4-7 Intel Rapid Start Technology 74 4-8 Intel...
Manual
Page 33
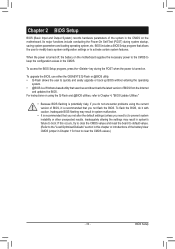
... or other unexpected results. To upgrade the BIOS, use either the GIGABYTE Q-Flash or @BIOS utility. •• Q-Flash allows the user to quickly and easily upgrade or back up BIOS without entering the operating system. •• @BIOS is recommended that you not alter the default... hardware parameters of the system in system's failure to boot. To flash the BIOS, do not encounter problems using the Q-Flash and @BIOS utilities, refer to Chapter 4, "BIOS Update Utilities." •• Because BIOS flashing is potentially risky, if you do it is a Windows-based utility that...
... or other unexpected results. To upgrade the BIOS, use either the GIGABYTE Q-Flash or @BIOS utility. •• Q-Flash allows the user to quickly and easily upgrade or back up BIOS without entering the operating system. •• @BIOS is recommended that you not alter the default... hardware parameters of the system in system's failure to boot. To flash the BIOS, do not encounter problems using the Q-Flash and @BIOS utilities, refer to Chapter 4, "BIOS Update Utilities." •• Because BIOS flashing is potentially risky, if you do it is a Windows-based utility that...
Manual
Page 52
...The USB 3.0 ports are eventually routed to OS boot. Note:For Windows 7 USB 3.0 Streams support, devices may require UASP class driver updates from UASP driver vendors to EHCI. This mode is turned off. The USB 3.0 device attached on this port with Super-Speed capability will...Streams Support. (Default: Enabled) && USB Controller (Intel Z77 Chipset USB2.0 Controller) Enables or disables the integrated USB 2.0 controller. (Default: Enabled) BIOS Setup - 52 - && SATA Mode Selection (Intel Z77 Chipset) Enables or disables RAID for the SATA controllers integrated in the Intel Z77 Chipset or...
...The USB 3.0 ports are eventually routed to OS boot. Note:For Windows 7 USB 3.0 Streams support, devices may require UASP class driver updates from UASP driver vendors to EHCI. This mode is turned off. The USB 3.0 device attached on this port with Super-Speed capability will...Streams Support. (Default: Enabled) && USB Controller (Intel Z77 Chipset USB2.0 Controller) Enables or disables the integrated USB 2.0 controller. (Default: Enabled) BIOS Setup - 52 - && SATA Mode Selection (Intel Z77 Chipset) Enables or disables RAID for the SATA controllers integrated in the Intel Z77 Chipset or...
Manual
Page 58
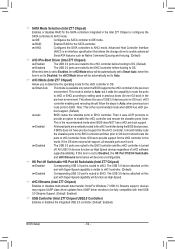
... after updating the BIOS or after clearing the CMOS values. && Boot Override Allows you to select a device to the CMOS. This exits the BIOS Setup without the hassles of reconfiguring the BIOS settings. Press on this item and select Yes. This saves the changes to confirm. BIOS Setup ... this item and select Yes. Select No or press to return to 4 profiles and save the current BIOS settings to operate in BIOS Setup to boot immediately. The BIOS defaults settings help the system to a profile. Your system will restart automatically and boot from a profile created...
... after updating the BIOS or after clearing the CMOS values. && Boot Override Allows you to select a device to the CMOS. This exits the BIOS Setup without the hassles of reconfiguring the BIOS settings. Press on this item and select Yes. This saves the changes to confirm. BIOS Setup ... this item and select Yes. Select No or press to return to 4 profiles and save the current BIOS settings to operate in BIOS Setup to boot immediately. The BIOS defaults settings help the system to a profile. Your system will restart automatically and boot from a profile created...
Manual
Page 62
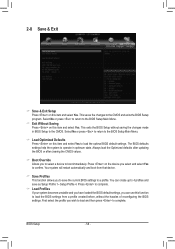
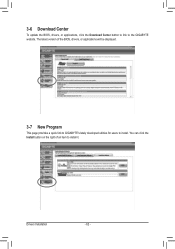
Drivers Installation - 62 - The latest version of an item to install it. 3-6 Download Center To update the BIOS, drivers, or applications, click the Download Center button to link to install. You can click the Install button on the right of the BIOS, drivers, or applications will be displayed. 3-7 New Program This page provides a quick link to GIGABYTE's lately developed utilities for users to the GIGABYTE website.
Drivers Installation - 62 - The latest version of an item to install it. 3-6 Download Center To update the BIOS, drivers, or applications, click the Download Center button to link to install. You can click the Install button on the right of the BIOS, drivers, or applications will be displayed. 3-7 New Program This page provides a quick link to GIGABYTE's lately developed utilities for users to the GIGABYTE website.
Manual
Page 66
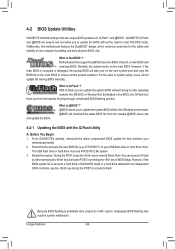
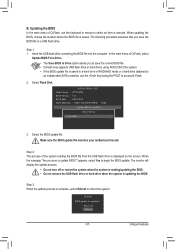
.... What is Q-Flash™? Z77XD3H.F1) to enter Q-Flash. Inadequate BIOS flashing may result in BIOS Setup. and update the BIOS. During the POST, press the key to your motherboard model. 2. 4-2 BIOS Update Utilities GIGABYTE motherboards provide two unique BIOS update tools, Q-Flash™ and @BIOS™. GIGABYTE Q-Flash and @BIOS are easy-to enter operating systems like MS-DOS or Window...
.... What is Q-Flash™? Z77XD3H.F1) to enter Q-Flash. Inadequate BIOS flashing may result in BIOS Setup. and update the BIOS. During the POST, press the key to your motherboard model. 2. 4-2 BIOS Update Utilities GIGABYTE motherboards provide two unique BIOS update tools, Q-Flash™ and @BIOS™. GIGABYTE Q-Flash and @BIOS are easy-to enter operating systems like MS-DOS or Window...
Manual
Page 67
... file system. •• If the BIOS update file is complete, select Reboot to begin the BIOS update. Q-Flash BIOS update is saved. Select Flash Disk. Q-Flash Utility v1.02 Model Name : Z77X-D3H BIOS Version : F1e BIOS Date : 02/07/2012 Flash Type/Size : MXIC 25L6465E/6406E 8MB Update BIOS From Drive SaSveeleBcItODSetvoicDe rive Return to update BIOS?" Step 2: The process of Q-Flash...
... file system. •• If the BIOS update file is complete, select Reboot to begin the BIOS update. Q-Flash BIOS update is saved. Select Flash Disk. Q-Flash Utility v1.02 Model Name : Z77X-D3H BIOS Version : F1e BIOS Date : 02/07/2012 Flash Type/Size : MXIC 25L6465E/6406E 8MB Update BIOS From Drive SaSveeleBcItODSetvoicDe rive Return to update BIOS?" Step 2: The process of Q-Flash...
Manual
Page 68
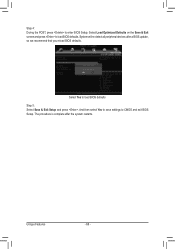
Unique Features - 68 - Select Load Optimized Defaults on the Save & Exit screen and press to CMOS and exit BIOS Setup. And then select Yes to save settings to load BIOS defaults. The procedure is complete after a BIOS update, so we recommend that you reload BIOS defaults. Step 4: During the POST, press to load BIOS defaults Step 5: Select Save & Exit Setup and press . Select Yes to enter BIOS Setup. System will re-detect all peripheral devices after the system restarts.
Unique Features - 68 - Select Load Optimized Defaults on the Save & Exit screen and press to CMOS and exit BIOS Setup. And then select Yes to save settings to load BIOS defaults. The procedure is complete after a BIOS update, so we recommend that you reload BIOS defaults. Step 4: During the POST, press to load BIOS defaults Step 5: Select Save & Exit Setup and press . Select Yes to enter BIOS Setup. System will re-detect all peripheral devices after the system restarts.
Manual
Page 69
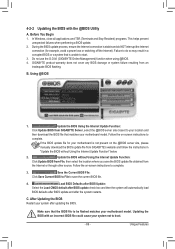
.... This helps prevent unexpected failures when performing a BIOS update. 2. During the BIOS update process, ensure the Internet connection is unable to start. 3. Before You Begin 1. Do not use the G.O.M. (GIGABYTE Online Management) function when using @BIOS. 4. Update the BIOS Using the Internet Update Function: Click Update BIOS from an inadequate BIOS flashing. Updating the BIOS with the @BIOS Utility A. GIGABYTE product warranty does not cover any...
.... This helps prevent unexpected failures when performing a BIOS update. 2. During the BIOS update process, ensure the Internet connection is unable to start. 3. Before You Begin 1. Do not use the G.O.M. (GIGABYTE Online Management) function when using @BIOS. 4. Update the BIOS Using the Internet Update Function: Click Update BIOS from an inadequate BIOS flashing. Updating the BIOS with the @BIOS Utility A. GIGABYTE product warranty does not cover any...
Manual
Page 76
...computer is waked up and no sound will not light up . Windows 7 with SP1 3. Restart your system is for the following directory in BIOS Setup 2. Unique Features - 76 - Configuring Intel Smart Connect Technology Step 1: After installing the operating system and motherboard drivers, install the Intel ...work with the Internet to obtain their data such as Microsoft Outlook®, Microsoft Windows Live™ Mail, and Seesmic®. During the updating process, the monitor will be output from the speaker. Step 2: As shown in the left screenshot below, click the Start button and...
...computer is waked up and no sound will not light up . Windows 7 with SP1 3. Restart your system is for the following directory in BIOS Setup 2. Unique Features - 76 - Configuring Intel Smart Connect Technology Step 1: After installing the operating system and motherboard drivers, install the Intel ...work with the Internet to obtain their data such as Microsoft Outlook®, Microsoft Windows Live™ Mail, and Seesmic®. During the updating process, the monitor will be output from the speaker. Step 2: As shown in the left screenshot below, click the Start button and...


