Manual
Page 3
...of the product, read the User's Manual. Disclaimer Information in the use GIGABYTE's unique features, read or download the information on/from the Support&Downloads\Motherboard\Technology Guide page on our website. For detailed product information, carefully read the ...may be reproduced, copied, translated, transmitted, or published in this product, GIGABYTE provides the following types of documentations: For quick set-up of GIGABYTE. Copyright © 2009 GIGA-BYTE TECHNOLOGY CO., LTD. Changes to their respective owners. For product-related information, check...
...of the product, read the User's Manual. Disclaimer Information in the use GIGABYTE's unique features, read or download the information on/from the Support&Downloads\Motherboard\Technology Guide page on our website. For detailed product information, carefully read the ...may be reproduced, copied, translated, transmitted, or published in this product, GIGABYTE provides the following types of documentations: For quick set-up of GIGABYTE. Copyright © 2009 GIGA-BYTE TECHNOLOGY CO., LTD. Changes to their respective owners. For product-related information, check...
Manual
Page 10
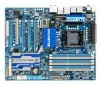
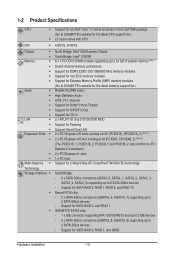
...; Support for non-ECC memory modules Support for Extreme Memory Profile (XMP) memory modules Audio (Go to GIGABYTE's website for the latest memory support list.) Realtek ALC889 codec High Definition Audio 2/4/5.1/7.1-channel...x1 slots 1 x PCI slot Multi-Graphics Support for 2-Way/3-Way ATI CrossFireX™/NVIDIA SLI technology Technology Storage Interface South Bridge: - 6 x SATA 3Gb/s connectors (SATA2_0, SATA2_1, SATA2_2, SATA2_3, SATA2_4, SATA2_5) supporting up to 2 ...
...; Support for non-ECC memory modules Support for Extreme Memory Profile (XMP) memory modules Audio (Go to GIGABYTE's website for the latest memory support list.) Realtek ALC889 codec High Definition Audio 2/4/5.1/7.1-channel...x1 slots 1 x PCI slot Multi-Graphics Support for 2-Way/3-Way ATI CrossFireX™/NVIDIA SLI technology Technology Storage Interface South Bridge: - 6 x SATA 3Gb/s connectors (SATA2_0, SATA2_1, SATA2_2, SATA2_3, SATA2_4, SATA2_5) supporting up to 2 ...
Manual
Page 16
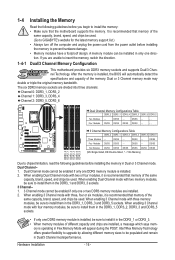
...unable to insert the memory, switch the direction. 1-4-1 Dual/3 Channel Memory Configuration This motherboard provides six DDR3 memory sockets and supports Dual/3 Channel Technology. DS/SS - - When enabling Dual Channel mode with two or four modules, it is recommended that memory of different capacity and chips are...in the DDR3_1 or DDR3_3. • When memory modules of the same capacity, brand, speed, and chips be used . (Go to GIGABYTE's website for the latest memory support list.) • Always turn off the computer and unplug the power cord from the power outlet before ...
...unable to insert the memory, switch the direction. 1-4-1 Dual/3 Channel Memory Configuration This motherboard provides six DDR3 memory sockets and supports Dual/3 Channel Technology. DS/SS - - When enabling Dual Channel mode with two or four modules, it is recommended that memory of different capacity and chips are...in the DDR3_1 or DDR3_3. • When memory modules of the same capacity, brand, speed, and chips be used . (Go to GIGABYTE's website for the latest memory support list.) • Always turn off the computer and unplug the power cord from the power outlet before ...
Manual
Page 19
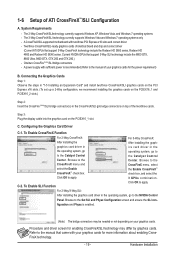
...After installing the graphics card driver in the operating system, go to the manual of the two/three cards. The 3-Way CrossFireX/SLI technology currectly supports Windows Vista and Windows 7 operating systems only - Connecting the Graphics Cards Step 1: Observe the steps in "1-5 Installing an...CrossFireX™/SLI Configuration A. C-2. 1-6 Setup of identical brand and chip and correct driver (Current ATI GPUs that support 3-Way CrossFireX technology include the Radeon HD 3800 series, Radeon HD 4800 and Radeon HD 58XX series. Step 3: Plug the display cable into the ...
...After installing the graphics card driver in the operating system, go to the manual of the two/three cards. The 3-Way CrossFireX/SLI technology currectly supports Windows Vista and Windows 7 operating systems only - Connecting the Graphics Cards Step 1: Observe the steps in "1-5 Installing an...CrossFireX™/SLI Configuration A. C-2. 1-6 Setup of identical brand and chip and correct driver (Current ATI GPUs that support 3-Way CrossFireX technology include the Radeon HD 3800 series, Radeon HD 4800 and Radeon HD 58XX series. Step 3: Plug the display cable into the ...
Manual
Page 42
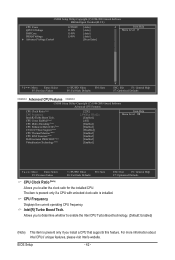
...CPU Enhanced Halt (C1E) (Note) C3/C6/C7 State Support (Note) CPU Thermal Monitor (Note) CPU EIST Function (Note) Bi-Directional PROCHOT (Note) Virtualization Technology (Note) [22X] 2.93GHz(133x22) [Enabled] [All] [Enabled] [Enabled] [Disabled] [Enabled] [Enabled] [Enabled] [Enabled] Item Help Menu Level &#... you to determine whether to alter the clock ratio for the installed CPU. Allows you to enable the Intel CPU Turbo Boost technology. (Default: Enabled) (Note) This item is installed. CPU Frequency Displays the current operating CPU frequency. Intel(R) Turbo Boost ...
...CPU Enhanced Halt (C1E) (Note) C3/C6/C7 State Support (Note) CPU Thermal Monitor (Note) CPU EIST Function (Note) Bi-Directional PROCHOT (Note) Virtualization Technology (Note) [22X] 2.93GHz(133x22) [Enabled] [All] [Enabled] [Enabled] [Disabled] [Enabled] [Enabled] [Enabled] [Enabled] Item Help Menu Level &#... you to determine whether to alter the clock ratio for the installed CPU. Allows you to enable the Intel CPU Turbo Boost technology. (Default: Enabled) (Note) This item is installed. CPU Frequency Displays the current operating CPU frequency. Intel(R) Turbo Boost ...

Manual
Page 43
...run multiple operating systems and applications in independent partitions. CPU Multi-Threading (Note) Allows you to determine whether to enable multi-threading technology when using an Intel CPU that support multi-processor mode. (Default: Enabled) CPU Enhanced Halt (C1E) (Note) Enables or ...three CPU cores. The C3/C6/C7 state is overheated. (Default: Enabled) CPU EIST Function (Note) Enables or disables Enhanced Intel SpeedStep Technology (EIST). For more enhanced power-saving state than C1. (Default: Disabled) CPU Thermal Monitor (Note) Enables or disables Intel CPU Thermal ...
...run multiple operating systems and applications in independent partitions. CPU Multi-Threading (Note) Allows you to determine whether to enable multi-threading technology when using an Intel CPU that support multi-processor mode. (Default: Enabled) CPU Enhanced Halt (C1E) (Note) Enables or ...three CPU cores. The C3/C6/C7 state is overheated. (Default: Enabled) CPU EIST Function (Note) Enables or disables Enhanced Intel SpeedStep Technology (EIST). For more enhanced power-saving state than C1. (Default: Disabled) CPU Thermal Monitor (Note) Enables or disables Intel CPU Thermal ...
Manual
Page 53
... Check HDD S.M.A.R.T. Press to deliver greater efficiency for entering the BIOS Setup program. HDD S.M.A.R.T. BIOS Setup Capability Enables or disables the S.M.A.R.T. (Self Monitoring and Reporting Technology) capability of your system to report read/write errors of the hard drive and to HDD Init Display First [Press Enter] [Disabled] [Floppy] [Hard Disk...
... Check HDD S.M.A.R.T. Press to deliver greater efficiency for entering the BIOS Setup program. HDD S.M.A.R.T. BIOS Setup Capability Enables or disables the S.M.A.R.T. (Self Monitoring and Reporting Technology) capability of your system to report read/write errors of the hard drive and to HDD Init Display First [Press Enter] [Disabled] [Floppy] [Hard Disk...

Manual
Page 79
... Energy SaverTM 2 is able to run in a set period of the button. Meter Mode In Meter Mode, GIGABYTE Dynamic Energy SaverTM 2 shows how much power they have saved in taskbar) 14 INFO/Help 15 Motherboard Phase LED On/Off ...devices currently in power-saving mode will light on testing method. - 79 - Unique Features The Dynamic Energy SaverTM 2 Interface A. 4-4 Dynamic Energy SaverTM 2 GIGABYTE Dynamic Energy SaverTM 2 (Note 1) is a revolutionary technology that delivers unparalleled power savings with a click of time. 12 13 14 3 2 4 76 5 1 8 9 15 11 16 10 Meter Mode ...
... Energy SaverTM 2 is able to run in a set period of the button. Meter Mode In Meter Mode, GIGABYTE Dynamic Energy SaverTM 2 shows how much power they have saved in taskbar) 14 INFO/Help 15 Motherboard Phase LED On/Off ...devices currently in power-saving mode will light on testing method. - 79 - Unique Features The Dynamic Energy SaverTM 2 Interface A. 4-4 Dynamic Energy SaverTM 2 GIGABYTE Dynamic Energy SaverTM 2 (Note 1) is a revolutionary technology that delivers unparalleled power savings with a click of time. 12 13 14 3 2 4 76 5 1 8 9 15 11 16 10 Meter Mode ...

Manual
Page 94
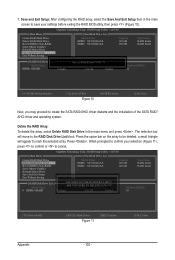
...(C) 2003-09 Intel Corporation. RAID1: Mirrors data (redundancy). RAID10: Mirrors data and stripes the mirror. Recovery Volume Options Intel Rapid Recover Technology provides data protection by allowing users to Non-RAID 4. A recovery volume and a RAID array cannot co-exist in the system at the...Menu Figure 8 Step 2: After entering the volume name, select Recovery under the RAID Level item and press (Figure 9). With the Rapid Recovery Technology, which employs RAID 1 functionality, users can be riewed in MAIN MENU and press (Figure 8). Intel(R) Matrix Storage Manager option ROM v8.9.0....
...(C) 2003-09 Intel Corporation. RAID1: Mirrors data (redundancy). RAID10: Mirrors data and stripes the mirror. Recovery Volume Options Intel Rapid Recover Technology provides data protection by allowing users to Non-RAID 4. A recovery volume and a RAID array cannot co-exist in the system at the...Menu Figure 8 Step 2: After entering the volume name, select Recovery under the RAID Level item and press (Figure 9). With the Rapid Recovery Technology, which employs RAID 1 functionality, users can be riewed in MAIN MENU and press (Figure 8). Intel(R) Matrix Storage Manager option ROM v8.9.0....

Manual
Page 98
.... PCI Express to SATAII HOST Controller ROM v1.07.06 Copyright (C) 2005-2009 Gigabyte Technology Corp. (http://www.gigabyte.com) HDD0 : HDD1 : ST3120026AS ST3120026AS 120 GB 120 GB Non-RAID Non-RAID Press to enter the RAID setup utility. Figure 2 In ...selected hard drive. Appendix - 98 - After the POST memory test begins and before the operating system boot begins, look for a non-RAID configuration. Gigabyte Technology Corp. Highlight the item that you can select a hard drive in the Main Menu block. Skip this step and proceed to the installation of the...
.... PCI Express to SATAII HOST Controller ROM v1.07.06 Copyright (C) 2005-2009 Gigabyte Technology Corp. (http://www.gigabyte.com) HDD0 : HDD1 : ST3120026AS ST3120026AS 120 GB 120 GB Non-RAID Non-RAID Press to enter the RAID setup utility. Figure 2 In ...selected hard drive. Appendix - 98 - After the POST memory test begins and before the operating system boot begins, look for a non-RAID configuration. Gigabyte Technology Corp. Highlight the item that you can select a hard drive in the Main Menu block. Skip this step and proceed to the installation of the...

Manual
Page 99
... temporarily disk required [hi]-Switch RAID Level [ENTER]-Next Figure 5 [ESC]-Abort - 99 - Then the Create New RAID screen appears (Figure 4). Gigabyte Technology Corp. Select RAID Mode: Under the Level item, use up or down arrow key to move onto the next step. [ Create New RAID ] Name...: Level: Disks: Block: Size: GRAID 0-Stripe Select Disk 128 KB 240 GB Gigabyte Technology Corp. Then press to select RAID 0 (Stripe), RAID 1 (Mirror) or JBOD (Figure 5). Appendix Create a RAID Array: In the main screen, press...
... temporarily disk required [hi]-Switch RAID Level [ENTER]-Next Figure 5 [ESC]-Abort - 99 - Then the Create New RAID screen appears (Figure 4). Gigabyte Technology Corp. Select RAID Mode: Under the Level item, use up or down arrow key to move onto the next step. [ Create New RAID ] Name...: Level: Disks: Block: Size: GRAID 0-Stripe Select Disk 128 KB 240 GB Gigabyte Technology Corp. Then press to select RAID 0 (Stripe), RAID 1 (Mirror) or JBOD (Figure 5). Appendix Create a RAID Array: In the main screen, press...

Manual
Page 100
... List ] Create RAID on[ tHheelspel]ect HDD (Y/N) ? Press . [ Create New RAID ] Name: Level: Disks: Block: Size: GRAID 0-Stripe Select Disk 128 KB 240 GB Gigabyte Technology Corp. Gigabyte Technology Corp. 3. Assign Array Disks: After a RAID mode is selected, RAID BIOS automatically assigns the two hard drives installed as the RAID drives. 4. Confirm Creation: After...
... List ] Create RAID on[ tHheelspel]ect HDD (Y/N) ? Press . [ Create New RAID ] Name: Level: Disks: Block: Size: GRAID 0-Stripe Select Disk 128 KB 240 GB Gigabyte Technology Corp. Gigabyte Technology Corp. 3. Assign Array Disks: After a RAID mode is selected, RAID BIOS automatically assigns the two hard drives installed as the RAID drives. 4. Confirm Creation: After...

Manual
Page 101
...displayed in the center of the screen (Figure 9). When finished, the new RAID array will appear in the RAID Disk Drive List block (Figure 8). Gigabyte Technology Corp. Select the array and press . RAID Setup Utility v1.07.06 [ Main Menu ] [ Hard Disk Drive List ] Create RAID Disk ...Inside Members(HDDx) 01 Members: HDD 01 Status: Normal [fgTAB]-Switch Window [hi]-Select RAID Figure 9 [ENTER]-Detail [ESC]-Exit - 101 - Gigabyte Technology Corp. RAID Setup Utility v1.07.06 [ Main Menu ] Create RAID Disk Drive Delete RAID Disk Drive Revert HDD to the RAID Disk Drive ...
...displayed in the center of the screen (Figure 9). When finished, the new RAID array will appear in the RAID Disk Drive List block (Figure 8). Gigabyte Technology Corp. Select the array and press . RAID Setup Utility v1.07.06 [ Main Menu ] [ Hard Disk Drive List ] Create RAID Disk ...Inside Members(HDDx) 01 Members: HDD 01 Status: Normal [fgTAB]-Switch Window [hi]-Select RAID Figure 9 [ENTER]-Detail [ESC]-Exit - 101 - Gigabyte Technology Corp. RAID Setup Utility v1.07.06 [ Main Menu ] Create RAID Disk Drive Delete RAID Disk Drive Revert HDD to the RAID Disk Drive ...
Manual
Page 102
...[ENTER]-Action [ESC]-Exit Now, you may proceed to Non-RAID Solve Mirror Conflict Rebuild Mirror Drive Save And Exit Setup Exit Without Saving Gigabyte Technology Corp. N RAID Level Capacity Status 0-Stripe 240 GB Normal Members(HDDx) 01 [hi]-Select RAID Appendix [SPACE]-Mark Delete Figure 11 ...Disk Drive Delete RAID Disk Drive Revert HDD to Non-RAID Solve Mirror Conflict Rebuild Mirror Drive Save And Exit Setup Exit Without Saving Gigabyte Technology Corp. RAID Setup Utility v1.07.06 [ Hard Disk Drive List ] Model Name HDD0: ST3120026AS HDD1: ST3120026AS Capacity 120 GB ...
...[ENTER]-Action [ESC]-Exit Now, you may proceed to Non-RAID Solve Mirror Conflict Rebuild Mirror Drive Save And Exit Setup Exit Without Saving Gigabyte Technology Corp. N RAID Level Capacity Status 0-Stripe 240 GB Normal Members(HDDx) 01 [hi]-Select RAID Appendix [SPACE]-Mark Delete Figure 11 ...Disk Drive Delete RAID Disk Drive Revert HDD to Non-RAID Solve Mirror Conflict Rebuild Mirror Drive Save And Exit Setup Exit Without Saving Gigabyte Technology Corp. RAID Setup Utility v1.07.06 [ Hard Disk Drive List ] Model Name HDD0: ST3120026AS HDD1: ST3120026AS Capacity 120 GB ...

Manual
Page 104
... : 1B4B 91A3 B1 1.0.0.1006 2.1.0.1314 2.56Gbps IDE Mode Help Use space bar to select the free disks to proceed (Figure 3). Marvell BIOS Setup (c) 2009 Marvell Technology Group Ltd. C. ENTER: Operation F10: Exit/Save ESC: Return Figure 2 Under Free Physical Disks, use the key to select the hard drives to HBA 0: Marvell...: Return Figure 3 Appendix - 104 - Configuring a RAID array Create a RAID Array: Move the selection bar to be marked with an asterisk (*). Marvell BIOS Setup (c) 2009 Marvell Technology Group Ltd.
... : 1B4B 91A3 B1 1.0.0.1006 2.1.0.1314 2.56Gbps IDE Mode Help Use space bar to select the free disks to proceed (Figure 3). Marvell BIOS Setup (c) 2009 Marvell Technology Group Ltd. C. ENTER: Operation F10: Exit/Save ESC: Return Figure 2 Under Free Physical Disks, use the key to select the hard drives to HBA 0: Marvell...: Return Figure 3 Appendix - 104 - Configuring a RAID array Create a RAID Array: Move the selection bar to be marked with an asterisk (*). Marvell BIOS Setup (c) 2009 Marvell Technology Group Ltd.

Manual
Page 105
... 2. Marvell BIOS Setup (c) 2009 Marvell Technology Group Ltd. Configure -> Select free disksCreate Virtual Disk HBA 0 : Marvell 0 Virtual Disks Free Physical Disks * PD 0: WDC WD800JD-22L * PD 8: WDC WD800JD-22L RAID Level : Max Size (MB) : Stripe Size : Gigabyte Rounding : Quick Init : VD Name... step. ENTER: Operation F10: Exit/Save ESC: Return Figure 5 - 105 - Appendix RAID Level: Select a RAID level. Gigabyte Rounding: Select whether to permit the installation of the screen and press (Figure 4). Configure -> Select free disksCreate Virtual Disk HBA...
... 2. Marvell BIOS Setup (c) 2009 Marvell Technology Group Ltd. Configure -> Select free disksCreate Virtual Disk HBA 0 : Marvell 0 Virtual Disks Free Physical Disks * PD 0: WDC WD800JD-22L * PD 8: WDC WD800JD-22L RAID Level : Max Size (MB) : Stripe Size : Gigabyte Rounding : Quick Init : VD Name... step. ENTER: Operation F10: Exit/Save ESC: Return Figure 5 - 105 - Appendix RAID Level: Select a RAID level. Gigabyte Rounding: Select whether to permit the installation of the screen and press (Figure 4). Configure -> Select free disksCreate Virtual Disk HBA...

Manual
Page 106
... as : Do you exit the configuration screen, be sure to cancel (Figure 7). Save the Settings and Exit. Marvell BIOS Setup (c) 2009 Marvell Technology Group Ltd. Marvell BIOS Setup (c) 2009 Marvell Technology Group Ltd. ENTER: Operation F10: Exit/Save ESC: Return Figure 7 Appendix - 106 - When completed, you can see the new array under...
... as : Do you exit the configuration screen, be sure to cancel (Figure 7). Save the Settings and Exit. Marvell BIOS Setup (c) 2009 Marvell Technology Group Ltd. Marvell BIOS Setup (c) 2009 Marvell Technology Group Ltd. ENTER: Operation F10: Exit/Save ESC: Return Figure 7 Appendix - 106 - When completed, you can see the new array under...

Manual
Page 107
Marvell BIOS Setup (c) 2009 Marvell Technology Group Ltd. Press . To install the utility, insert the motherboard driver disk, then go to Application Software\Install GIGABYTE Utilities and select Marvell Raid Utility to cancel (Figure 8). Appendix Delete the RAID Array: To deleted the existing array, select the array on chip controller. ...
Marvell BIOS Setup (c) 2009 Marvell Technology Group Ltd. Press . To install the utility, insert the motherboard driver disk, then go to Application Software\Install GIGABYTE Utilities and select Marvell Raid Utility to cancel (Figure 8). Appendix Delete the RAID Array: To deleted the existing array, select the array on chip controller. ...

Manual
Page 119
... rebuilding process. Press to Non-RAID Solve Mirror Conflict Rebuild Mirror Drive Save And Exit Setup Exit Without Saving Gigabyte Technology Corp. RAID Setup Utility v1.07.06 [ Main Menu ] Create RAID Disk Drive Delete RAID Disk Drive Revert...to enter RAID Setup Utility" appears, press + to enter the utility. Use either the RAID setup utility or the GIGABYTE RAID CONFIGURER utility in the Hard Disk Drive List block. In the Main Menu block, select Rebuild Mirror Drive and... Name RDD0: GRAID RAID Level 1-Mirror Capacity 120 GB Status Degraded Members(HDDx) 0? Gigabyte Technology Corp.
... rebuilding process. Press to Non-RAID Solve Mirror Conflict Rebuild Mirror Drive Save And Exit Setup Exit Without Saving Gigabyte Technology Corp. RAID Setup Utility v1.07.06 [ Main Menu ] Create RAID Disk Drive Delete RAID Disk Drive Revert...to enter RAID Setup Utility" appears, press + to enter the utility. Use either the RAID setup utility or the GIGABYTE RAID CONFIGURER utility in the Hard Disk Drive List block. In the Main Menu block, select Rebuild Mirror Drive and... Name RDD0: GRAID RAID Level 1-Mirror Capacity 120 GB Status Degraded Members(HDDx) 0? Gigabyte Technology Corp.

Manual
Page 121
... After the system starts, enter the BIOS Setup program and go to rebuild wiNthumsebleecrste d physical d:isk on8this vd? Marvell BIOS Setup (c) 2009 Marvell Technology Group Ltd. Topology Information HBA 0 : Marvell 0 Virtual Disks VD 0: New_VD PD 8: WDC WD800JD-22L Free Physical Disks * PD 0: WDC ...N/A Number of PDs : 1 Do you must enter the GSATA RAID Configuration menu in the array. Marvell BIOS Setup (c) 2009 Marvell Technology Group Ltd. Yes No Help Use space bar to select the free disks to perform the rebuild, you want to Integrated Peripherals. Press ...
... After the system starts, enter the BIOS Setup program and go to rebuild wiNthumsebleecrste d physical d:isk on8this vd? Marvell BIOS Setup (c) 2009 Marvell Technology Group Ltd. Topology Information HBA 0 : Marvell 0 Virtual Disks VD 0: New_VD PD 8: WDC WD800JD-22L Free Physical Disks * PD 0: WDC ...N/A Number of PDs : 1 Do you must enter the GSATA RAID Configuration menu in the array. Marvell BIOS Setup (c) 2009 Marvell Technology Group Ltd. Yes No Help Use space bar to select the free disks to perform the rebuild, you want to Integrated Peripherals. Press ...
