

Manual
Page 1
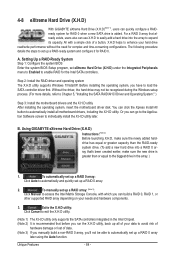
... Setup program, set up a RAID 0 array later using the Auto function. Before installing the operating system, you can build a RAID 0, RAID 1, or other supported RAID array depending on your hard drive read/write performance without the need for complex and time-consuming configurations. Using GIGABYTE...Drive (X.H.D) under the Integrated Peripherals menu to Enabled to enable RAID for the Intel SATA controllers. eXtreme Hard Drive (X.H.D) With GIGABYTE eXtreme Hard Drive (X.H.D)(Note 1), users can quickly configure a RAIDready system for RAID 0 when a new SATA drive is greater than or equal...
... Setup program, set up a RAID 0 array later using the Auto function. Before installing the operating system, you can build a RAID 0, RAID 1, or other supported RAID array depending on your hard drive read/write performance without the need for complex and time-consuming configurations. Using GIGABYTE...Drive (X.H.D) under the Integrated Peripherals menu to Enabled to enable RAID for the Intel SATA controllers. eXtreme Hard Drive (X.H.D) With GIGABYTE eXtreme Hard Drive (X.H.D)(Note 1), users can quickly configure a RAIDready system for RAID 0 when a new SATA drive is greater than or equal...
Manual
Page 53
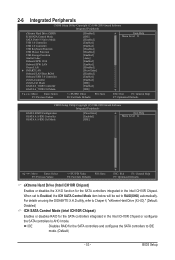
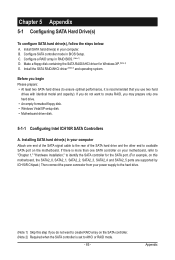
...details on using the GIGABYTE X.H.D utility, refer to Chaper 4, "eXtreme Hard Drive (X.H.D)." (Default: Disabled) ICH SATA Control Mode (Intel ICH10R Chipset) Enables or disables RAID for the SATA controllers integrated in the Intel ICH10R Chipset. BIOS Setup IDE Disables RAID for the SATA ...(Default) - 53 - When set to Enabled, the ICH SATA Control Mode item below will be set to RAID(XHD) automatically. 2-6 Integrated Peripherals CMOS Setup Utility-Copyright (C) 1984-2009 Award Software Integrated Peripherals eXtreme Hard Drive (XHD) ICH SATA Control Mode SATA Port0-3...
...details on using the GIGABYTE X.H.D utility, refer to Chaper 4, "eXtreme Hard Drive (X.H.D)." (Default: Disabled) ICH SATA Control Mode (Intel ICH10R Chipset) Enables or disables RAID for the SATA controllers integrated in the Intel ICH10R Chipset. BIOS Setup IDE Disables RAID for the SATA ...(Default) - 53 - When set to Enabled, the ICH SATA Control Mode item below will be set to RAID(XHD) automatically. 2-6 Integrated Peripherals CMOS Setup Utility-Copyright (C) 1984-2009 Award Software Integrated Peripherals eXtreme Hard Drive (XHD) ICH SATA Control Mode SATA Port0-3...
Manual
Page 54
... the SATA controllers use dedicated IRQs that do not support Native mode. (Default) Enabled Allows the SATA controllers to be disabled automatically. (Default: Disabled) BIOS Setup - 54 - Green LAN When the onboard LAN function and Green LAN are enabled, the system will turn off all of the integrated SATA controllers. Enable... SATA controllers to enable advanced Serial ATA features such as Native Command Queuing and hot plug. Advanced Host Controller Interface (AHCI) is connected or not. RAID(XHD) Enables RAID for the SATA controllers.
... the SATA controllers use dedicated IRQs that do not support Native mode. (Default) Enabled Allows the SATA controllers to be disabled automatically. (Default: Disabled) BIOS Setup - 54 - Green LAN When the onboard LAN function and Green LAN are enabled, the system will turn off all of the integrated SATA controllers. Enable... SATA controllers to enable advanced Serial ATA features such as Native Command Queuing and hot plug. Advanced Host Controller Interface (AHCI) is connected or not. RAID(XHD) Enables RAID for the SATA controllers.

Manual
Page 56
...in the JMicron JMB362 chip. (Default: Enabled) eSATA Ctrl Mode (JMicron JMB362 Chip, eSATA Connectors) Enables or disables RAID for instructions on configuring a RAID array. BIOS Setup - 56 - IDE Configures the SATA controller to IDE mode. (Default) AHCI Configures the SATA controller to AHCI mode...the Marvell 9128 chip to AHCI mode. abled) GSATA 8_9/IDE Ctrl Mode (GIGABYTE SATA2 Chip, IDE and GSATA2_8/9 Connectors) Enables or disables RAID for the SATA controller. GSATA 8_9/IDE Controller (GIGABYTE SATA2 Chip, IDE and GSATA2_8/9 Connectors) Enables or disables the IDE and ...
...in the JMicron JMB362 chip. (Default: Enabled) eSATA Ctrl Mode (JMicron JMB362 Chip, eSATA Connectors) Enables or disables RAID for instructions on configuring a RAID array. BIOS Setup - 56 - IDE Configures the SATA controller to IDE mode. (Default) AHCI Configures the SATA controller to AHCI mode...the Marvell 9128 chip to AHCI mode. abled) GSATA 8_9/IDE Ctrl Mode (GIGABYTE SATA2 Chip, IDE and GSATA2_8/9 Connectors) Enables or disables RAID for the SATA controller. GSATA 8_9/IDE Controller (GIGABYTE SATA2 Chip, IDE and GSATA2_8/9 Connectors) Enables or disables the IDE and ...
Manual
Page 69
... IDE connector is the first physical drive. Step 2: Click New. (Note) Xpress Recovery2 checks the first physical hard drive in RAID/AHCI mode are attached to boot from the Windows Vista setup disk. Supporting NTFS, FAT32, and FAT16 file systems, Xpress Recovery2 can only back up/restore the first physical hard drive...
... IDE connector is the first physical drive. Step 2: Click New. (Note) Xpress Recovery2 checks the first physical hard drive in RAID/AHCI mode are attached to boot from the Windows Vista setup disk. Supporting NTFS, FAT32, and FAT16 file systems, Xpress Recovery2 can only back up/restore the first physical hard drive...
Manual
Page 72
...motherboard model. 2. Note: The USB flash drive or hard drive must use the key during the POST or pressing the key in RAID/AHCI mode or a hard drive attached to enter operating systems like MS-DOS or Window first. Unique Features - 72 - With Q-Flash...floppy disk, USB flash drive, or hard drive. Before You Begin 1. X58A-UD3R F1d . . . . : BIOS Setup : XpressRecovery2 : Boot Menu : Qflash 12/23/2009-X58-ICH10-7A89QG0KC-00 Because BIOS flashing is DualBIOS™? 4-2 BIOS Update Utilities GIGABYTE motherboards provide two unique BIOS update tools, Q-Flash™ and @BIOS&#...
...motherboard model. 2. Note: The USB flash drive or hard drive must use the key during the POST or pressing the key in RAID/AHCI mode or a hard drive attached to enter operating systems like MS-DOS or Window first. Unique Features - 72 - With Q-Flash...floppy disk, USB flash drive, or hard drive. Before You Begin 1. X58A-UD3R F1d . . . . : BIOS Setup : XpressRecovery2 : Boot Menu : Qflash 12/23/2009-X58-ICH10-7A89QG0KC-00 Because BIOS flashing is DualBIOS™? 4-2 BIOS Update Utilities GIGABYTE motherboards provide two unique BIOS update tools, Q-Flash™ and @BIOS&#...
Manual
Page 84
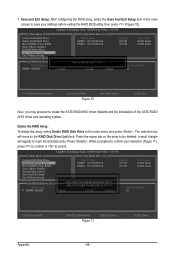
...Before installing the operating system, you can go to the Application Software screen to individually install the X.H.D utility later. Using GIGABYTE eXtreme Hard Drive (X.H.D) Instructions:(Note 2) Before launching X.H.D, make sure the newly added harddrive has equal or greater capacity than ...If you manually build a non-RAID 0 array, you'll not be recognized during the Windows setup process. (For more details, refer to enable RAID for RAID 0. Setting Up a RAID-Ready System Step 1: Configure the system BIOS Enter the system BIOS Setup program, set up a RAID 0 array. 2. Without the ...
...Before installing the operating system, you can go to the Application Software screen to individually install the X.H.D utility later. Using GIGABYTE eXtreme Hard Drive (X.H.D) Instructions:(Note 2) Before launching X.H.D, make sure the newly added harddrive has equal or greater capacity than ...If you manually build a non-RAID 0 array, you'll not be recognized during the Windows setup process. (For more details, refer to enable RAID for RAID 0. Setting Up a RAID-Ready System Step 1: Configure the system BIOS Enter the system BIOS Setup program, set up a RAID 0 array. 2. Without the ...
Manual
Page 85
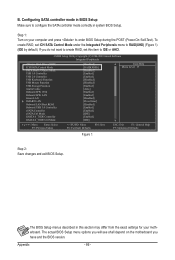
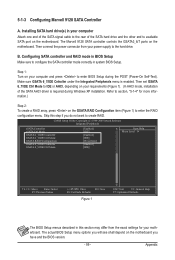
...one hard drive. • An empty formatted floppy disk. • Windows Vista/XP setup disk. • Motherboard driver disk. 5-1-1 Configuring Intel ICH10R SATA Controllers A. B. Configure a RAID array in BIOS Setup. Before you may prepare only one SATA controller on your power supply to the hard... drive. (Note 1) Skip this step if you do not want to create RAID array on this motherboard, the SATA2_0, SATA2_1, ...
...one hard drive. • An empty formatted floppy disk. • Windows Vista/XP setup disk. • Motherboard driver disk. 5-1-1 Configuring Intel ICH10R SATA Controllers A. B. Configure a RAID array in BIOS Setup. Before you may prepare only one SATA controller on your power supply to the hard... drive. (Note 1) Skip this step if you do not want to create RAID array on this motherboard, the SATA2_0, SATA2_1, ...
Manual
Page 86
.... Appendix - 86 - Step 1: Turn on the motherboard you do not want to create RAID, set ICH SATA Control Mode under the Integrated Peripherals menu to RAID(XHD) (Figure 1) (IDE by default). If you have and the BIOS version. CMOS Setup Utility-Copyright (C) 1984-2009 Award Software Integrated Peripherals eXtreme Hard Drive (XHD) ICH...
.... Appendix - 86 - Step 1: Turn on the motherboard you do not want to create RAID, set ICH SATA Control Mode under the Integrated Peripherals menu to RAID(XHD) (Figure 1) (IDE by default). If you have and the BIOS version. CMOS Setup Utility-Copyright (C) 1984-2009 Award Software Integrated Peripherals eXtreme Hard Drive (XHD) ICH...

Manual
Page 87
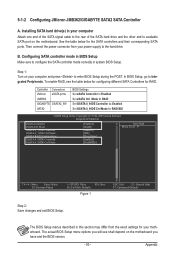
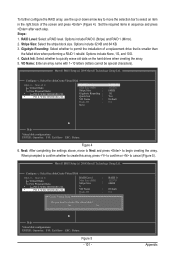
... with the installation of Windows operating system for a message which says "Press to create a RAID array, select Create RAID Volume in RAID BIOS Enter the RAID BIOS setup utility to enter the ICH10R RAID Configuration Utility. All Rights Reserved. Recovery Volume Options RAID Volumes : None defined. [ DISK/VOLUME INFORMATION ] Physical Disks : Port Drive Model 0 ST3120026AS 1 ST3120026AS Serial...
... with the installation of Windows operating system for a message which says "Press to create a RAID array, select Create RAID Volume in RAID BIOS Enter the RAID BIOS setup utility to enter the ICH10R RAID Configuration Utility. All Rights Reserved. Recovery Volume Options RAID Volumes : None defined. [ DISK/VOLUME INFORMATION ] Physical Disks : Port Drive Model 0 ST3120026AS 1 ST3120026AS Serial...
Manual
Page 93
... different SATA Controllers for your power supply to enter BIOS Setup during the POST. The BIOS Setup menus described in system BIOS Setup. Controller Connectors JMicron eSATA ports JMB362 GIGABYTE GSATA2_8/9 SATA2 BIOS Settings Set eSATA Controller to Enabled Set eSATA Ctrl Mode to RAID Set GSATA 8_9/IDE Controller to Enabled Set GSATA 8_9...
... different SATA Controllers for your power supply to enter BIOS Setup during the POST. The BIOS Setup menus described in system BIOS Setup. Controller Connectors JMicron eSATA ports JMB362 GIGABYTE GSATA2_8/9 SATA2 BIOS Settings Set eSATA Controller to Enabled Set eSATA Ctrl Mode to RAID Set GSATA 8_9/IDE Controller to Enabled Set GSATA 8_9...

Manual
Page 94
... before the operating system boot begins, look for a non-RAID configuration. GIGABYTE Technology Corp. Gigabyte Technology Corp. Appendix - 94 - RAID Setup Utility v1.07.06 [ Main Menu ] Create RAID Disk Drive Delete RAID Disk Drive Revert HDD to Non-RAID Solve Mirror Conflict Rebuild Mirror Drive Save And Exit Setup Exit Without Saving [ Hard Disk Drive List ] Model Name...
... before the operating system boot begins, look for a non-RAID configuration. GIGABYTE Technology Corp. Gigabyte Technology Corp. Appendix - 94 - RAID Setup Utility v1.07.06 [ Main Menu ] Create RAID Disk Drive Delete RAID Disk Drive Revert HDD to Non-RAID Solve Mirror Conflict Rebuild Mirror Drive Save And Exit Setup Exit Without Saving [ Hard Disk Drive List ] Model Name...

Manual
Page 95
...) or JBOD (Figure 5). Then the Create New RAID screen appears (Figure 4). Gigabyte Technology Corp. RAID Setup Utility v1.07.06 [ Hard Disk Drive List ] Model Name HDD0: ST3120026AS HDD1: ST3120026AS Available 120 GB 120 GB Type/Status Non-RAID Non-RAID Confirm Creation [ RAID Disk Drive List ] [ Help ] Select RAID Level RAID 0 RAID 1 JBOD Data striped for performance Data mirrored...
...) or JBOD (Figure 5). Then the Create New RAID screen appears (Figure 4). Gigabyte Technology Corp. RAID Setup Utility v1.07.06 [ Hard Disk Drive List ] Model Name HDD0: ST3120026AS HDD1: ST3120026AS Available 120 GB 120 GB Type/Status Non-RAID Non-RAID Confirm Creation [ RAID Disk Drive List ] [ Help ] Select RAID Level RAID 0 RAID 1 JBOD Data striped for performance Data mirrored...

Manual
Page 96
...RAID Setup Utility v1.07.06 [ Hard Disk Drive List ] Model Name } HDD0: ST3120026AS } HDD1: ST3120026AS Available 120 GB 120 GB Type/Status Non-RAID Non-RAID Confirm Creation [ RAID Disk Drive List ] [ Help ] Setting Stripe Block Select a stripe size which will be used to divide data from 4 KB to abort. Gigabyte... up or down arrow key to select the stripe block size (Figure 6), ranging from /to the Confirm Creation item. RAID Setup Utility v1.07.06 [ Create New RAID ] Name: Level: Disks: Block: Size: GRAID 0-Stripe Select Disk 128 KB 240 GB [ Hard Disk Drive List...
...RAID Setup Utility v1.07.06 [ Hard Disk Drive List ] Model Name } HDD0: ST3120026AS } HDD1: ST3120026AS Available 120 GB 120 GB Type/Status Non-RAID Non-RAID Confirm Creation [ RAID Disk Drive List ] [ Help ] Setting Stripe Block Select a stripe size which will be used to divide data from 4 KB to abort. Gigabyte... up or down arrow key to select the stripe block size (Figure 6), ranging from /to the Confirm Creation item. RAID Setup Utility v1.07.06 [ Create New RAID ] Name: Level: Disks: Block: Size: GRAID 0-Stripe Select Disk 128 KB 240 GB [ Hard Disk Drive List...

Manual
Page 97
...]-Switch Window [hi]-Select RAID Figure 9 [ENTER]-Detail [ESC]-Exit - 97 - Select the array and press . RAID Setup Utility v1.07.06 [ Main Menu ] Create RAID Disk Drive Delete RAID Disk Drive Revert HDD to the RAID Disk Drive List block.... A small window displaying the array information will be displayed in the RAID Disk Drive List block (Figure 8). When finished, the new RAID array will appear in the center of the screen (Figure 9). Gigabyte...
...]-Switch Window [hi]-Select RAID Figure 9 [ENTER]-Detail [ESC]-Exit - 97 - Select the array and press . RAID Setup Utility v1.07.06 [ Main Menu ] Create RAID Disk Drive Delete RAID Disk Drive Revert HDD to the RAID Disk Drive List block.... A small window displaying the array information will be displayed in the RAID Disk Drive List block (Figure 8). When finished, the new RAID array will appear in the center of the screen (Figure 9). Gigabyte...
Manual
Page 98
... . When prompted to confirm your settings before exiting the RAID BIOS utility, then press (Figure 10). [ Main Menu ] Create RAID Disk Drive Delete RAID Disk Drive Revert HDD to Non-RAID Solve Mirror Conflict Rebuild Mirror Drive Save And Exit Setup Exit Without Saving Gigabyte Technology Corp. RAID Setup Utility v1.07.06 [ Hard Disk Drive List ] Model...
... . When prompted to confirm your settings before exiting the RAID BIOS utility, then press (Figure 10). [ Main Menu ] Create RAID Disk Drive Delete RAID Disk Drive Revert HDD to Non-RAID Solve Mirror Conflict Rebuild Mirror Drive Save And Exit Setup Exit Without Saving Gigabyte Technology Corp. RAID Setup Utility v1.07.06 [ Hard Disk Drive List ] Model...
Manual
Page 99
...6_7/IDE Ctrl Mode to the rear of the SATA AHCI driver is enabled. Configuring SATA controller and RAID mode in BIOS Setup Make sure to enter BIOS Setup during Windows XP installation. Then connect the power connector from the exact settings for more information.) Step...step if you have and the BIOS version. - 99 - 5-1-3 Configuring Marvell 9128 SATA Controller A. Refer to enter the RAID configuration menu. CMOS Setup Utility-Copyright (C) 1984-2009 Award Software Integrated Peripherals eSATA Controller eSATA Ctrl Mode GSATA 6_7/IDE Controller GSATA 6_7/IDE Ctrl...
...6_7/IDE Ctrl Mode to the rear of the SATA AHCI driver is enabled. Configuring SATA controller and RAID mode in BIOS Setup Make sure to enter BIOS Setup during Windows XP installation. Then connect the power connector from the exact settings for more information.) Step...step if you have and the BIOS version. - 99 - 5-1-3 Configuring Marvell 9128 SATA Controller A. Refer to enter the RAID configuration menu. CMOS Setup Utility-Copyright (C) 1984-2009 Award Software Integrated Peripherals eSATA Controller eSATA Ctrl Mode GSATA 6_7/IDE Controller GSATA 6_7/IDE Ctrl...

Manual
Page 100
... Create a RAID Array: Move the selection bar to be included in the array. ENTER: Operation F10: Exit/Save ESC: Return Figure 2 Under Free Physical Disks, use the key to select the hard drives to HBA 0: Marvell 0 and press . Marvell BIOS Setup (c) 2009 Marvell Technology Group Ltd. Topology HBA 0 : ...: Revision ID : BIOS Version : Firmware Version : PCIe Speed rate : Configure SATA as : 1B4B 91A3 B1 1.0.0.1006 2.1.0.1314 2.56Gbps IDE Mode Help Marvell RAID on chip controller. C. After selecting the hard drives, press to be marked with an asterisk (*). Marvell BIOS...
... Create a RAID Array: Move the selection bar to be included in the array. ENTER: Operation F10: Exit/Save ESC: Return Figure 2 Under Free Physical Disks, use the key to select the hard drives to HBA 0: Marvell 0 and press . Marvell BIOS Setup (c) 2009 Marvell Technology Group Ltd. Topology HBA 0 : ...: Revision ID : BIOS Version : Firmware Version : PCIe Speed rate : Configure SATA as : 1B4B 91A3 B1 1.0.0.1006 2.1.0.1314 2.56Gbps IDE Mode Help Marvell RAID on chip controller. C. After selecting the hard drives, press to be marked with an asterisk (*). Marvell BIOS...
Manual
Page 101
...name with 1~10 letters (letters cannot be special characters). When prompted to confirm whether to create this virtual disk? Marvell BIOS Setup (c) 2009 Marvell Technology Group Ltd. Configure -> Select free disksCreate Virtual Disk HBA 0 : Marvell 0 Virtual Disks Free Physical... erase old data on the hard drives when creating the array. 5. RAID Level: Select a RAID level. Stripe Size: Select the stripe block size. Options include RAID 0 (Stripe) and RAID 1 (Mirror). 2. Gigabyte Rounding: Select whether to cancel (Figure 5). Configure -> Select free disksCreate...
...name with 1~10 letters (letters cannot be special characters). When prompted to confirm whether to create this virtual disk? Marvell BIOS Setup (c) 2009 Marvell Technology Group Ltd. Configure -> Select free disksCreate Virtual Disk HBA 0 : Marvell 0 Virtual Disks Free Physical... erase old data on the hard drives when creating the array. 5. RAID Level: Select a RAID level. Stripe Size: Select the stripe block size. Options include RAID 0 (Stripe) and RAID 1 (Mirror). 2. Gigabyte Rounding: Select whether to cancel (Figure 5). Configure -> Select free disksCreate...

Manual
Page 115
... Name HDD0: ST3120026AS HDD1: ST3120026AS Capacity 120 GB 120 GB Type/Status RAID Inside Non-RAID [ RAID Disk Drive List ] Model Name RDD0: GRAID RAID Level 1-Mirror Capacity 120 GB Status Degraded Members(HDDx) 0? Gigabyte Technology Corp. Use either the RAID setup utility or the GIGABYTE RAID CONFIGURER utility in the Hard Disk Drive List block. In the Main...
... Name HDD0: ST3120026AS HDD1: ST3120026AS Capacity 120 GB 120 GB Type/Status RAID Inside Non-RAID [ RAID Disk Drive List ] Model Name RDD0: GRAID RAID Level 1-Mirror Capacity 120 GB Status Degraded Members(HDDx) 0? Gigabyte Technology Corp. Use either the RAID setup utility or the GIGABYTE RAID CONFIGURER utility in the Hard Disk Drive List block. In the Main...


