Manual
Page 9
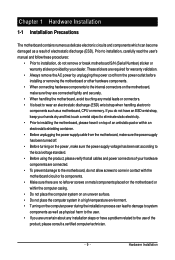
... remove the AC power by your hands dry and first touch a metal object to eliminate static electricity. • Prior to installing the motherboard, please have a problem related to the use of electrostatic discharge (ESD). These stickers are connected tightly and securely. • When handling the motherboard, avoid touching any installation steps...
... remove the AC power by your hands dry and first touch a metal object to eliminate static electricity. • Prior to installing the motherboard, please have a problem related to the use of electrostatic discharge (ESD). These stickers are connected tightly and securely. • When handling the motherboard, avoid touching any installation steps...
Manual
Page 29
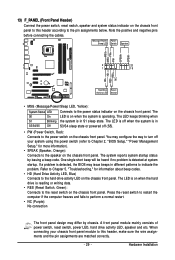
... configure the way to turn off your chassis front panel module to the power status indicator on the chassis front panel. If a problem is reading or writing data. • RES (Reset Switch, Green): Connects to the hard drive activity LED on the chassis front...hard drive activity LED, speaker and etc. Refer to Chapter 5, "Troubleshooting," for more information). • SPEAK (Speaker, Orange): Connects to indicate the problem. When connecting your system using the power switch (refer to Chapter 2, "BIOS Setup," "Power Management Setup," for information about beep codes. •...
... configure the way to turn off your chassis front panel module to the power status indicator on the chassis front panel. If a problem is reading or writing data. • RES (Reset Switch, Green): Connects to the hard drive activity LED on the chassis front...hard drive activity LED, speaker and etc. Refer to Chapter 5, "Troubleshooting," for more information). • SPEAK (Speaker, Orange): Connects to indicate the problem. When connecting your system using the power switch (refer to Chapter 2, "BIOS Setup," "Power Management Setup," for information about beep codes. •...
Manual
Page 37
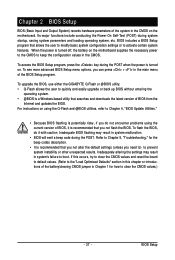
...Setup BIOS (Basic Input and Output System) records hardware parameters of the BIOS Setup program. To flash the BIOS, do not encounter problems using the Q-Flash and @BIOS utilities, refer to keep the configuration values in system's failure to boot. Inadequate BIOS flashing may ... or other unexpected results. Refer to Chapter 5, "Troubleshooting," for how to activate certain system features. To upgrade the BIOS, use either the GIGABYTE Q-Flash or @BIOS utility. • Q-Flash allows the user to quickly and easily upgrade or back up BIOS without entering the operating system...
...Setup BIOS (Basic Input and Output System) records hardware parameters of the BIOS Setup program. To flash the BIOS, do not encounter problems using the Q-Flash and @BIOS utilities, refer to keep the configuration values in system's failure to boot. Inadequate BIOS flashing may ... or other unexpected results. Refer to Chapter 5, "Troubleshooting," for how to activate certain system features. To upgrade the BIOS, use either the GIGABYTE Q-Flash or @BIOS utility. • Q-Flash allows the user to quickly and easily upgrade or back up BIOS without entering the operating system...
Manual
Page 47
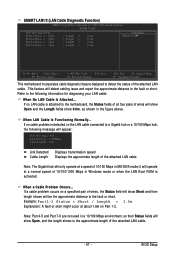
If no cable problem is attached to the fault or short. it will show 0.0m, as shown in the figure above. Note: Part...Cable Length= 30m Link Detected Cable Length Displays transmission speed Displays the approximate length of the attached LAN cable. If a cable problem occurs on a specified pair of wires, the Status field will show Short and then length shown will detect cabling issue and report... Mbps hub, the following information for diagnosing your LAN cable: When No LAN Cable Is Attached... When a Cable Problem Occurs... If no LAN cable is detected on Part 1-2.
If no cable problem is attached to the fault or short. it will show 0.0m, as shown in the figure above. Note: Part...Cable Length= 30m Link Detected Cable Length Displays transmission speed Displays the approximate length of the attached LAN cable. If a cable problem occurs on a specified pair of wires, the Status field will show Short and then length shown will detect cabling issue and report... Mbps hub, the following information for diagnosing your LAN cable: When No LAN Cable Is Attached... When a Cable Problem Occurs... If no LAN cable is detected on Part 1-2.
Manual
Page 110
...a metal object like a screwdriver to touch the positive and negative terminals of my keyboard/optical mouse still on GIGABYTE's website. Plug in Chapter 1 to short the jumper to enter BIOS Setup during the POST mean? 5-4 ...problems. (For reference only.) 1 short: System boots successfully 2 short: CMOS setting error 1 long, 1 short: Memory or motherboard error 1 long, 2 short: Monitor or graphics card error 1 long, 3 short: Keyboard error 1 long, 9 short: BIOS ROM error Continuous long beeps: Graphics card not inserted properly Continuous short beeps: Power error GA-X48T-DQ6...
...a metal object like a screwdriver to touch the positive and negative terminals of my keyboard/optical mouse still on GIGABYTE's website. Plug in Chapter 1 to short the jumper to enter BIOS Setup during the POST mean? 5-4 ...problems. (For reference only.) 1 short: System boots successfully 2 short: CMOS setting error 1 long, 1 short: Memory or motherboard error 1 long, 2 short: Monitor or graphics card error 1 long, 3 short: Keyboard error 1 long, 9 short: BIOS ROM error Continuous long beeps: Graphics card not inserted properly Continuous short beeps: Power error GA-X48T-DQ6...
Manual
Page 111
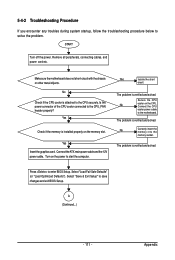
No Check if the CPU cooler is attached to enter BIOS Setup. Secure the CPU No cooler on the power to the motherboard. The problem is installed properly on the memory slot. Press to the CPU securely. Appendix START Turn off the power. Yes Check if the memory... socket. Yes Insert the graphics card. Connect the CPU cooler power cable to start the computer. The problem is verified and solved. Select "Save & Exit Setup" to the CPU_FAN header properly? The problem is verified and solved. Select "Load Fail-Safe Defaults" (or "Load Optimized Defaults"). Connect the ATX...
No Check if the CPU cooler is attached to enter BIOS Setup. Secure the CPU No cooler on the power to the motherboard. The problem is installed properly on the memory slot. Press to the CPU securely. Appendix START Turn off the power. Yes Check if the memory... socket. Yes Insert the graphics card. Connect the CPU cooler power cable to start the computer. The problem is verified and solved. Select "Save & Exit Setup" to the CPU_FAN header properly? The problem is verified and solved. Select "Load Fail-Safe Defaults" (or "Load Optimized Defaults"). Connect the ATX...
Manual
Page 112
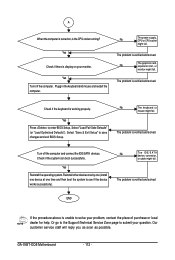
...Exit Setup" to see if the device works successfully). Or go to the Support\Technical Service Zone page to enter BIOS Setup. The problem is working properly. GA-X48T-DQ6 Motherboard - 112 - Yes Press to submit your question. No The IDE/SATA device, connector, or cable might fail. The... problem is verified and solved. No The keyboard or mouse might fail. Our customer service staff will reply you as soon as...
...Exit Setup" to see if the device works successfully). Or go to the Support\Technical Service Zone page to enter BIOS Setup. The problem is working properly. GA-X48T-DQ6 Motherboard - 112 - Yes Press to submit your question. No The IDE/SATA device, connector, or cable might fail. The... problem is verified and solved. No The keyboard or mouse might fail. Our customer service staff will reply you as soon as...


