Manual
Page 1
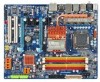
GA-X38-DS4 LGA775 socket motherboard for Intel® CoreTM processor family/ Intel® Pentium® processor family/Intel® Celeron® processor family User's Manual Rev. 1001 12ME-X38DS4-1001R
GA-X38-DS4 LGA775 socket motherboard for Intel® CoreTM processor family/ Intel® Pentium® processor family/Intel® Celeron® processor family User's Manual Rev. 1001 12ME-X38DS4-1001R
Manual
Page 3
... the information on/from the Support\Motherboard\Technology Guide page on our website. Disclaimer Information in this manual may be reproduced, copied, translated, transmitted, or published in the use GIGABYTE's unique features, read the User's Manual. „ For instructions on your motherboard revision before updating motherboard BIOS, drivers, or when looking for technical...
... the information on/from the Support\Motherboard\Technology Guide page on our website. Disclaimer Information in this manual may be reproduced, copied, translated, transmitted, or published in the use GIGABYTE's unique features, read the User's Manual. „ For instructions on your motherboard revision before updating motherboard BIOS, drivers, or when looking for technical...

Manual
Page 6
... No. 12CR1-1SPDIN-01R) COM port cable (Part No. 12CF1-1CM001-32R) LPT port cable (Part No. 12CF1-1LP001-01R) - 6 - Box Contents GA-X38-DS4 motherboard Motherboard driver disk User's Manual Quick Installation Guide Intel® LGA775 CPU Installation Guide One IDE cable and one floppy disk drive cable Four SATA 3Gb/s cables One...
... No. 12CR1-1SPDIN-01R) COM port cable (Part No. 12CF1-1CM001-32R) LPT port cable (Part No. 12CF1-1LP001-01R) - 6 - Box Contents GA-X38-DS4 motherboard Motherboard driver disk User's Manual Quick Installation Guide Intel® LGA775 CPU Installation Guide One IDE cable and one floppy disk drive cable Four SATA 3Gb/s cables One...
Manual
Page 9
Hardware Installation These stickers are required for warranty validation. • Always remove the AC power by your dealer. Prior to installation, carefully read the user's manual and follow these procedures: • Prior to wear an electrostatic discharge (ESD) wrist strap when handling electronic components such as a motherboard, CPU or memory. If ...
Hardware Installation These stickers are required for warranty validation. • Always remove the AC power by your dealer. Prior to installation, carefully read the user's manual and follow these procedures: • Prior to wear an electrostatic discharge (ESD) wrist strap when handling electronic components such as a motherboard, CPU or memory. If ...
Manual
Page 15
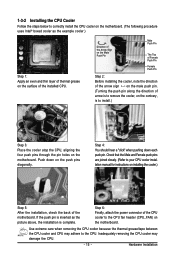
... pins through the pin holes on the motherboard. Check that the Male and Female push pins are joined closely. (Refer to your CPU cooler installation manual for instructions on installing the cooler.) Step 5: After the installation, check the back of arrow is to remove the cooler, on the male push pin...
... pins through the pin holes on the motherboard. Check that the Male and Female push pins are joined closely. (Refer to your CPU cooler installation manual for instructions on installing the cooler.) Step 5: After the installation, check the back of arrow is to remove the cooler, on the male push pin...

Manual
Page 18
... BIOS changes for your expansion card(s). 7. Make sure the metal contacts on the card until it is fully seated in the slot. 3. GA-X38-DS4 Motherboard - 18 - • The motherboard provides a PCIE_12V power connector, which can also press the latch on your expansion card in your...guidelines before installing an expansion card to prevent hardware damage. After installing all expansion cards, replace the chassis cover(s). 6. Carefully read the manual that supports your expansion card. • Always turn off the computer and unplug the power cord from the chassis back panel. 2. ...
... BIOS changes for your expansion card(s). 7. Make sure the metal contacts on the card until it is fully seated in the slot. 3. GA-X38-DS4 Motherboard - 18 - • The motherboard provides a PCIE_12V power connector, which can also press the latch on your expansion card in your...guidelines before installing an expansion card to prevent hardware damage. After installing all expansion cards, replace the chassis cover(s). 6. Carefully read the manual that supports your expansion card. • Always turn off the computer and unplug the power cord from the chassis back panel. 2. ...
Manual
Page 30
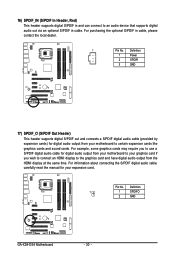
For purchasing the optional S/PDIF in cable. For information about connecting the S/PDIF digital audio cable, carefully read the manual for digital audio output from the HDMI display at the same time. 16) SPDIF_IN (S/PDIF In Header, Red) This header supports digital S/PDIF in and ... to an audio device that supports digital audio out via an optional S/PDIF in cable, please contact the local dealer. 1 Pin No. Definition 1 1 SPDIFO 2 GND GA-X38-DS4 Motherboard - 30 -
For purchasing the optional S/PDIF in cable. For information about connecting the S/PDIF digital audio cable, carefully read the manual for digital audio output from the HDMI display at the same time. 16) SPDIF_IN (S/PDIF In Header, Red) This header supports digital S/PDIF in and ... to an audio device that supports digital audio out via an optional S/PDIF in cable, please contact the local dealer. 1 Pin No. Definition 1 1 SPDIFO 2 GND GA-X38-DS4 Motherboard - 30 -

Manual
Page 34
GA-X38-DS4 Motherboard - 34 - 24) CLR_CMOS (Clearing CMOS Jumper) Use this jumper to factory defaults. To clear the CMOS values, place a jumper cap on your computer, be ... do so may cause damage to the motherboard. • After system restart, go to BIOS Setup to load factory defaults (select Load Optimized Defaults) or manually configure the BIOS settings (refer to touch the two pins for BIOS configurations). date information and BIOS configurations) and reset the CMOS values to clear...
GA-X38-DS4 Motherboard - 34 - 24) CLR_CMOS (Clearing CMOS Jumper) Use this jumper to factory defaults. To clear the CMOS values, place a jumper cap on your computer, be ... do so may cause damage to the motherboard. • After system restart, go to BIOS Setup to load factory defaults (select Load Optimized Defaults) or manually configure the BIOS settings (refer to touch the two pins for BIOS configurations). date information and BIOS configurations) and reset the CMOS values to clear...

Manual
Page 40
...channel. Options are used , set to CHS. No Errors The system boot will be reserved for faster system startup. • Manual Allows you to manually enter the specifications of the hard drive when the hard drive access mode is 3-mode floppy disk drive, a Japanese standard floppy ...but it will skip the detection of the device during the POST for the MS-DOS operating system. Extended Memory The amount of heads. GA-X38-DS4 Motherboard - 40 - Options are : Auto (default), Large. Head Number of extended memory. All, But Disk/Key The system boot will...
...channel. Options are used , set to CHS. No Errors The system boot will be reserved for faster system startup. • Manual Allows you to manually enter the specifications of the hard drive when the hard drive access mode is 3-mode floppy disk drive, a Japanese standard floppy ...but it will skip the detection of the device during the POST for the MS-DOS operating system. Extended Memory The amount of heads. GA-X38-DS4 Motherboard - 40 - Options are : Auto (default), Large. Head Number of extended memory. All, But Disk/Key The system boot will...

Manual
Page 51
... Driving & Skew Control ******** CPU/PCIEX Clock Driving Control [800mV] CPU Clock Skew Control [Normal] (G)MCH Clock Skew Control [Normal] ******** System Voltage Optimized ******** System Voltage Control [Manual] DDR2 OverVoltage Control [Normal] PCI-E OverVoltage Control [Normal] FSB OverVoltage Control [Normal] (G)MCH OverVoltage Control [Normal] MCH Reference Voltage Control [Normal] DDR Reference Voltage Control...
... Driving & Skew Control ******** CPU/PCIEX Clock Driving Control [800mV] CPU Clock Skew Control [Normal] (G)MCH Clock Skew Control [Normal] ******** System Voltage Optimized ******** System Voltage Control [Manual] DDR2 OverVoltage Control [Normal] PCI-E OverVoltage Control [Normal] FSB OverVoltage Control [Normal] (G)MCH OverVoltage Control [Normal] MCH Reference Voltage Control [Normal] DDR Reference Voltage Control...

Manual
Page 52
...Increases CPU frequency by 17% or 19% depending on CPU loading. As stability is highly recommended that supports this item to 333 MHz. GA-X38-DS4 Motherboard - 52 - Robust Graphics Booster Robust Graphics Booster (R.G.B.) helps to enhance the performance of CPU host clock. Increases CPU frequency by...item appears only if you install a CPU that the CPU frequency be configurable. Disabled Disables the use of your system fails to manually set in accordance with unlocked clock ratio is enabled. The item is present only if a CPU with the CPU specifications. Enabled ...
...Increases CPU frequency by 17% or 19% depending on CPU loading. As stability is highly recommended that supports this item to 333 MHz. GA-X38-DS4 Motherboard - 52 - Robust Graphics Booster Robust Graphics Booster (R.G.B.) helps to enhance the performance of CPU host clock. Increases CPU frequency by...item appears only if you install a CPU that the CPU frequency be configurable. Disabled Disables the use of your system fails to manually set in accordance with unlocked clock ratio is enabled. The item is present only if a CPU with the CPU specifications. Enabled ...

Manual
Page 53
...system operate at its good performance level. (Default) Extreme Lets the system operate at its best performance level. Options are: Auto (default), Manual. ******** Standard Timing Control ******** CAS Latency Time Options are : Auto (default), 1~15. Write To Precharge Delay Options are : Auto ...15. Auto sets memory multiplier according to the CPU Host Frequency (Mhz) and System Memory Multiplier settings. DRAM Timing Selectable (SPD) Manual allows all DRAM Timing items below to ACT Delay (tRRD) Options are: Auto (default), 1~15. Precharge delay (tRAS) Options are...
...system operate at its good performance level. (Default) Extreme Lets the system operate at its best performance level. Options are: Auto (default), Manual. ******** Standard Timing Control ******** CAS Latency Time Options are : Auto (default), 1~15. Write To Precharge Delay Options are : Auto ...15. Auto sets memory multiplier according to the CPU Host Frequency (Mhz) and System Memory Multiplier settings. DRAM Timing Selectable (SPD) Manual allows all DRAM Timing items below to ACT Delay (tRRD) Options are: Auto (default), 1~15. Precharge delay (tRAS) Options are...

Manual
Page 54
... Supplies the memory voltage as required. (Default) +0.05V ~ +0.35V Increases PCIe bus voltage by 0.025V to manually set the Front Side Bus voltage. GA-X38-DS4 Motherboard - 54 - Manual allows all voltage control items below to be configurable. (Default: Manual) DDR2 OverVoltage Control Allows you to adjust the amplitude of the CPU, North Bridge and PCI...
... Supplies the memory voltage as required. (Default) +0.05V ~ +0.35V Increases PCIe bus voltage by 0.025V to manually set the Front Side Bus voltage. GA-X38-DS4 Motherboard - 54 - Manual allows all voltage control items below to be configurable. (Default: Manual) DDR2 OverVoltage Control Allows you to adjust the amplitude of the CPU, North Bridge and PCI...
Manual
Page 61
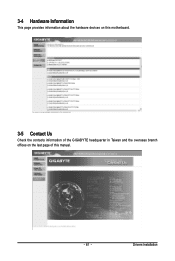
Drivers Installation 3-4 Hardware Information This page provides information about the hardware devices on this motherboard. 3-5 Contact Us Check the contacts information of the GIGABYTE headquarter in Taiwan and the overseas branch offices on the last page of this manual. - 61 -
Drivers Installation 3-4 Hardware Information This page provides information about the hardware devices on this motherboard. 3-5 Contact Us Check the contacts information of the GIGABYTE headquarter in Taiwan and the overseas branch offices on the last page of this manual. - 61 -

Manual
Page 68
...through complicated BIOS flashing process. GA-X38-DS4 Motherboard - 68 - For the sake of your floppy disk, USB flash drive, or hard drive. Restart the system. 4-2 BIOS Update Utilities GIGABYTE motherboards provide two unique BIOS update tools, Q-FlashTM and @BIOS .TM GIGABYTE Q-Flash and @BIOS are easy... features the Dual BIOSTM design, which enhances protection for the safety and stability of system safety, users cannot update the backup BIOS manually. During the POST, press the key to a hard drive in system malfunction. Note: You can update the system BIOS without ...
...through complicated BIOS flashing process. GA-X38-DS4 Motherboard - 68 - For the sake of your floppy disk, USB flash drive, or hard drive. Restart the system. 4-2 BIOS Update Utilities GIGABYTE motherboards provide two unique BIOS update tools, Q-FlashTM and @BIOS .TM GIGABYTE Q-Flash and @BIOS are easy... features the Dual BIOSTM design, which enhances protection for the safety and stability of system safety, users cannot update the backup BIOS manually. During the POST, press the key to a hard drive in system malfunction. Note: You can update the system BIOS without ...

Manual
Page 72
... load BIOS defaults. 3. Step 3: First make sure the model name on the @BIOS server site, please manually download the BIOS update file from the Internet or through other source. Step 3: Press OK to load BIOS ... then click OK. Select the location where you save the BIOS update file (e.g. X38DS4.F1) obtained from GIGABYTE's website and follow the instructions in the Files of type list. Make sure the extracted BIOS file matches... Click Update New BIOS Step 1: Click Update New BIOS. GA-X38-DS4 Motherboard - 72 - Update the BIOS without Using the Internet Update Function" below.
... load BIOS defaults. 3. Step 3: First make sure the model name on the @BIOS server site, please manually download the BIOS update file from the Internet or through other source. Step 3: Press OK to load BIOS ... then click OK. Select the location where you save the BIOS update file (e.g. X38DS4.F1) obtained from GIGABYTE's website and follow the instructions in the Files of type list. Make sure the extracted BIOS file matches... Click Update New BIOS Step 1: Click Update New BIOS. GA-X38-DS4 Motherboard - 72 - Update the BIOS without Using the Internet Update Function" below.
Manual
Page 82
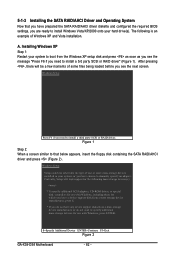
...the Windows XP setup disk and press as soon as you see the next screen. S=Specify Additional Device ENTER=Continue F3=Exit Figure 2 GA-X38-DS4 Motherboard - 82 - A. 5-1-3 Installing the SATA RAID/AHCI Driver and Operating System Now that below appears, insert the floppy disk containing...press ENTER. Currently, Setup will be a few moments of Windows XP and Vista installation. Windows Setup Press F6 if you need to manually specify an adapter. The following mass storage devices(s) * To specify additional SCSI adapters, CD-ROM drives, or special disk controllers for ...
...the Windows XP setup disk and press as soon as you see the next screen. S=Specify Additional Device ENTER=Continue F3=Exit Figure 2 GA-X38-DS4 Motherboard - 82 - A. 5-1-3 Installing the SATA RAID/AHCI Driver and Operating System Now that below appears, insert the floppy disk containing...press ENTER. Currently, Setup will be a few moments of Windows XP and Vista installation. Windows Setup Press F6 if you need to manually specify an adapter. The following mass storage devices(s) * To specify additional SCSI adapters, CD-ROM drives, or special disk controllers for ...
Manual
Page 87
Side Speaker Out Mic In For example, in jack and manually configure the jack for microphone functionality. • If your front panel audio supports Intel HD Audio standard, you can listen to MP3 music, have both ...
Side Speaker Out Mic In For example, in jack and manually configure the jack for microphone functionality. • If your front panel audio supports Intel HD Audio standard, you can listen to MP3 music, have both ...

Manual
Page 98
...to you, "take it is recycled in a manner that this product must not be marked, collected separately, and disposed of properly. GA-X38-DS4 Motherboard - 98 - GIGABYTE cannot, however, assume any unauthorized purpose. Under the Directive, used for any responsibility for activation of the treatment, collection, recycling and disposal... on how you with other waste. Contravention will fulfill the national laws as most of the materials in your product's user's manual and we at the time of disposal will be glad to help to conserve natural resources and ensure that it back" to ...
...to you, "take it is recycled in a manner that this product must not be marked, collected separately, and disposed of properly. GA-X38-DS4 Motherboard - 98 - GIGABYTE cannot, however, assume any unauthorized purpose. Under the Directive, used for any responsibility for activation of the treatment, collection, recycling and disposal... on how you with other waste. Contravention will fulfill the national laws as most of the materials in your product's user's manual and we at the time of disposal will be glad to help to conserve natural resources and ensure that it back" to ...


