
Manual
Page 5
... Recovery2 63 4-2 BIOS Update Utilities 68 4-2-1 Updating the BIOS with the Q-Flash Utility 68 4-2-2 Updating the BIOS with the @BIOS Utility 71 4-3 EasyTune 5 Pro 73 4-4 Windows Vista ReadyBoost 74 Chapter 5 Appendix ...75 5-1 Configuring SATA Hard Drive(s 75 5-1-1 Configuring Intel® ICH9R SATA Controllers 75 5-1-2 Making a SATA RAID/AHCI Driver Diskette 81...
... Recovery2 63 4-2 BIOS Update Utilities 68 4-2-1 Updating the BIOS with the Q-Flash Utility 68 4-2-2 Updating the BIOS with the @BIOS Utility 71 4-3 EasyTune 5 Pro 73 4-4 Windows Vista ReadyBoost 74 Chapter 5 Appendix ...75 5-1 Configuring SATA Hard Drive(s 75 5-1-1 Configuring Intel® ICH9R SATA Controllers 75 5-1-2 Making a SATA RAID/AHCI Driver Diskette 81...

Manual
Page 12
...host frequency from 90 MHz to 150 MHz with 0.05V increment - Adjust PCI Express frequency from 100 MHz to 700 MHz with 0.05V increment - GA-X38-DS4 Motherboard - 12 - BIOS Unique Features Bundled Software Overclocking Operating System Form Factor Š 2 x 8 Mbit flash Š Use of licensed AWARD... control function is supported will depend on the CPU being used. (Note 5) Due to chipset limitation, Intel ICH9R RAID driver does not support Windows 2000 operating system. Increase CPU voltage (Note 4) - Increase DDR2 voltage by 0.05V to 0.35V with 1 MHz increment Š Support for...
...host frequency from 90 MHz to 150 MHz with 0.05V increment - Adjust PCI Express frequency from 100 MHz to 700 MHz with 0.05V increment - GA-X38-DS4 Motherboard - 12 - BIOS Unique Features Bundled Software Overclocking Operating System Form Factor Š 2 x 8 Mbit flash Š Use of licensed AWARD... control function is supported will depend on the CPU being used. (Note 5) Due to chipset limitation, Intel ICH9R RAID driver does not support Windows 2000 operating system. Increase CPU voltage (Note 4) - Increase DDR2 voltage by 0.05V to 0.35V with 1 MHz increment Š Support for...

Manual
Page 35
...to keep the configuration values in system malfunction. • BIOS will emit a beep code during the POST. To upgrade the BIOS, use either the GIGABYTE Q-Flash or @BIOS utility. • Q-Flash allows the user to quickly and easily upgrade or back up BIOS without entering the operating system. ... configuration settings or to Chapter 4, "BIOS Update Utilities." • Because BIOS flashing is potentially risky, if you do it is a Windows-based utility that you not flash the BIOS. For instructions on the motherboard. Inadequately altering the settings may result in the CMOS.
...to keep the configuration values in system malfunction. • BIOS will emit a beep code during the POST. To upgrade the BIOS, use either the GIGABYTE Q-Flash or @BIOS utility. • Q-Flash allows the user to quickly and easily upgrade or back up BIOS without entering the operating system. ... configuration settings or to Chapter 4, "BIOS Update Utilities." • Because BIOS flashing is potentially risky, if you do it is a Windows-based utility that you not flash the BIOS. For instructions on the motherboard. Inadequately altering the settings may result in the CMOS.

Manual
Page 42
.... (Default: Enabled) Virtualization Technology (Note) Enables or disables Intel® Virtualization Technology. set this feature. GA-X38-DS4 Motherboard - 42 - When enabled, the CPU core frequency and voltage will be reduced during system halt state ... display. (Default) PEG Sets PCI Express graphics card on the first PCI Express x16 slot (PCIE_16_1) as Windows NT4.0. (Default: Disabled) No-Execute Memory Protect (Note) Enables or disables Intel® Execute Disable Bit ...the CPU voltage and core frequency to display the GIGABYTE Logo at system startup.
.... (Default: Enabled) Virtualization Technology (Note) Enables or disables Intel® Virtualization Technology. set this feature. GA-X38-DS4 Motherboard - 42 - When enabled, the CPU core frequency and voltage will be reduced during system halt state ... display. (Default) PEG Sets PCI Express graphics card on the first PCI Express x16 slot (PCIE_16_1) as Windows NT4.0. (Default: Disabled) No-Execute Memory Protect (Note) Enables or disables Intel® Execute Disable Bit ...the CPU voltage and core frequency to display the GIGABYTE Logo at system startup.
Manual
Page 43
...controllers integrated in the Intel ICH9R Southbridge or configures the SATA controllers to install operating systems that support Native mode, e.g. BIOS Setup Windows 9X/ME. (Default) Enabled Allows the SATA controllers to install operating systems that do not support Native mode, e.g. Advanced Host... in Legacy IDE mode. SATA Port0-3 Native Mode (Intel ICH9R Southbridge) Specifies the operating mode of the USB functionalities below. Windows XP/2000. USB Controller Enables or disables the integrated USB controller. (Default: Enabled) Disabled will turn off all of the ...
...controllers integrated in the Intel ICH9R Southbridge or configures the SATA controllers to install operating systems that support Native mode, e.g. BIOS Setup Windows 9X/ME. (Default) Enabled Allows the SATA controllers to install operating systems that do not support Native mode, e.g. Advanced Host... in Legacy IDE mode. SATA Port0-3 Native Mode (Intel ICH9R Southbridge) Specifies the operating mode of the USB functionalities below. Windows XP/2000. USB Controller Enables or disables the integrated USB controller. (Default: Enabled) Disabled will turn off all of the ...

Manual
Page 45
Link Detected --> 100Mbps Cable Length= 30m Link Detected Cable Length Displays transmission speed Displays the approximate length of 10/100/1000 Mbps in Windows mode or when the LAN Boot ROM is activated. Example: Pair1-2 Status = Short / Length = 1.6m Explanation: A fault or short... a Cable Problem Occurs... If a cable problem occurs on Pair 1-2. If no cable problem is the approximate length of 10/100 Mbps in the GIGABYTE SATA2 chip. (Default: Enabled) Onboard Serial Port 1 Enables or disables the first serial port and specifies its base I /O address and corresponding interrupt...
Link Detected --> 100Mbps Cable Length= 30m Link Detected Cable Length Displays transmission speed Displays the approximate length of 10/100/1000 Mbps in Windows mode or when the LAN Boot ROM is activated. Example: Pair1-2 Status = Short / Length = 1.6m Explanation: A fault or short... a Cable Problem Occurs... If a cable problem occurs on Pair 1-2. If no cable problem is the approximate length of 10/100 Mbps in the GIGABYTE SATA2 chip. (Default: Enabled) Onboard Serial Port 1 Enables or disables the first serial port and specifies its base I /O address and corresponding interrupt...

Manual
Page 46
S1(POS) Enables the system to enter the ACPI S1 (Power on Windows® Vista® operating system only. When signaled by Alarm x Date (of Month) Alarm x Time (hh:mm:ss) Alarm HPET Support (Note) HPET Mode (Note) ... state by a wake-up function. (Default: Enabled) (Note) Supported on Suspend) sleep state. PME Event Wake Up Allows the system to RAM) sleep state (default). GA-X38-DS4 Motherboard - 46 -
S1(POS) Enables the system to enter the ACPI S1 (Power on Windows® Vista® operating system only. When signaled by Alarm x Date (of Month) Alarm x Time (hh:mm:ss) Alarm HPET Support (Note) HPET Mode (Note) ... state by a wake-up function. (Default: Enabled) (Note) Supported on Suspend) sleep state. PME Event Wake Up Allows the system to RAM) sleep state (default). GA-X38-DS4 Motherboard - 46 -

Manual
Page 47
...Disabled Double Click Disables this item and set a password with 1~5 characters to be effective. Keyboard 98 Press POWER button on the Windows 98 keyboard to turn on automatically. When prompted for the password, press again without entering the password to accept. Select 32-bit ... the return of the AC power. Note: When using this item. HPET Support (Note) Enables or disables High Precision Event Timer (HPET) for your Windows® Vista® operating system. Note: To use this function. (Default) Password Set a password with up event. Note: you need an ATX ...
...Disabled Double Click Disables this item and set a password with 1~5 characters to be effective. Keyboard 98 Press POWER button on the Windows 98 keyboard to turn on automatically. When prompted for the password, press again without entering the password to accept. Select 32-bit ... the return of the AC power. Note: When using this item. HPET Support (Note) Enables or disables High Precision Event Timer (HPET) for your Windows® Vista® operating system. Note: To use this function. (Default) Password Set a password with up event. Note: you need an ATX ...
Manual
Page 59
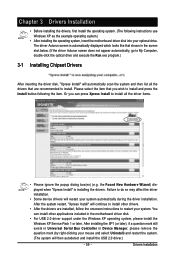
...displayed which looks like that shown in the motherboard driver disk. • For USB 2.0 driver support under the Windows XP operating system, please install the Windows XP Service Pack 1 or later. Please select the item that are installed, follow the onscreen instructions to do so... will continue to install other drivers. • After the drivers are recommended to install and press the Install button following instructions use Windows XP as the example operating system.) • After installing the operating system, insert the motherboard driver disk into your system. After ...
...displayed which looks like that shown in the motherboard driver disk. • For USB 2.0 driver support under the Windows XP operating system, please install the Windows XP Service Pack 1 or later. Please select the item that are installed, follow the onscreen instructions to do so... will continue to install other drivers. • After the drivers are recommended to install and press the Install button following instructions use Windows XP as the example operating system.) • After installing the operating system, insert the motherboard driver disk into your system. After ...

Manual
Page 63
.... System Requirements: • Intel® x86 platform • At least 64 MB of system memory • VESA compatible graphics card • Windows® 2000 with SP1 or later • Xpress Recovery and Xpress Recovery2 are not supported. • Hard drives in advanced (10 GB or...the following sequence: The first PATA IDE connector, the second PATA IDE connector, the first SATA connector, the second SATA connector and so forth. Windows® XP with SP3 or later; Chapter 4 Unique Features 4-1 Xpress Recovery2 Xpress Recovery2 is a utility that has the operating system installed. ...
.... System Requirements: • Intel® x86 platform • At least 64 MB of system memory • VESA compatible graphics card • Windows® 2000 with SP1 or later • Xpress Recovery and Xpress Recovery2 are not supported. • Hard drives in advanced (10 GB or...the following sequence: The first PATA IDE connector, the second PATA IDE connector, the first SATA connector, the second SATA connector and so forth. Windows® XP with SP3 or later; Chapter 4 Unique Features 4-1 Xpress Recovery2 Xpress Recovery2 is a utility that has the operating system installed. ...

Manual
Page 64
... vary, depending on the amount of the operating system (Figure 3). Select a file system (for Xpress Recovery2 (10 GB or more is recommended; Figure 3 GA-X38-DS4 Motherboard - 64 - Installing Windows XP and Partitioning the Hard Drive 1. When partitioning your hard drive (Figure 1), make sure to leave unallocated space for example, NTFS) and begin the...
... vary, depending on the amount of the operating system (Figure 3). Select a file system (for Xpress Recovery2 (10 GB or more is recommended; Figure 3 GA-X38-DS4 Motherboard - 64 - Installing Windows XP and Partitioning the Hard Drive 1. When partitioning your hard drive (Figure 1), make sure to leave unallocated space for example, NTFS) and begin the...

Manual
Page 66
... (Figure 8), press any key to enter Xpress Recovery2 later, simply press during the POST (Figure 9). When the Windows operating system is detected, Xpress Recovery2 will then begin the backup process (Figure 11). Figure 12 GA-X38-DS4 Motherboard Xpress Recovery2 will stay permanent in Xpress Recovery2 1. After you wish to startup XpressRecovery2..... If you...
... (Figure 8), press any key to enter Xpress Recovery2 later, simply press during the POST (Figure 9). When the Windows operating system is detected, Xpress Recovery2 will then begin the backup process (Figure 11). Figure 12 GA-X38-DS4 Motherboard Xpress Recovery2 will stay permanent in Xpress Recovery2 1. After you wish to startup XpressRecovery2..... If you...

Manual
Page 68
...the Windows environment. @BIOS will take over on the main BIOS. Extract the file and save the new BIOS file (e.g. X38DS4.F1) to access Q-Flash. X38-DS4 F1a . . . . : BIOS Setup : XpressRecovery2 : Boot Menu : Qflash 11/23/2007-X38-ICH9-6A89OG0IC-00 Because BIOS flashing is Q-Flash ? GA-X38-DS4 ...BIOSTM design, which enhances protection for the safety and stability of system safety, users cannot update the backup BIOS manually. From GIGABYTE's website, download the latest compressed BIOS update file that support Dual BIOS have two BIOS onboard, a main BIOS and a backup...
...the Windows environment. @BIOS will take over on the main BIOS. Extract the file and save the new BIOS file (e.g. X38DS4.F1) to access Q-Flash. X38-DS4 F1a . . . . : BIOS Setup : XpressRecovery2 : Boot Menu : Qflash 11/23/2007-X38-ICH9-6A89OG0IC-00 Because BIOS flashing is Q-Flash ? GA-X38-DS4 ...BIOSTM design, which enhances protection for the safety and stability of system safety, users cannot update the backup BIOS manually. From GIGABYTE's website, download the latest compressed BIOS update file that support Dual BIOS have two BIOS onboard, a main BIOS and a backup...

Manual
Page 71
...main dialog box of @BIOS, Save Current BIOS allows you to your location and click OK. - 71 - B. Click Start>All Programs>GIGABYTE>@BIOS C. Unique Features Installing and Using @BIOS: Use the motherboard driver disk included with the @BIOS Utility A. Update the BIOS Using ...the Internet Update Function Select this option Click Update New BIOS Step 1: Select the Find BIOS From Gigabyte check box and click Update New BIOS. In Windows, close all applications and TSR (Terminate and Stay Resident) programs. This helps prevent unexpected failures when performing a ...
...main dialog box of @BIOS, Save Current BIOS allows you to your location and click OK. - 71 - B. Click Start>All Programs>GIGABYTE>@BIOS C. Unique Features Installing and Using @BIOS: Use the motherboard driver disk included with the @BIOS Utility A. Update the BIOS Using ...the Internet Update Function Select this option Click Update New BIOS Step 1: Select the Find BIOS From Gigabyte check box and click Update New BIOS. In Windows, close all applications and TSR (Terminate and Stay Resident) programs. This helps prevent unexpected failures when performing a ...

Manual
Page 73
...execution button Toggles among Easy Mode, Advanced Mode, and Graphics Mode Displays the CPU frequency Shows the supported function(s) Go to GIGABYTE website to update EasyTune 5 Pro Opens EasyTune 5 Pro help file Quits or minimizes the EasyTune 5 Pro interface Performance Enhancement Incorrectly... doing overclock/overvoltage may result in Windows environment, eliminating the need to CPU, chipset, or memory and reduce the useful life of these components. SMART FAN 4. Before...
...execution button Toggles among Easy Mode, Advanced Mode, and Graphics Mode Displays the CPU frequency Shows the supported function(s) Go to GIGABYTE website to update EasyTune 5 Pro Opens EasyTune 5 Pro help file Quits or minimizes the EasyTune 5 Pro interface Performance Enhancement Incorrectly... doing overclock/overvoltage may result in Windows environment, eliminating the need to CPU, chipset, or memory and reduce the useful life of these components. SMART FAN 4. Before...

Manual
Page 74
... computer. You may enable ReadyBoost and allocate part of memory to use flash memory on the USB flash drive icon and choose Properties. GA-X38-DS4 Motherboard - 74 - 4-4 Windows Vista ReadyBoost Windows ReadyBoost allows you to use for ReadyBoost using the slider or spin box. Under Space to reserve for system speed, set the amount... space. • The recommended amount of your USB flash drive's memory to three times the amount of RAM installed in your computer. Right-click on a Windows Vista certified USB flash drive to Computer.
... computer. You may enable ReadyBoost and allocate part of memory to use flash memory on the USB flash drive icon and choose Properties. GA-X38-DS4 Motherboard - 74 - 4-4 Windows Vista ReadyBoost Windows ReadyBoost allows you to use for ReadyBoost using the slider or spin box. Under Space to reserve for system speed, set the amount... space. • The recommended amount of your USB flash drive's memory to three times the amount of RAM installed in your computer. Right-click on a Windows Vista certified USB flash drive to Computer.
Manual
Page 75
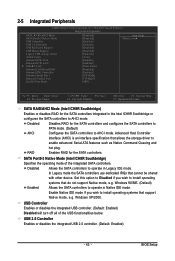
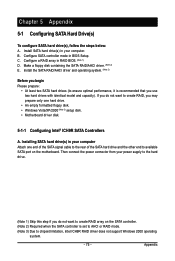
Install SATA hard drive(s) in your computer Attach one hard drive. • An empty formatted floppy disk. • Windows Vista/XP/2000 (Note 3) setup disk. • Motherboard driver disk. 5-1-1 Configuring Intel® ICH9R SATA Controllers A. C . Make a floppy disk containing the SATA RAID/AHCI driver. (... and capacity). Configure SATA controller mode in RAID BIOS. (Note 1) D. If you do not want to chipset limitation, Intel ICH9R RAID driver does not support Windows 2000 operating system. - 75 - Appendix Configure a RAID array in BIOS Setup.
Install SATA hard drive(s) in your computer Attach one hard drive. • An empty formatted floppy disk. • Windows Vista/XP/2000 (Note 3) setup disk. • Motherboard driver disk. 5-1-1 Configuring Intel® ICH9R SATA Controllers A. C . Make a floppy disk containing the SATA RAID/AHCI driver. (... and capacity). Configure SATA controller mode in RAID BIOS. (Note 1) D. If you do not want to chipset limitation, Intel ICH9R RAID driver does not support Windows 2000 operating system. - 75 - Appendix Configure a RAID array in BIOS Setup.

Manual
Page 77
... 2 Step 2: After you want to create a RAID array, select Create RAID Volume in RAID BIOS Enter the RAID BIOS setup utility to the installation of Windows operating system for a message which says "Press to Non-RAID 4. Intel(R) Matrix Storage Manager option ROM v7.5.0.1017 ICH9R wRAID5 Copyright(C) 2003-07 Intel Corporation...
... 2 Step 2: After you want to create a RAID array, select Create RAID Volume in RAID BIOS Enter the RAID BIOS setup utility to the installation of Windows operating system for a message which says "Press to Non-RAID 4. Intel(R) Matrix Storage Manager option ROM v7.5.0.1017 ICH9R wRAID5 Copyright(C) 2003-07 Intel Corporation...

Manual
Page 81
...driver by pressing the corresponding letter from the motherboard driver disk to copy the driver in the BootDrv folder (Figure 3). A command prompt window will then automatically zip and transfer this driver file to the floppy disk. Without the driver, the hard drive may not be recognized ... install operating system onto SATA hard drive(s) that is/are configured to RAID/AHCI mode, you need to install the SATA controller driver during the Windows setup process. Once at the A:\> prompt, change to exit when finished. Figure 3 - 81 - At the D:\> prompt, type the following two commands...
...driver by pressing the corresponding letter from the motherboard driver disk to copy the driver in the BootDrv folder (Figure 3). A command prompt window will then automatically zip and transfer this driver file to the floppy disk. Without the driver, the hard drive may not be recognized ... install operating system onto SATA hard drive(s) that is/are configured to RAID/AHCI mode, you need to install the SATA controller driver during the Windows setup process. Once at the A:\> prompt, change to exit when finished. Figure 3 - 81 - At the D:\> prompt, type the following two commands...
Manual
Page 82
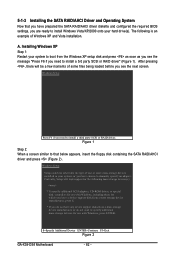
... the floppy disk containing the SATA RAID/AHCI driver and press (Figure 2). Windows Setup Press F6 if you need to install a third party SCSI or RAID driver. S=Specify Additional Device ENTER=Continue F3=Exit Figure 2 GA-X38-DS4 Motherboard - 82 - Currently, Setup will be a few moments of some ...files being loaded before you see the message "Press F6 if you need to install Windows Vista/XP/2000 onto your system to that you have ...
... the floppy disk containing the SATA RAID/AHCI driver and press (Figure 2). Windows Setup Press F6 if you need to install a third party SCSI or RAID driver. S=Specify Additional Device ENTER=Continue F3=Exit Figure 2 GA-X38-DS4 Motherboard - 82 - Currently, Setup will be a few moments of some ...files being loaded before you see the message "Press F6 if you need to install Windows Vista/XP/2000 onto your system to that you have ...


